
Thor Kitchen TMO24
THOR Kitchen Professional 24-inch Built-In Microwave Speed Oven
Model: TMO24 | Brand: Thor Kitchen
Introduction
This manual provides essential information for the safe and efficient operation of your THOR Kitchen Professional 24-inch Built-In Microwave Speed Oven, Model TMO24. This appliance combines microwave, convection, and broiling functions, offering versatile cooking capabilities. Please read these instructions thoroughly before installation and use, and retain them for future reference.
Important Safety Instructions
When using electrical appliances, basic safety precautions should be followed, including the following:
- Read all instructions before using the appliance.
- Do not operate the oven if it has a damaged cord or plug, if it is not working properly, or if it has been damaged or dropped.
- Do not use corrosive chemicals or vapors in this appliance.
- This appliance must be grounded. Connect only to properly grounded outlets.
- Do not allow children to use the oven without supervision.
- Do not heat liquids or other foods in sealed containers as they are liable to explode.
- Maintain the oven and its ventilation openings free from obstruction.
- Do not operate the oven when empty.
- Always ensure the turntable is correctly placed before operation.
Product Overview
The THOR Kitchen TMO24 is a 24-inch built-in microwave speed oven designed for integration into kitchen cabinetry. It features a stainless steel exterior and interior, a full-touch LCD display, and a 1.55 cubic feet capacity.

Figure 1: Front view of the THOR Kitchen TMO24 Microwave Speed Oven, showing the stainless steel finish and control panel.

Figure 2: Interior view of the oven with the door open, revealing the stainless steel cavity, ceramic turntable, and metal rack.
Control Panel Features

Figure 3: Detailed view of the full-touch LCD control panel.
- Auto Defrost: Automatically defrosts food based on weight.
- Frozen Foods: Pre-programmed settings for various frozen food items.
- Sensor Cook: Detects humidity released from food to automatically adjust cooking time.
- Sensor Reheat: Reheats food based on sensor detection.
- Broil High/Low: Allows for high or low broiling settings.
- Power Level: Adjusts microwave power from 1 to 10 levels.
- Popcorn: Optimized setting for popping popcorn.
- Beverage: Pre-programmed setting for heating beverages.
- Pizza: Pre-programmed setting for cooking pizza.
- Auto Menu: Access to additional pre-set cooking options.
- Convection: Activates convection cooking mode.
- Preheat: Used to preheat the oven for convection or broiling.
- Numeric Keypad (1-0): For entering time, weight, or menu selections.
- Time/Weight: Buttons to select input type.
- Panel Lock: Locks the control panel to prevent accidental operation.
- Start/Enter +30 Seconds: Starts cooking or adds 30 seconds to cooking time.
- Clock: Sets the time of day.
- Clear/Off: Clears settings or stops operation.
Installation and Setup
Unpacking
Carefully remove the oven from its packaging. Remove all packing materials, including any protective film or tape. Inspect the oven for any damage. If the oven appears damaged, do not operate it and contact customer service.
Location Requirements
This appliance is designed for built-in installation. Ensure the installation area provides adequate ventilation and meets the specified dimensions. Do not block any ventilation openings on the oven. Maintain proper clearances around the appliance as indicated in the installation guide (typically provided separately or with the product packaging).
Electrical Requirements
The oven requires a dedicated, properly grounded 120V, 60Hz electrical outlet. Ensure the electrical circuit can support the oven's 1000-watt power consumption. Do not use extension cords or adapter plugs.

Figure 4: Rear view of the oven, illustrating the integrated power cord for electrical connection.
Built-In Installation
For detailed built-in installation instructions, refer to the separate installation template and guide that accompanies this appliance. Proper cabinet cutout dimensions and securing methods are crucial for safe and stable operation. The overall product dimensions are approximately 22.06 inches deep, 23.38 inches wide, and 17.88 inches high.
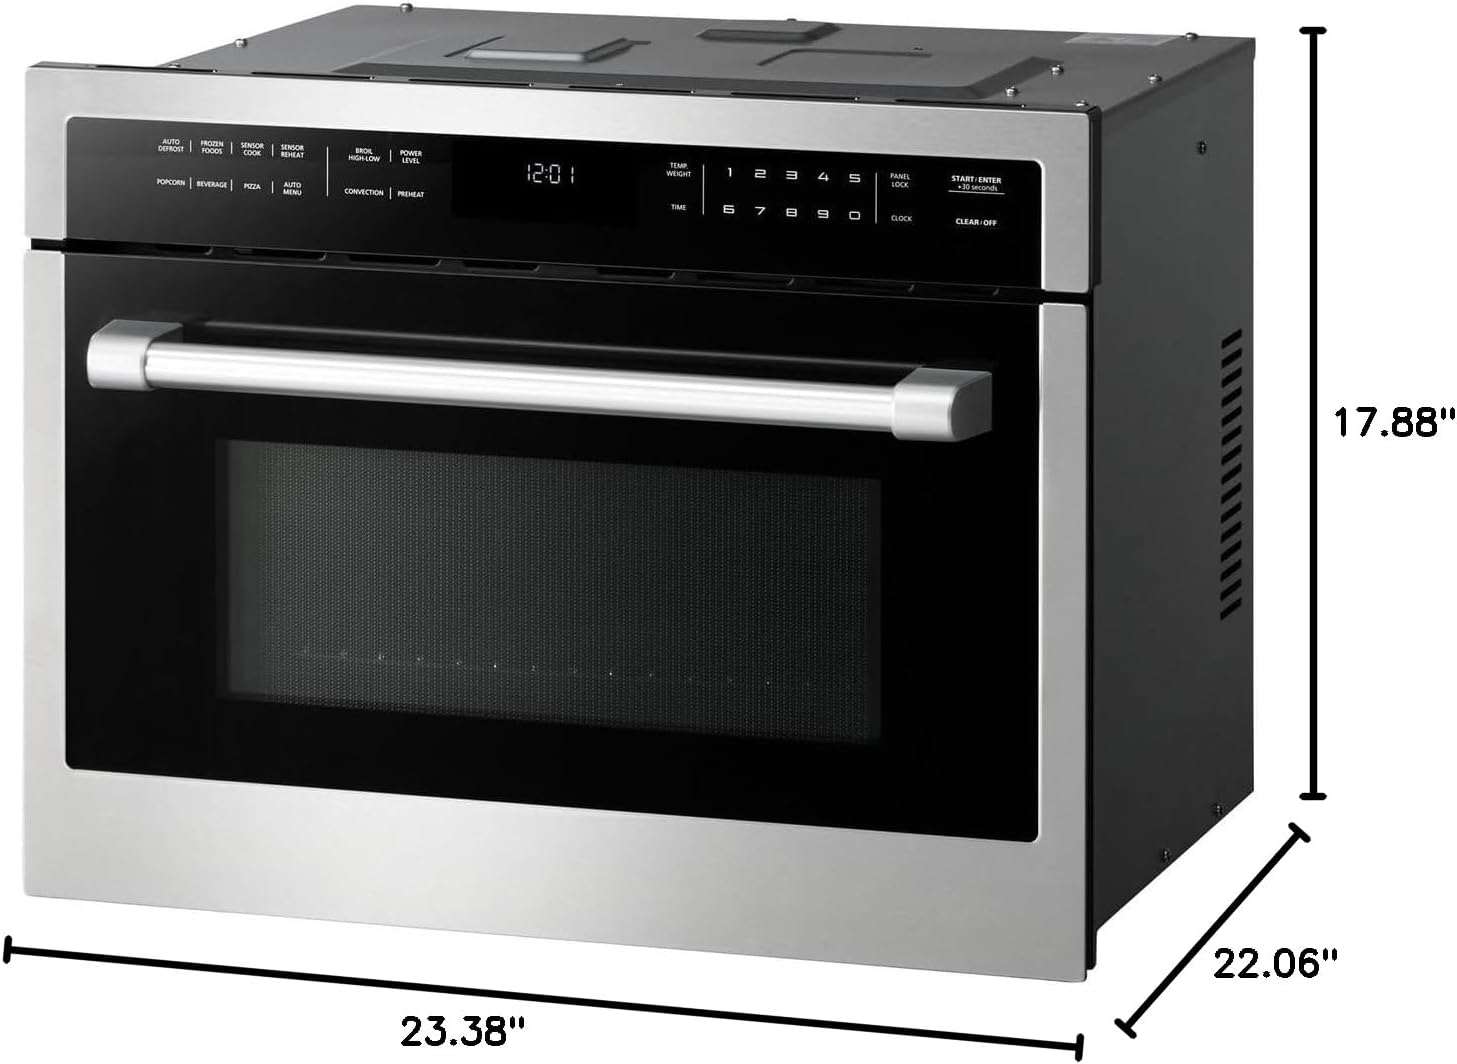
Figure 5: Diagram showing the approximate dimensions of the oven: 23.38 inches width, 22.06 inches depth, and 17.88 inches height.
Initial Setup
After installation and connecting to power, the oven display will show "12:00" or similar. To set the clock:
- Press the CLOCK button.
- Use the numeric keypad to enter the current time (e.g., 12:30 for 12:30 PM).
- Press the CLOCK button again to confirm.
Operating Instructions
Basic Microwave Operation
- Place food in a microwave-safe container on the turntable.
- Close the oven door firmly.
- Enter the desired cooking time using the numeric keypad.
- To adjust power level (optional): Press POWER LEVEL, then enter a number from 1 to 10 (10 being 100% power).
- Press START/ENTER to begin cooking.
Convection Cooking
This oven features a convection fan for even heat distribution, suitable for baking and roasting.
- Press the CONVECTION button.
- Enter the desired temperature using the numeric keypad.
- Press PREHEAT if preheating is desired. The oven will beep when preheated.
- Place food inside the oven.
- Enter the desired cooking time.
- Press START/ENTER.
Broiling
Use the broil function for browning or crisping food surfaces.
- Press the BROIL HIGH/LOW button to select high or low broil.
- Enter the desired broiling time.
- Press START/ENTER.
Auto Menu Functions
The oven includes several pre-programmed auto menu functions for convenience:
- Auto Defrost: Select this function and enter the weight of the food to defrost.
- Sensor Cook/Reheat: Place food in the oven, select the appropriate sensor function, and press start. The oven will automatically determine cooking time.
- Popcorn, Beverage, Pizza, Frozen Foods: Select the desired food type and follow the prompts for quantity or size, then press start.
- Auto Menu: Provides access to a wider range of pre-set cooking options. Refer to the display for specific selections.
Panel Lock
To prevent accidental operation, especially by children, activate the Panel Lock function. Typically, this is done by pressing and holding the PANEL LOCK button for a few seconds until an indicator appears on the display. Repeat the process to unlock.
Care and Maintenance
Cleaning the Interior
The oven features a stainless steel cavity for easy cleaning. After each use, wipe the interior with a damp cloth and mild detergent. For stubborn stains, use a non-abrasive cleaner specifically designed for stainless steel. Do not use abrasive pads or harsh chemicals.
Cleaning the Exterior
Wipe the exterior surfaces, including the control panel, with a soft, damp cloth. For stainless steel surfaces, use a stainless steel cleaner and polish in the direction of the grain. Avoid spraying cleaners directly onto the control panel.
Turntable Care
The ceramic and enamel turntable can be removed for cleaning. Wash it with warm, soapy water or in the dishwasher. Ensure it is completely dry before placing it back in the oven.
Troubleshooting Guide
Before contacting customer service, please refer to the following table for common issues and their solutions.
| Problem | Possible Cause | Solution |
|---|---|---|
| Oven does not start. | Door is not closed properly. Panel Lock is activated. Power cord is unplugged. | Ensure the door is firmly closed. Deactivate Panel Lock. Check power connection. |
| Food is not cooking or heating evenly. | Incorrect power level or cooking time. Food not placed centrally on turntable. Turntable not rotating. | Adjust power level and cooking time. Ensure food is centered. Check turntable placement and ensure it's not obstructed. |
| Display shows an error code. | Internal malfunction. | Disconnect power for 30 seconds, then reconnect. If error persists, contact customer support. |
| Oven light is not working. | Light bulb needs replacement. | Contact qualified service personnel for bulb replacement. |
Product Specifications
| Feature | Specification |
|---|---|
| Model Number | TMO24 |
| Brand | Thor Kitchen |
| Installation Type | Built-In |
| Capacity | 1.55 Cubic Feet |
| Wattage (Microwave) | 1000 Watts |
| Voltage | 120 Volts |
| Product Dimensions (D x W x H) | 22.06" x 23.38" x 17.88" |
| Item Weight | 92.1 pounds |
| Color | Stainless Steel |
| Interior Material | Stainless Steel |
| Oven Cooking Mode | Convection Heat |
| Special Feature | Ventless |
| Included Components | Turntable |
Warranty and Customer Support
This THOR Kitchen appliance is covered by a manufacturer's warranty. Specific warranty terms and conditions, including coverage period and limitations, are typically provided with your purchase documentation or can be found on the official Thor Kitchen website. Please retain your proof of purchase for warranty claims.
For technical assistance, service inquiries, or to obtain replacement parts, please contact Thor Kitchen customer support. Contact information can usually be found on the manufacturer's website or in your product registration materials.
You can visit the official Thor Kitchen Store for more information: Thor Kitchen Store on Amazon
Related documentsTMO24


Ask a question about this manual
Ask about setup, troubleshooting, compatibility, parts, safety, or missing instructions. Manuals+ will review the question and use this page’s manual context to help answer it.