
1. Introduction
This manual provides essential information for the safe and efficient operation, installation, and maintenance of your Mont Alpi MABi400-BSS-COMBO Outdoor Kitchen Island Grill and Refrigerator. Please read all instructions carefully before assembly or use to ensure proper function and to prevent injury or damage.
2. Safety Information
WARNING: For outdoor use only. Do not store or use gasoline or other flammable vapors and liquids in the vicinity of this or any other appliance.
DANGER: If you smell gas:
- Shut off gas to the appliance.
- Extinguish any open flame.
- Open lid.
- If odor continues, keep away from the appliance and immediately call your gas supplier or fire department.
- Always ensure adequate ventilation when operating the grill.
- Keep children and pets away from the grill during operation.
- Do not attempt to repair or alter the appliance. Contact qualified service personnel.
- Ensure all gas connections are tight and leak-free before use. Perform a leak test as described in the setup section.
- The refrigerator requires a 115V AC power supply. Ensure the electrical outlet is properly grounded and protected by a Ground Fault Circuit Interrupter (GFCI).
3. Package Contents
Your Mont Alpi MABi400-BSS-COMBO includes the following components:
- MABi400-BSS 32-inch Built-In Gas Grill
- MAF Glass Door Compact Refrigerator
- Rotisserie Kit (120V 4-Watt heavy duty electric motor, holds up to 25 lbs)
- Weather Cover
- Griddle Plate (MAGR)
- Charcoal Tray (MACT)
- Chopping Board
- Propane Hose and Regulator (for initial propane setup)
- White Granite Surfaces and Waterfall Side


4. Specifications
| Feature | Specification |
|---|---|
| Model Name | MABi400-BSS-COMBO |
| Brand | Mont Alpi |
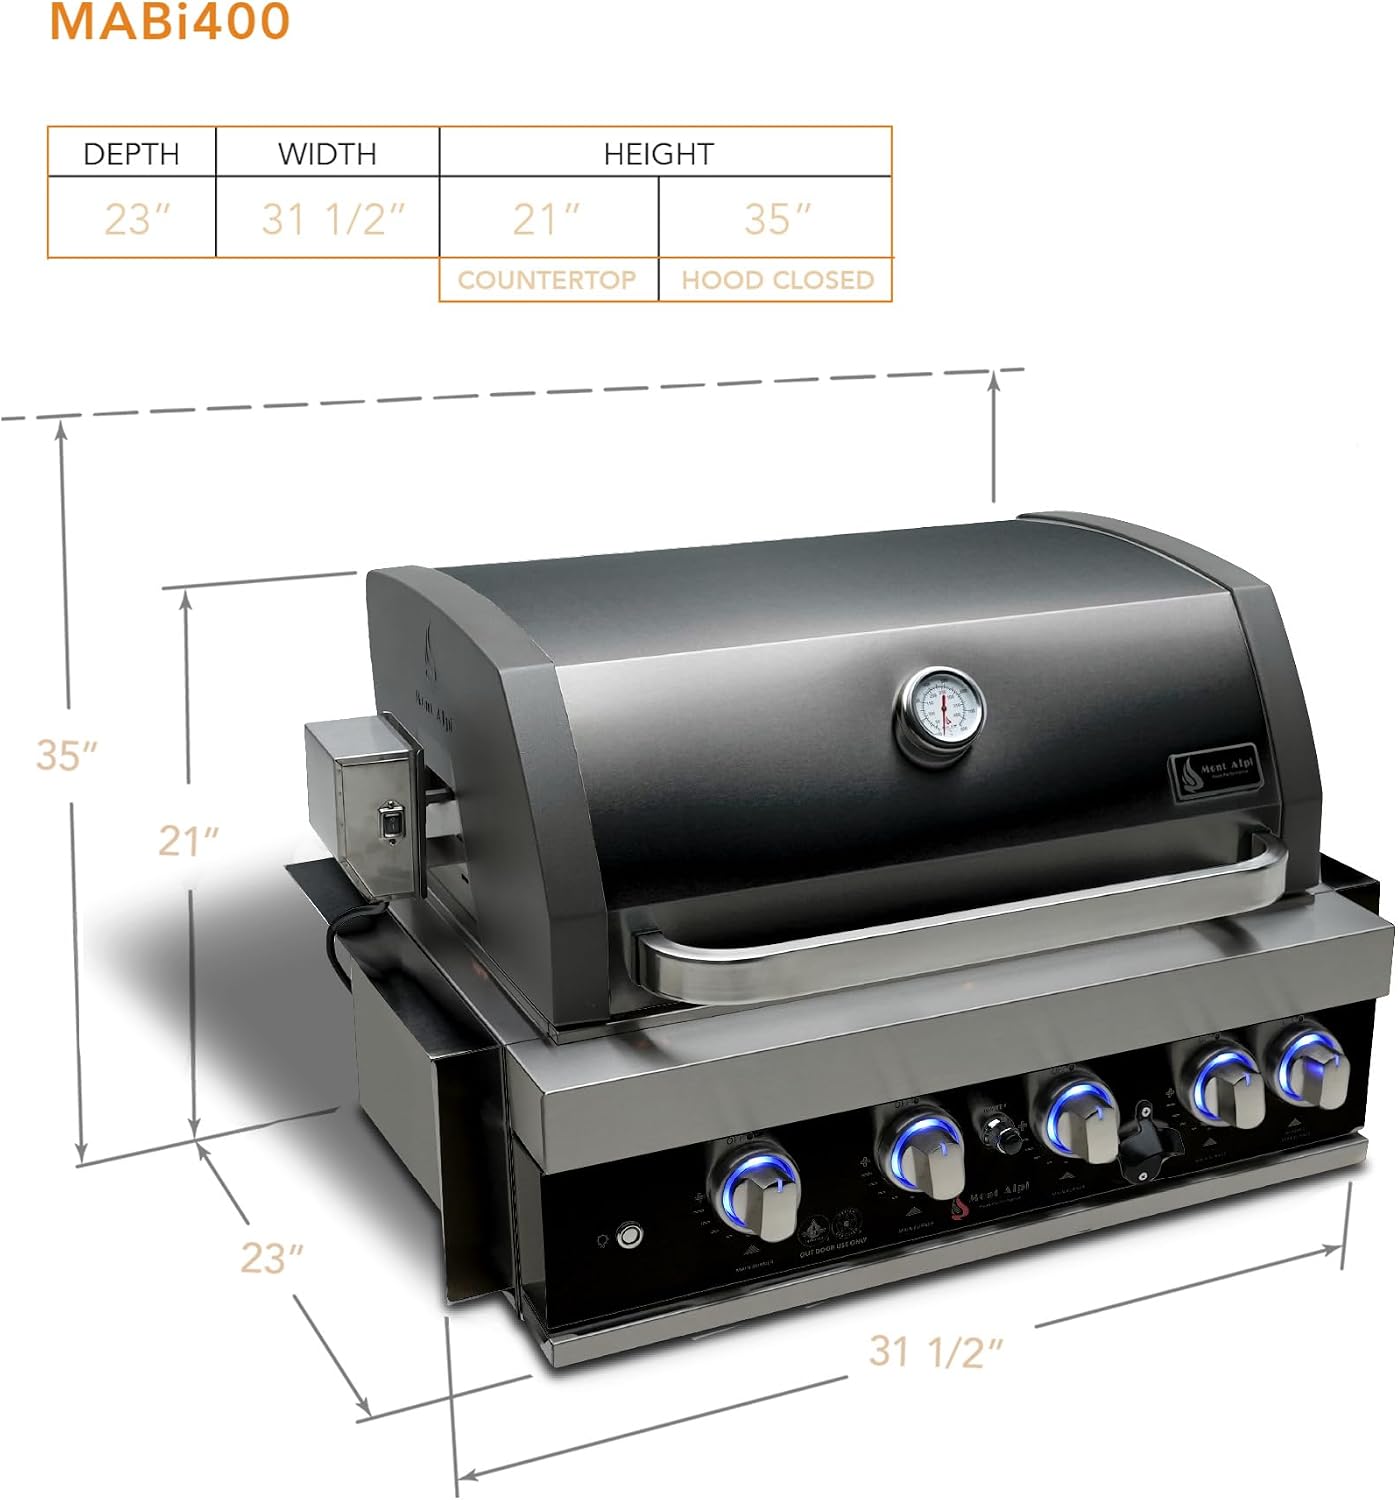
| Grill Dimensions (Hood Closed) | 23"D x 32"W x 21"H |
| Grill Dimensions (Hood Open) | 23"D x 32"W x 35"H |
| Main Cooking Area | 28" x 18" (792 sq. inches total) |
| Main Burner Count | 4 Tubular Stainless Steel Burners |
| Main Burner BTU Output | 4 x 12,000 BTU (48,000 BTU total) |
| Rear Infrared Burner BTU Output | 15,000 BTU |
| Total BTU Output | 63,000 BTU |
| Fuel Type | Propane (convertible to Natural Gas with separate kit) |
| Material | 304 Marine Grade Stainless Steel |
| Refrigerator Dimensions | 18.5"W x 17"D x 27"H |
| Refrigerator Voltage | 115 Volts (AC) |
| Installation Type | Built-In |

5. Setup and Installation
The Mont Alpi MABi400-BSS-COMBO is designed for built-in outdoor kitchen installations. Professional installation is recommended for gas and electrical connections.
5.1 Site Preparation
- Ensure the installation area is level, non-combustible, and provides adequate clearance from combustible materials.
- Refer to the grill and refrigerator dimension diagrams (Figures 4.1 and 4.2) for precise cutout requirements in your outdoor kitchen island.
- Provide proper ventilation for the grill and ensure access for gas line and electrical connections.
5.2 Gas Connection
- The grill comes ready for propane (LP) use with an included hose and regulator.
- If converting to natural gas (NG), a separate conversion kit (sold separately) and professional installation are required.
- Connect the gas supply line according to local codes and manufacturer instructions. Use a leak detection solution (soapy water) to check all connections for bubbles, indicating a leak.
5.3 Electrical Connection (Refrigerator)
- The refrigerator requires a dedicated 115V AC, 60Hz, 15-amp grounded electrical outlet.
- Ensure the outlet is protected by a GFCI (Ground Fault Circuit Interrupter) for outdoor safety.
- Do not use extension cords.
5.4 Component Placement
- Carefully place the grill and refrigerator into their respective cutouts.
- Install the included granite surfaces and waterfall side as per your outdoor kitchen design.
6. Operating Instructions
6.1 Grill Operation
6.1.1 Lighting the Main Burners
- Ensure the grill lid is open.
- Turn on the gas supply at the tank or main valve.
- Push in and turn a control knob counter-clockwise to the HIGH position.
- Press and hold the electronic ignition switch until the burner ignites. The control knob LED will change from blue to red when lit.
- If the burner does not light within 5 seconds, turn the knob to OFF, wait 5 minutes, and repeat the process.
- Adjust the flame to the desired cooking temperature.
6.1.2 Using the Rotisserie
- Securely attach food to the rotisserie spit.
- Insert the rotisserie spit into the motor and support brackets.
- Plug the rotisserie motor into a grounded electrical outlet.
- Turn on the rear ceramic infrared burner by pushing in and turning its control knob.
- Monitor cooking progress and ensure proper clearance from the burner.
6.1.3 Using the Charcoal Tray and Griddle Plate
- Charcoal Tray: Place the charcoal tray on the burner supports. Add charcoal and ignite using appropriate methods. Do not use gas burners simultaneously with charcoal.
- Griddle Plate: Place the griddle plate directly on the cooking grates. Preheat on medium heat. Use appropriate utensils for griddle cooking.
6.2 Refrigerator Operation
- Plug the refrigerator into a grounded 115V AC GFCI outlet.
- Allow the refrigerator to cool for several hours before loading with contents.
- Adjust the internal temperature using the control knob located inside the unit.
- The interior blue lighting can be controlled via a switch, if available.
- The door is lockable for security. Use the provided key.
7. Maintenance and Cleaning
7.1 Grill Cleaning
- After Each Use: Turn off gas supply. Allow grill to cool. Scrape cooking grates with a grill brush.
- Grease Tray: The pull-out grease tray should be emptied and cleaned regularly to prevent grease fires.
- Exterior: Clean stainless steel surfaces with a mild detergent and a soft cloth. Avoid abrasive cleaners or steel wool.
- Burners: Periodically inspect burner ports for blockages. Clean with a wire brush if necessary.
7.2 Refrigerator Cleaning
- Unplug the refrigerator before cleaning.
- Clean interior surfaces and shelves with a mild soap and water solution.
- Wipe down the exterior stainless steel with a soft cloth and stainless steel cleaner.
- Ensure the door gasket is clean and free of debris for proper sealing.
7.3 Weather Protection
- Use the included all-weather cover to protect the grill from outdoor elements when not in use.
8. Troubleshooting
| Problem | Possible Cause | Solution |
|---|---|---|
| Burner does not light | No gas supply, clogged burner port, faulty igniter | Check gas tank/valve. Clean burner ports. Check igniter electrode and wire. |
| Uneven heating | Clogged burner ports, damaged flame tamers | Clean burner ports. Inspect and replace flame tamers if damaged. |
| Refrigerator not cooling | No power, temperature setting too high, door not sealed | Check power connection and GFCI. Adjust temperature control. Ensure door is fully closed and gasket is clean. |
| Control knob lights not working | Electrical connection issue, faulty LED | Check electrical connections. Contact support if issue persists. |
9. Warranty and Support
9.1 Limited Lifetime Warranty
Mont Alpi products are designed for durability and performance. This product is covered by a limited lifetime warranty. Specific limitations and terms apply. Please refer to the official Mont Alpi warranty documentation for full details.
9.2 Customer Support
If you have any questions, concerns, or require assistance with your Mont Alpi MABi400-BSS-COMBO, please do not hesitate to contact Mont Alpi customer support. Contact information can typically be found on the Mont Alpi website or through your retailer.
For warranty claims or technical support, please have your model number (MABi400-BSS-COMBO) and proof of purchase available.


