
IRONWALLS BI00TPS7249
IRONWALLS Surface Vertical Rod Exit Device Instruction Manual
Brand: IRONWALLS | Model: BI00TPS7249
1. Introduction
This manual provides comprehensive instructions for the installation, operation, and maintenance of the IRONWALLS Surface Vertical Rod Exit Device. This commercial-grade panic exit device is designed for emergency exits, offering reliable and secure operation for various door types.
Key features include:
- Upgraded Single Point Top Latching Design: Features a single point top latching mechanism with an adjustable vertical rod (23.8” to 45.3” height range). This design eliminates the need for a bottom strike, reducing tripping hazards and potential floor damage.
- Wide Compatibility: Suitable for 27.5” to 41” wide wood or steel doors with heights ranging from 80” to 97”. The bar tail can be cut for narrower doors, and it supports both right and left-hand door installations.
- Strong Stainless Steel Construction: Constructed from heavy-duty stainless steel with a chrome coating, ensuring rust-proof, corrosion-resistant, and fire-resistant properties for durability in high-traffic environments.
- Fast Escape & High Security: Allows for immediate exit by pressing the bar from the inside. The device automatically locks when the door is closed, preventing unauthorized entry from the exterior.
- Wide Application: Ideal for various commercial and public spaces such as office buildings, hospitals, shopping malls, apartments, and factories, enhancing safety and security.
2. Product Specifications

Figure 2.1: Product Dimensions and Key Specifications
| Feature | Detail |
|---|---|
| Material | Stainless Steel |
| Brand | IRONWALLS |
| Color | Silver |
| Product Dimensions | 27.6"L x 6.3"W |
| Exterior Finish | Chrome, Stainless Steel |
| Special Feature | Adjustable, Corrosion resistant, Rustproof |
| Included Components | Panic bar with vertical rod |
| Lock Type | Dogging |
| Center To Center Spacing | 10.75 Inches |
| Metal Type | Stainless Steel |
| Handle Material | Stainless Steel |
| Hand Orientation | Ambidextrous |
| Unit Count | 1.0 Count |
| Number of Items | 1 |
| Manufacturer | IRONWALLS |
| Item Depth | 2 inches |
| Handle Attachment Mechanism | Top Latch |
| Indoor/Outdoor Usage | Indoor |
| Part Number | BI00TPS7249 |
| Item Weight | 6.84 pounds |
| Size | 27.5 Inch |
| Finish | Chrome |
| Number Of Pieces | 1 |

Figure 2.2: Door Compatibility and Types
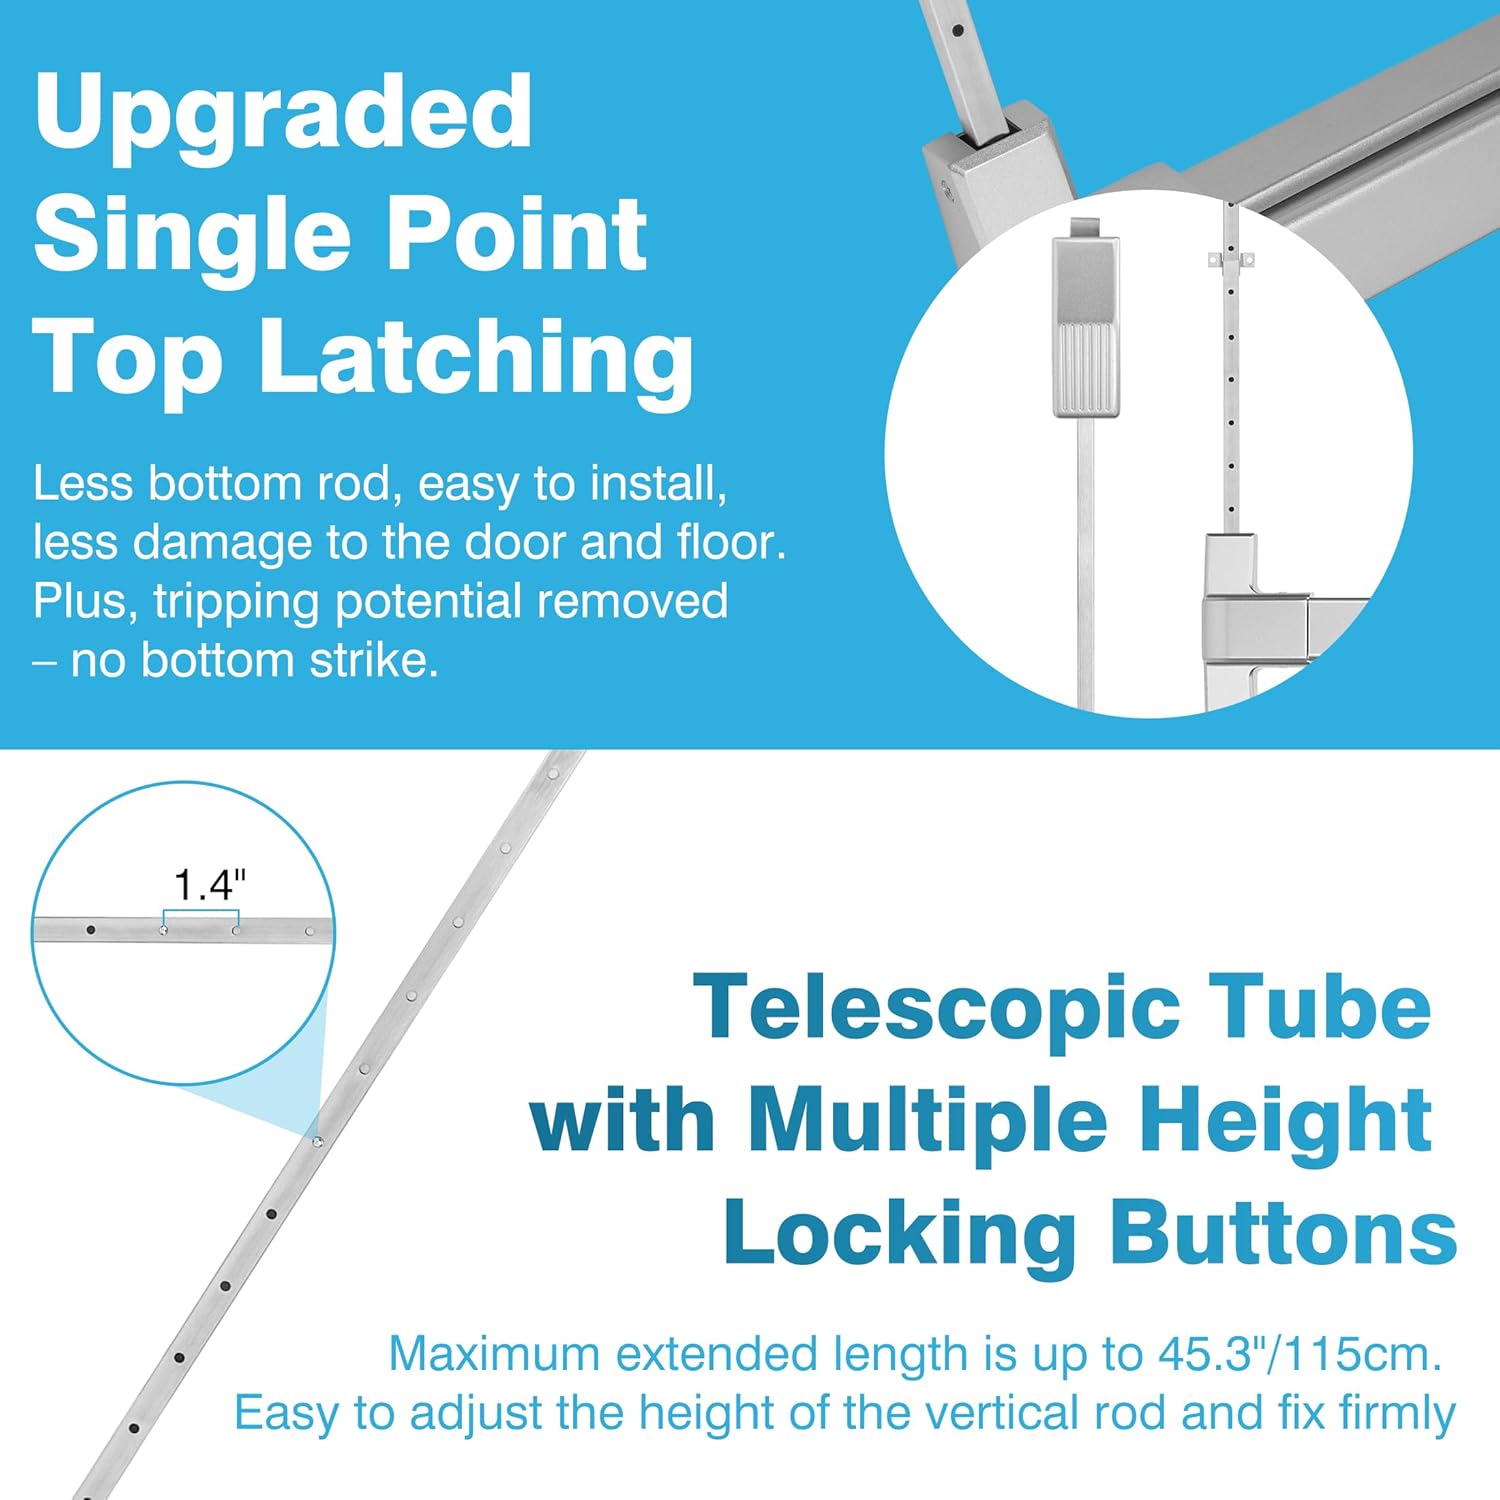
Figure 2.3: Upgraded Single Point Top Latching and Telescopic Tube Features

Figure 2.4: Detailed Product Features
3. Setup and Installation
Before beginning installation, ensure you have all components as listed in Figure 3.1. Refer to the detailed steps below and the accompanying diagrams for proper installation.
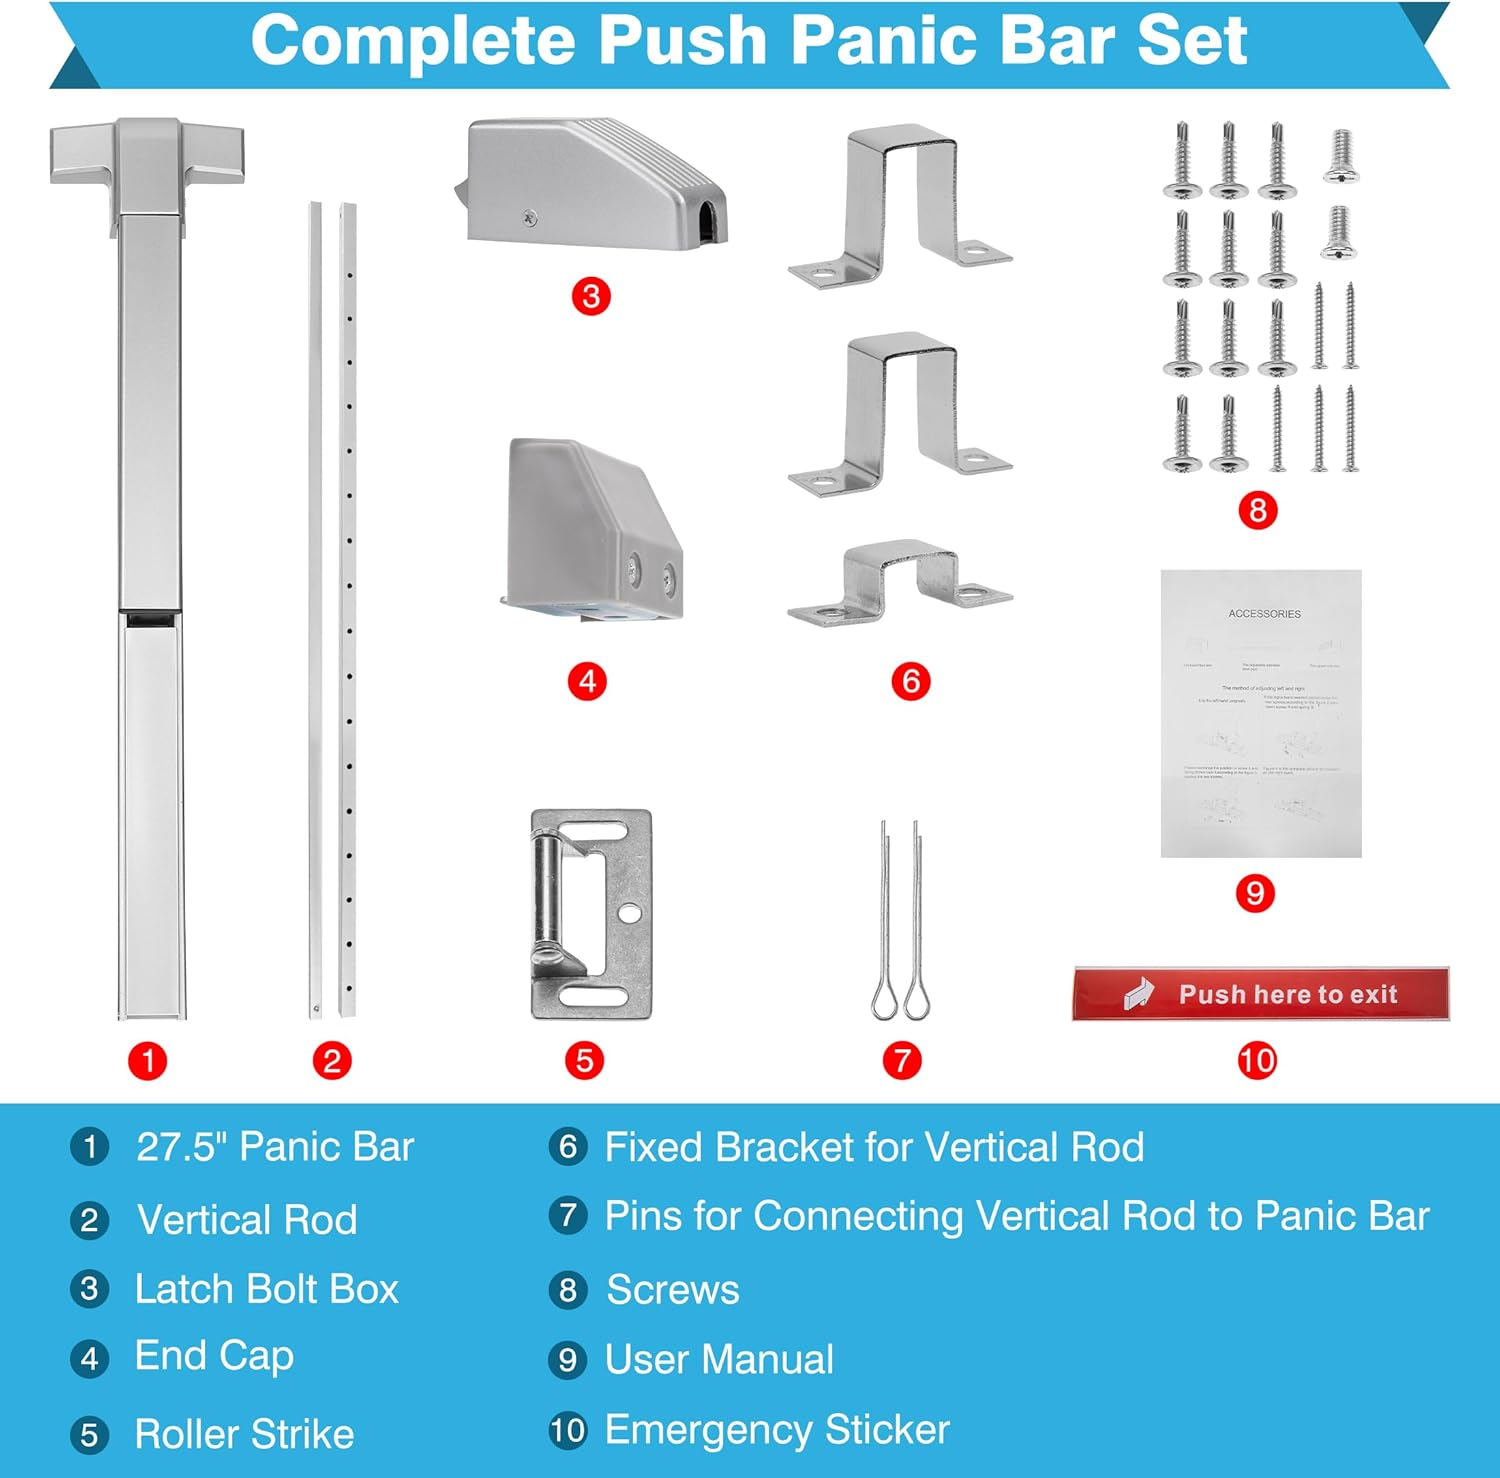
Figure 3.1: Complete Push Panic Bar Set Components
3.1. Simple Installation Steps
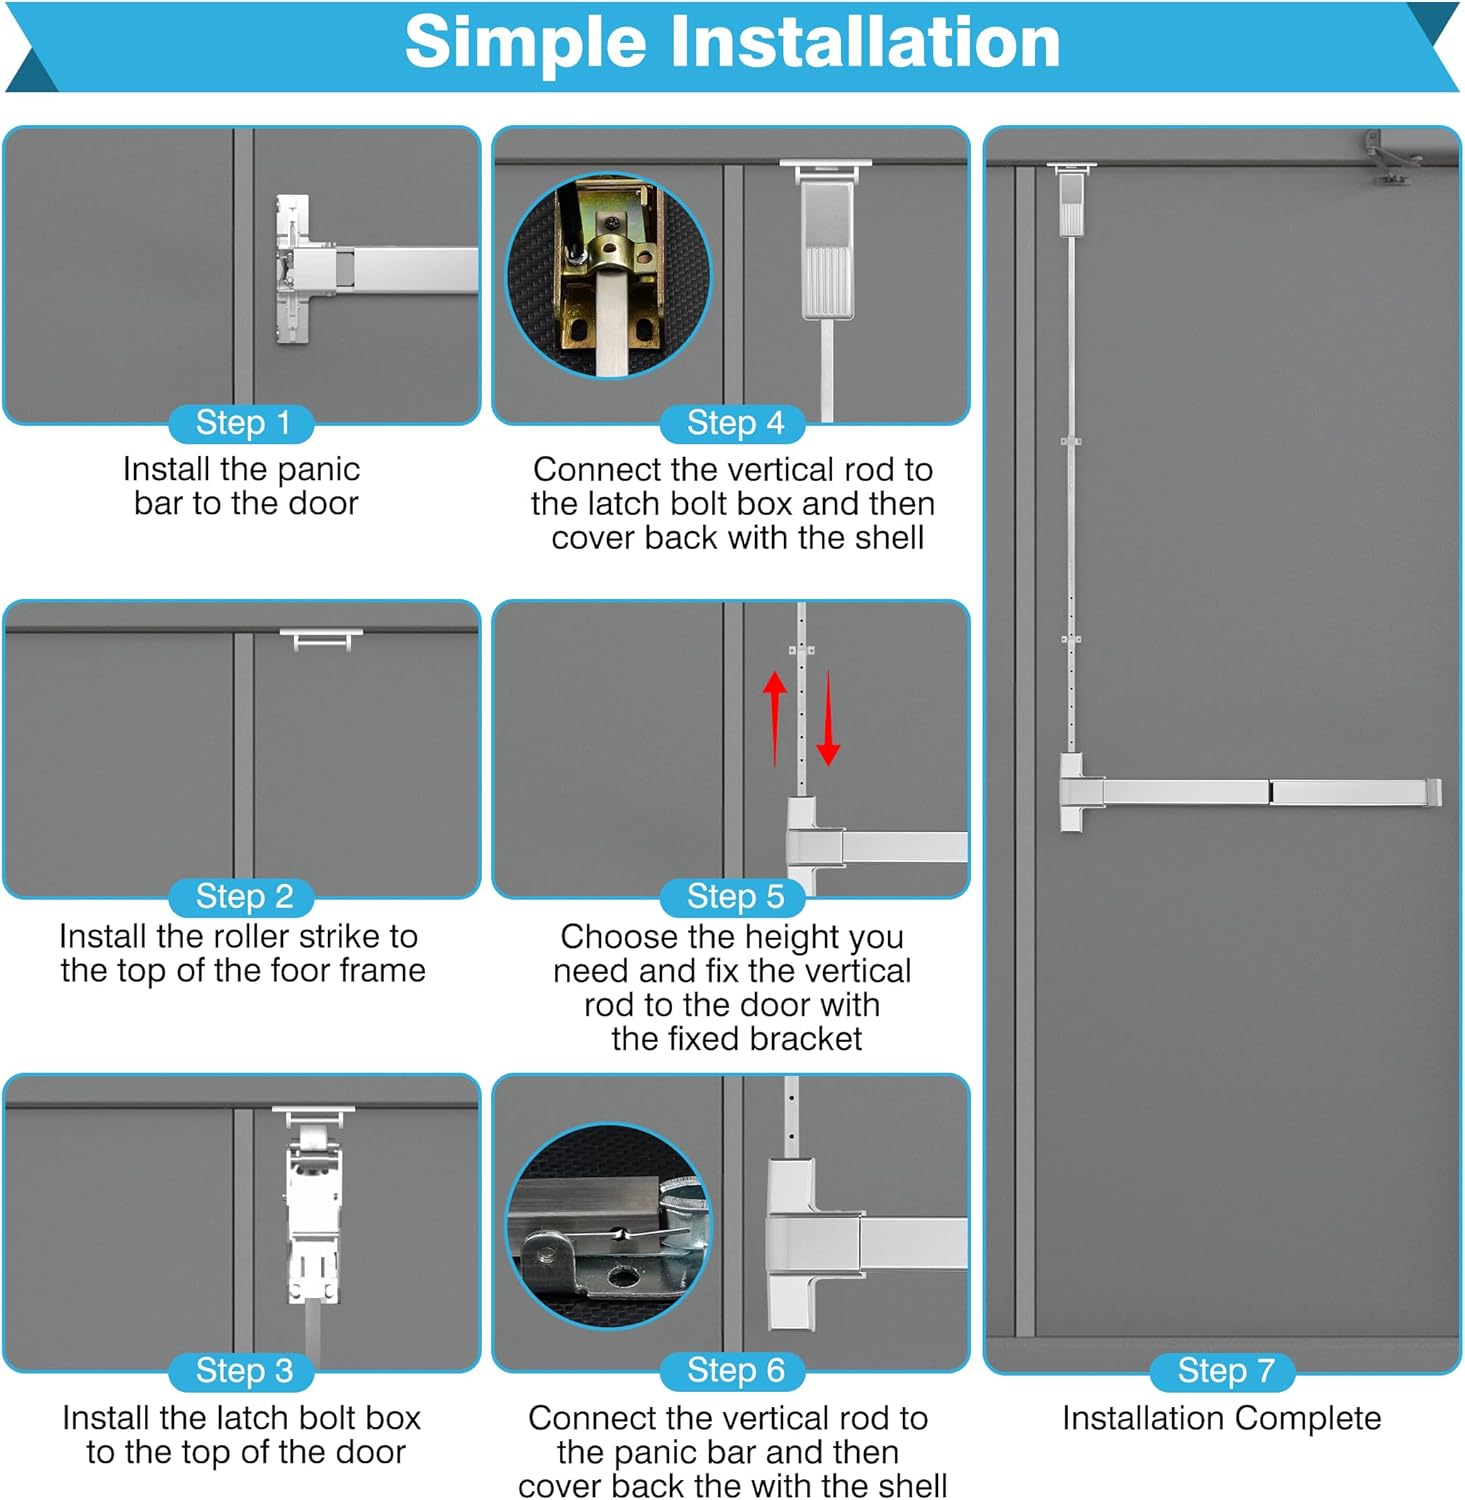
Figure 3.2: Simple Installation Steps
- Step 1: Install the Panic Bar. Securely install the main panic bar assembly onto the door using the provided screws.
- Step 2: Install the Roller Strike. Attach the roller strike to the top of the door frame.
- Step 3: Install the Latch Bolt Box. Install the latch bolt box to the top of the door.
- Step 4: Connect Vertical Rod to Latch Bolt Box. Connect the vertical rod to the latch bolt box and then cover it back with its shell.
- Step 5: Adjust and Fix Vertical Rod. Choose the appropriate height for the vertical rod and fix it to the door using the fixed bracket.
- Step 6: Connect Vertical Rod to Panic Bar. Connect the vertical rod to the panic bar and then cover it back with its shell.
- Step 7: Installation Complete. Verify all components are securely fastened and operate smoothly.
3.2. Adjustment for Left/Right Hand Doors
The panic bar is ambidextrous and can be adjusted for either left or right-hand opening doors. The default setting is for left-hand doors. Follow these steps to adjust for right-hand doors:

Figure 3.3: Adjustment for Left/Right Hand Door
- Step 1: Remove Black Spring. The default setting is for left-opening doors. Carefully take off the black spring from the mechanism.
- Step 2: Loosen Screw. Loosen the designated screw on the mechanism.
- Step 3: Hook Spring and Insert Screw. Hook up the long hook of the spring to the screw with the "R" mark and insert the screw into the hole with the "L" mark. After this adjustment, the panic bar can be installed on right-opening doors.
4. Operating Instructions
The IRONWALLS Surface Vertical Rod Exit Device is designed for simple and effective emergency egress.
- Exiting: To exit, simply press down on the horizontal push bar from the inside of the door. This action will retract the latch bolt, allowing the door to open.
- Security: When the door is closed, the device automatically locks, preventing unauthorized entry from the outside.
- Emergency Use: In an emergency, the panic bar provides immediate and unobstructed egress, ensuring fast escape.
5. Maintenance
Regular maintenance ensures the longevity and reliable operation of your IRONWALLS panic exit device.
- Cleaning: Clean the stainless steel surfaces regularly with a soft, damp cloth. Avoid abrasive cleaners or harsh chemicals that could damage the chrome finish.
- Inspection: Periodically inspect all moving parts, screws, and connections for any signs of wear, looseness, or damage. Ensure the push bar moves freely and the latch bolt retracts and extends smoothly.
- Lubrication: If the mechanism feels stiff, apply a small amount of silicone-based lubricant to the moving parts, avoiding excessive application.
- Professional Check: For commercial applications, it is recommended to have the device inspected by a qualified professional annually to ensure compliance with safety regulations.
6. Troubleshooting
If you encounter issues with your IRONWALLS panic exit device, refer to the following common troubleshooting tips:
- Bar is Stiff or Hard to Push:
- Check for any obstructions around the bar or the latch mechanism.
- Apply a small amount of silicone lubricant to the moving parts.
- Ensure all mounting screws are tightened appropriately, but not overtightened.
- Door Does Not Latch Properly:
- Verify that the latch bolt box and roller strike are correctly aligned.
- Check for any debris or foreign objects preventing the latch from fully extending.
- Ensure the door frame is not warped or misaligned.
- Device Appears Damaged:
- Do not attempt to repair severely damaged components yourself.
- Contact a qualified locksmith or the manufacturer for assistance.
If the problem persists after attempting these solutions, please contact customer support.
7. Warranty and Support
Specific warranty details and direct support contact information are not provided within this manual. For warranty claims, technical support, or replacement parts, please refer to the product packaging or contact the IRONWALLS retailer or manufacturer directly through their official website or customer service channels.
Ask a question about this manual
Ask about setup, troubleshooting, compatibility, parts, safety, or missing instructions. Manuals+ will review the question and use this page’s manual context to help answer it.