
1. Introduction
This manual provides detailed instructions for the setup, operation, and maintenance of your Raddy VP7 Wireless Weather Station. The system includes a main display unit and three R5 remote sensors, designed to provide comprehensive weather data for your home environment.
2. Package Contents
- Raddy VP7 Main Display Unit (1)
- Raddy Outdoor Sensor Array (1)
- Raddy R5 Remote Sensors (3)
- Power Adapter for Main Display (1)
- Mounting Hardware for Outdoor Sensor (screws, pole clamp)
- User Manual (this document)
3. Product Overview
3.1 Main Display Unit
The Raddy VP7 main display features a 7.4-inch color screen that presents various weather parameters. It can be placed on a table using its integrated stand or mounted on a wall.
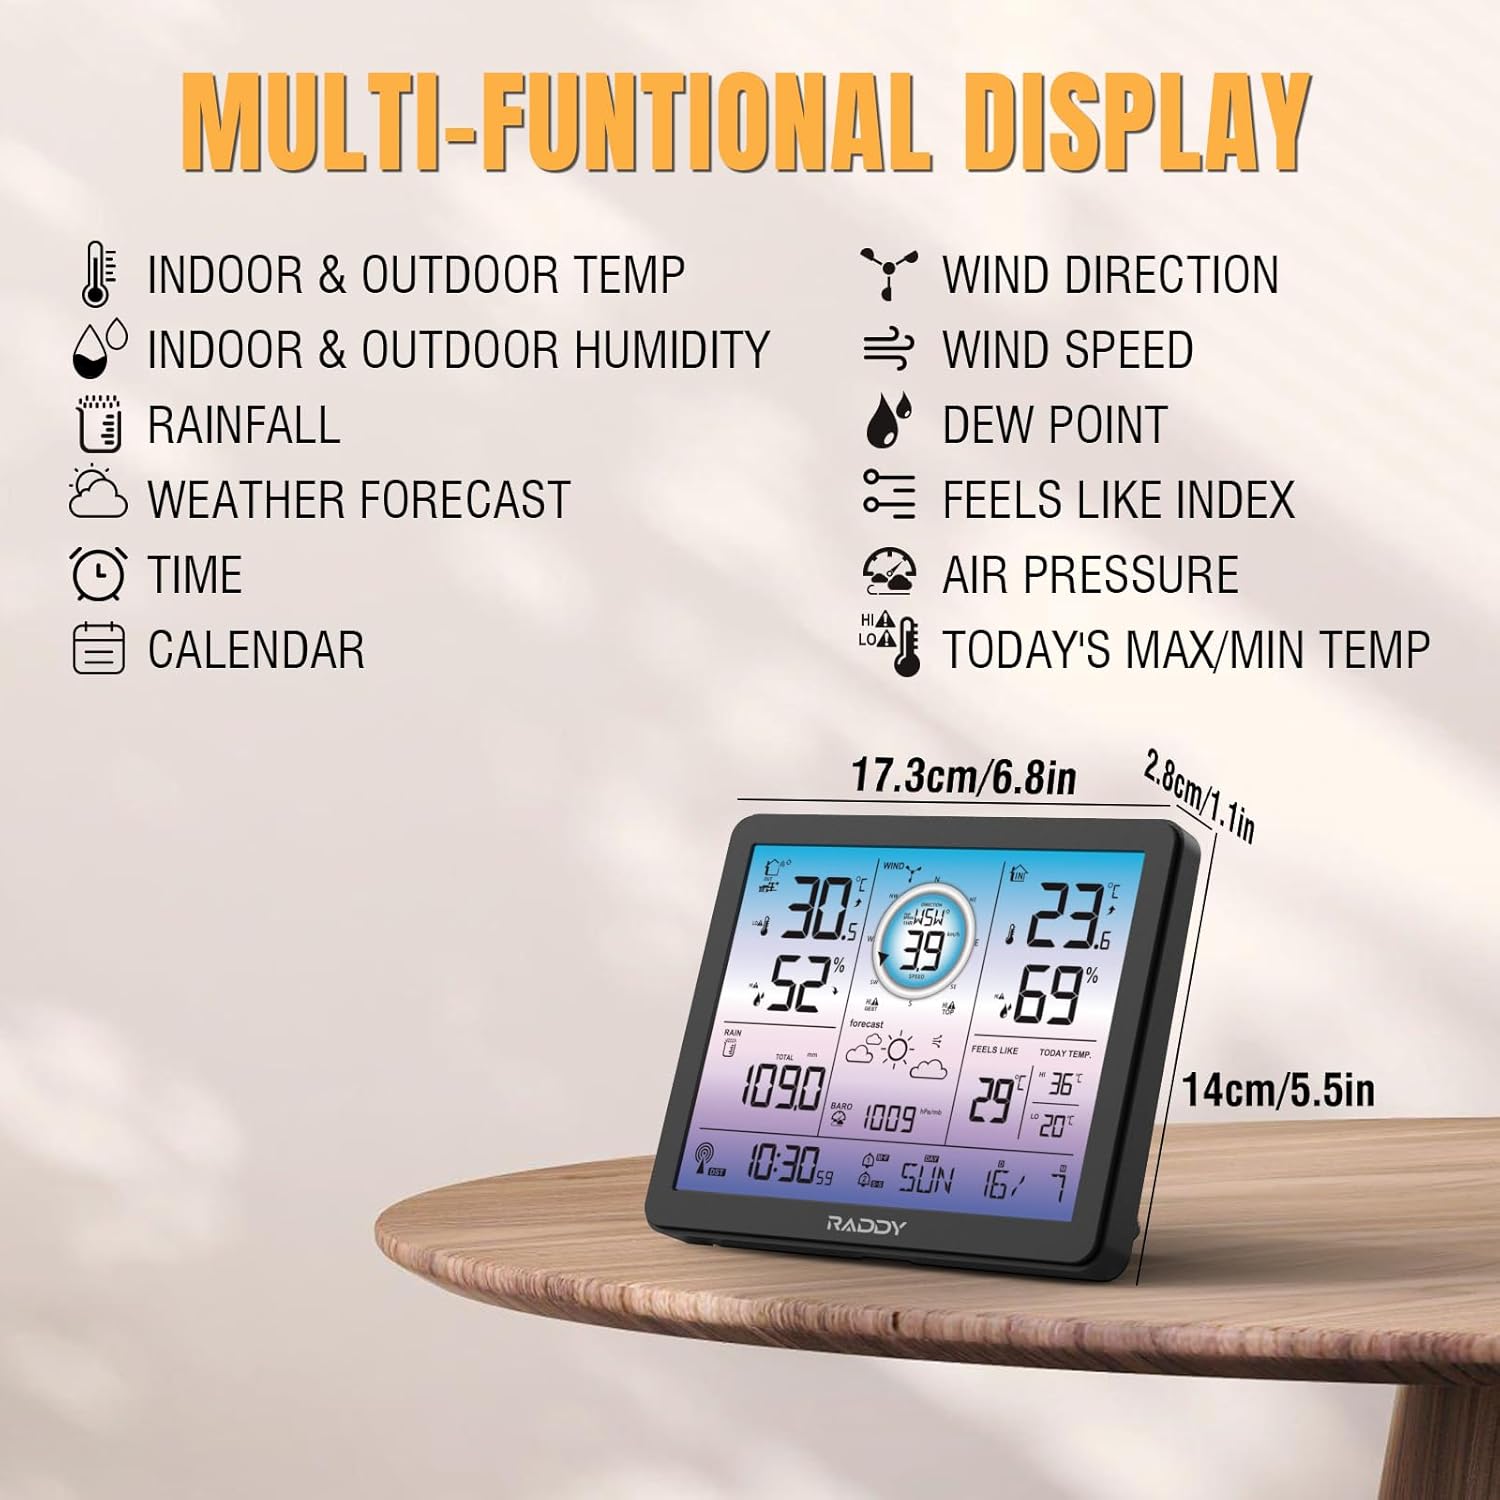
Figure 3.1: Main Display Unit with Multi-functional Data. This image illustrates the 7.4-inch color display, highlighting various data points such as indoor/outdoor temperature and humidity, wind direction and speed, rainfall, weather forecast, time, calendar, dew point, feels like index, air pressure, and today's max/min temperatures.

Figure 3.2: Display Unit Placement Options. The image shows the main display unit configured for both table-top use with its integrated stand and wall-mounted installation, demonstrating its versatility.
3.2 Outdoor Sensor Array
The outdoor sensor array is a comprehensive unit that measures wind speed, wind direction, rainfall, temperature, and humidity. It is powered by a solar panel and includes a thermo-hygrometer radiation shield for accurate readings.
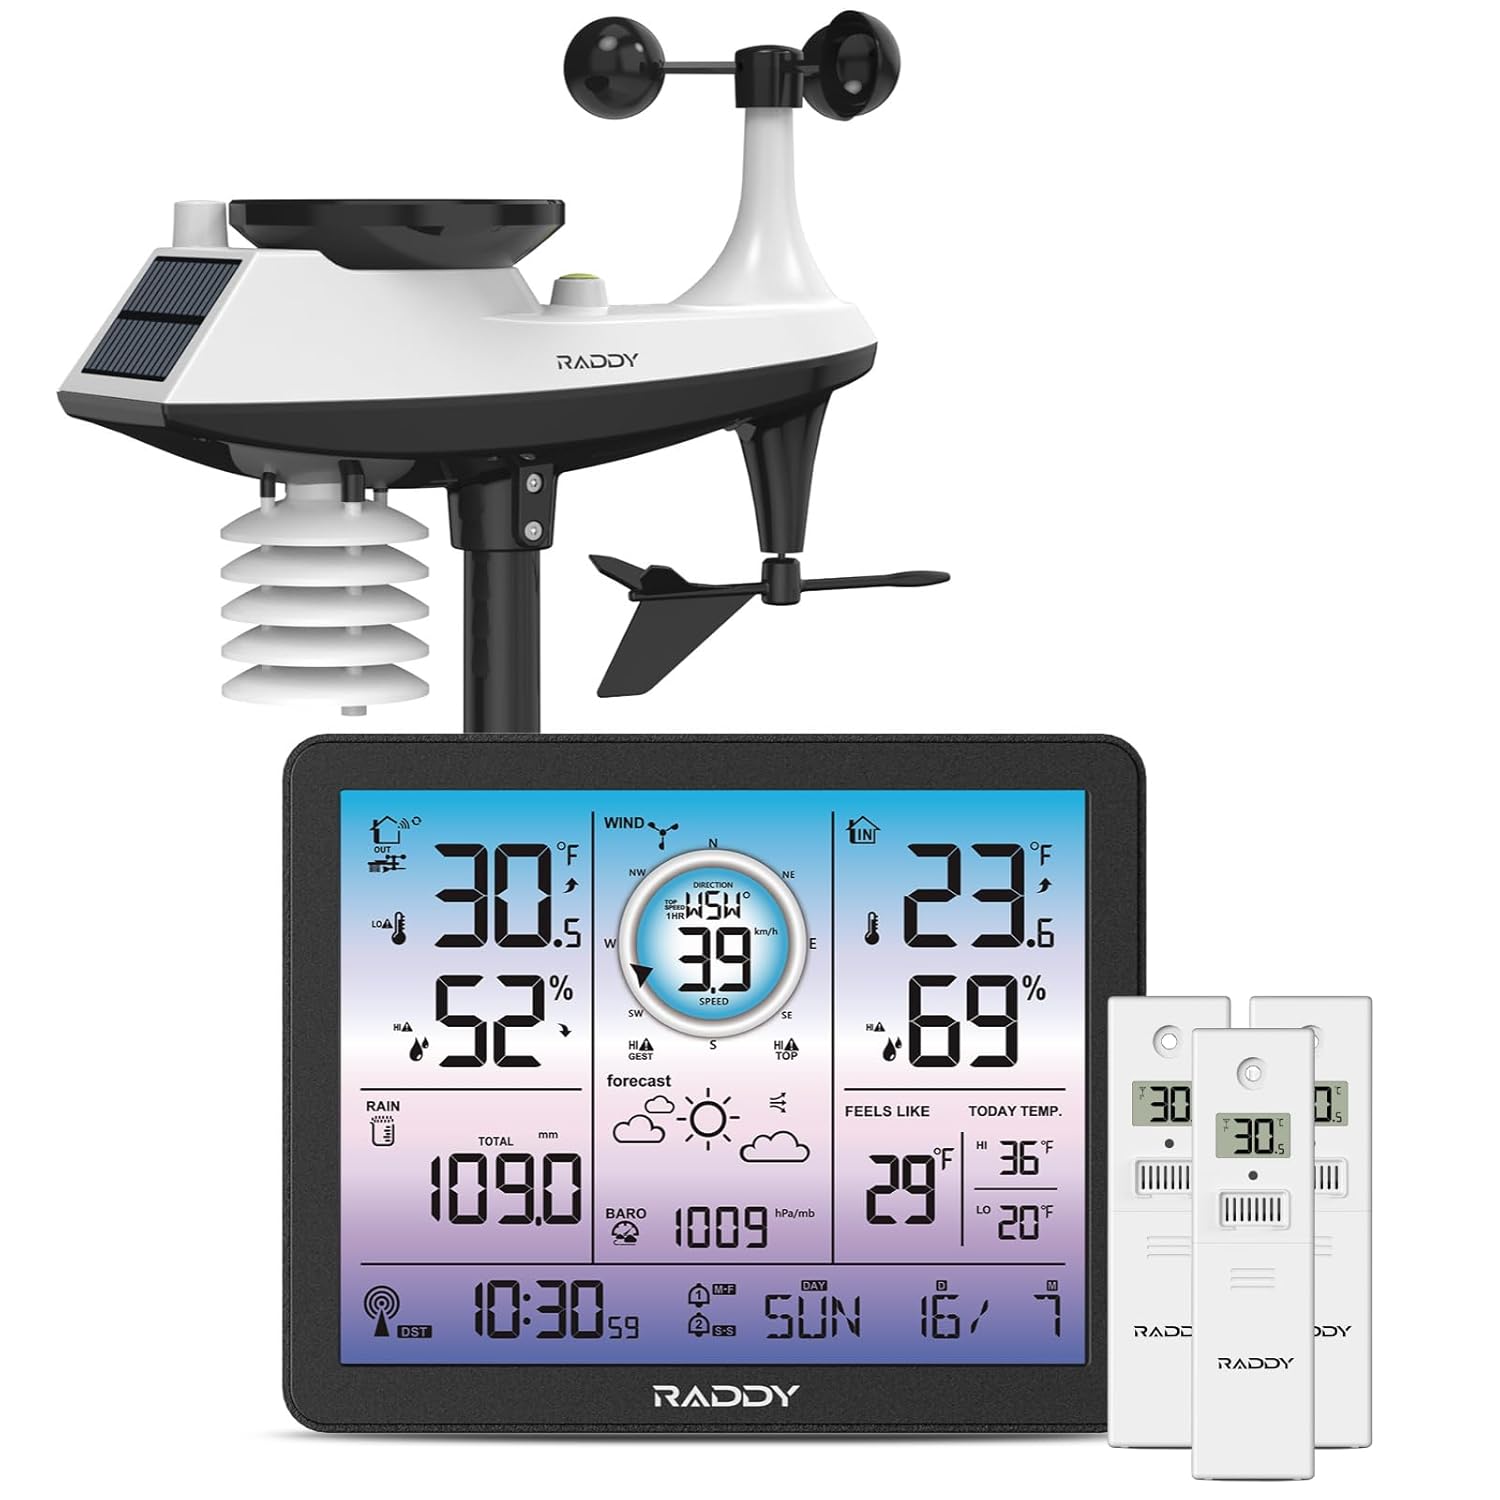
Figure 3.3: Complete Raddy VP7 Weather Station System. This image displays the entire system, including the outdoor sensor array (with rain funnel, wind vane, speed cup, solar panel), the main digital color display, and three R5 remote sensors.
3.3 R5 Remote Sensors
The three R5 remote sensors allow for monitoring of temperature and humidity in up to three additional locations. These sensors transmit data wirelessly to the main display unit.

Figure 3.4: R5 Remote Sensor. A close-up view of one of the R5 remote sensors, showing its compact design and wireless signal indicator.
4. Setup
4.1 Battery Installation
Main Display Unit: Insert 3x AAA batteries (not included) into the battery compartment on the back of the unit. The display can also be powered by the included AC adapter.
Outdoor Sensor Array: The outdoor sensor array is primarily solar-powered but includes a compartment for backup batteries (2x AA, not included) to ensure continuous operation during periods of low light.
R5 Remote Sensors: Each R5 remote sensor requires 2x AAA batteries (not included).
4.2 Outdoor Sensor Assembly and Placement
- Assemble the wind vane, wind speed cup, and rain funnel onto the main outdoor sensor body according to the diagrams in the full printed manual.
- Mount the assembled outdoor sensor array in an open area, away from obstructions, to ensure accurate readings for wind and rain.
- Ensure the solar panel faces south (in the Northern Hemisphere) for optimal charging.
- The sensor should be mounted securely using the provided hardware, typically on a pole or fence post.
4.3 R5 Remote Sensor Placement
Proper placement of the R5 remote sensors is crucial for accurate readings and reliable wireless transmission. Consider the following guidelines:
- Orientation: Mount the sensor upright. Avoid laying it down horizontally.
- Protection: Place the sensor in a shaded area with good air circulation. Avoid direct sunlight or direct exposure to rain, which can affect temperature and humidity readings.
- Interference: Keep sensors away from large metal objects, electrical appliances, or other sources of electromagnetic interference.
- Height: For outdoor use, mount the sensor at least 1.2 meters (approximately 4 feet) above the ground.
- Range: The sensors have a wireless transmission range of up to 330 feet (100 meters) in open air. Walls and other obstacles will reduce this range.

Figure 4.1: Correct Usage of Remote Sensor. This diagram illustrates optimal placement for the R5 remote sensors, emphasizing upright orientation, shaded areas, distance from interfering sources, and appropriate height from the ground, contrasted with incorrect placements.

Figure 4.2: Monitoring Multiple Areas. The image demonstrates the capability of the Raddy VP7 system to monitor up to five distinct areas (indoor, outdoor, and three optional remote sensor locations) simultaneously, showcasing various placement scenarios like a garden, baby's room, and kitchen.
4.4 Pairing Sensors with Main Display
Once batteries are installed in all sensors and the main display is powered on, the units should automatically attempt to pair. If pairing does not occur automatically:
- Ensure all sensors are within range of the main display.
- Press and hold the "SEARCH" or "PAIR" button (refer to the specific button on your main display, usually on the back or side) for a few seconds.
- For R5 remote sensors, there may be a small "TX" button inside the battery compartment or on the back; press this to force a transmission.
- Allow a few minutes for the display to receive data from all sensors.

Figure 4.3: Wireless Data Transmission. This image illustrates the wireless communication between the indoor display console and the outdoor sensor, highlighting the effective transmission range of up to 330 feet (100 meters).
5. Operating Instructions
5.1 Display Functions and Navigation
The 7.4-inch color display provides a clear overview of all collected data. Use the buttons on the display (typically MODE, UP, DOWN, ALERT) to navigate through settings and view different data modes.
- Indoor/Outdoor Temperature & Humidity: Displays current readings for the main unit and outdoor sensor.
- Wind Direction & Speed: Shows current wind conditions.
- Rainfall: Tracks daily, weekly, or monthly rainfall totals.
- Weather Forecast: Provides a 12-hour forecast based on barometric pressure changes.
- Time & Calendar: Synchronized via RCC atomic clock for accuracy.
- Dew Point & Feels Like Temperature: Calculated values for environmental comfort.
- Air Pressure: Current barometric pressure.
- Max/Min Temperatures: Records daily high and low temperatures.

Figure 5.1: Detailed View of the 7.4-inch Display. This image provides a close-up of the main display, showcasing its vibrant color and the clear presentation of various weather metrics.
5.2 Backlight Adjustment
The display features adjustable backlight levels for optimal viewing in different lighting conditions. Typically, a dedicated button (e.g., "LIGHT" or "BRIGHTNESS") or a combination of buttons allows cycling through different brightness settings (e.g., LV0, LV1, LV2, LV3).

Figure 5.2: Adjustable Backlight Levels. The image illustrates the four distinct backlight levels (LV0 to LV3) available on the Raddy VP7 display, demonstrating how brightness can be adjusted for comfort and visibility.
5.3 Setting Alerts and Alarms
The VP7 allows you to set high/low alerts for temperature and humidity, as well as warnings for wind speed and rainfall. It also includes dual alarms for weekday and weekend settings.
- Press the "ALERT" button to enter alert setting mode.
- Use the "UP" and "DOWN" buttons to select the parameter you wish to set an alert for (e.g., Outdoor Temp High, Indoor Humidity Low).
- Press "MODE" or "ALERT" again to confirm your selection and adjust the threshold value.
- Repeat for all desired alerts.
- For alarm settings, navigate to the alarm section using the "MODE" button and set desired times for weekdays and weekends.
5.4 Time and Date Settings
The unit typically synchronizes time and date automatically via RCC (Radio Controlled Clock). If manual adjustment is needed:
- Press and hold the "MODE" button to enter time setting mode.
- Use "UP" and "DOWN" to adjust values (e.g., hour, minute, year, month, day).
- Press "MODE" to confirm each setting and move to the next.
6. Maintenance
6.1 Cleaning
- Main Display: Wipe with a soft, dry cloth. Avoid abrasive cleaners or solvents.
- Outdoor Sensor Array: Periodically check the rain funnel for debris (leaves, insects) and clean as necessary. Ensure the wind vane and speed cups rotate freely. Gently wipe the solar panel to maintain charging efficiency.
- R5 Remote Sensors: Wipe with a soft, damp cloth if dirty. Ensure the ventilation openings are clear.
6.2 Battery Replacement
Replace batteries in the main display and R5 remote sensors when the low battery indicator appears on the screen. For the outdoor sensor, replace backup batteries annually or as needed, especially if the unit is in a consistently shaded area.
6.3 Sensor Calibration
While the sensors are factory-calibrated, some models allow for minor adjustments to temperature or humidity readings if you suspect inaccuracies. Refer to the detailed manual for specific calibration procedures, if available for your model.
7. Troubleshooting
| Problem | Possible Cause | Solution |
|---|---|---|
| No outdoor data on display. | Batteries low/dead in outdoor sensor; sensor out of range; interference; pairing lost. | Replace batteries. Move sensor closer to display. Re-pair sensor (see Section 4.4). Reduce interference sources. |
| Inaccurate temperature/humidity readings. | Sensor exposed to direct sunlight/rain; poor air circulation; sensor near heat/cold source. | Relocate sensor to a shaded, well-ventilated area (see Section 4.3). |
| Wind speed/direction not registering. | Wind cups/vane obstructed; sensor not level; debris in mechanism. | Check for obstructions. Ensure sensor is level. Clean mechanism (see Section 6.1). |
| Rainfall data incorrect. | Rain funnel blocked by debris; sensor not level. | Clear rain funnel. Ensure sensor is level. |
| Display screen is blank. | No power; batteries dead; AC adapter unplugged. | Check AC adapter connection. Replace display unit batteries. |
8. Specifications
| Feature | Detail |
|---|---|
| Model | Raddy VP7 Weather Station |
| Display Type | 7.4-inch Digital Color Display |
| Connectivity | 433 MHz Wireless |
| Wireless Range | Up to 330 feet (100 meters) in open air |
| Power Source (Main Display) | AC Adapter (included), 3x AAA Batteries (not included) |
| Power Source (Outdoor Sensor) | Solar Panel, 2x AA Batteries (backup, not included) |
| Power Source (R5 Remote Sensor) | 2x AAA Batteries (not included) |
| Measurements | Indoor/Outdoor Temp & Humidity, Rainfall, Wind Direction & Speed, 12-hour Forecast, RCC Atomic Clock, Calendar, Dew Point, Feels Like Temp, Air Pressure, Max/Min Temps |
| Special Features | Adjustable Backlight, High/Low Alerts, Dual Alarms, Expandable Monitoring (up to 5 areas) |
| Material | Plastic |
9. Warranty and Support
Raddy products are designed for reliability and performance. This product comes with a standard manufacturer's warranty. For specific warranty terms and conditions, please refer to the warranty card included in your package or visit the official Raddy website.
For technical assistance, troubleshooting, or customer service inquiries, please contact Raddy customer support. Lifetime technical support is available.
- Manufacturer: Radioddity
- Contact: Refer to the official Raddy website or your product packaging for the most current contact information.


