
1. Introduction
This manual provides detailed instructions for the proper use and maintenance of your CVLIFE Scope Leveling Kit. This kit is designed to assist in accurately leveling rifle scopes, ensuring optimal performance. Please read these instructions thoroughly before use.
2. Product Overview
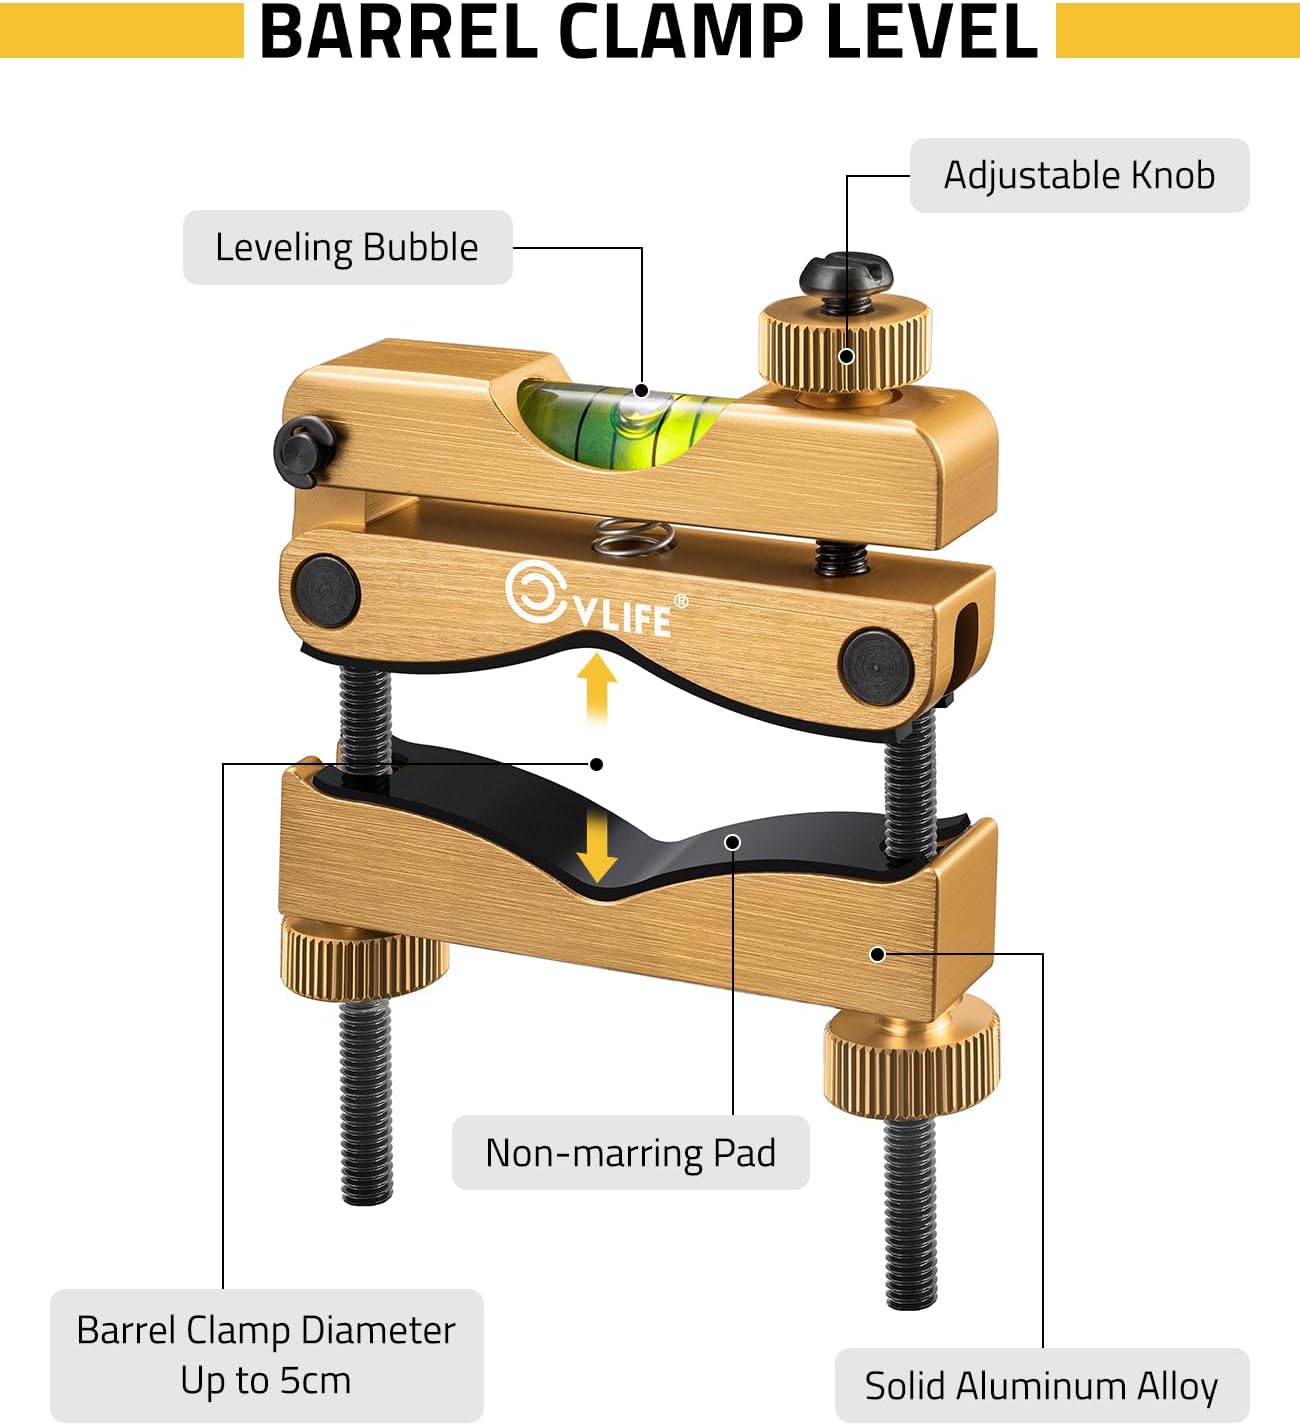
The CVLIFE Scope Leveling Kit includes a barrel clamp level and two magnetic reference levels, all constructed from durable aluminum alloy with an anodized finish. The kit is designed for high accuracy and ease of use.
Key Features:
- High Accuracy: 10mm calibration distance for precise measurements.
- Durable Construction: Crafted from sturdy aluminum alloy with an anodized surface.
- Non-Marring Padding: Barrel clamp features padding to prevent equipment scratches.
- User-Friendly Design: Magnetic base on reference levels for stable placement and adjustable knobs on the barrel clamp.
- Versatile: Barrel clamp fits diameters up to 1.97 inches (5cm).
- Dual Reference Levels: Two levels included for enhanced accuracy, one for the barrel and one for a flat surface or scope turret.

3. Setup
Proper setup is crucial for accurate scope leveling. Follow these steps to prepare your equipment.
3.1 Inspecting Components
Before beginning, ensure all components are present and free from damage:
- 1 x Barrel Clamp Level
- 2 x Magnetic Reference Levels
- 1 x Hex Key (if included for adjustment)

3.2 Attaching the Barrel Clamp Level
- Place your rifle on a stable, level surface or a shooting rest.
- Identify a flat, accessible section of the rifle's barrel.
- Loosen the adjustable knobs on the barrel clamp level to open it sufficiently.
- Carefully position the barrel clamp level onto the rifle barrel, ensuring the non-marring padding is in contact with the barrel surface.
- Tighten the adjustable knobs until the clamp is secure on the barrel. Do not overtighten.
- Adjust the barrel clamp level until the bubble is centered, indicating the rifle itself is level.


4. Operating Instructions
Once the rifle is level, proceed with leveling your scope.
4.1 Leveling the Scope
- Ensure your scope is mounted loosely in its rings, allowing for rotation.
- Place one of the magnetic reference levels on a flat surface of your scope, such as the top of the turret cap or a flat section of the scope body. The strong magnetic base will hold it securely.
- Gently rotate the scope within its rings until the bubble in the magnetic reference level is perfectly centered.
- Once the scope is level, carefully tighten the scope rings according to the scope manufacturer's instructions, ensuring the scope does not shift during tightening.
- Verify the level again after tightening to confirm accuracy.


5. Maintenance
To ensure the longevity and accuracy of your CVLIFE Scope Leveling Kit, follow these simple maintenance guidelines:
- Cleaning: Wipe the levels with a soft, dry cloth after each use to remove dust, dirt, or fingerprints. Avoid abrasive cleaners or solvents that could damage the anodized finish or the bubble level.
- Storage: Store the kit in a clean, dry place, preferably in its original packaging or a protective case, to prevent damage.
- Inspection: Periodically check the adjustable knobs and screws for tightness. Ensure the non-marring pads on the barrel clamp are intact.
6. Troubleshooting
If you encounter issues while using your leveling kit, refer to the following common problems and solutions:
6.1 Inaccurate Readings
- Issue: Bubble does not center or provides inconsistent readings.
- Solution: Ensure the surface where the level is placed is clean and free of debris. Verify that the rifle itself is stable and not moving. Check if the barrel clamp is securely tightened without overtightening.
6.2 Difficulty Attaching Barrel Clamp
- Issue: The barrel clamp does not fit or is unstable on the barrel.
- Solution: Confirm your barrel diameter is within the specified range (up to 1.97 inches / 5cm). Ensure the adjustable knobs are sufficiently loosened before attempting to attach.
6.3 Magnetic Reference Level Not Sticking
- Issue: The magnetic reference level does not adhere firmly to the scope.
- Solution: The magnetic base requires a ferrous metal surface to adhere. Ensure you are placing it on a suitable part of the scope, such as a steel turret cap or a metal section of the scope body.
7. Specifications
| Feature | Specification |
|---|---|
| Brand | CVLIFE |
| Model Number | B0CMQCQH5K |
| Material | Aluminum |
| Color | Gold |
| Style | Magnetic |
| Operation Mode | Manual |
| Number of Items | 3 (1 Barrel Clamp Level, 2 Magnetic Reference Levels) |
| Barrel Clamp Diameter | Up to 1.97 inches (5cm) |
| Level Measurement Type | Bubble |
8. Warranty & Support
CVLIFE products are manufactured to high-quality standards. For specific warranty information or technical support, please refer to the product packaging or contact CVLIFE customer service directly through their official website or the retailer where the product was purchased. Keep your purchase receipt for warranty claims.