
1. Introduction
Thank you for choosing the Midea 18.7 Cu. Ft. Bottom Mount Freezer Refrigerator. This appliance is designed to provide efficient and convenient food storage with its thoughtful layout, placing frequently accessed items at eye level. It features an electronic control system, reversible door swing, and bright LED interior lighting. This manual provides essential information for the safe installation, operation, and maintenance of your new refrigerator.

Figure 1: Front view of the Midea 18.7 Cu. Ft. Bottom Mount Freezer Refrigerator.
2. Important Safety Information
Before operating your refrigerator, please read all safety instructions carefully to reduce the risk of fire, electric shock, or injury. Keep this manual for future reference.
2.1 General Safety Precautions
- Ensure the refrigerator is properly grounded. Use a dedicated electrical outlet.
- Do not use extension cords or ungrounded adapters.
- Unplug the refrigerator before cleaning or performing any maintenance.
- Keep ventilation openings clear of obstruction.
- Do not store explosive substances such as aerosol cans with a flammable propellant in this appliance.
- This appliance contains R-290 or R-600A refrigerant. Handle with care and ensure proper ventilation during installation and servicing.
- Do not damage the refrigerant circuit.
- Children should be supervised to ensure they do not play with the appliance.
- Do not touch cold surfaces, especially when hands are damp or wet, as skin may stick to extremely cold surfaces.
3. Setup and Installation
3.1 Unpacking
Remove all packaging materials, including foam and adhesive tape. Inspect the refrigerator for any shipping damage. Keep packaging materials out of reach of children.
3.2 Location Requirements
Place the refrigerator on a strong, level floor. Allow adequate space around the unit for proper air circulation (at least 2 inches at the back and sides). Avoid direct sunlight or heat sources. Ensure the ambient temperature is suitable for appliance operation.
3.3 Leveling
Adjust the leveling feet at the bottom of the refrigerator to ensure it is stable and level. This prevents vibrations and ensures proper door sealing.
3.4 Reversible Door Swing
The door swing of this refrigerator can be reversed to open from either the left or right side, accommodating various kitchen layouts. Refer to the detailed instructions in your full user manual for the door reversal procedure. This process typically involves removing hinges and reattaching them on the opposite side.
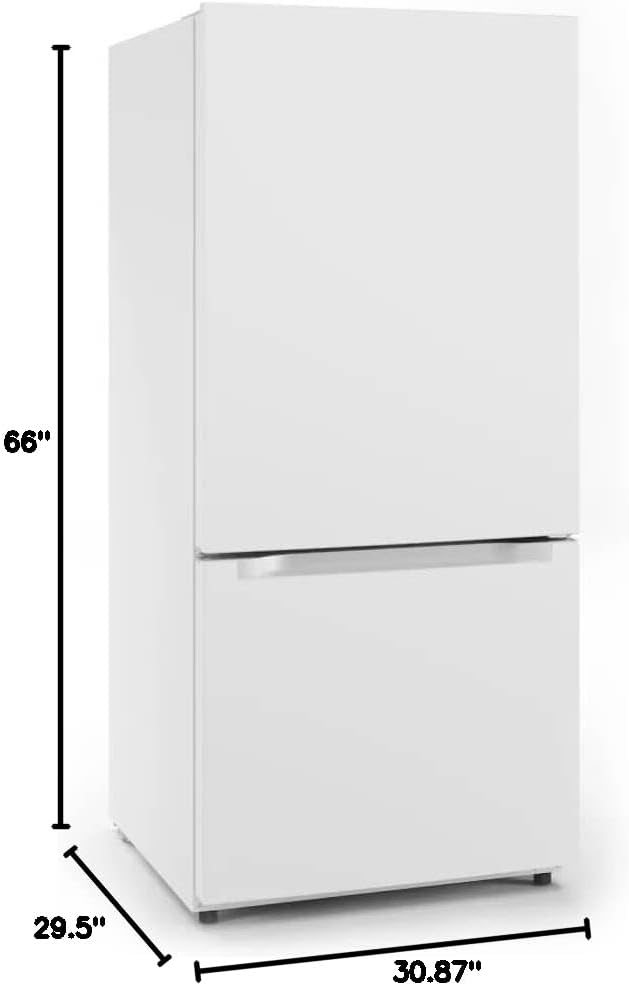
Figure 2: Product dimensions for installation planning.
4. Operating Your Refrigerator
4.1 Electronic Control
Your Midea refrigerator is equipped with an electronic control panel, typically located inside the fresh food compartment. This panel allows you to adjust temperature settings for both the refrigerator and freezer sections. Consult the full manual for specific button functions and temperature range settings.
4.2 Refrigerator Compartment
The upper compartment is the refrigerator section, designed for fresh food storage. It features:
- Adjustable Shelves: Three toughened glass or plastic shelves can be repositioned to accommodate items of various heights.
- Humidity-Controlled Crisper Bins: Two crisper drawers are located at the bottom of the refrigerator compartment. These bins are designed to maintain optimal humidity levels, extending the freshness of fruits and vegetables.
- LED Interior Lighting: Bright LED lights illuminate the interior, making it easy to find items even in low-light conditions.

Figure 3: Interior layout of the refrigerator compartment.

Figure 4: Humidity-controlled crisper drawers for produce storage.
4.3 Freezer Compartment
The lower compartment is the freezer section, featuring a 2-level freezer drawer system. This design provides easy access and organization for your frozen foods.
4.4 Door Shelves
The refrigerator door is equipped with full-width door shelves, including gallon door storage, providing ample space for larger items like milk jugs and beverage bottles.
5. Care and Maintenance
5.1 Cleaning
Regular cleaning helps maintain the appearance and efficiency of your refrigerator.
- Interior: Clean the interior with a solution of mild soap and warm water. Wipe dry with a soft cloth. Remove shelves and drawers for thorough cleaning.
- Exterior: Wipe the exterior surfaces with a damp cloth and mild detergent. For stainless steel finishes, use a stainless steel cleaner.
- Door Gaskets: Clean door gaskets regularly to ensure a tight seal.
- Condenser Coils: Periodically clean the condenser coils (located at the back or bottom) to ensure efficient operation. Unplug the unit before cleaning coils.
5.2 Defrosting
This refrigerator features an Automatic Defrost System, eliminating the need for manual defrosting of the freezer compartment. Frost buildup is automatically melted and evaporated.
5.3 Power Outage
In case of a power outage, keep the refrigerator and freezer doors closed to maintain temperature for as long as possible. Avoid opening the doors unnecessarily.
5.4 Vacation and Storage
For short vacations, leave the refrigerator operating normally. For long absences, empty the refrigerator, unplug it, clean it thoroughly, and leave the doors slightly ajar to prevent odors and mold growth.
6. Troubleshooting Guide
Before calling for service, check the following common issues and solutions:
| Problem | Possible Cause | Solution |
|---|---|---|
| Refrigerator does not operate. | Not plugged in; circuit breaker tripped; power outage. | Check power cord connection; reset circuit breaker; check household power. |
| Temperature is too warm. | Temperature setting too high; door opened too frequently; large amount of warm food added; poor ventilation. | Adjust temperature setting lower; minimize door openings; allow food to cool before placing in fridge; ensure proper clearance around unit. |
| Unusual noises. | Refrigerator not level; items vibrating inside; normal operating sounds (e.g., refrigerant flow, defrost cycle). | Level the unit; rearrange items; normal sounds are expected. |
| Door does not close completely. | Door gasket dirty or damaged; food package blocking door; refrigerator not level. | Clean or replace gasket; rearrange food; level the unit. |
| Water on floor. | Defrost drain clogged; excessive humidity. | Clear drain; ensure proper door sealing. |
7. Product Specifications
Below are the key specifications for the Midea 18.7 Cu. Ft. Bottom Mount Freezer Refrigerator (Model: MRB19B7AWW):
| Feature | Specification |
|---|---|
| Brand | Midea |
| Model Info | MRB19B7AWW |
| Capacity | 18.7 Cubic Feet |
| Product Dimensions (D x W x H) | 30.87 x 29.5 x 66 inches |
| Installation Type | Freestanding |
| Form Factor | Freezer Bottom |
| Defrost System | Automatic |
| Shelf Type | Toughened Glass or Plastic |
| Number of Shelves | 3 |
| Number of Doors | 2 |
| Certification | Energy Star |
| Included Components | Gallon Door Storage |
| Refrigerant | R-290 or R-600A |
| Finish Type | Matte |
8. Warranty and Support
Midea provides a limited warranty for this appliance. Please refer to the warranty card included with your product for specific terms, conditions, and duration of coverage. Keep your proof of purchase for warranty claims.
8.1 Customer Support
For technical assistance, service requests, or to order replacement parts, please contact Midea Customer Service. Contact information can typically be found on the Midea official website or on the warranty card provided with your appliance.
When contacting support, please have your model number (MRB19B7AWW) and serial number ready.


