
GCSOAR MPPT 30A (BLE)
GCSOAR MPPT Solar Charge Controller 30A (BLE) User Manual
Model: MPPT 30A (BLE) | Brand: GCSOAR
1. Important Safety Instructions
Please read all instructions and warnings carefully before installation and operation. Failure to follow these instructions may result in electric shock, fire, or severe injury.
- Ensure all wiring is correctly polarized. Incorrect polarity can damage the controller and battery.
- Always connect the battery first, then the solar panel, and finally the load. Disconnect in the reverse order.
- Install the controller in a well-ventilated area, away from flammable materials and direct sunlight.
- Use appropriate circuit breakers and fuses for all connections to protect against overcurrent.
- Do not disassemble or attempt to repair the controller. Contact qualified personnel for service.
- Wear eye protection when working with batteries.
2. Product Overview
The GCSOAR MPPT Solar Charge Controller 30A (BLE) is an advanced Maximum Power Point Tracking (MPPT) device designed to optimize power harvesting from solar panels and efficiently charge various battery types. It features a built-in Bluetooth module for convenient monitoring and parameter setting via a smartphone application.

Figure 1: GCSOAR MPPT Solar Charge Controller 30A (BLE) with smartphone app interface.
3. Key Features
- 30A MPPT Technology: High-efficiency Maximum Power Point Tracking for optimal solar energy utilization.
- 12V/24V Auto System Voltage: Automatically detects and adapts to 12V or 24V battery systems.
- Max PV Input 75V: Supports solar panel arrays with a maximum open circuit voltage of 75V.
- Built-in Bluetooth Module: Enables wireless monitoring and parameter configuration via the iConnect APP.
- Multi-Battery Type Support: Compatible with Lead-acid (Gel, Sealed, Flooded, AGM) and Lithium-ion (LiFePO4, Li(NiCoMn)O2) batteries.
- 4-Stage Charging (Lead-acid): Bulk Charge, Boost Charge, Float Charge, and Equalization.
- 2-Stage Charging (Lithium): Bulk and Absorption, with Lithium Reactivation feature.
- Comprehensive Protections: Includes battery over-voltage, reverse connection, and load over-current protection.
- USB Output: DC 5V/2A for charging small electronic devices.

Figure 2: Overview of GCSOAR Tracer Dream series MPPT Solar Charge Controller features.
4. Installation Guide
4.1 Wiring Diagram
Refer to the diagram below for proper wiring connections. Ensure all connections are secure and correct before powering on the system.
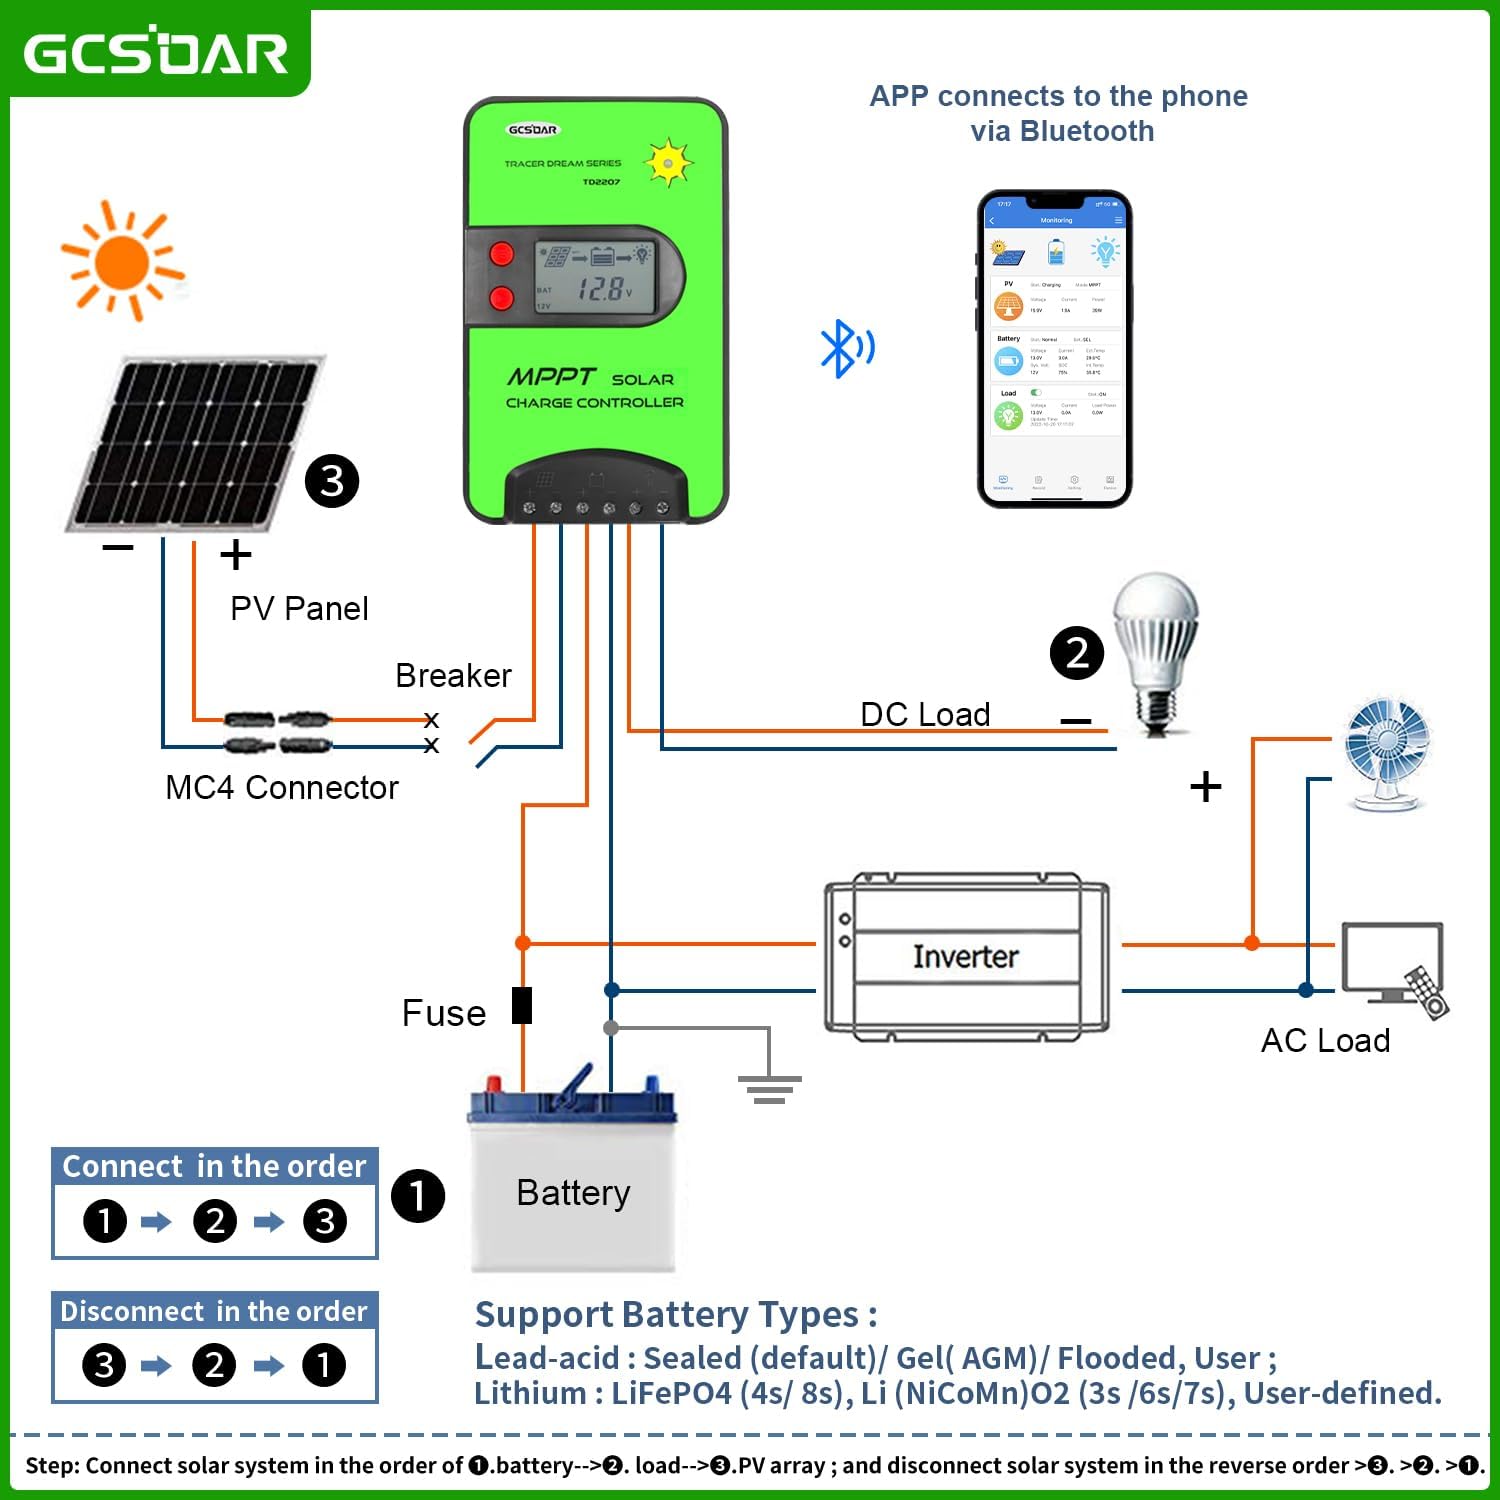
Figure 3: Detailed wiring diagram showing connections for PV panel, battery, DC load, and inverter.
4.2 Connection Order
Follow the specified connection and disconnection order to prevent damage to the controller and other components:
- Connect Battery: Connect the battery to the controller first.
- Connect Load: Connect the DC load to the controller.
- Connect PV Array: Connect the solar panel array to the controller.
Disconnection Order: Disconnect in the reverse sequence: PV array, then load, then battery.
5. Operation
5.1 Display Interface
The controller features an LCD display that shows various system parameters. Use the buttons to navigate through different screens and view information such as PV power, battery voltage, load status, and more.

Figure 4: Various display interfaces on the controller, showing PV power, battery type, load mode, and voltage readings.
5.2 Bluetooth APP Control (iConnect)
The built-in Bluetooth module allows for remote monitoring and parameter adjustment via the iConnect smartphone application.
- Download the APP:
- For Android: Search for "LD iConnect" in Google Play Store or scan the QR code on the manual.
- For iOS: Search for "LD iConnect" in the App Store.
- Alternatively, visit the official website for download: ldsolarpv.com/jszc
- Connect via Bluetooth: Open the iConnect App, select "Local Device", and add your controller (e.g., BT04-E). Follow the on-screen prompts to pair.
- Monitor Data: Once connected, the app displays real-time data for PV, Battery, and Load, including voltage, current, power, and state of charge.
- Adjust Parameters: Navigate to the "Setting" tab within the app to customize various parameters, such as battery type and charging voltages.

Figure 5: GCSOAR MPPT Solar Charge Controller with the iConnect Bluetooth APP for remote monitoring.
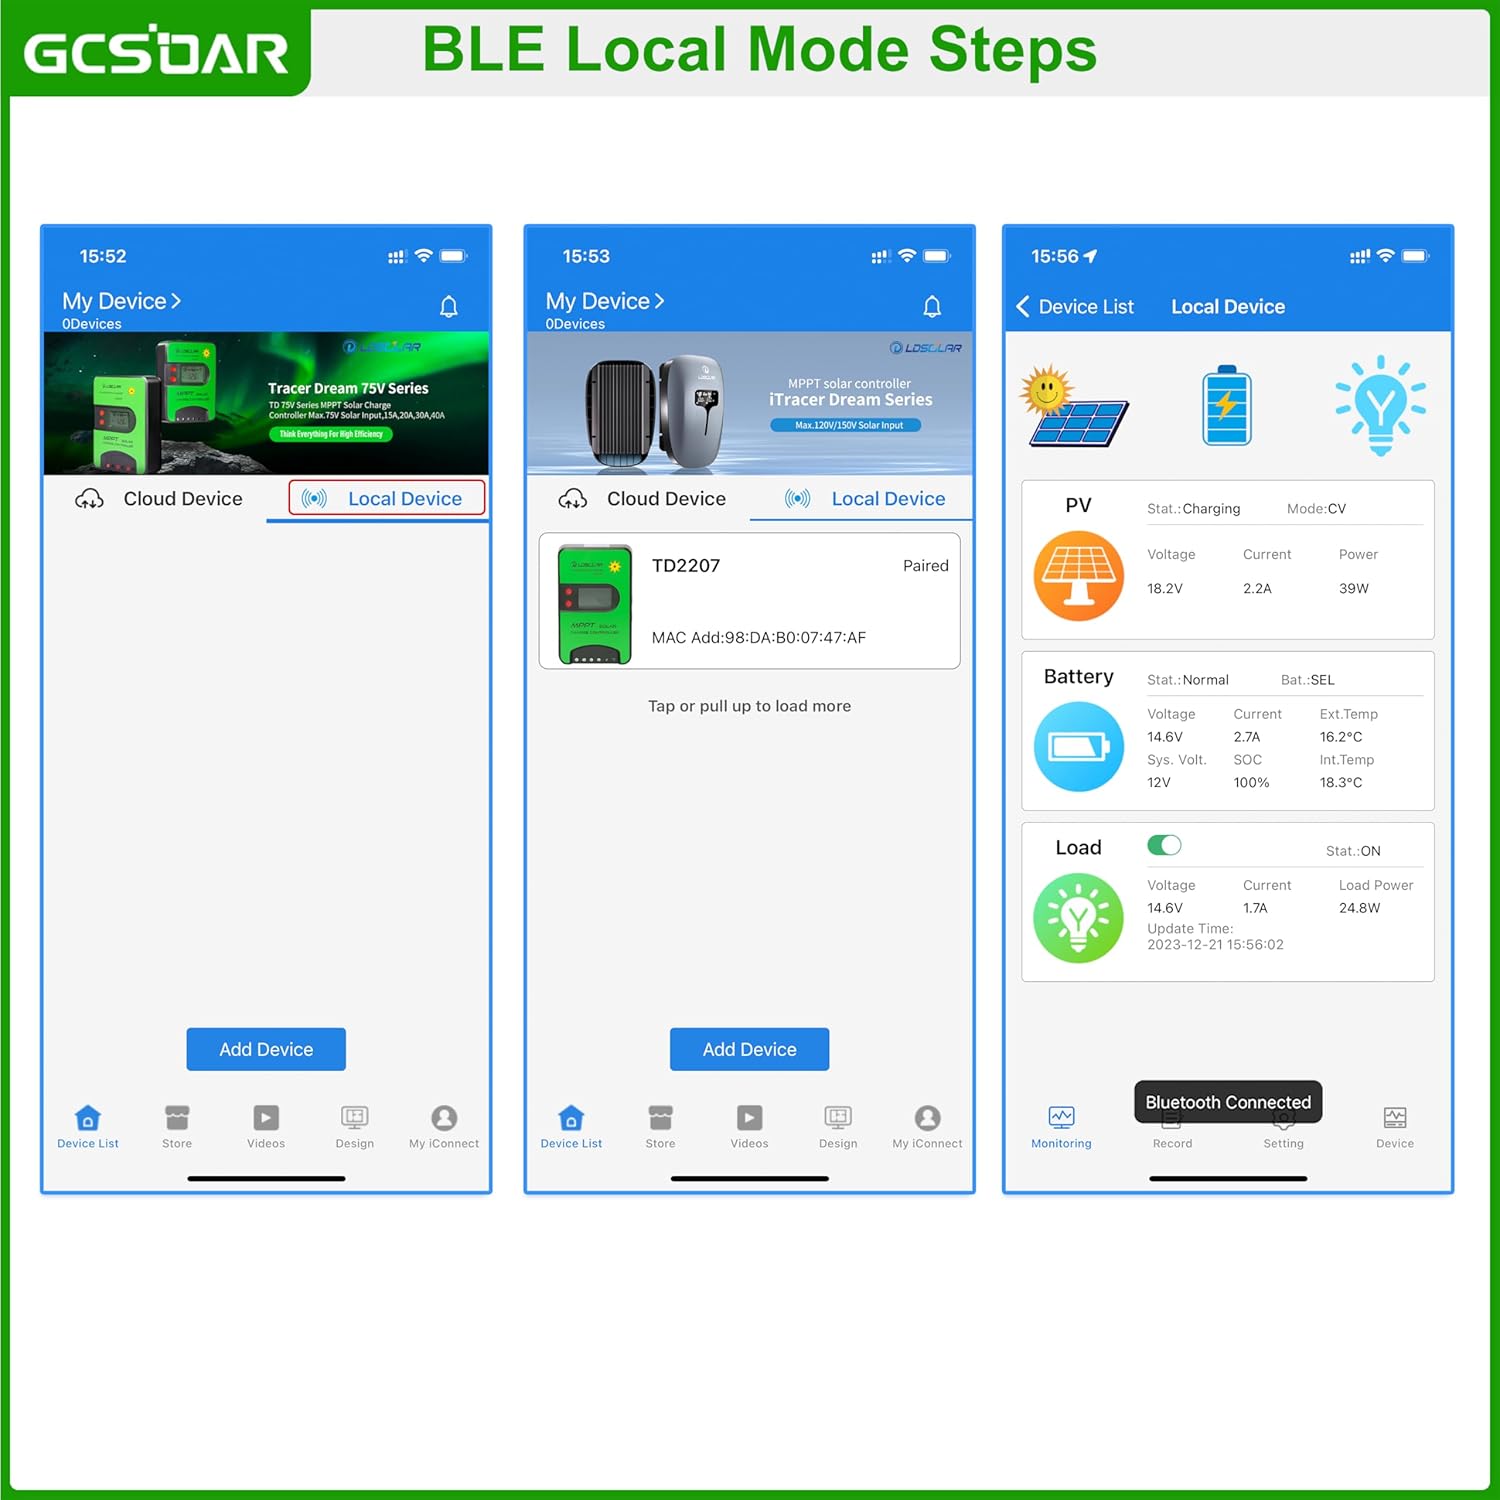
Figure 6: iConnect App showing local device monitoring data for PV, Battery, and Load.
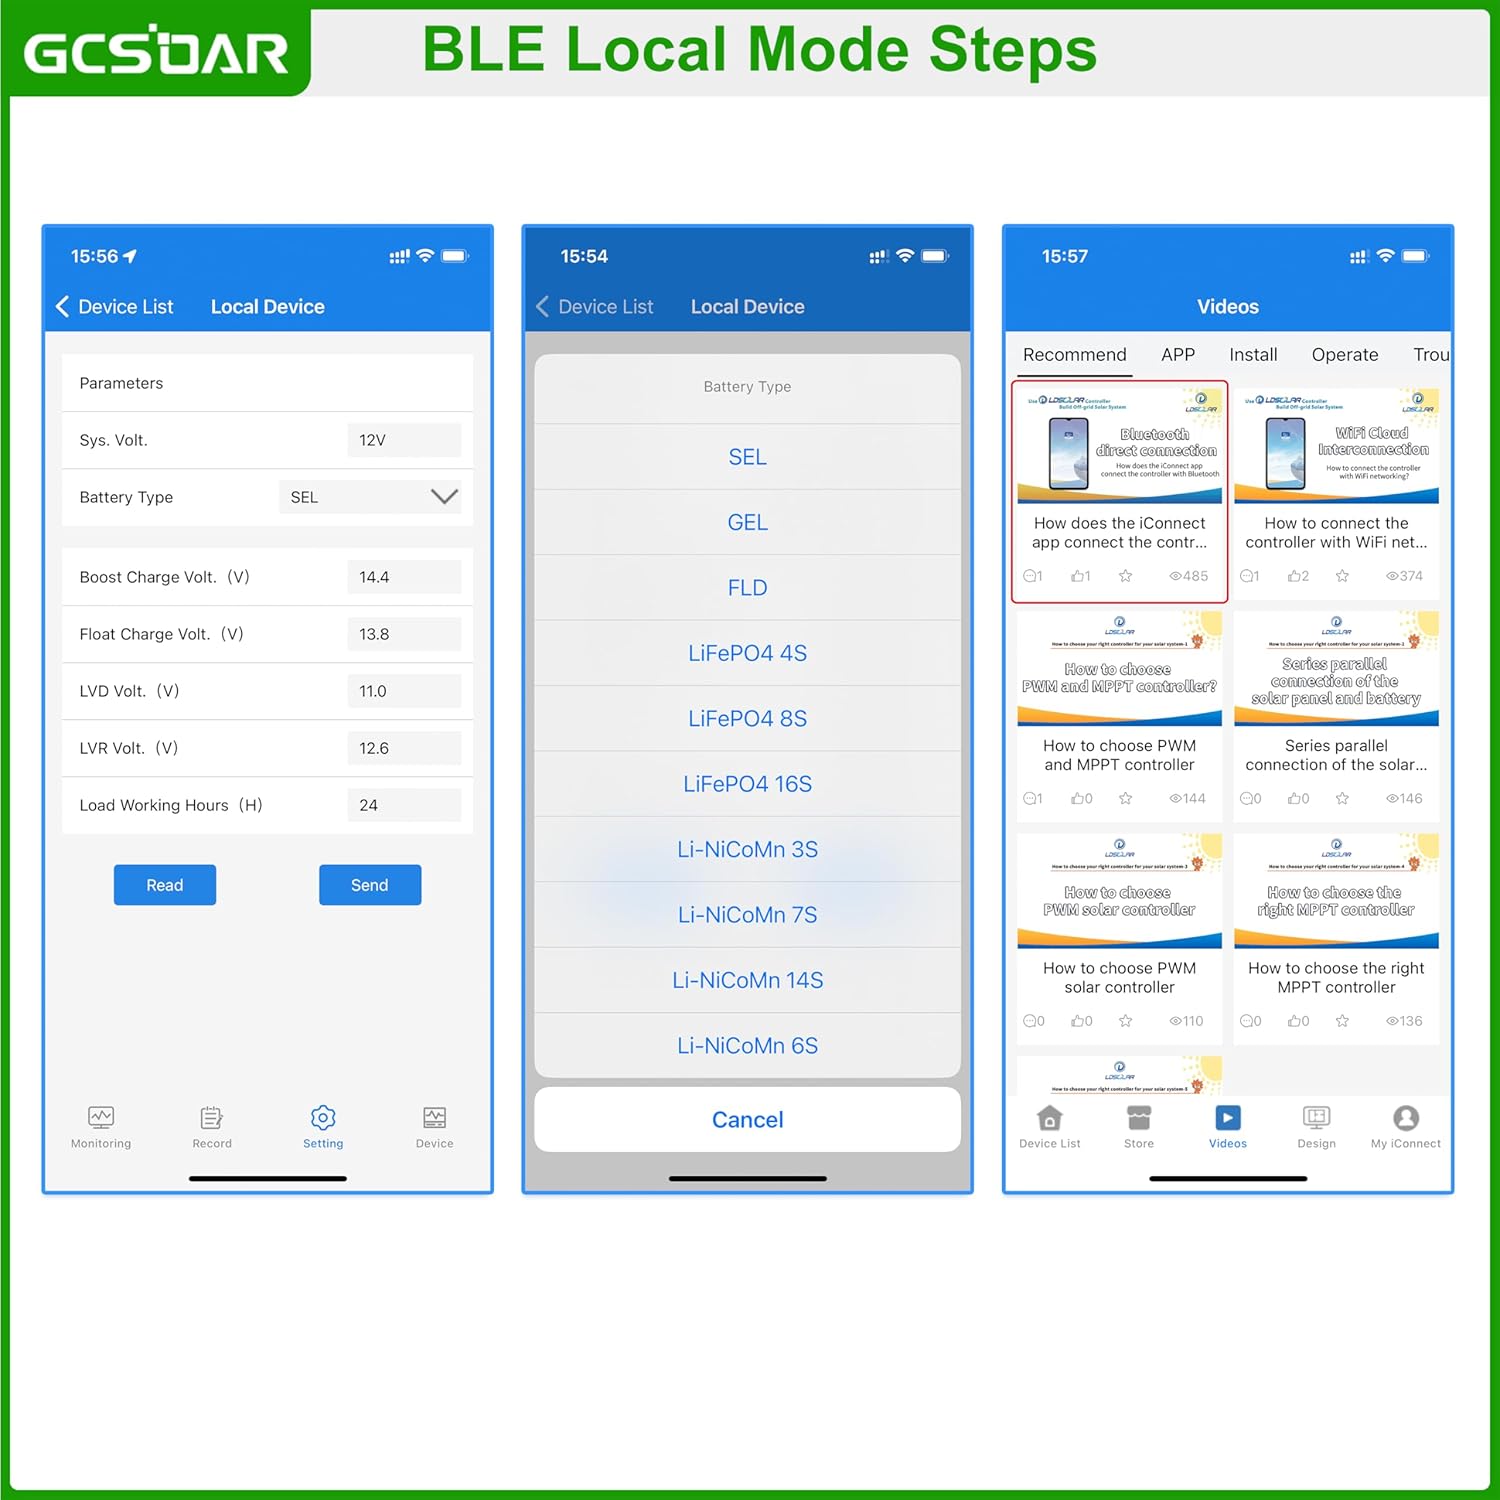
Figure 7: iConnect App settings interface, including options for selecting battery type and adjusting charging parameters.
5.3 Battery Type Settings
The controller supports various battery types. It is crucial to select the correct battery type in the iConnect App settings to ensure proper charging and prolong battery life.
- Lead-acid: Gel (AGM), Deep Cycle, Sealed, Flooded
- Lithium-ion: LiFePO4 (4S/8S), Li(NiCoMn)O2 (3S/6S/7S)
- User-defined settings are also available for custom battery configurations.
Video 1: GCSOAR MPPT Solar Charge Controller APP Operation by Bluetooth. This video demonstrates how to connect and operate the controller using the iConnect mobile application via Bluetooth, including monitoring and setting parameters.
6. Specifications
The following table outlines the electrical and physical specifications for the GCSOAR MPPT Solar Charge Controller TD2307 (30A model).

Figure 8: Table of electrical parameters for GCSOAR MPPT Solar Charge Controllers, including the TD2307 model.
| Parameter | Value (TD2307) |
|---|---|
| Model | TD2307 |
| Battery System Voltage | 12V/24V Auto |
| PV Max Input Voltage | 75V (at min. operating temp), 70V (at 25°C) |
| MPP Voltage Range | (Vbat+2V)~65V |
| PV Max Input Power | 12V 390W / 24V 780W |
| Max Charging Current | 30A |
| Max Discharging Current | 30A |
| USB Output | DC 5V/2A |
| Product Dimensions | 8.07 x 6.18 x 2.09 inches (205mm x 157mm x 53mm) |
| Item Weight | 2.5 pounds (1.2 KG) |
| Operating Temperature | -20°C to +50°C |
| Waterproof Grade | IP32 |
7. Maintenance
Regular maintenance ensures optimal performance and longevity of your solar charge controller:
- Cleanliness: Keep the controller clean and free from dust and debris. Use a dry cloth for cleaning.
- Ventilation: Ensure adequate airflow around the controller to prevent overheating. Do not block ventilation openings.
- Connections: Periodically check all wiring connections for tightness and corrosion. Loose connections can cause power loss or overheating.
- Firmware Updates: Check the iConnect App regularly for any available firmware updates to ensure your controller has the latest features and bug fixes.
8. Troubleshooting
If you encounter issues with your GCSOAR MPPT Solar Charge Controller, refer to the following common problems and solutions:
- No Display/Power:
- Check battery connections and ensure they are secure and correctly polarized.
- Verify battery voltage is within the operating range (12V/24V).
- No Charging from PV:
- Ensure solar panels are connected correctly and receiving sufficient sunlight.
- Check PV input voltage in the app or on the display; it should be higher than battery voltage.
- Verify PV Max Input Voltage (75V) is not exceeded.
- Bluetooth Connection Issues:
- Ensure Bluetooth is enabled on your smartphone.
- Restart the iConnect App and try reconnecting.
- Make sure the controller is powered on and within Bluetooth range.
- Incorrect Charging Parameters:
- Verify the correct battery type is selected in the iConnect App settings.
- Adjust custom charging voltages if using a user-defined battery type.
9. Warranty and Support
GCSOAR products are designed for reliability and performance. For warranty information, technical assistance, or customer support, please refer to the contact details provided with your product packaging or visit the official GCSOAR website.
GCSOAR offers free technical assistance through their assistance centers in Chicago (USA), Munich (Germany), Toronto (Canada), and Melbourne (Australia).
Ask a question about this manual
Ask about setup, troubleshooting, compatibility, parts, safety, or missing instructions. Manuals+ will review the question and use this page’s manual context to help answer it.