Introduction
Thank you for choosing the AWESAFE Android 13 Car Stereo. This manual provides detailed instructions for the installation, operation, and maintenance of your new car stereo system. Please read this manual thoroughly before installation and use to ensure proper functionality and safety.
Vehicle Compatibility
This AWESAFE Android 13 Car Stereo is compatible with the following vehicle models:
- For GMC: Sierra (2007-2013), Savana (2008-2019), Yukon (2007-2014), Acadia (2007-2012)
- For Chevy: Silverado 1500HD 2500HD 3500HD (2007-2013) (Second Generation), Tahoe (2007-2014) (Second Generation), Equinox (2005-2009) (First Generation), Suburban (2007-2012) (Tenth Generation), Avalanche (2007-2013), Express Van (2008-2019), Impala (2006-2013)
- For Buick: Enclave (2008-2012)
Note: Please verify your car's model year and dashboard shape before purchasing to ensure proper fitment.
Package Contents
The package includes the following items:
- AWESAFE Android 13 Car Stereo Head Unit
- Power Cable
- RCA Cable
- GPS Antenna
- USB Cables (4-pin and 6-pin)
- Microphone
- Backup Camera
- CANBUS Decoder
- Trim Tool
- User Manual
- Wiring Diagram

Figure 1: All components included in the AWESAFE car stereo package.
Safety Information
Always prioritize safety during installation and operation. Improper installation can lead to vehicle damage or personal injury. If you are unsure about any step, consult a qualified professional.
- Disconnect the vehicle's battery before starting installation.
- Ensure all wiring is correctly connected to prevent short circuits or electrical damage.
- Do not operate the device in a way that distracts you from driving.
- Keep the volume at a safe level to hear external traffic sounds.
- Avoid blocking airbags or other safety features during installation.
Installation Guide
The installation process involves removing the original radio, connecting the new unit, and securing it. Refer to the detailed video tutorial and wiring diagrams for visual guidance.
1. Preparation
- Ensure the vehicle is turned off and the parking brake is engaged.
- Disconnect the negative terminal of the car battery to prevent electrical shorts.
- Gather all necessary tools, including the provided trim tool and screwdrivers.
2. Removing the Original Radio and Climate Control Unit
Carefully use the trim tool to pry off the plastic decorative strip around the radio. Remove the four screws securing the original radio. Gently pull out the radio and disconnect the three plugs behind it. Then, remove the climate control unit from the original radio assembly.

Figure 2: Before and After Installation of the AWESAFE Car Stereo.
Video 1: Product Introduction Before Installation. This video demonstrates the components and initial steps of preparing the unit for installation.
Video 2: Detailed Installation Guide for Chevy Silverado. This video provides a comprehensive step-by-step walkthrough of the installation process.
3. Installing the New Radio Trim and Wiring
Install the climate control unit into the new radio trim. Connect all necessary wiring harnesses, including the power cable, RCA cables, GPS antenna, USB cables, and microphone. Ensure all connections are secure. If your vehicle has a Bose sound system, you may need a fiber optic box (B0F9K58LXD) for compatibility.

Figure 3: Wiring Diagram for the AWESAFE Car Stereo.
- Steering Wheel Control (SWC): Connect the CANBUS and 8-pin extend cable to enable original steering wheel control functionality.
- Microphone: Install the external microphone for clear hands-free calls.
- USB Cables: Connect the 4-pin and 6-pin USB cables for data transfer and charging.
- GPS Antenna: Securely install the GPS antenna for accurate navigation.
- Backup Camera: Connect the HD rear camera video input (if included) for convenient reversing and parking.
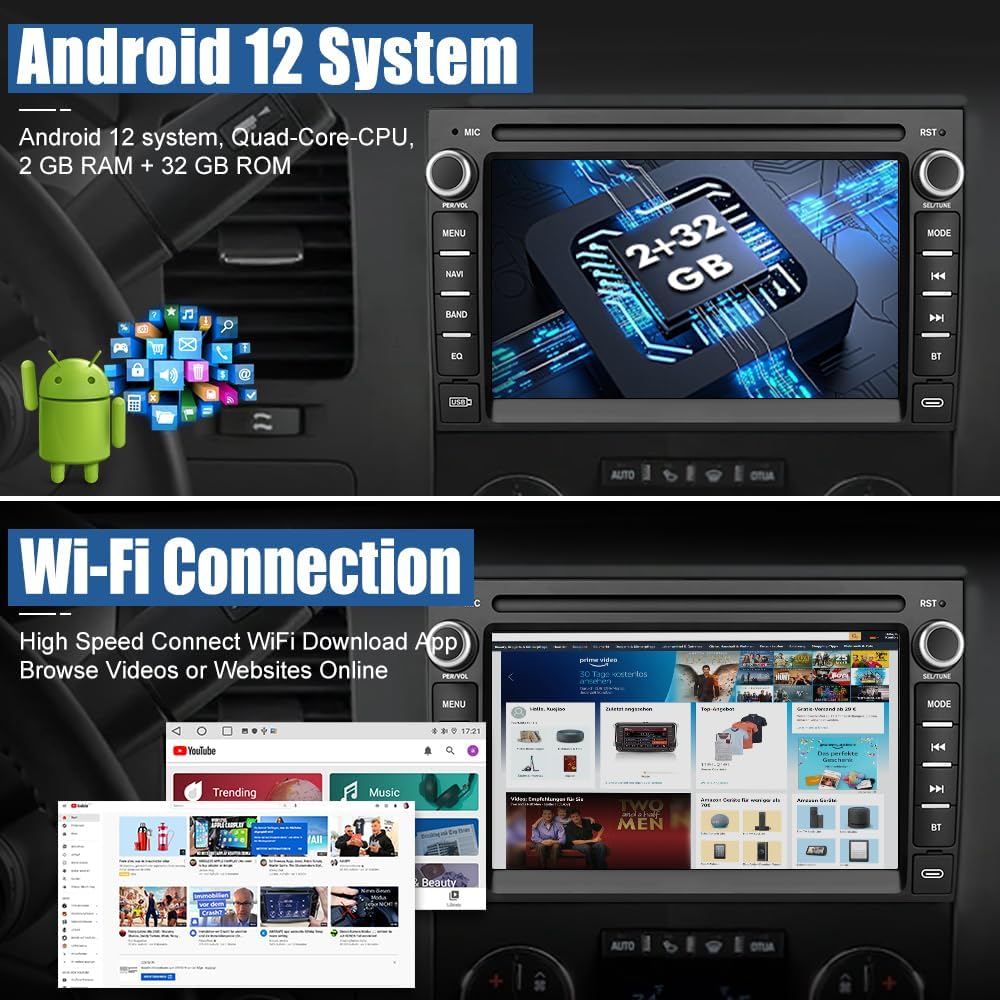
Figure 4: Steering Wheel Control setup interface.
After all connections are made, carefully reinsert the new car stereo unit into the dashboard opening and secure it with screws. Reattach the plastic trim pieces.
Operating Instructions
1. Android 13 System Overview
The car stereo runs on Android 13 with 2GB RAM and 32GB ROM, providing a smooth and responsive user experience. Access various applications from the home screen, similar to a smartphone.

Figure 5: Android 13 Home Screen and System Information.
2. Wireless CarPlay & Android Auto
The unit supports both wireless CarPlay and Android Auto. Connect your smartphone to access navigation, music, calls, and messages via voice control or the touch screen.
- Wireless CarPlay: Open the Zlink5 app on the stereo, confirm the Bluetooth name, turn on Bluetooth on your iPhone, pair with "Car BT", and allow contacts sync. After successful connection, you can use online maps and listen to music.
- Wireless Android Auto: Open the Zlink5 app, confirm the Bluetooth name, turn on Bluetooth on your Android phone, pair with "Car BT", and connect to the device's Wi-Fi hotspot. After successful connection, you can use online maps and listen to music.

Figure 6: Wireless CarPlay and Android Auto interfaces.
Video 3: How to Connect Wireless CarPlay. This video demonstrates the steps for connecting your iPhone to the car stereo via wireless CarPlay.
Video 4: How to Connect Wireless Android Auto. This video demonstrates the steps for connecting your Android phone to the car stereo via wireless Android Auto.
3. GPS Navigation & Wi-Fi Connection
The unit comes with a built-in offline map of North America. Connect to Wi-Fi to use online navigation apps and download other Android applications from the Play Store.
Figure 7: GPS Navigation interface.
4. Bluetooth & FM Radio
Utilize Bluetooth for hands-free calling, phonebook synchronization, and mobile music streaming. The built-in microphone ensures clear communication. The FM radio allows you to listen to real-time traffic, news, and weather forecasts.

Figure 8: FM Radio and Bluetooth Call Interface.
5. HD Backup Camera
The system supports HD rear camera video input, making reversing and parking safer and more convenient. The backup camera provides a wide-angle view with parking guidelines.

Figure 9: Backup Camera Functionality.
6. Digital Sound Processor (DSP) and Split Screen
Enhance your audio experience with the built-in DSP, offering various sound effects and equalization options. The split-screen function allows you to run two applications simultaneously, such as navigation and music playback.


Figure 10: DSP and Split Screen Features.
Maintenance
- Keep the screen clean using a soft, dry cloth. Avoid abrasive cleaners.
- Ensure all cables are securely connected and free from damage.
- Regularly check for software updates to ensure optimal performance and access to new features.
- Avoid exposing the unit to extreme temperatures or direct sunlight for prolonged periods.
Troubleshooting
| Problem | Possible Solution |
|---|---|
| Unit does not power on. | Check all power connections. Ensure the vehicle battery is connected and charged. Verify fuses. |
| No sound from speakers. | Check speaker wiring connections. Ensure volume is not muted or set too low. If your car has an amplifier or Bose system, ensure the correct wiring or fiber optic box is installed. |
| Bluetooth/CarPlay/Android Auto not connecting. | Ensure Bluetooth and Wi-Fi are enabled on both the stereo and your smartphone. Try restarting both devices. Verify correct pairing procedure. |
| GPS signal is weak or inaccurate. | Ensure the GPS antenna is correctly installed and has a clear view of the sky. Check antenna connection. |
| Steering wheel controls not working. | Verify CANBUS and steering wheel control wiring. Perform the steering wheel control learning procedure in the unit's settings. |
Specifications
| Feature | Detail |
|---|---|
| Operating System | Android 13 |
| RAM | 2GB |
| ROM | 32GB |
| Display Size | 7 Inches |
| Resolution | 1024 x 600 |
| Connectivity | Wi-Fi, Bluetooth |
| Navigation | Built-in Offline Map (North America), Online Map Support |
| Special Features | Wireless CarPlay, Android Auto, Built-In WiFi, DSP, Split Screen, HD Backup Camera Support, Steering Wheel Control |
| Item Weight | 2.64 pounds |
| Product Dimensions | 9.4 x 5.3 x 3 inches |
Warranty and Support
This AWESAFE product comes with a 1-year warranty from the date of purchase.
For technical assistance, troubleshooting, or warranty claims, please contact AWESAFE customer support:
- Email: us.support@awesafeinc.com
- Online Service: 24 Hours Online Service is available to assist with any issues.

Figure 11: AWESAFE Customer Support.


