1. Introduction
This manual provides essential information for the safe and efficient operation, installation, and maintenance of your TECHTONGDA Desktop Refrigerated Cake Display Cabinet, Model GS-DGG1. Please read this manual thoroughly before using the appliance and retain it for future reference. This display cabinet is designed for commercial use in bakeries, snack bars, cafes, buffets, and restaurants to refrigerate and display various items such as cakes, breads, fruits, and other perishable goods.
2. Safety Information
- Ensure the appliance is connected to a grounded 220V power outlet.
- Do not operate the appliance with a damaged power cord or plug.
- Keep ventilation openings clear of obstructions.
- Do not store explosive substances such as aerosol cans with a flammable propellant in this appliance.
- Only qualified personnel should perform repairs or maintenance.
- Unplug the unit before cleaning or performing any maintenance.
- Avoid placing hot items directly into the cabinet as this can affect internal temperature stability.
3. Product Overview
The TECHTONGDA GS-DGG1 is a desktop refrigerated display cabinet featuring an air-cooled, frost-free system, adjustable temperature control, and a demisting function for clear visibility. It includes LED lighting to enhance product presentation and a convenient rear sliding door for easy access.

Figure 3.1: Front view of the TECHTONGDA Desktop Refrigerated Cake Display Cabinet, showcasing its design and capacity for displaying various items like cakes and fruits.

Figure 3.2: Detailed dimensions of the display cabinet, indicating its width (35.4 inches), depth (20.1 inches), and height (34.6 inches), along with internal shelf spacing.

Figure 3.3: Illustration of the air-cooled, frost-free refrigeration system and the digital control panel for adjusting temperature between 35.6℉-46.4℉ (2℃-8℃).

Figure 3.4: Demonstration of the demist function, which uses an electric heating wire to prevent fogging on the front glass, ensuring clear product visibility.

Figure 3.5: View of the interior with built-in yellow LED lighting, designed to illuminate products attractively and enhance their visual appeal.
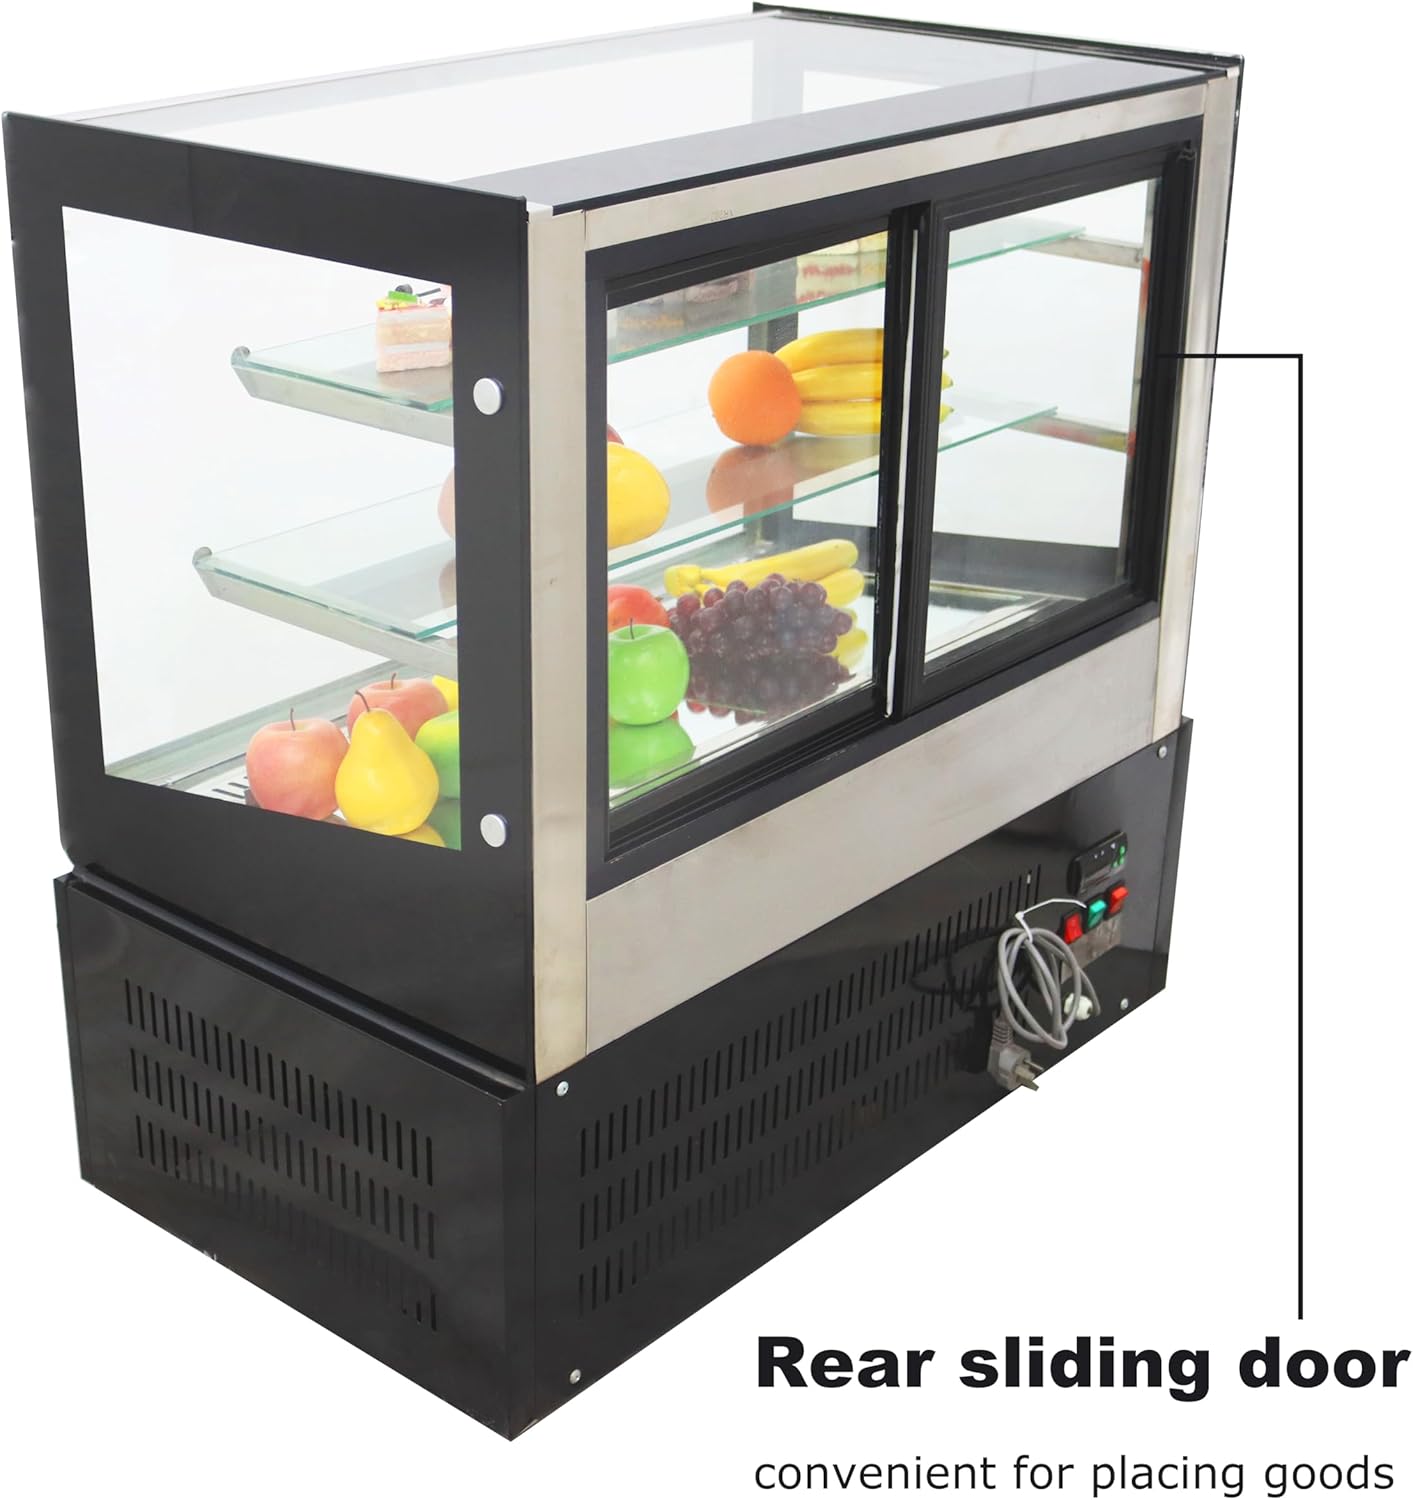
Figure 3.6: Image highlighting the rear sliding door, which provides convenient access for placing and retrieving items from the display cabinet.

Figure 3.7: Rear view of the display cabinet, showing the location of the control panel and power cord connection point.
4. Setup
- Unpacking: Carefully remove the display cabinet from its packaging. Inspect for any shipping damage.
- Placement: Place the unit on a stable, level countertop. Ensure there is adequate space (at least 4 inches) around the sides and rear for proper ventilation. Avoid direct sunlight or proximity to heat sources.
- Power Connection: Connect the power cord to a dedicated 220V, grounded electrical outlet. Do not use extension cords.
- Initial Cleaning: Before first use, clean the interior and exterior surfaces with a mild detergent and a soft cloth. Rinse and dry thoroughly.
- Initial Operation: After cleaning, allow the unit to stand upright for at least 2 hours before plugging it in to allow refrigerants to settle. Plug in the unit and allow it to run empty for 2-4 hours to reach the desired temperature before loading products.
5. Operating Instructions
- Power On/Off: The unit is powered on by plugging it into the electrical outlet. Use the power switch on the control panel (refer to Figure 3.3 or 3.7) to turn the refrigeration system on or off.
- Temperature Adjustment: The temperature can be adjusted via the digital control screen. The recommended operating temperature range is 35.6℉-46.4℉ (2℃-8℃). Consult the control panel's specific instructions for setting the desired temperature.
- Loading Products: Use the rear sliding door (refer to Figure 3.6) to place or retrieve items. This minimizes temperature fluctuations in the display area. Arrange products to allow for proper air circulation.
- Demisting Function: The demist function is typically activated automatically or can be manually controlled via the control panel. This feature uses an electric heating wire to keep the front glass clear of condensation.
- LED Light Operation: The internal LED yellow light can be switched on or off using a dedicated switch on the control panel to illuminate the displayed items.
6. Maintenance
- Daily Cleaning: Wipe down the interior and exterior surfaces, including glass panels, with a soft cloth and a mild, non-abrasive cleaner. Ensure no cleaning solution enters the electrical components.
- Shelf Cleaning: Remove shelves and clean them separately with warm, soapy water. Rinse and dry completely before returning them to the cabinet.
- Condenser Coil Cleaning: Periodically clean the condenser coils (located at the rear or bottom of the unit) to ensure efficient operation. Use a brush or vacuum cleaner to remove dust and debris. This should be done by a qualified technician if access is difficult.
- Door Seal Inspection: Regularly check the door seals for any signs of wear or damage. Damaged seals can lead to inefficient cooling and increased energy consumption.
- Frost-Free System: The unit features a frost-free system, minimizing the need for manual defrosting. However, ensure proper air circulation inside to prevent ice buildup.
7. Troubleshooting
| Problem | Possible Cause | Solution |
|---|---|---|
| Unit not cooling | Power supply issue; thermostat set too high; condenser coils dirty; door not sealed properly. | Check power connection; adjust thermostat; clean condenser coils; inspect and clean door seals. |
| Excessive fogging on glass | Demist function off or malfunctioning; high ambient humidity; door left open frequently. | Ensure demist function is active; reduce ambient humidity if possible; minimize door openings. |
| Unusual noise | Unit not level; fan obstruction; compressor issue. | Ensure unit is level; check for obstructions around fans; contact service if compressor noise persists. |
| LED light not working | Light switch off; LED bulb failure; electrical connection issue. | Check light switch; contact service for bulb replacement or electrical inspection. |
If problems persist after attempting these solutions, please contact TECHTONGDA customer support or a qualified service technician.
8. Specifications
| Parameter | Value |
|---|---|
| Model | GS-DGG1 |
| Brand | TECHTONGDA |
| Power | 255W |
| Voltage | 220V |
| Volume | 10.59 ft³ (0.3 m³) |
| Ambient Temperature Range | 35.6℉-46.4℉ (2℃-8℃) |
| Product Dimensions (W x D x H) | 35.4" x 20.1" x 34.6" (90 x 51 x 88 cm) |
| Configuration | Air-cooled |
| Defrost System | Frost Free |
| Installation Type | Countertop |
| Number of Doors | 2 (Rear Sliding Doors) |
| Color | Black |
9. Warranty and Support
For warranty information, technical support, or service inquiries regarding your TECHTONGDA Desktop Refrigerated Cake Display Cabinet Model GS-DGG1, please contact the manufacturer directly or refer to the purchase documentation. Ensure you have your model number (GS-DGG1) and purchase date available when contacting support.


