
1. Introduction
This manual provides detailed instructions for the installation, operation, and maintenance of your ADARONIC HD Backup Camera, Model HD01. This camera is designed to provide a clear, wide-angle view behind your vehicle, enhancing safety during reversing maneuvers.
Package Contents
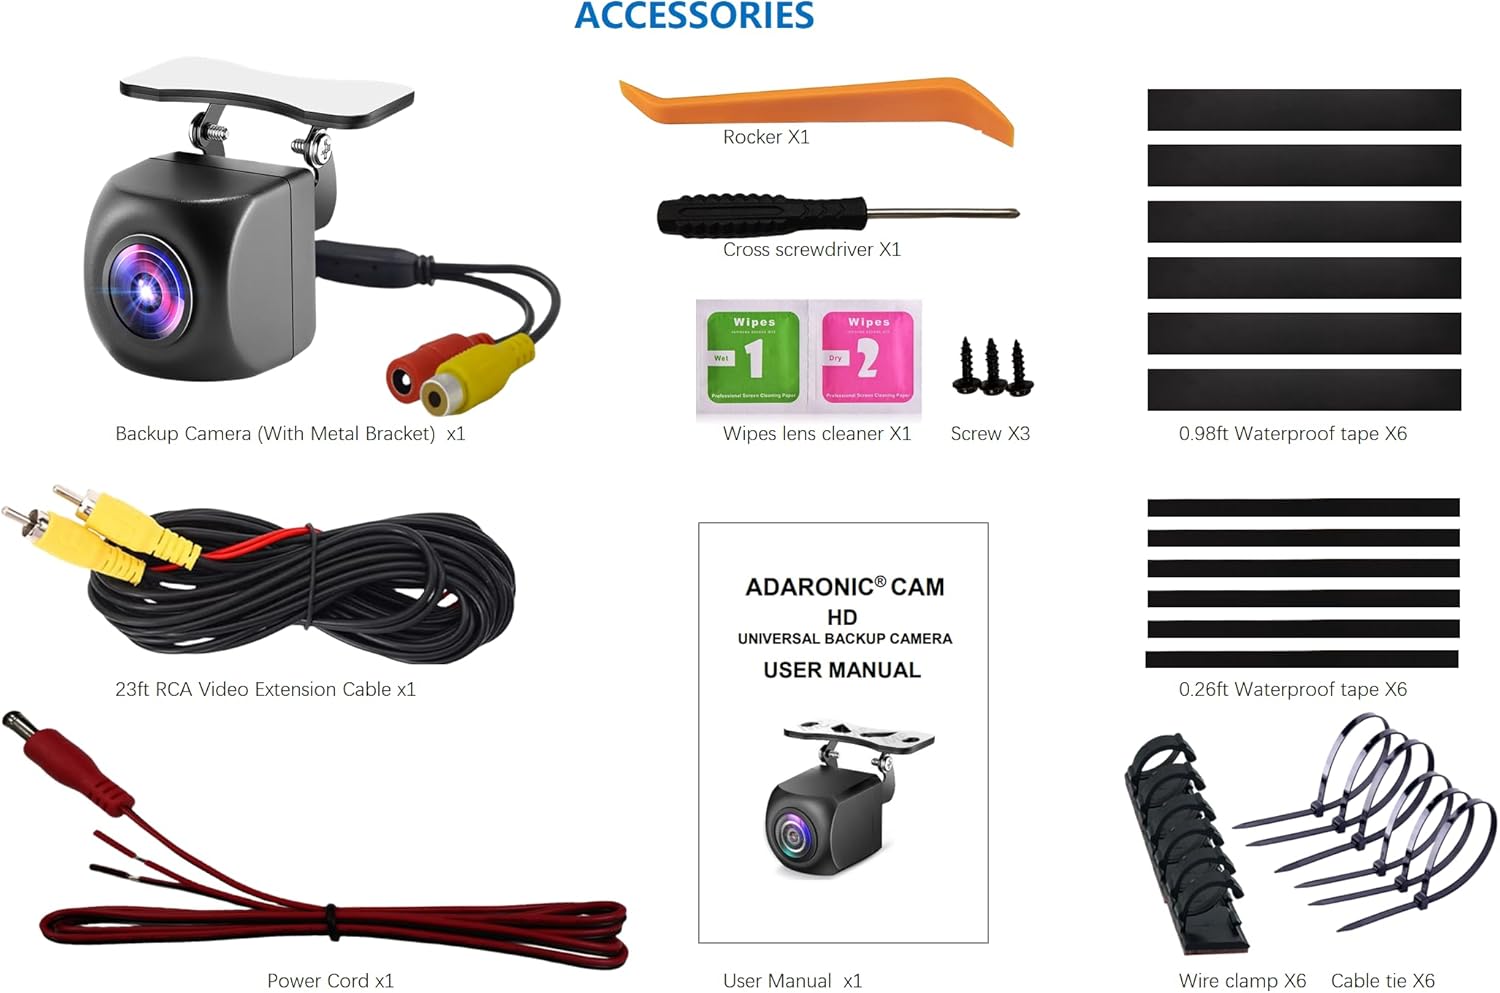
Please verify that all items listed below are included in your package:
- ADARONIC HD Backup Camera (with metal bracket) x1
- 23ft RCA Video Extension Cable x1
- Power Cord x1
- Rocker x1
- Cross screwdriver x1
- Wipes lens cleaner x1
- Screw x3
- 0.98ft Waterproof tape x6
- 0.26ft Waterproof tape x6
- Wire clamp x6
- Cable tie x6
- User Manual x1

2. Compatibility
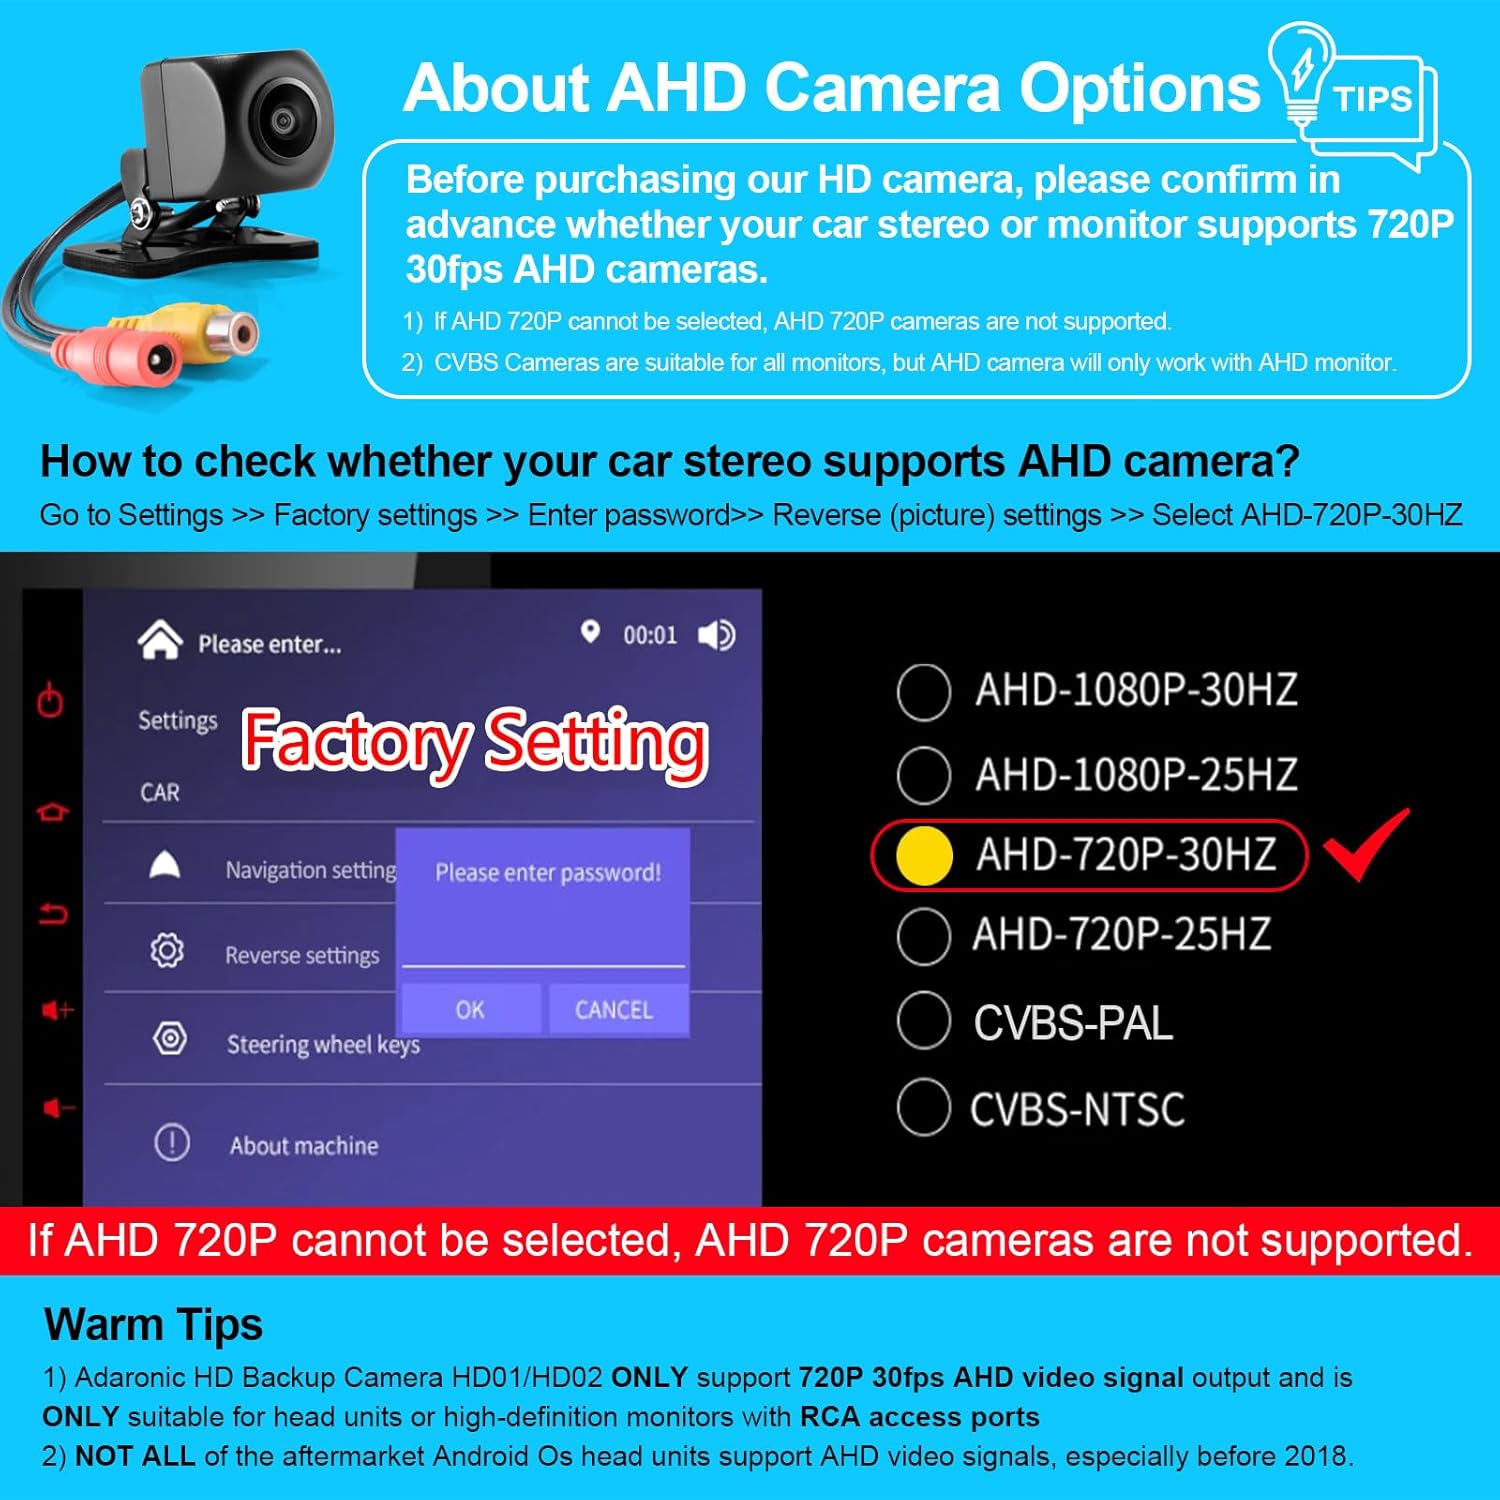
Important: This camera ONLY supports 720P 30fps AHD video signal output and is ONLY suitable for head units or high-definition monitors with RCA access ports. Before installation, please confirm whether your car stereo or monitor supports 720P 30fps AHD cameras.
Not all aftermarket Android OS head units support AHD video signals, especially those manufactured before 2018. If AHD 720P cannot be selected in your stereo's settings, AHD cameras are not supported.
How to Check for AHD Compatibility:
- Go to your car stereo's Settings.
- Navigate to Factory settings (you may need a password).
- Enter the password.
- Locate Reverse (picture) settings.
- Select AHD-720P-30HZ. If this option is not available, your stereo does not support this camera.
3. Installation
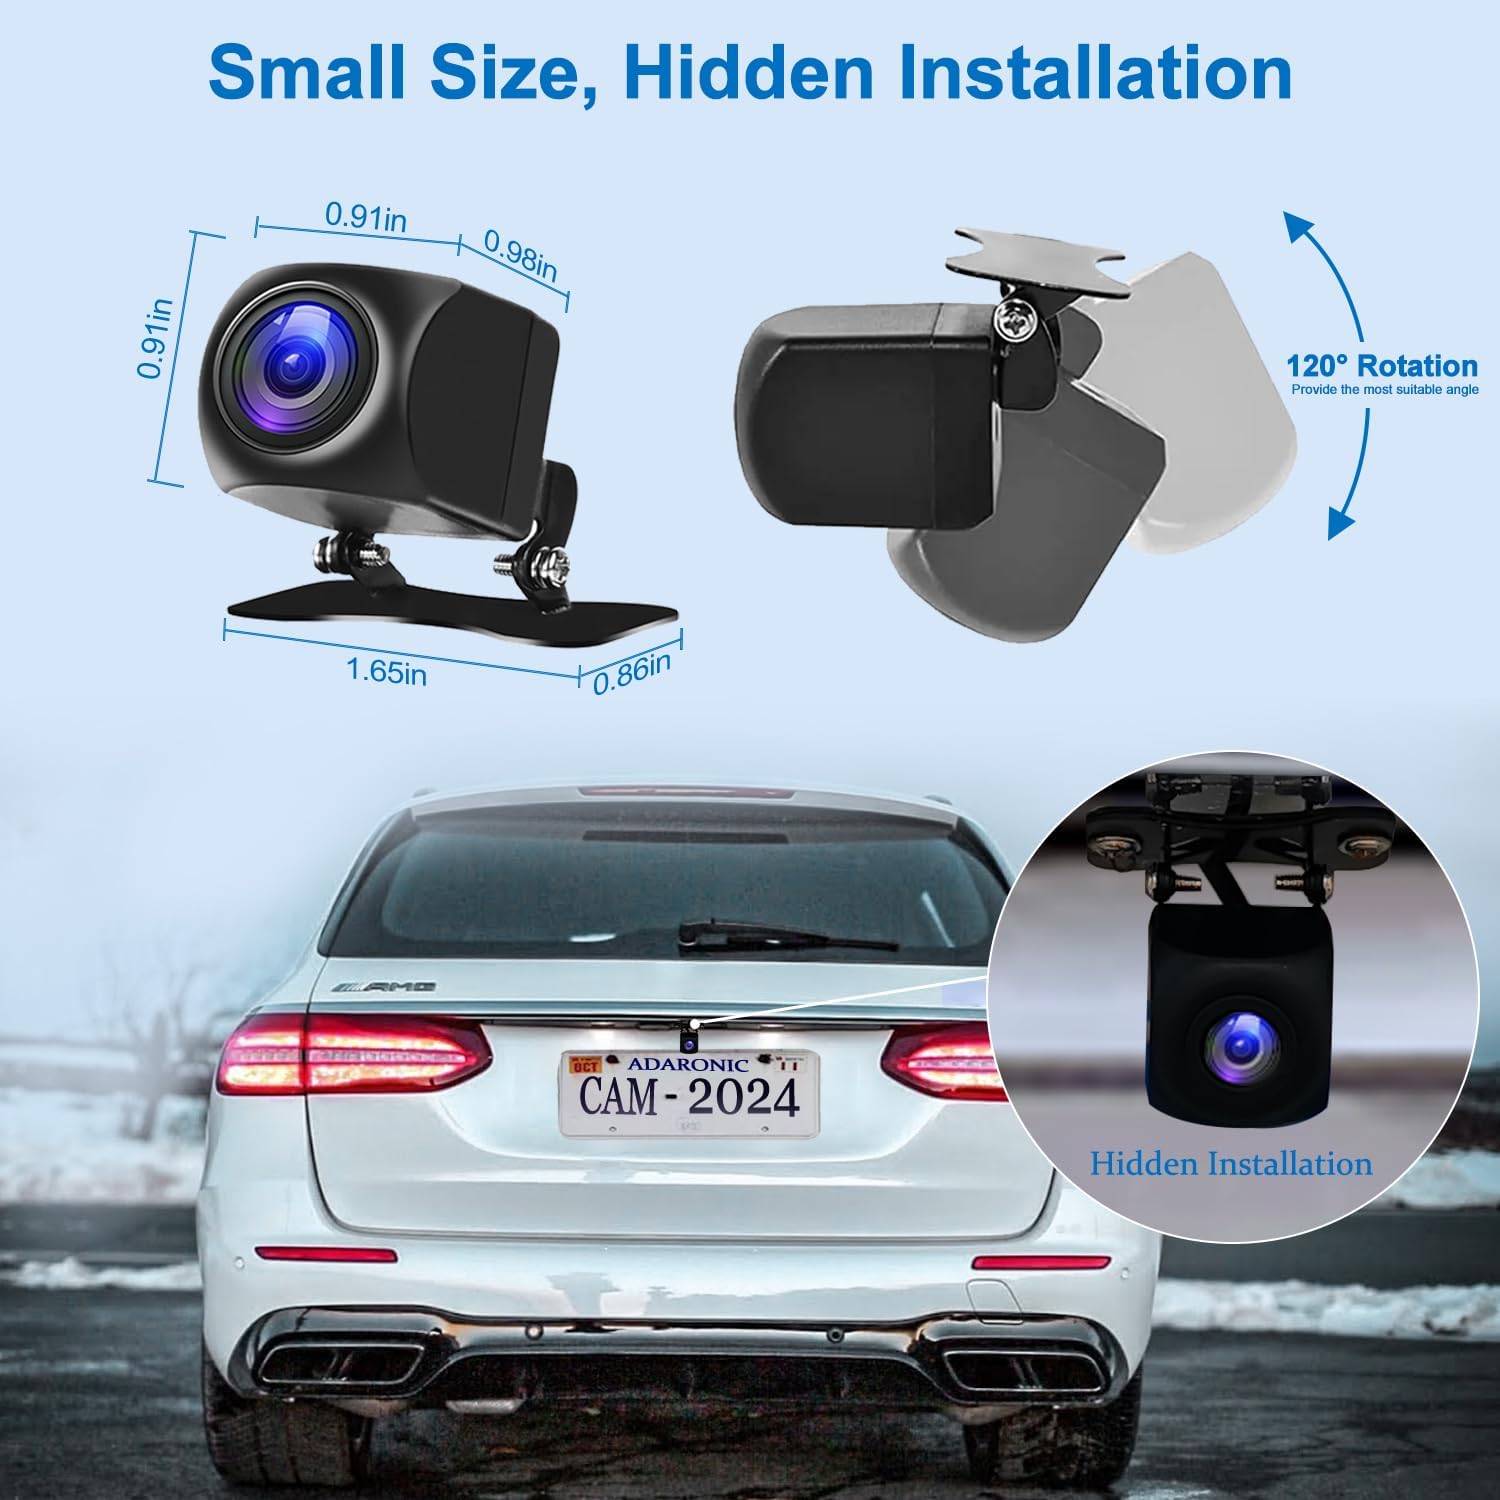
The ADARONIC HD Backup Camera is designed for universal application and can be installed on various vehicles including cars, pickups, SUVs, minivans, and off-road vehicles. It features a small size for hidden installation, typically near the license plate light.
Physical Installation
- Choose Location: Select a proper location to mount the backup camera, often near the license plate light for optimal rear visibility and discreet placement.
- Mount Camera: Drill holes as needed for the camera bracket. The size and distance of the holes may vary. Secure the camera using the provided screws. The camera offers 120° rotation for angle adjustment.
Wiring Instructions
Follow these steps to connect the camera to your vehicle's electrical system and display unit:
- Connect Power: Connect the camera's power wire to the reversing light circuit. The positive (red wire) connects to the reversing light positive (+DC 12V), and the negative (black wire) connects to the reversing light negative (-) or ground.
- Connect Video Cable: Connect the RCA port of the backup camera to the video extension cable.
- Route Video Cable: Lead the video extension cable to the navigation screen or head unit monitor in the front of the vehicle.
- Connect to Head Unit: Connect the yellow RCA port of the video extension cable to the head unit's video input.
- Trigger Wire (Optional): If your vehicle's monitor has a trigger wire, connect it to the reversing light positive. If not, the red trigger wire can be ignored.
4. Operation
Once properly installed and connected, the ADARONIC HD Backup Camera will automatically activate when the vehicle is shifted into reverse gear, displaying the rear view on your compatible monitor.
Key Features:
- Wide View Angle: The camera provides an adjustable 160° horizontal viewing angle, allowing for a broad perspective of the area behind your vehicle. This helps in reducing blind spots and improving situational awareness during reversing.
- Super Night Vision: Equipped with a high-transmittance lens and a large, high-sensitivity CMOS chip, the camera delivers clear images even in low-light conditions or at night.
- AHD Video Signal: The camera outputs a 720P 30fps AHD video signal, ensuring a high-definition image on compatible displays.


5. Maintenance
To ensure optimal performance and longevity of your ADARONIC HD Backup Camera, follow these maintenance guidelines:
- Lens Cleaning: Regularly clean the camera lens using a soft, lint-free cloth. For stubborn dirt or smudges, use the provided lens cleaner wipes or a mild, non-abrasive cleaning solution specifically designed for optical lenses. Avoid harsh chemicals that could damage the lens coating.
- Housing Inspection: Periodically check the camera housing and mounting bracket for any signs of damage, looseness, or corrosion. Ensure all screws are tight and the camera is securely positioned.
- Cable Integrity: Inspect the video and power cables for any cuts, pinches, or fraying. Ensure all connections remain secure and free from moisture.
- Weather Protection: While the camera is designed to be waterproof, extreme weather conditions (e.g., heavy snow, ice, prolonged direct sunlight) can still affect its performance or lifespan. Ensure the camera is not obstructed by snow or ice before driving.
6. Troubleshooting
If you encounter issues with your ADARONIC HD Backup Camera, refer to the following troubleshooting steps:
No Image or Black Screen
- Check Compatibility: Reconfirm that your car stereo or monitor explicitly supports 720P 30fps AHD video signals. Refer to Section 2: Compatibility.
- Verify Connections: Ensure all power and video RCA cables are securely connected. Check for any loose connections at both the camera and the head unit.
- Power Supply: Confirm that the camera is receiving 12V DC power when the vehicle is in reverse. Use a multimeter to check the voltage at the camera's power input.
- Trigger Wire: If your head unit uses a trigger wire to activate the backup camera input, ensure it is correctly connected to the reversing light circuit.
- Head Unit Input: Ensure the head unit is set to the correct video input channel for the backup camera.
Flickering or Distorted Image
- Cable Interference: Ensure the video cable is not routed too close to high-voltage wires or other sources of electrical interference.
- Ground Connection: A poor ground connection can cause image distortion. Verify that the camera's ground wire is securely connected to a clean, unpainted metal surface on the vehicle chassis.
- Power Fluctuations: Check the vehicle's electrical system for stable 12V power.
Poor Night Vision
- Clean Lens: Ensure the camera lens is clean and free from dirt, dust, or moisture, which can significantly impair night vision performance.
- Ambient Light: While the camera has super night vision, extremely dark environments with no ambient light may still result in limited visibility.
If these steps do not resolve the issue, please contact ADARONIC customer support for further assistance.
7. Specifications
| Feature | Specification |
|---|---|
| Model | HD01 |
| Video Signal | AHD 720P 30fps |
| Optical Sensor Technology | CMOS |
| Real Angle of View | 160 Degrees |
| Lens Type | Wide Angle |
| Voltage | 12 Volts (DC) |
| Connector Type | RCA |
| Installation Type | Surface Mount |
| Compatible Devices | Monitor (AHD 720P compatible) |
| Product Dimensions | 0.93 x 0.93 x 0.98 inches (2.36 x 2.36 x 2.49 cm) |
| Item Weight | 7.8 ounces (221 grams) |
8. Warranty and Support
Specific warranty information for the ADARONIC HD Backup Camera (Model HD01) is not provided in this manual. For details regarding warranty coverage, terms, and conditions, please refer to the product packaging or contact ADARONIC customer support directly.
For technical assistance, troubleshooting beyond the scope of this manual, or to inquire about replacement parts, please reach out to ADARONIC customer service through their official website or the contact information provided with your purchase.
