
1. Safety Instructions
Please read all safety instructions carefully before using the EasyAcc Rotary Dehumidifier. Failure to follow these instructions may result in electric shock, fire, or serious injury.
- Always connect the dehumidifier to a grounded electrical outlet with the correct voltage.
- Do not operate the unit with a damaged power cord or plug. If the cord is damaged, it must be replaced by the manufacturer or a qualified service agent.
- Do not place the dehumidifier near heat sources, flammable materials, or in direct sunlight.
- Ensure adequate clearance around the unit (at least 20 cm / 8 inches) for proper airflow.
- Do not block the air inlet or outlet.
- Unplug the unit before cleaning, moving, or performing any maintenance.
- Do not immerse the unit, power cord, or plug in water or other liquids.
- This appliance is not intended for use by persons (including children) with reduced physical, sensory, or mental capabilities, or lack of experience and knowledge, unless they have been given supervision or instruction concerning use of the appliance by a person responsible for their safety.
- Children should be supervised to ensure that they do not play with the appliance.
- Empty the water tank regularly to prevent overflow and potential water damage.
- The unit features Tip-over Protection. If the unit tips over, it will emit a warning sound and shut off automatically. Place the unit on a stable, level surface.
2. Product Overview
The EasyAcc Rotary Dehumidifier is designed to efficiently remove excess moisture from the air in spaces up to 1000 sq.ft (92 m²), helping to prevent mold, mildew, and musty odors. It features advanced rotary dehumidification technology, quiet operation, and multiple convenient functions.
2.1 Main Components

Figure 2.1: Front view of the EasyAcc Rotary Dehumidifier. This image shows the overall design of the unit, including the air intake grille and the transparent water tank at the bottom.

Figure 2.2: Internal view illustrating the rotary dehumidification technology. This diagram highlights the warm air output and the internal mechanism responsible for moisture removal.
2.2 Control Panel
The control panel is located on the top of the unit and provides access to all functions. It features touch-sensitive buttons and indicator lights.

Figure 2.3: Detailed view of the EasyAcc Dehumidifier control panel. From left to right, the buttons are: On/Off, Timer (2H/4H/8H), Sleep Mode, Strong Mode. There is also an indicator light for when the water tank is full.
- On/Off Button: Powers the unit on or off. A 90-second shutdown sequence ensures complete power-off.
- Timer Button: Sets the operating time for 2, 4, or 8 hours.
- Sleep Mode Button: Activates low-speed, quiet operation (approx. 30dB).
- Strong Mode Button: Activates high-speed, maximum dehumidification (approx. 45dB).
- Water Full Indicator: Lights up red when the water tank is full, and the unit will automatically shut off.
3. Setup
3.1 Unpacking
- Carefully remove the dehumidifier from its packaging.
- Remove all packing materials, including any tape or protective films.
- Inspect the unit for any signs of damage. If damaged, do not operate and contact customer support.
3.2 Placement
Proper placement is essential for efficient operation and safety.
- Place the dehumidifier on a firm, level surface to prevent tipping.
- Ensure there is at least 20 cm (8 inches) of clear space around the air inlet and outlet for optimal airflow.
- Do not place the unit in a closet or other confined space where airflow is restricted.
- Avoid placing the unit near furniture or curtains that could obstruct airflow.
- For best results, operate the dehumidifier in an enclosed area. Close all doors and windows to the room where the unit is operating.
3.3 Power Connection
- Ensure the power cord is fully extended and not tangled.
- Plug the power cord into a suitable grounded electrical outlet.
3.4 Drainage Options
The EasyAcc Dehumidifier offers two drainage methods: manual emptying of the water tank or continuous drainage using the included hose.
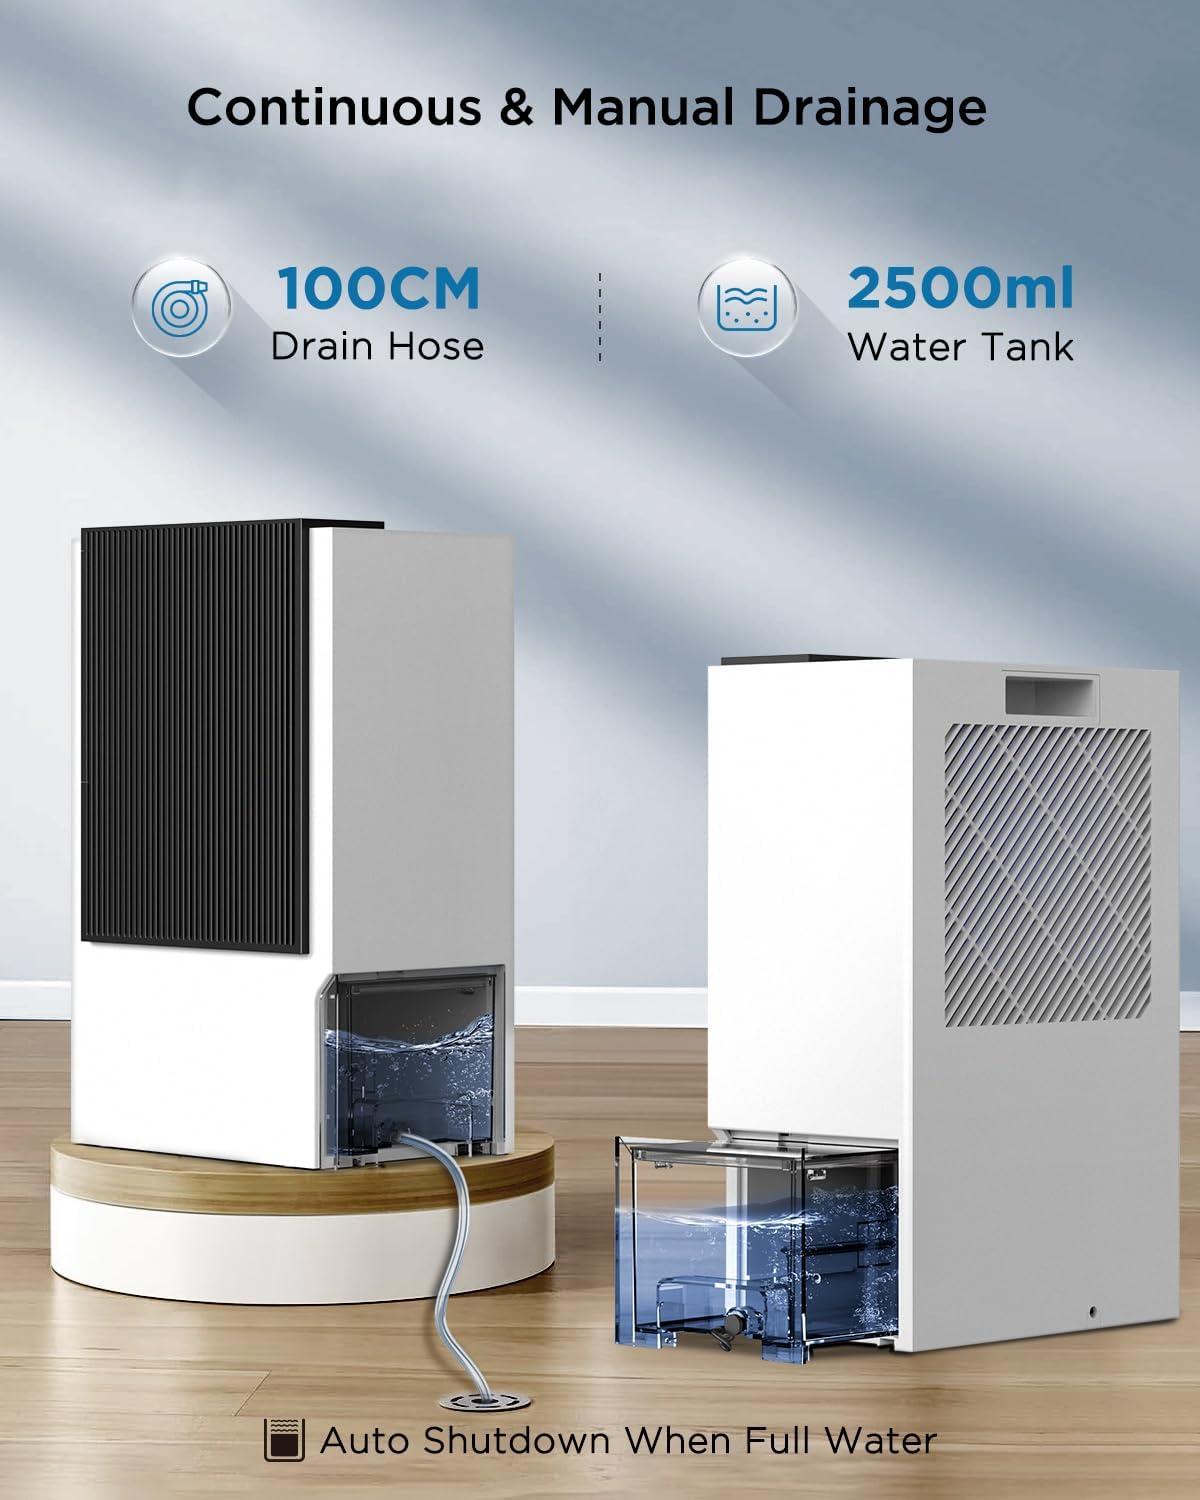
Figure 3.1: Illustration of the continuous drainage setup with the 100cm drain hose and the manual water tank. The unit automatically shuts down when the tank is full.
3.4.1 Manual Drainage (85 oz / 2.5L Water Tank)
- The unit will collect moisture in the integrated 85 oz (2.5L) water tank.
- When the tank is full, the "Water Full" indicator light will illuminate red, and the unit will automatically shut off.
- Carefully remove the water tank from the unit, empty the collected water, and then reinsert the tank securely. The unit will resume operation.
3.4.2 Continuous Drainage
- For continuous operation without needing to empty the tank, attach the included 100 cm (39 inch) drain hose.
- Locate the drain outlet on the back or side of the unit (refer to diagram in Figure 3.1).
- Connect one end of the drain hose to the outlet. Ensure a tight connection to prevent leaks.
- Route the other end of the hose to a suitable drain (e.g., floor drain, large bucket, sink). Ensure the hose is sloped downwards to allow gravity to drain the water. Do not allow the hose to be kinked or blocked.
4. Operation
4.1 Power On/Off
- To turn on the unit, press the On/Off button on the control panel.
- To turn off the unit, press the On/Off button again. The unit will enter a 90-second shutdown sequence before powering off completely.
4.2 Selecting Dehumidification Mode
The dehumidifier offers two operating modes to suit different needs:

Figure 4.1: Depiction of the two adjustable modes: High Speed Mode (45dB) and Low Speed Mode (30dB), suitable for different environments like living rooms or bedrooms.
- Strong Mode (High Speed): Press the Strong Mode button for maximum dehumidification. This mode operates at approximately 45dB and is ideal for quickly reducing humidity in larger or very damp areas.
- Sleep Mode (Low Speed): Press the Sleep Mode button for quieter operation. This mode operates at approximately 30dB, making it suitable for bedrooms or other areas where noise reduction is desired.
4.3 Timer Function
- Press the Timer button to set the desired operating duration.
- Each press cycles through 2 hours, 4 hours, 8 hours, and then off.
- The unit will automatically turn off after the set time has elapsed.
4.4 Auto Shut-Off
- The dehumidifier is equipped with an auto shut-off feature. When the water tank is full, the unit will automatically stop operating, and the "Water Full" indicator light will turn red.
- Empty the water tank and reinsert it securely to resume operation.
4.5 Drying Clothes Function
The dehumidifier can assist in drying clothes by circulating warm air.
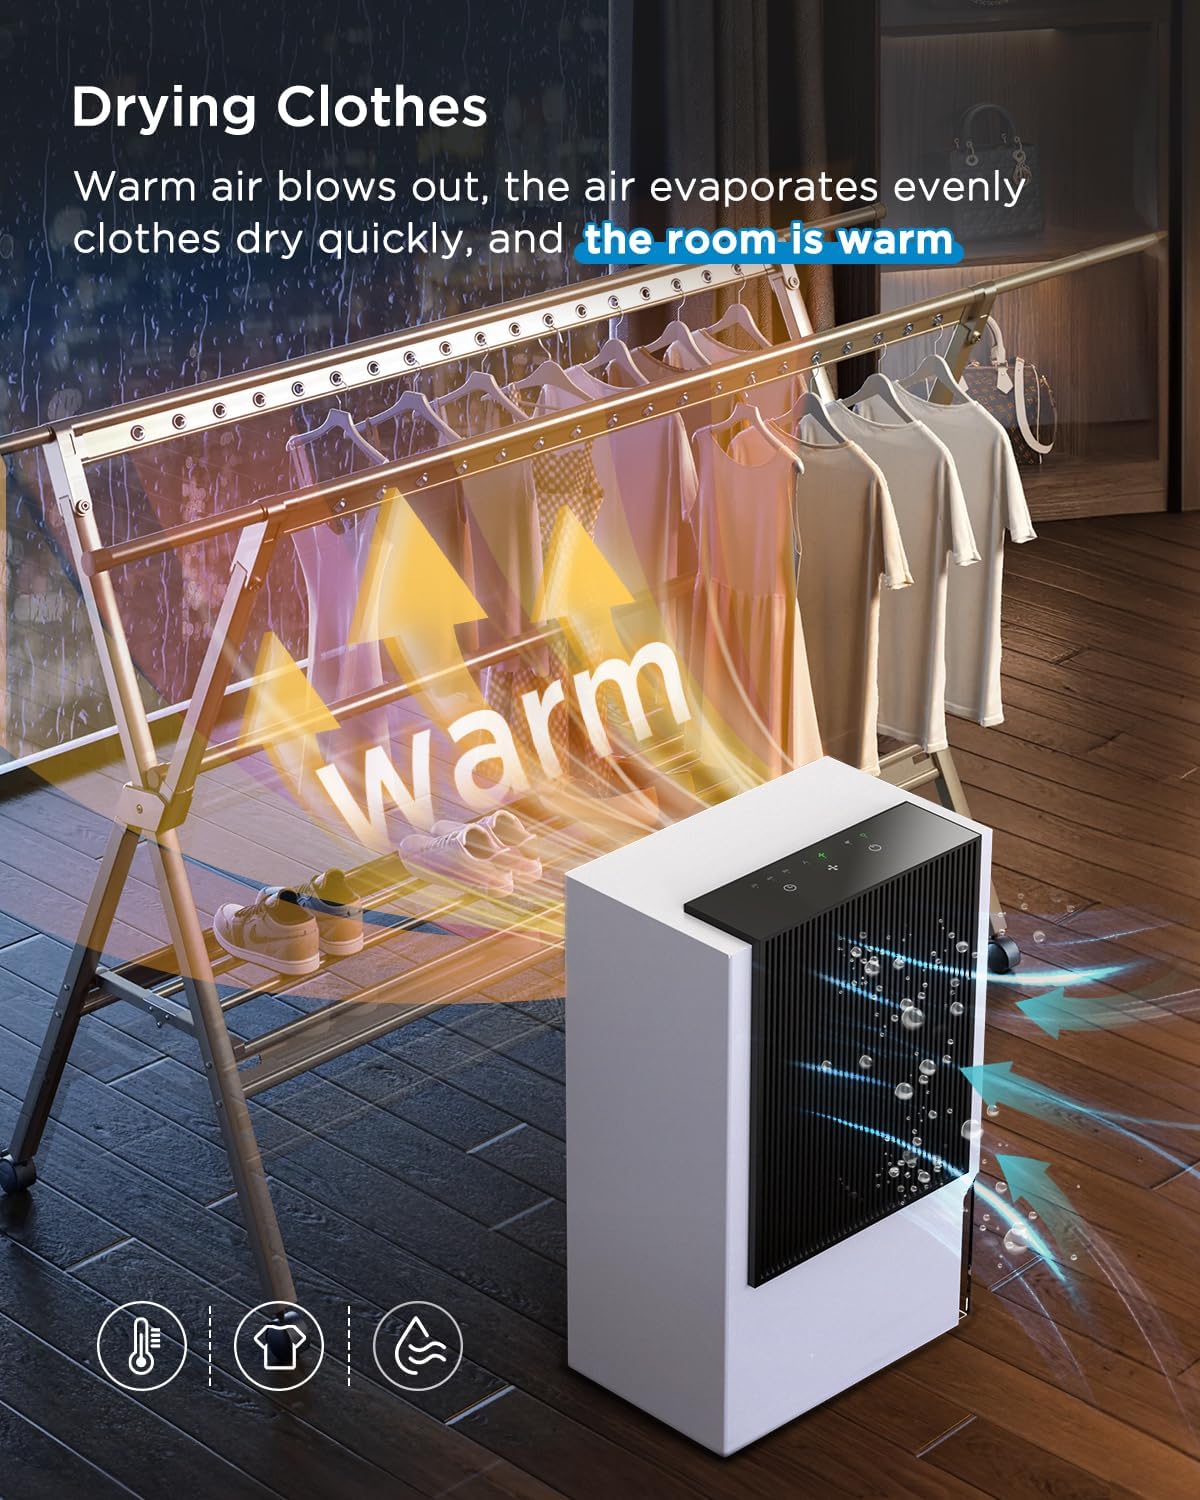
Figure 4.2: The dehumidifier positioned near a clothes rack, illustrating its ability to blow warm air to aid in drying clothes and warming the room.
- Place the dehumidifier in a well-ventilated room with clothes hanging to dry.
- Select the desired operating mode (Strong Mode is recommended for faster drying).
- The unit will emit warm air, which helps to evaporate moisture from clothes and contributes to warming the room.
5. Maintenance
Regular maintenance ensures optimal performance and extends the lifespan of your dehumidifier. Always unplug the unit before performing any cleaning or maintenance.
5.1 Cleaning the Water Tank
- Remove the water tank from the unit.
- Empty any collected water.
- Rinse the tank with clean water. For thorough cleaning, use a mild detergent and a soft brush, then rinse thoroughly.
- Ensure the tank is completely dry before reinserting it into the dehumidifier.
5.2 Cleaning the Air Filter
The dehumidifier is equipped with a detachable and washable air filter to prevent dust and debris from entering the unit.

Figure 5.1: Close-up view of the detachable and washable air filter, showing how it can be removed for cleaning.
- Locate the air filter on the unit (typically behind the air intake grille).
- Gently pull to detach the filter.
- Rinse the filter under running water to remove dust and debris. A soft brush can be used for stubborn dirt.
- Allow the filter to air dry completely before reinserting it. Do not use a dryer or direct heat.
- Reinsert the dry filter back into its position.
- Clean the filter every 2-4 weeks, or more frequently if the unit is used in a dusty environment.
5.3 Exterior Cleaning
- Wipe the exterior of the unit with a soft, damp cloth.
- Do not use abrasive cleaners, solvents, or harsh chemicals, as these can damage the surface.
- Ensure the unit is completely dry before plugging it back in.
6. Troubleshooting
Before contacting customer support, please refer to the following troubleshooting guide for common issues.
| Problem | Possible Cause | Solution |
|---|---|---|
| Unit does not turn on. |
|
|
| Dehumidifier is not collecting water effectively. |
|
|
| Unit is leaking water. |
|
|
| Unit makes unusual noise. |
|
|
7. Specifications
| Feature | Detail |
|---|---|
| Brand | EasyAcc |
| Model Name | CSZLX2US |
| Color | White |
| Dehumidification Capacity | Up to 3 Liters per Day (approx. 100 oz) |
| Coverage Area | Up to 1000 sq.ft (92 m²) |
| Water Tank Volume | 85 Fluid Ounces (approx. 2.5 Liters) |
| Operation Modes | 2 (Strong Mode, Sleep Mode) |
| Noise Level | Approx. 30dB (Sleep Mode), 45dB (Strong Mode) |
| Wattage | 2500 watts |
| Operation Mode | Automatic |
| Upper Temperature Rating | 40 Degrees Celsius |
| Low Temperature Operation | Works normally at 0°C to -50°C |
| Product Dimensions (L x W x H) | 7.72 x 12.99 x 17.72 inches |
| Item Weight | 9.13 pounds |
| Drain Hose Length | 100 cm (approx. 39 inches) |
Note: Specifications are subject to change without notice.
8. Warranty & Customer Support
For information regarding the product warranty, please refer to the warranty card included with your purchase or visit the official EasyAcc website.
If you encounter any issues that cannot be resolved using the troubleshooting guide, or if you require further assistance, please contact EasyAcc customer support:
- Website: www.easyacc.com
- Email: support@easyacc.com
- Please have your model number (CSZLX2US) and purchase date ready when contacting support.