
1. Introduction
This manual provides detailed instructions for the installation, operation, and maintenance of your SCON 1.65FT/ 19.7in Recessed Magnetic Track Lighting Rail System. Please read this manual thoroughly before installation and use to ensure safe and efficient operation. This system is designed for flush-mount LED lamp heads and is intended for use at the end of a magnetic track lighting system.
2. Safety Information
- Electrical Safety: Installation must be performed by a qualified electrician in accordance with local electrical codes. Ensure power is disconnected at the circuit breaker before any installation or maintenance.
- Voltage Compatibility: This 24V track system requires a 24V DC power driver. Connecting to an incompatible voltage will damage the product and may pose a safety risk.
- Driver Capacity: The total power consumption of connected lights must not exceed 80% of the power driver's rated capacity. One driver can power up to 12 meters of total track length.
- Recessed Installation: This recessed track system requires installation before the ceiling is sealed. Ensure adequate space (minimum 60mm depth) for the track and wiring.
- Indoor Use Only: This product is designed for indoor use only and is not water resistant.
- Low Voltage Safety: The system operates at a safe 24V DC, allowing for safe handling of lamp heads even when powered.
3. Product Overview
The SCON Recessed Magnetic Track Lighting Rail System provides a flexible and modern lighting solution. It features a 1.65ft (19.7in / 50cm) aluminum track designed for recessed installation. The system utilizes strong magnetic attraction for easy placement and adjustment of compatible SCON magnetic lamp heads.
Key Features:
- Length: 1.65ft / 19.7in / 50cm track rail.
- Material: Durable aluminum with an anodized finish.
- Voltage: 24V DC low-voltage operation.
- Conductive Wires: Upgraded built-in 4 gilt conductive wires for higher efficiency and compatibility with various dimming systems.
- Magnetic Attraction: Strong magnetic hold for secure and adjustable lamp head placement.
- Flexible Wings: Adjustable aircraft wings for compatibility with various drywall/plasterboard thicknesses.
- Safety: Operates at a safe voltage below 36V.
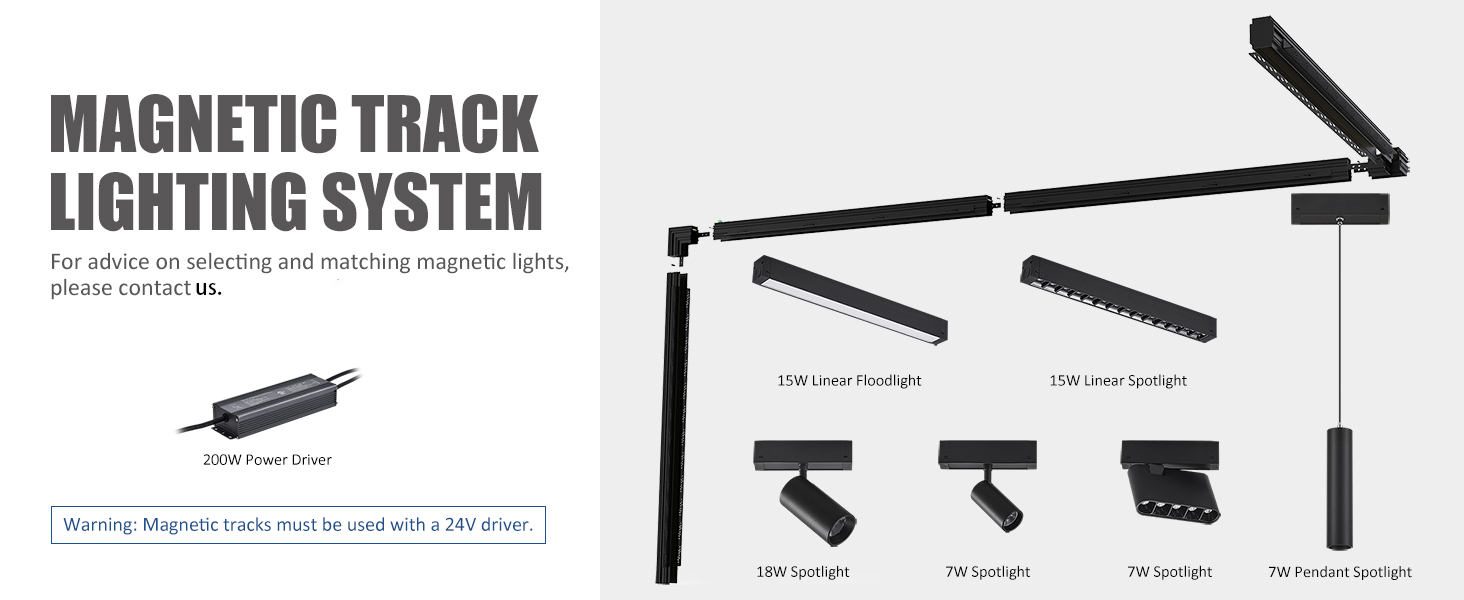
Image: SCON Magnetic Track Lighting System installed in a modern living room, showcasing various light heads.

Image: Diagram illustrating various components of the SCON Magnetic Track Lighting System, including different lamp heads and drivers.
4. Setup & Installation
Proper installation is crucial for the performance and safety of your magnetic track lighting system. Please follow these steps carefully.
4.1 Pre-Installation Considerations
- Ensure the ceiling is unfinished or accessible for recessed installation.
- Plan your track layout and mark the desired path on the ceiling.
- Confirm you have a compatible 24V DC power driver.
4.2 Track Slot Preparation
- According to your design path, make a slot in the ceiling that is 50 mm wide and 60 mm deep. This slot is for placing and securing the track.
- Ensure the slot dimensions are precise for a flush and secure fit.

Image: Diagram illustrating the required slot dimensions (50mm wide, >60mm deep) for recessed track installation in plasterboard.
4.3 Track Assembly and Connection
- Connect Tracks: If using multiple track segments, connect them using the provided track connectors. Ensure a secure fit.
- Corner Connections: For corner installations, use the appropriate corner connectors. These connect the track segments at angles.
- Side Mount Installation: Attach the side mount brackets to the track. These are suitable for 9-24 mm plasterboards. Tighten screws clockwise to secure.
Video: Installation guide for the SCON Magnetic Track Lighting System, demonstrating track and corner connections.
4.4 Power Driver Connection
- Connect the power supply to the driver.
- Connect the driver to the track. Ensure correct polarity for DC connections (DC V+ and DC V-).
- For dimmable systems, connect the signal wires (Signal Wire+ and Signal Wire-) to your dimming switch (e.g., 0-10V dimmer or TRIAC/ELV dimmer).
- Perform a running test to ensure the track and lights are working properly before sealing the ceiling.

Image: Wiring diagram for connecting a non-dimmable 24V driver to the track system.
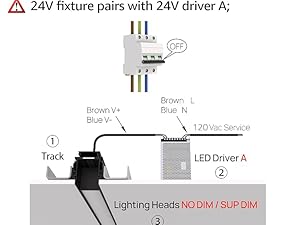
Image: Wiring diagram for connecting a 0-10V dimmable 24V driver to the track system.
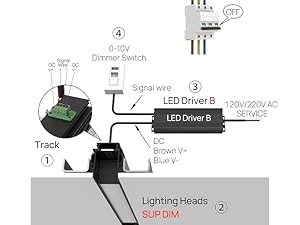
Image: Wiring diagram for connecting a TRIAC/ELV dimmable 24V driver to the track system.
Video: Demonstration of connecting the power supply and driver to the track, and testing the circuit.
4.5 Finalizing Installation
- Once the track is installed and tested, cover both sides of the track with plasterboard or ceiling material to achieve a flush finish.
- Assemble your desired combination of magnetic lamp heads onto the track.

Image: Visual guide showing the four main steps of track lighting installation: making the slot, powering on to test, covering the track, and assembling lights.
5. Operation
5.1 Attaching and Adjusting Lamp Heads
- Magnetic Attachment: Simply place compatible SCON magnetic lamp heads onto the track. The strong magnetic attraction will secure them in place.
- Repositioning: Lamp heads can be moved freely along the track, even at corners, allowing for flexible lighting arrangements without tools.
- Safety Latch: The lamp holder safety latch provides double protection, preventing accidental falling.

Image: A woman adjusting a magnetic track light head on the ceiling, demonstrating tool-free adjustment.

Image: Illustration showing a magnetic track light head being moved left or right along the track, highlighting easy installation and free movement.
5.2 Adjusting Color Temperature (if applicable)
- Some SCON lamp heads feature a dip switch design for adjusting color temperature. Refer to the specific lamp head's manual for detailed instructions.
Video: Demonstration of the SCON Magnetic Track Lighting System, showcasing various light heads and their flexible positioning.
6. Maintenance
- Cleaning: Disconnect power before cleaning. Use a soft, dry cloth to wipe the track and lamp heads. Avoid abrasive cleaners or solvents.
- Inspection: Periodically inspect the track and connections for any signs of wear, damage, or loose connections.
- Lamp Head Replacement: Ensure power is off before removing or replacing lamp heads, although the low voltage system is designed for safety.
7. Troubleshooting
| Problem | Possible Cause | Solution |
|---|---|---|
| Lights not turning on | No power to the driver; Incorrect wiring; Faulty driver or lamp head. | Check circuit breaker; Verify all wiring connections (L, N, V+, V-); Test driver and lamp heads individually. |
| Lights flickering | Loose connection; Driver overload; Incompatible dimmer. | Check all connections; Ensure total wattage is below 80% of driver capacity; Use a compatible dimming system. |
| Lamp head not staying in place | Weak magnetic connection; Safety latch not engaged. | Ensure the lamp head is fully seated and the safety latch is engaged. |
| Incorrect color temperature | Dip switch setting incorrect (if applicable). | Adjust the dip switch on the lamp head according to its specific instructions. |
8. Specifications
| Feature | Detail |
|---|---|
| Brand | SCON |
| Model Number | SC-XTB106-GTRACK-0.5M-NOCALBE-B |
| Item Dimensions (L x W x H) | 19.68"L x 1.87"W x 2.22"H (50cm x 4.75cm x 5.64cm) |
| Material | Aluminum |
| Finish Type | Anodized |
| Voltage | 24 Volts (DC) |
| Light Fixture Form | Recessed |
| Mounting Type | Flush Mount |
| Indoor/Outdoor Usage | Indoor Only |
| Control Method | Remote (with compatible dimmable driver and switch) |
| Special Features | Dimmable (with compatible driver), Must be installed in unfinished ceiling |
9. Warranty & Support
Manufacturer Warranty: This product comes with a 3-year manufacturer's warranty.
For technical support, installation inquiries, or warranty claims, please contact SCON customer service. You can also refer to the official SCON store page for additional resources and contact information.
Note: For specific inquiries regarding compatibility or complex installations, you may contact SCON via WhatsApp at +8618924995001.