
1. Introduction
The GUTSTARK Industrial Edge Bander is designed for professional application of edge banding to wooden workpieces. This machine ensures uniform edge application using an efficient hot melt adhesive system. Its robust construction and adjustable speed settings are ideal for continuous operation in carpentry workshops and furniture production environments.
Key features include:
- Uniform edge application for professional finishes.
- Efficient hot melt adhesive system, compatible with granular glue melting between 150°C and 200°C.
- Automatic straight cutting and manual curved cutting capabilities.
- Adjustable feeding speed for optimized precision and productivity.
- Robust industrial steel structure with an extendable work table.
2. Safety Information
Always read and understand all safety warnings and instructions before operating this machine. Failure to follow these instructions may result in electric shock, fire, and/or serious injury.
- Work Area Safety: Keep the work area clean and well-lit. Cluttered or dark areas invite accidents. Do not operate power tools in explosive atmospheres, such as in the presence of flammable liquids, gases, or dust.
- Electrical Safety: Ensure the power supply matches the machine's requirements (110V). Avoid body contact with earthed or grounded surfaces. Do not expose power tools to rain or wet conditions.
- Personal Safety: Always wear appropriate personal protective equipment (PPE), including safety glasses, hearing protection, and gloves. Do not overreach. Keep proper footing and balance at all times.
- Machine Use and Care: Do not force the machine. Use the correct machine for your application. Disconnect the plug from the power source before making any adjustments, changing accessories, or storing power tools.
- Hot Melt System: The hot melt system operates at high temperatures (up to 200°C). Exercise extreme caution to avoid burns. Allow the machine to cool completely before cleaning or maintenance.
3. Components Included
The following components are included with your GUTSTARK Industrial Edge Bander:
- Edge Bander Machine
- Roll holder disc for edge banding material
- Tubular support for the disc
- Table extender with rollers
- Pedal for manual cutting
- 5 Fuses
- Hardware (screws, etc.)

Figure 3.1: Overview of included components and machine features.
4. Setup
Follow these steps to set up your edge bander for operation:
- Unpacking: Carefully remove all components from the packaging. Inspect for any damage during transit.
- Assembly: Attach the tubular support and roll holder disc to the machine. Secure the table extender with rollers to provide adequate support for your workpieces. Use the provided hardware.
- Placement: Place the machine on a stable, level workbench capable of supporting its weight (approximately 25.15 kg). Ensure sufficient space around the machine for safe operation and material handling.
- Power Connection: Connect the machine to a 110V power outlet. Ensure the power switch is in the OFF position before plugging in.
- Adhesive Loading: Load the appropriate hot melt granular adhesive into the machine's adhesive reservoir.

Figure 4.1: Assembled GUTSTARK Industrial Edge Bander.
5. Operating Instructions
Operating the GUTSTARK Edge Bander involves several key steps to ensure precise and efficient edge banding.
5.1 Control Panel Overview
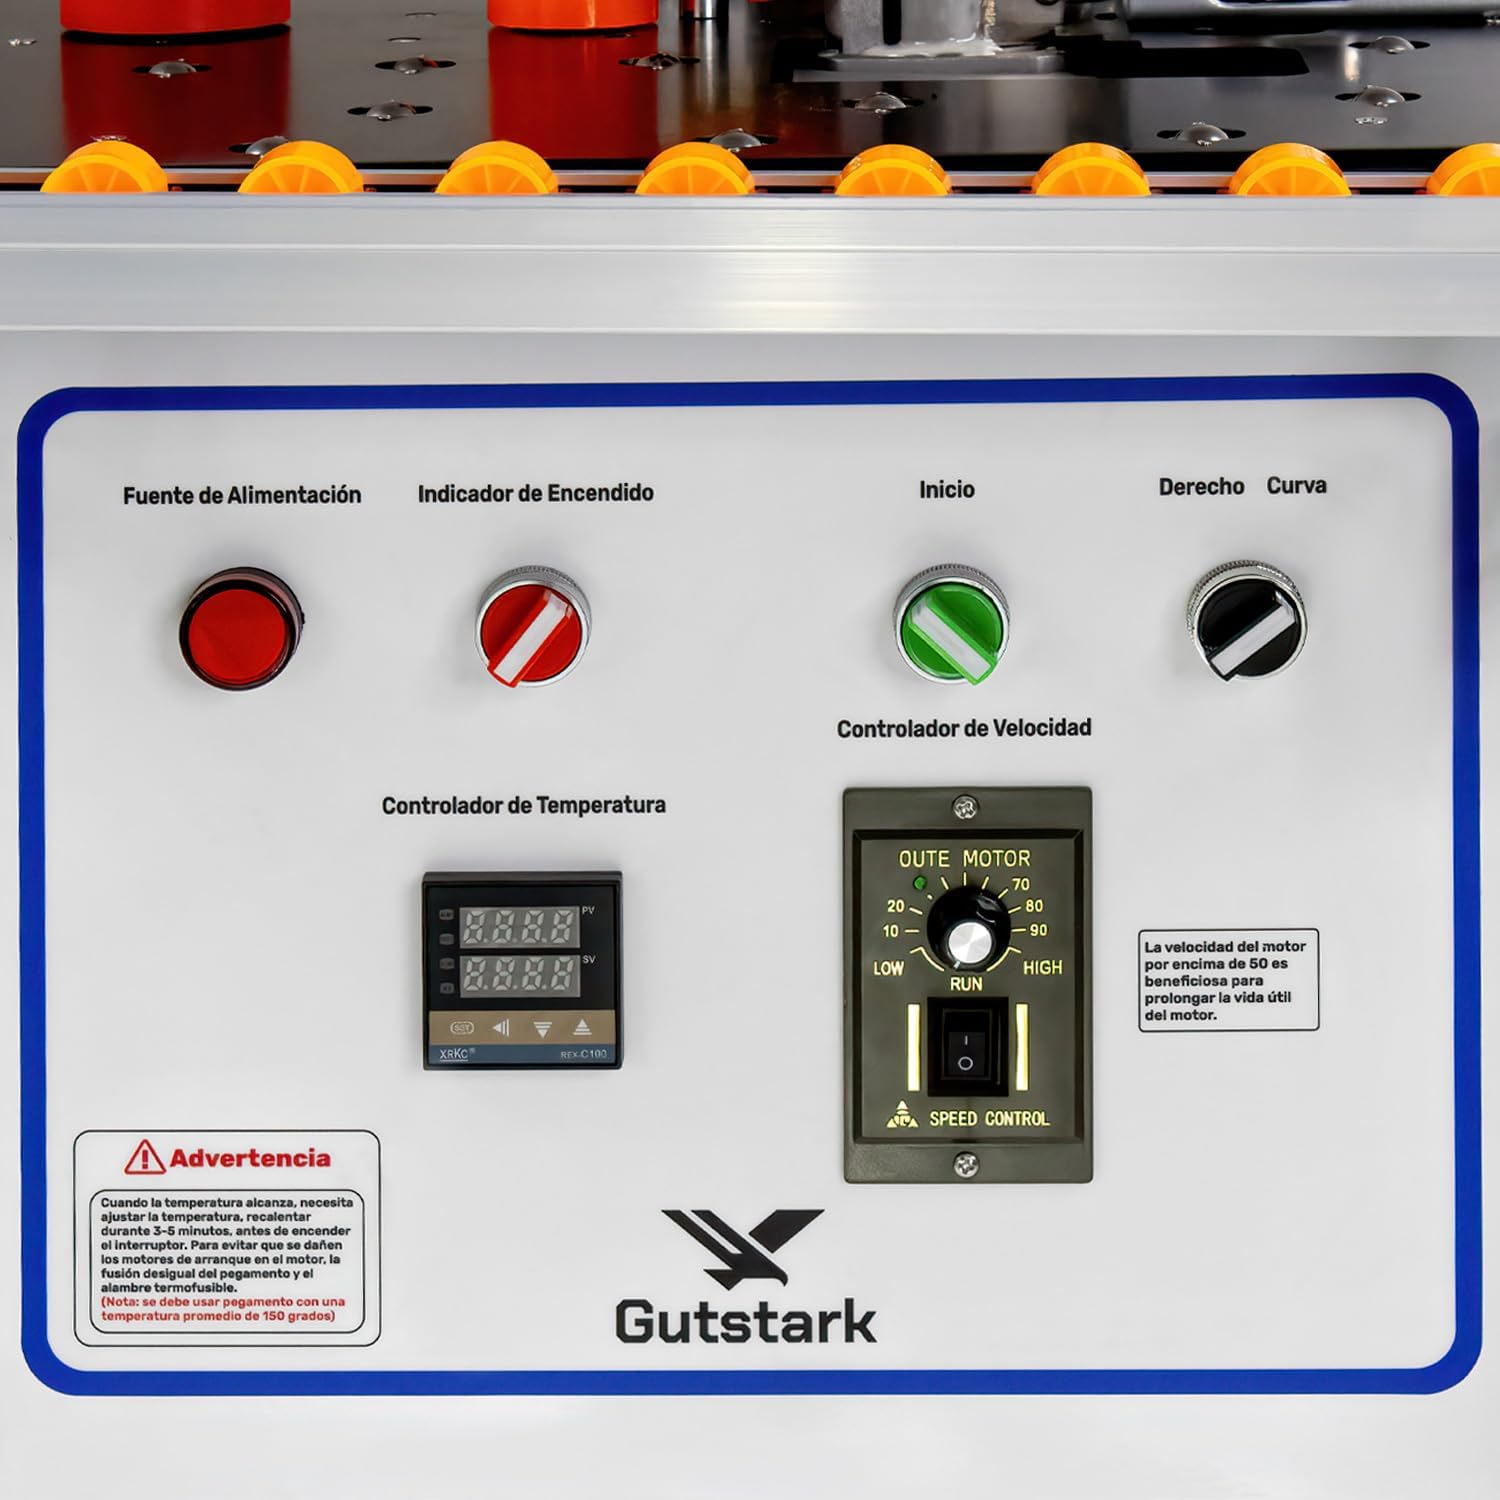
Figure 5.1: Control Panel of the Edge Bander.
- Fuente de Alimentación (Power Supply): Main power switch.
- Indicador de Encendido (Power Indicator): Lights up when the machine is powered on.
- Inicio (Start): Initiates the edge banding process.
- Derecho / Curva (Straight / Curve): Selects the cutting mode.
- Controlador de Temperatura (Temperature Controller): Digital display and controls for setting the adhesive temperature.
- Controlador de Velocidad (Speed Controller): Knob to adjust the feeding speed of the material.
5.2 Edge Banding Process
- Power On: Turn on the main power switch. The power indicator will illuminate.
- Set Temperature: Use the temperature controller to set the desired adhesive temperature, typically between 150°C and 200°C. Allow the machine to heat up until the set temperature is reached.
- Load Edge Banding: Feed the edge banding material into the roll holder disc.
- Adjust Speed: Use the speed controller to set the appropriate feeding speed for your material and desired finish.
- Position Workpiece: Place the wooden workpiece on the table, aligning the edge to be banded with the machine's application rollers.
- Start Application: Press the 'Inicio' (Start) button. Guide the workpiece smoothly through the machine.
- Cutting: For straight cuts, the machine will cut automatically. For curved edges, use the manual cut pedal for precise control.

Figure 5.2: Automatic and manual cutting versatility.

Figure 5.3: Hot melt adhesive application for firm and uniform adhesion.

Figure 5.4: Manual edge banding process.
5.3 Operational Video
Video 5.1: Demonstration of the Edge Banding Machine in operation, showing the application and cutting process.
6. Maintenance
Regular maintenance ensures the longevity and optimal performance of your GUTSTARK Edge Bander.
- Cleaning: After each use, clean any adhesive residue from the rollers, cutting blades, and work table. Ensure the machine is cool before cleaning.
- Adhesive Reservoir: Periodically inspect and clean the adhesive reservoir to prevent clogs and ensure smooth adhesive flow.
- Lubrication: Lubricate moving parts as recommended in the detailed maintenance guide (if provided separately) to reduce wear and tear.
- Blade Sharpening/Replacement: Keep cutting blades sharp for clean cuts. Replace dull or damaged blades promptly.
- Storage: Store the machine in a dry, clean environment when not in use.
7. Troubleshooting
If you encounter issues with your edge bander, refer to the following common problems and solutions:
- Machine Not Powering On:
- Check if the power cord is securely plugged into a functional outlet.
- Verify that the main power switch is in the ON position.
- Inspect the fuses. Replace if blown (5 spare fuses are included).
- Adhesive Not Melting/Applying:
- Ensure the temperature controller is set correctly (150-200°C) and the machine has reached the set temperature.
- Check the adhesive reservoir for sufficient granular glue.
- Clean any blockages in the adhesive application system.
- Poor Edge Adhesion:
- Confirm the adhesive temperature is within the recommended range.
- Ensure the workpiece and edge banding material are clean and free of dust or debris.
- Adjust the feeding speed to allow adequate contact time for adhesion.
- Uneven or Rough Cuts:
- Check the cutting blades for sharpness and damage. Replace or sharpen as needed.
- Ensure the workpiece is guided steadily and evenly through the machine.
For issues not listed here, please contact customer support.
8. Specifications
| Feature | Specification |
|---|---|
| Power | 1200 W |
| Voltage | 110 V |
| Temperature Range | Up to 200 °C |
| Edge Banding Thickness | 0.6 to 60 mm |
| Adhesive System | Hot Melt |
| Product Dimensions (L x W x H) | 52.5 x 52.5 x 54 cm |
| Product Weight | 25.15 kg |

Figure 8.1: Product dimensions.
9. Warranty and Support
For warranty information, technical support, or to purchase replacement parts, please refer to the contact details provided with your product packaging or visit the official GUTSTARK website. Keep your purchase receipt as proof of purchase for warranty claims.