
ANDELI CUT-50Y Pro XS
ANDELI CUT-50Y Pro XS Plasma Cutter
User Instruction Manual
1. Introduction
This manual provides essential information for the safe and effective operation, maintenance, and troubleshooting of your ANDELI CUT-50Y Pro XS Plasma Cutter. Please read this manual thoroughly before operating the machine to ensure proper usage and to prevent injury or damage.
The ANDELI CUT-50Y Pro XS is a versatile plasma cutting machine designed for industrial-grade performance. It features a built-in air compressor, eliminating the need for an external air source, and supports dual voltage input (110V/220V). Its low-frequency non-contact pilot arc technology allows for effortless cutting through various materials, including rusted, painted, or uneven surfaces, while minimizing slag and extending consumable life.

Figure 1: Front view of the ANDELI CUT-50Y Pro XS Plasma Cutter, showcasing its compact design and control panel.
2. Safety Information
WARNING: Plasma cutting produces intense heat, UV radiation, and fumes. Always follow safety precautions to prevent serious injury or death.
- Eye and Face Protection: Always wear a welding helmet with appropriate shade settings to protect against arc flash and sparks.
- Body Protection: Wear flame-resistant clothing, gloves, and sturdy footwear. Avoid synthetic materials.
- Ventilation: Ensure adequate ventilation to remove fumes and gases from the work area. Use a fume extractor if necessary.
- Electrical Safety: Ensure the machine is properly grounded. Do not operate in wet conditions. Inspect cables and connections for damage before each use.
- Fire Prevention: Keep flammable materials away from the cutting area. Have a fire extinguisher readily available.
- Noise Protection: Wear hearing protection during operation.
- Work Area: Keep the work area clean and free of clutter. Ensure stable footing.
3. Product Components
The ANDELI CUT-50Y Pro XS Plasma Cutter comes with a complete professional kit to get you started. Please verify all components are present upon unboxing.
- ANDELI CUT-50Y Pro XS Plasma Cutter Unit
- FPT-40 Professional Torch (6M length)
- 10 sets of Premium Consumables (electrodes, tips, nozzles)
- 3M Gas Hose
- Oil-Water Separator
- Ground Clamp
- Power Cord
- Necessary Installation Accessories

Figure 2: The plasma cutter is designed for portability, with dimensions of 430 x 175 x 265mm and a weight of 13.0KG, making it easy to transport for outdoor use.
4. Setup
Follow these steps to set up your plasma cutter for first use:
- Unpacking: Carefully remove the plasma cutter and all accessories from the packaging. Inspect for any shipping damage.
- Placement: Place the machine on a stable, level surface in a well-ventilated area, away from flammable materials.
- Power Connection: Connect the power cord to a suitable 110V or 220V power outlet. The machine automatically detects the voltage. Ensure the power supply matches the machine's requirements.
- Torch Connection: Connect the FPT-40 professional torch to the designated port on the front panel of the machine. Ensure it is securely fastened.
- Ground Clamp Connection: Attach the ground clamp cable to the appropriate terminal on the machine. Securely clamp the ground clamp to the workpiece or work table, ensuring good electrical contact.
- Air Connection: The CUT-50Y Pro XS has a built-in air compressor. No external air supply is required for operation. If using an external air supply, connect the 3M gas hose to the external air inlet and ensure the oil-water separator is installed inline.

Figure 3: The integrated low-frequency air pump eliminates the need for an external air compressor, offering greater convenience and portability.
5. Operating Instructions
Familiarize yourself with the control panel and operating procedures before beginning any cutting tasks.
5.1 Control Panel Overview

Figure 4: The digital display provides real-time working parameters, including current and air pressure, for precise control.
The user-friendly interface features a bright digital display that shows real-time working parameters such as current and air pressure. Use the adjustment knob to set the desired cutting current.
5.2 Powering On/Off
- To power on, flip the main power switch located on the rear of the machine. The digital display will illuminate.
- To power off, flip the main power switch to the OFF position.
5.3 Cutting Procedure
- Prepare Workpiece: Ensure the workpiece is clean and free of excessive rust, paint, or debris for optimal cutting.
- Set Current: Adjust the cutting current (Amperage) using the control knob based on the material type and thickness. Refer to the cutting chart in the Specifications section for guidance.
- Pilot Arc: The CUT-50Y Pro XS utilizes a non-contact pilot arc. Position the torch nozzle approximately 1/8" to 1/4" above the workpiece.
- Initiate Arc: Press the trigger on the torch to initiate the pilot arc. Once the arc is established, move the torch steadily across the material.
- Cutting Speed: Maintain a consistent cutting speed. Too fast will result in an incomplete cut or excessive dross; too slow will cause a wide kerf and excessive heat input.
- Cutting Thickness: The machine can cut up to 7/8" (22mm) thick steel at 220V and 15mm at 110V.

Figure 5: The CUT-50Y Pro XS can easily cut materials from 1mm to 15mm, with capabilities up to 20mm under stable power supply conditions.
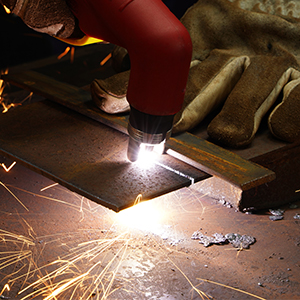
Figure 6: A close-up view of the plasma cutting process, showing the precise and clean cut achieved by the torch.
5.4 Compatible Materials
The ANDELI CUT-50Y Pro XS is suitable for cutting a variety of conductive metals, including:
- Angle Steel
- Mild Steel
- Sheet Metal
- Stainless Steel
- Aluminum
- Carbon Steel

Figure 7: The plasma cutter is capable of cutting various metal types, including angle steel, mild steel, sheet metal, and stainless steel.
6. Maintenance
Regular maintenance ensures the longevity and optimal performance of your plasma cutter.
6.1 Consumable Replacement
The torch consumables (electrode, tip, nozzle, shield cup) wear out during use and need periodic replacement. Inspect them regularly for wear and replace as needed to maintain cut quality.
- Electrode: Replace when the hafnium insert is pitted to a depth of approximately 1/16" (1.5mm).
- Tip/Nozzle: Replace when the orifice becomes elongated or damaged.
- Shield Cup: Replace if cracked or severely damaged.
6.2 Air Filter/Separator
The oil-water separator helps ensure clean, dry air for cutting. Periodically drain any accumulated moisture from the separator bowl. Clean or replace the filter element as necessary, especially if you notice a decrease in air flow or cut quality.
6.3 General Cleaning
- Keep the machine clean and free of dust and metal particles. Use compressed air to blow out the internal components periodically, ensuring the machine is unplugged first.
- Inspect all cables and connections for signs of wear, cuts, or damage. Replace any damaged components immediately.
7. Troubleshooting
This section addresses common issues you might encounter with your plasma cutter.
| Problem | Possible Cause | Solution |
|---|---|---|
| No arc or weak arc |
|
|
| Poor cut quality / Excessive dross |
|
|
| Machine powers on but no cutting output |
|
|
| Built-in compressor seems weak for thick cuts |
|
|
If you encounter issues not listed here or if solutions do not resolve the problem, please contact ANDELI customer support for assistance.
8. Specifications
Detailed technical specifications for the ANDELI CUT-50Y Pro XS Plasma Cutter.

Figure 8: Technical specifications for the CUT-50Y Pro XS model, including power, current, and cutting thickness.
| Feature | Detail |
|---|---|
| Model Number | CUT-50Y Pro XS |
| Power Supply Voltage | 110V/220V AC (Auto-sensing) |
| Frequency | 50/60 Hz |
| Rated Output Current | 50 Amp (adjustable 15-50A) |
| Maximum Cut Thickness (220V) | 7/8" (22mm) |
| Maximum Cut Thickness (110V) | 15mm |
| Built-in Air Compressor | Yes |
| Technology | DC Inverter IGBT, Low Frequency Pilot Arc |
| Protection Class | IP21S |
| Insulation Class | H |
| Cooling | Air cooling |
| Dimensions (L x W x H) | 430 x 175 x 265 mm (16.9 x 6.9 x 10.4 inches) |
| Net Weight | 13 KG (28.6 lbs) |
9. Warranty and Support
ANDELI stands behind the quality of its products.
- Satisfaction Guarantee: Your purchase is backed by a 30-day satisfaction guarantee.
- Comprehensive Warranty: The ANDELI CUT-50Y Pro XS Plasma Cutter comes with a 2-year comprehensive warranty.
- Technical Support: Enjoy lifetime free technical support from our expert team.
For warranty claims, technical assistance, or any product-related inquiries, please contact ANDELI customer service through the official channels provided at the time of purchase or on the ANDELI website.
Ask a question about this manual
Ask about setup, troubleshooting, compatibility, parts, safety, or missing instructions. Manuals+ will review the question and use this page’s manual context to help answer it.