
1. Safety Information
Read all safety warnings and instructions carefully before operating this device. Failure to follow these instructions may result in electric shock, fire, or serious injury.
- Power Supply: Always connect the spot welder directly to a wall power socket. Do not use power strips or extension cords, as this may lead to unstable power supply and potential triggering issues or damage to the unit.
- Work Area: Ensure your work area is clean, well-lit, and free from flammable materials. Keep children and bystanders away during operation.
- Personal Protective Equipment (PPE): Always wear appropriate PPE, including safety glasses, gloves, and protective clothing, to prevent injury from sparks, heat, or electrical contact.
- Soldering Pin Maintenance: Keep the surface of the soldering pins clean. Regularly wipe off any oxide layer with sandpaper to ensure optimal welding performance and prevent poor welding results.
- Pressure Regulator: Set the pressure regulator to the correct value for the material being welded. Incorrect pressure can lead to poor welding results.
- Ventilation: Ensure adequate ventilation when soldering, as fumes can be harmful.
- Storage: Store the device in a dry, secure location away from moisture and extreme temperatures when not in use.
2. Product Overview
The ZXSYYDS 709AD is a high-power pulse battery spot welder designed for precise and efficient welding of lithium batteries and battery packs. It features both fixed-head welding and a welding pen for versatile applications, along with an integrated soldering station.
Key Features:
- Trigger Spot Welding: Automatic spot welding function activates when welding pens contact metal for 1 second, eliminating the need for a foot pedal in AT mode.
- Dual Welding Options: Includes a fixed welding head for thicker materials and a welding pen (HB-70BN) for flexible applications.
- LED Lighting: Integrated LED lighting illuminates the welding area, improving visibility in low-light conditions.
- Long Service Life: Utilizes super Faraday capacitors for high capacity, low energy consumption, and extended battery life.
- Wide Application: Suitable for multi-row lithium battery packs, electric vehicle battery pack assembly and repair, button batteries, polymer batteries, protection boards, mobile phone cameras, stainless steel hardware, and stainless steel mesh.

Figure 2.1: Range of applications for the ZXSYYDS 709AD spot welder.
3. Setup
Follow these steps to set up your ZXSYYDS 709AD spot welder for initial use:
- Unpacking: Carefully remove all components from the packaging. Verify that all parts are present according to the packing list.
- Placement: Place the spot welder on a stable, level, and non-flammable surface in a well-ventilated area.
- Power Connection: Connect the power cord directly to a suitable AC220V/110V±20V wall power socket. Ensure the voltage matches your local power supply. Do not use power strips or extension cords.
- Connect Welding Accessories:
- For fixed-head welding, ensure the fixed welding head is securely attached to the unit.
- For welding pen operation, connect the HB-70BN welding pen to the designated port on the front panel.
- If using the foot pedal (for MT mode), connect it to the 'PEDAL INTERFACE' port.
- Connect Soldering Iron: If using the soldering function, connect the soldering iron to the 'IRON' port.
- Initial Inspection: Before powering on, visually inspect all connections for security and ensure no visible damage to the unit or cables.
4. Operating Instructions
4.1 Powering On and Mode Selection
- Press the power button to turn on the device. The LED display will illuminate.
- Select the desired welding mode using the AT/MT switch:
- AT Mode (Automatic Spot Welding): The welder will automatically trigger a spot weld when the welding pins make contact with the metal for approximately 1 second. This mode does not require the foot pedal.
- MT Mode (Foot Control Spot Welding): The welder will only trigger a spot weld when the foot pedal is pressed. This mode requires the foot pedal to be connected.

Figure 4.1: AT (Automatic) and MT (Foot Control) welding modes.
4.2 Spot Welding Operation
- Adjust Pulse Time: Use the 'SET PULSE' knob to select the desired pulse time (1-10ms for double pulse, 2-20ms for four pulse, 8-80ms for eight pulse). The display will show the selected pulse setting.
- Adjust Current: Use the 'SET CURRENT' knob to adjust the spot welding current between 50A and 800A. Start with lower settings and gradually increase as needed for your material.
- Prepare Materials: Ensure the nickel strip and battery terminals are clean and free of oxidation.
- Welding with Fixed Head: Position the material under the fixed welding head. Ensure proper contact. The fixed head can weld 0.05-0.35mm thick nickel-plated nickel strip or 0.05-0.2mm pure nickel strip.
- Welding with Welding Pen (HB-70BN): Hold the welding pen firmly. The welding pen can weld 0.05-0.2mm thick nickel-plated nickel strip or 0.05-0.15mm pure nickel strip.
- Execute Weld:
- In AT Mode, simply press the welding pins firmly onto the material. The weld will trigger automatically after 1 second of contact.
- In MT Mode, press the welding pins firmly onto the material, then press the foot pedal to trigger the weld.
- Inspect Weld: After each weld, inspect the joint for strength and quality. Adjust settings as necessary.

Figure 4.2: Assembling a battery pack with the HB-70BN welding pen.
4.3 Soldering Station Operation
- Ensure the soldering iron is connected to the 'IRON' port.
- Use the 'SOLDER' thermoregulation knob to set the desired temperature between 150°C and 450°C.
- Allow 6-8 seconds for the soldering iron to reach 300°C. The constant temperature accuracy is ±5°C.
- The soldering station provides 20VDC output voltage and 50W power.
- Perform soldering tasks as required. The expert 912 solder pen with T12 heating core is suitable for anti-static soldering of circuit boards and SMD ICs.

Figure 4.3: Soldering station with thermoregulation and T12 heating core.
5. Maintenance
Regular maintenance ensures the longevity and optimal performance of your spot welder.
- Cleaning Welding Pins: After each use, or when performance degrades, clean the tips of the welding pins and the fixed welding head. Use fine-grit sandpaper to remove any oxide layers or residue. This is crucial for consistent weld quality.
- General Cleaning: Keep the main unit clean and free of dust and debris. Use a soft, dry cloth. Do not use abrasive cleaners or solvents.
- Soldering Iron Tip Replacement: The T12 heating core in the soldering pen is replaceable. Refer to Figure 4.3 for visual guidance on how to replace the heating core with different shapes as needed.
- Cable Inspection: Periodically inspect all cables and connections for signs of wear, cuts, or damage. Replace any damaged components immediately.
- Storage: When not in use, store the spot welder in a dry, cool place, protected from dust and moisture.
6. Troubleshooting
If you encounter issues with your ZXSYYDS 709AD spot welder, refer to the following common problems and solutions:
| Problem | Possible Cause | Solution |
|---|---|---|
| Poor welding results (weak welds, inconsistent welds) |
|
|
| Welder not triggering (in AT mode) |
|
|
| Welder not triggering (in MT mode) |
|
|
| Unit does not power on |
|
|
| Soldering iron not heating up |
|
|
7. Specifications
Detailed technical specifications for the ZXSYYDS 709AD Battery Spot Welder:
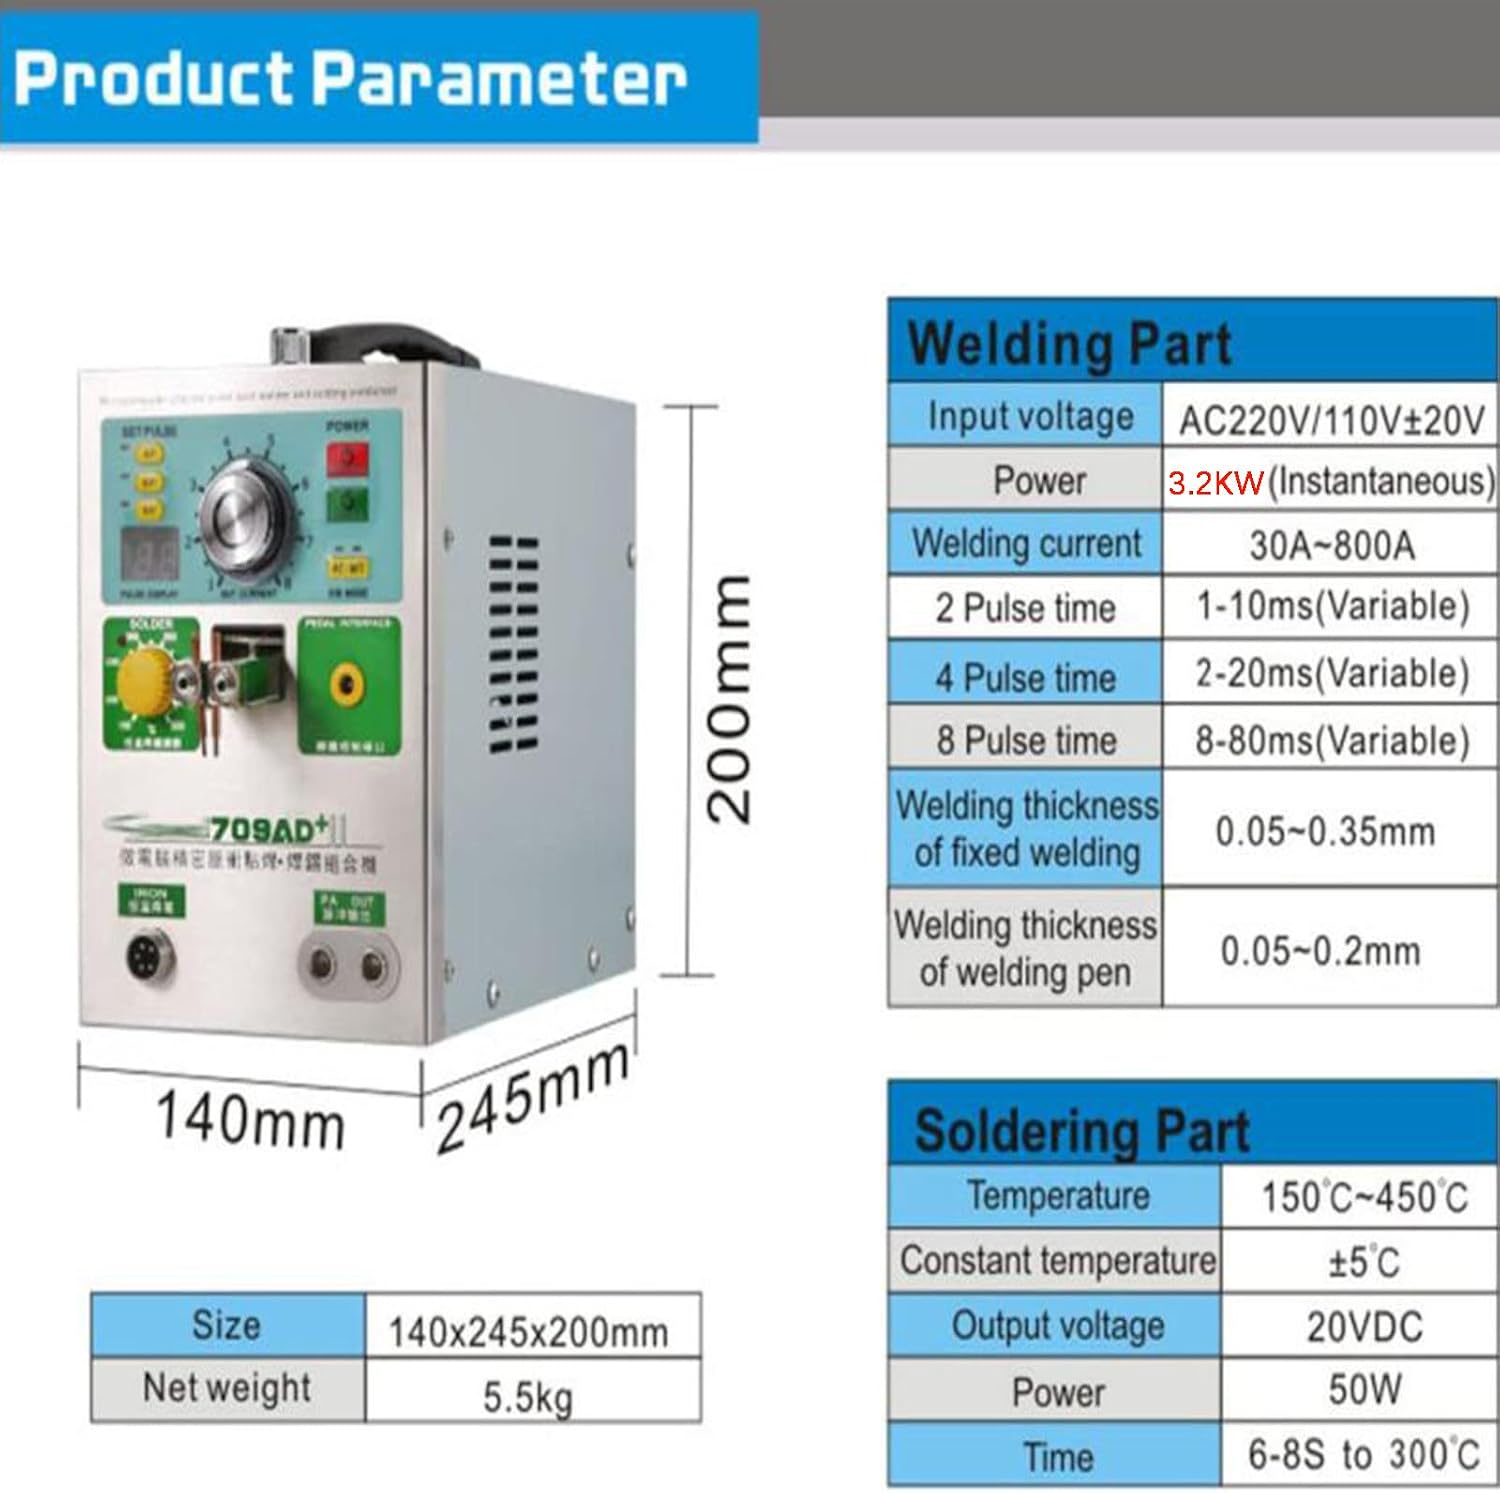
Figure 7.1: Product dimensions and technical parameters.
| Parameter | Value |
|---|---|
| Model | 709AD |
| Power Supply Voltage | AC220V/110V±20V |
| Peak Power | 3.2KW |
| Spot Welding Current | 50~800A |
| Double Pulse Time | 1-10ms (Adjustable) |
| Four Pulse Time | 2-20ms (Adjustable) |
| Eight Pulse Time | 8-80ms (Adjustable) |
| Fixed Head Welding Thickness | 0.05~0.35mm (Nickel-plated nickel strip) 0.05~0.2mm (Pure nickel strip) |
| Welding Pen Welding Thickness | 0.05~0.2mm (Nickel-plated nickel strip) 0.05~0.15mm (Pure nickel strip) |
| Soldering Station Temperature | 150℃~450℃ |
| Constant Temperature Accuracy | ±5℃ |
| Soldering Station Output Voltage | 20VDC |
| Soldering Station Power | 50W |
| Soldering Iron Heating Time (to 300°C) | 6-8 seconds |
| Body Dimensions (L×W×H) | 140×245×200mm (5.5 x 9.6 x 7.9 inches) |
| Net Weight | 7kg (approx. 15.4 lbs) |
| ASIN | B0CKZ6S4JG |
| Manufacturer | ZXSYYDS |
8. Warranty and Support
For warranty information, technical support, or service inquiries, please contact your retailer or the manufacturer directly. Keep your purchase receipt as proof of purchase for any warranty claims.