
1. Introduction
Thank you for purchasing the IRIS OHYAMA Corded Cyclone Lightweight 2-Way Stick Cleaner SCA-112-W. This manual provides important information for the safe and efficient use of your new vacuum cleaner. Please read it thoroughly before use and keep it for future reference.

Figure 1: IRIS OHYAMA SCA-112-W 2-Way Stick Cleaner in stick mode.
2. Important Safety Instructions
Always follow basic safety precautions when using electrical appliances to reduce the risk of fire, electric shock, or injury.
- Read all instructions before using the appliance.
- Do not use outdoors or on wet surfaces.
- Do not allow to be used as a toy. Close attention is necessary when used by or near children.
- Use only as described in this manual. Use only manufacturer’s recommended attachments.
- Do not use with a damaged cord or plug. If appliance is not working as it should, has been dropped, damaged, left outdoors, or dropped into water, return it to a service center.
- Do not pull or carry by cord, use cord as a handle, close a door on cord, or pull cord around sharp edges or corners. Do not run appliance over cord. Keep cord away from heated surfaces.
- Do not unplug by pulling on cord. To unplug, grasp the plug, not the cord.
- Do not handle plug or appliance with wet hands.
- Do not put any object into openings. Do not use with any opening blocked; keep free of dust, lint, hair, and anything that may reduce airflow.
- Keep hair, loose clothing, fingers, and all parts of body away from openings and moving parts.
- Turn off all controls before unplugging.
- Use extra care when cleaning on stairs.
- Do not use to pick up flammable or combustible liquids, such as gasoline, or use in areas where they may be present.
- Do not pick up anything that is burning or smoking, such as cigarettes, matches, or hot ashes.
- Do not use without dust cup and/or filters in place.
3. Package Contents
Verify that all items are included in the package:
- Main Unit (Motor body with dust cup)
- Extension Pipe
- Floor Head
- Crevice Nozzle
- Power Cord (attached to main unit)
- User Manual (this document)
4. Parts Identification
Familiarize yourself with the components of your vacuum cleaner:

Figure 2: Main unit, extension pipe, floor head, and crevice nozzle.
- Handle
- Power Switch
- Dust Cup Release Button
- Dust Cup
- Cyclone Unit
- HEPA Filter
- Extension Pipe Release Button
- Extension Pipe
- Floor Head
- Crevice Nozzle
- Power Cord
5. Setup and Assembly
Your IRIS OHYAMA stick cleaner can be assembled in two configurations: Stick mode and Handy mode.
5.1. Assembling for Stick Mode
- Insert the extension pipe into the main unit until it clicks into place.
- Attach the floor head to the other end of the extension pipe until it clicks into place.
- Ensure all connections are secure before use.
5.2. Assembling for Handy Mode
- For handheld use, detach the extension pipe by pressing the release button and pulling it out.
- Attach the crevice nozzle directly to the main unit until it clicks into place.
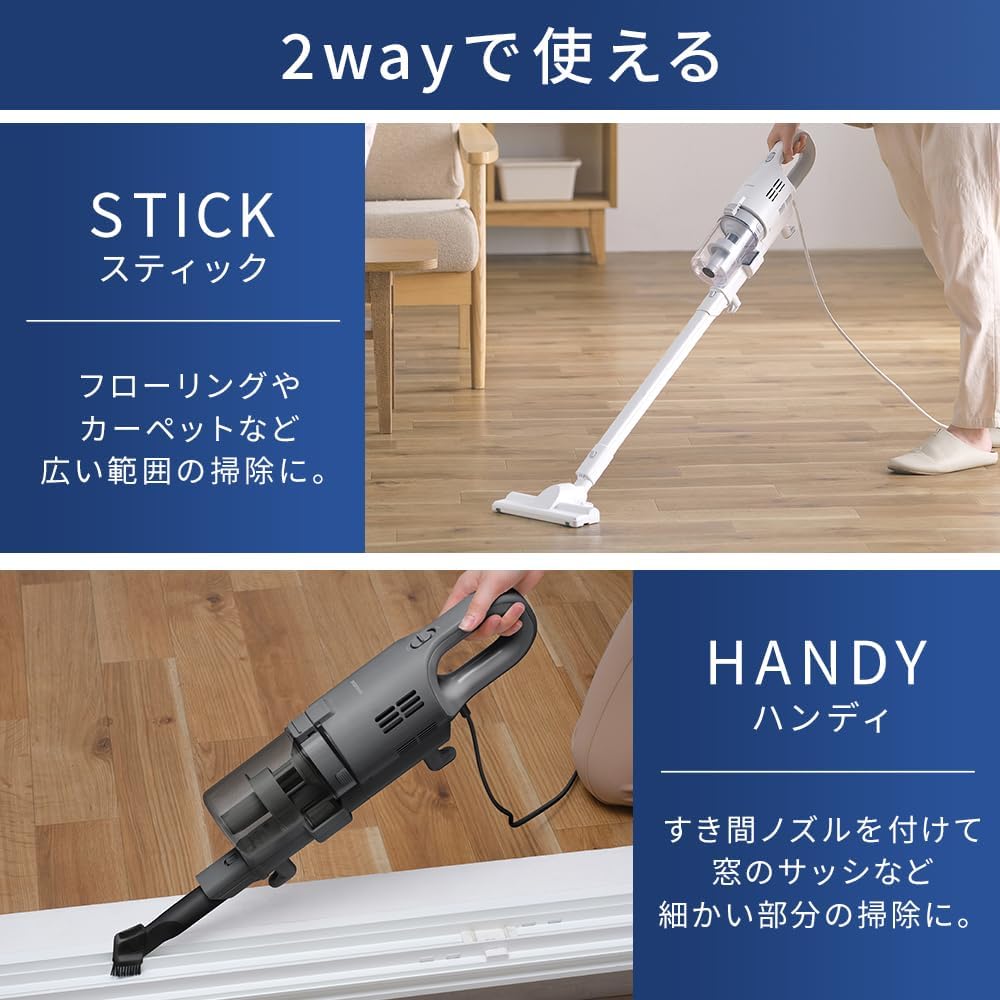
Figure 3: The vacuum cleaner configured for stick and handy use.
6. Operating Instructions
6.1. Powering On/Off
- Plug the power cord into a standard AC100V outlet.
- Press the power switch located on the handle to turn the vacuum cleaner ON.
- Press the power switch again to turn the vacuum cleaner OFF.
6.2. Using in Stick Mode
Stick mode is ideal for cleaning wide areas such as flooring and carpets.
- Ensure the extension pipe and floor head are securely attached.
- Hold the handle firmly and guide the floor head over the surface to be cleaned.
- The powerful 100W suction effectively picks up dust and debris.
6.3. Using in Handy Mode
Handy mode is suitable for cleaning small spaces, corners, and delicate areas with the crevice nozzle.
- Attach the crevice nozzle directly to the main unit.
- Use the nozzle to reach narrow gaps, window sashes, and other hard-to-reach spots.

Figure 4: Illustration of the cyclone system and powerful suction.
The cyclone system separates dust from the air using centrifugal force. Dust is collected in the dust cup, and clean air is discharged through a high-performance HEPA filter.
7. Maintenance and Cleaning
Regular maintenance ensures optimal performance and extends the life of your vacuum cleaner.
7.1. Emptying the Dust Cup
- Ensure the vacuum cleaner is turned OFF and unplugged.
- Press the dust cup release button and remove the dust cup from the main unit.
- Hold the dust cup over a trash bin and open the bottom lid to dispose of the collected dust and debris.
- Close the lid and reattach the dust cup to the main unit until it clicks securely.

Figure 5: Steps for emptying and washing the dust cup and cyclone unit.
7.2. Washing the Dust Cup and Cyclone Unit
The dust cup and cyclone unit are washable to maintain hygiene and suction power.
- After emptying the dust cup, separate the cyclone unit from the dust cup.
- Rinse both the dust cup and the cyclone unit thoroughly under running water.
- Allow all parts to air dry completely before reassembling. Ensure no moisture remains to prevent damage to the motor.
- Reassemble the cyclone unit into the dust cup and attach it back to the main unit.
7.3. Filter Maintenance
The HEPA filter should be cleaned regularly. Tap it gently to remove dust. If heavily soiled, it can be rinsed with water. Ensure it is completely dry before reinserting.
7.4. Storage
The compact design allows for convenient storage. The vacuum cleaner can be stored upright against a wall, and the power cord can be neatly wrapped using the integrated cord hook.

Figure 6: Upright storage and cord winding feature.
8. Troubleshooting
If you encounter any issues, refer to the table below for common problems and solutions.
| Problem | Possible Cause | Solution |
|---|---|---|
| Vacuum cleaner does not turn on. | Power cord not properly plugged in. No power from outlet. | Check power cord connection. Test outlet with another appliance. |
| Low suction power. | Dust cup is full. Filters are clogged. Obstruction in nozzle/pipe. | Empty the dust cup. Clean the filters. Check for and remove any blockages. |
| Unusual noise. | Obstruction in the brush roll or air path. Loose parts. | Turn off and unplug. Inspect for obstructions. Ensure all parts are securely assembled. |
| Overheating and automatic shutdown. | Motor overheating due to prolonged use or clogged filters/dust cup. | Turn off and unplug the unit. Empty the dust cup and clean filters. Allow the unit to cool down for at least 1 hour before resuming use. |
9. Specifications
| Feature | Specification |
|---|---|
| Power Source | AC100V, 50/60Hz |
| Rated Power Consumption | 600W |
| Suction Power | 100W |
| Dust Collection Capacity (Max) | 0.5L |
| Dust Disposal Line Capacity | 0.3L |
| Product Dimensions (W x D x H) | Approx. 23.5 x 17.1 x 97.7 cm (with floor head and extension pipe) |
| Weight (Body Only) | Approx. 1.4 kg |
| Weight (Overall) | Approx. 1.7 kg (with floor head and extension pipe) |
| Operating Temperature Range | Approx. 0-40°C |
| Power Cord Length | Approx. 4m |
| Filter Type | HEPA Filter |
| Included Accessories | Crevice Nozzle |
10. Warranty and Support
This product comes with a manufacturer's warranty. Please refer to the warranty card included in your product packaging for specific terms and conditions, including the warranty period and coverage details.
For technical support, service, or replacement parts, please contact IRIS OHYAMA customer service through their official website or the contact information provided in your warranty documentation.
Keep your purchase receipt as proof of purchase for warranty claims.


