
SIXTOP P-1
SIXTOP Wireless Backup Camera System with 5-inch Monitor (Model P-1)
Instruction Manual
1. Introduction
This manual provides detailed instructions for the installation, operation, and maintenance of your SIXTOP Wireless Backup Camera System. This system is designed to enhance vehicle safety by providing a clear rear view, especially during reversing maneuvers.
- 5-inch HD Display: The high-definition 5-inch IPS monitor provides real-time images with 800x480 resolution, ensuring clear visibility from various viewing angles without obstructing driving perspective.
- Parking Assistance: Features include low-light IR night vision for clear images at night and an IP69 waterproof rear camera. Adjustable reverse guide lines assist with precise parking.
- Stable Wireless Signal: Utilizes AHD technology for digital wireless signal transmission, offering clearer images and strong anti-interference capabilities, improving performance by 50% compared to previous models.
- Easy Installation: Designed for portable installation with wireless signal transmission. The monitor can be powered via a 12V accessory port or direct wiring. The camera connects to the vehicle's reverse light power.
- Vehicle Compatibility: Suitable for DC 12V vehicles, including cars, trucks, SUVs, pickups, and vans. The license plate frame design ensures easy and aesthetic camera integration.
2. Package Contents
Verify that all items listed below are included in your package:
- 1 x Weatherproof Wireless Backup Camera
- 1 x Wireless Antennas
- 1 x 5 inch Wireless Color IPS Monitor
- 1 x Universal Mount with Adhesive Pad
- 1 x Power Cable
- 1 x Screw Kit for Camera Installation
- 1 x User Manual
- 1 x Cigarette Lighter Power Adapter
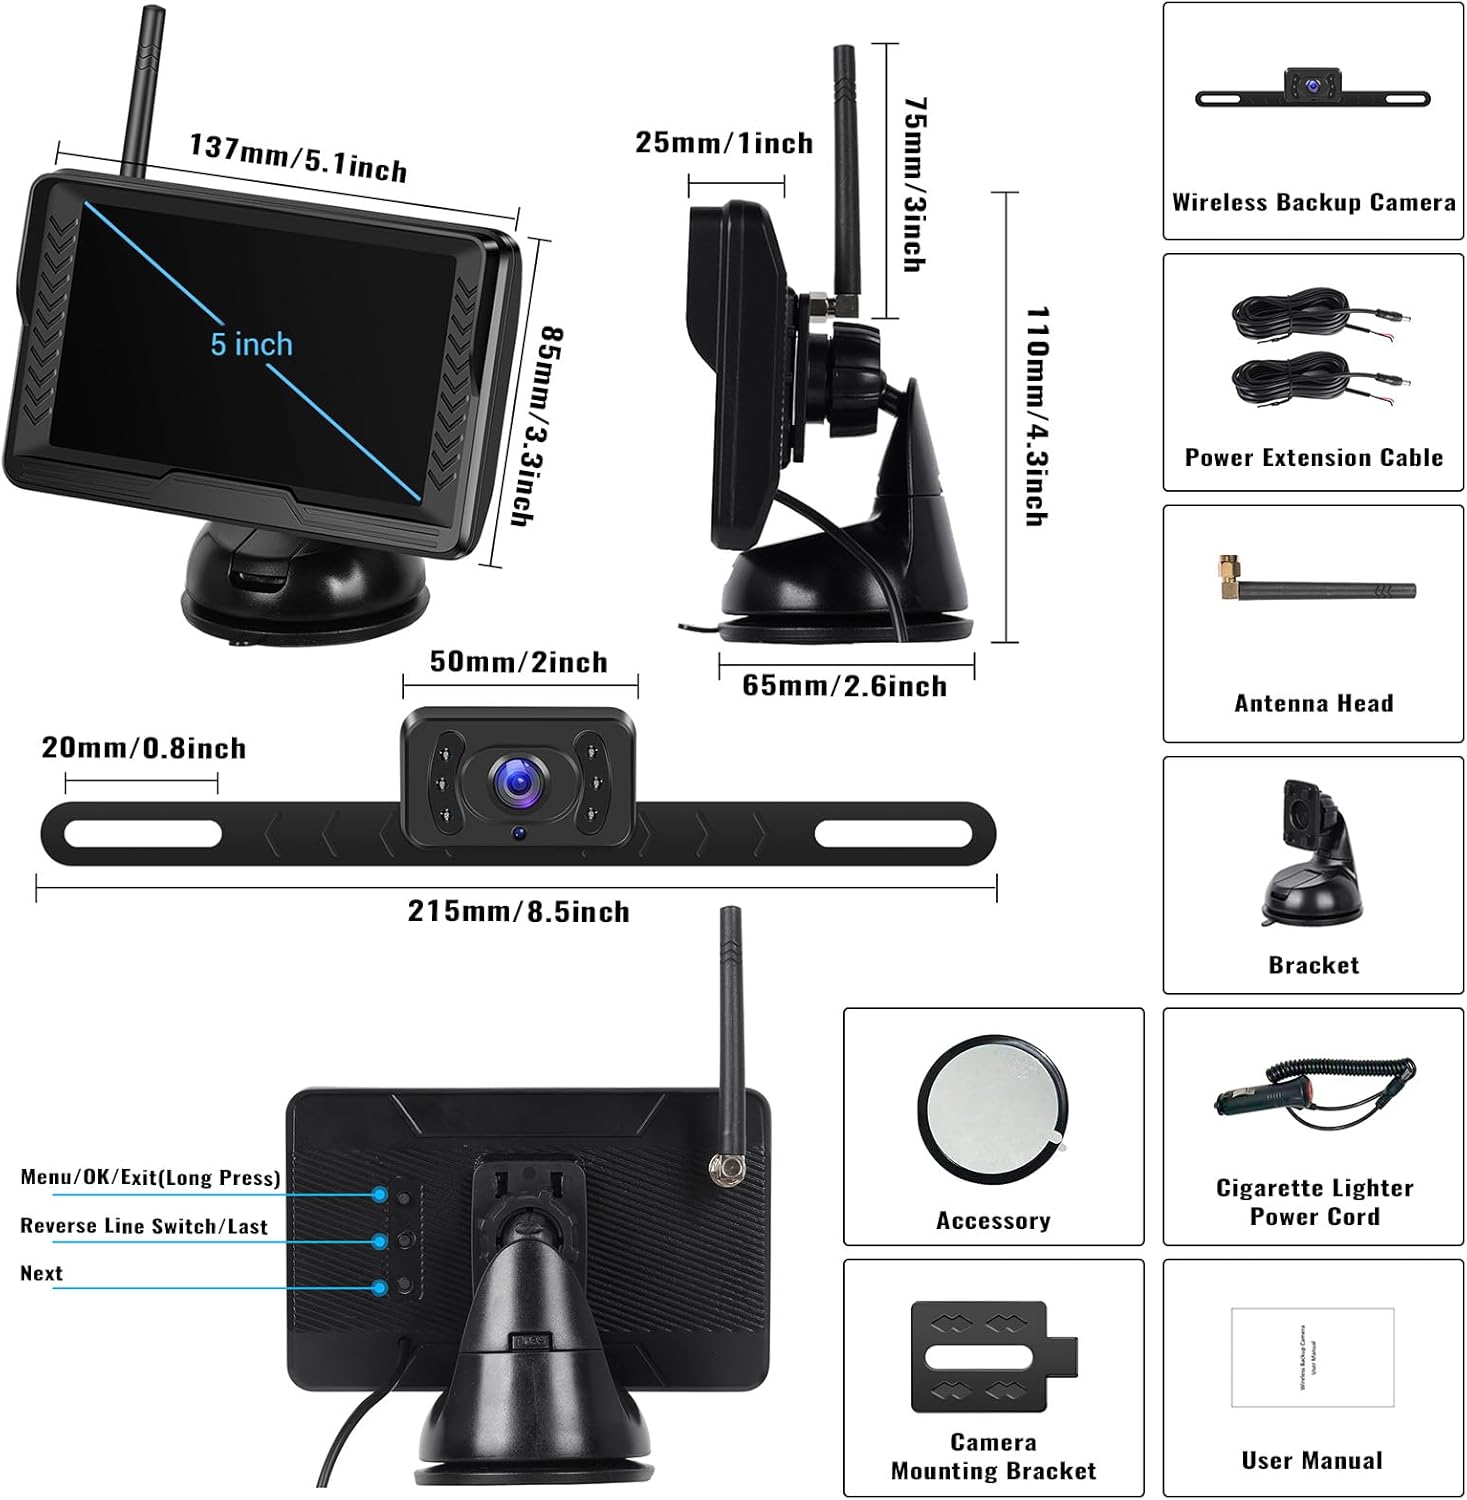
Figure 1: All components included in the package.
3. Specifications
Monitor Specifications:
- Screen Size: 5 Inches
- Display Technology: LCD (IPS Panel)
- Resolution: 800*480
- Brightness: 500cd/m2
- Contrast Ratio: 700:1
- Operating Temperature: -22°F ~ 176°F (-30°C ~ 80°C)
- Power: 1.8W
- Voltage: 12V
- Signal Standard: PAL/NTSC
- Supported Cameras: 1 Camera
- Grid Lines: Can be switched on/off
- Languages: Chinese, English, Japanese, Russian, Spanish, Italian, German, French
- Material: Plastic + Metal
- Product Dimensions: 5.39 x 1 x 3.3 inches
- Item Weight: 1.32 pounds
Camera Specifications:
- Image Sensor: 1/3 inch AHD sensor
- View Angle: 115°[H] / 145°[D] (Wide Angle Lens)
- Resolution: 720P
- TV System: PAL
- Waterproof Rating: IP69
- Power Supply: DC12V
- Operating Temperature: -22°F ~ 176°F (-30°C ~ 80°C)
- Optical Sensor Technology: CMOS
- Connector Type: Wireless
4. Setup and Installation
4.1 Monitor Installation
The 5-inch monitor can be installed using two methods:
- Dashboard Installation: Use the universal mount with an adhesive pad to secure the monitor on your vehicle's dashboard.
- Windshield Installation: Utilize the suction cup bracket to attach the monitor to your windshield.

Figure 2: Monitor installation options.
4.2 Camera Installation
The wireless backup camera is designed to fit perfectly with your license plate frame for easy and aesthetic integration. Use the provided screw kit for secure mounting.

Figure 3: Camera mounted on a license plate frame.
4.3 Wiring and Power Connection
Follow these steps to connect power to your monitor and camera:
- Monitor Power: Connect the monitor's power cord. You can either connect the red wire to the positive pole of a 12V power supply and the black wire to the negative pole, or use the provided cigarette lighter adapter for power.
- Camera Power: Connect the camera's red power wire to the positive terminal of your vehicle's reversing light, and the black wire to the negative terminal. This ensures the camera activates automatically when reversing.

Figure 4: Wiring diagram for monitor and camera.
4.4 Wireless Transmission
The system uses AHD technology for stable digital wireless signal transmission, providing clear and interference-free video. Ensure the wireless antennas are properly connected for optimal performance.

Figure 5: Wireless signal transmission.
4.5 Setup Video Guide
Video 1: A seller-provided guide demonstrating the installation and setup of a wireless backup camera system.
5. Operating Instructions
5.1 Powering On/Off
The monitor will automatically power on and display the camera feed when your vehicle is shifted into reverse, provided the camera is correctly wired to the reverse lights. If using the cigarette lighter adapter, press the button on the adapter to manually turn the monitor on or off.
5.2 Parking Assistance Features
The camera system offers several features to aid in parking:
- IR Night Vision: The camera provides clear and colorful images even in low-light conditions, enhancing visibility at night.
- Adjustable Guide Lines: The built-in reverse guide lines can be adjusted for height and width to match your specific vehicle and parking needs. These lines provide visual cues for distance and trajectory.

Figure 6: Parking assistance with adjustable guide lines.
5.3 Monitor Controls
The monitor features buttons for menu navigation, OK/Exit (long press), Reverse Line Switch/Last, and Next. A remote control is also included for convenient adjustment of settings.
6. Maintenance
- Cleaning: Regularly clean the camera lens and monitor screen with a soft, damp cloth to ensure clear visibility. Avoid abrasive cleaners.
- Waterproof Rating: The camera has an IP69 waterproof rating, meaning it is protected against close-range high-pressure, high-temperature spray downs. However, avoid prolonged submersion.
- Connection Check: Periodically inspect all wiring connections for tightness and signs of wear or corrosion.
7. Troubleshooting
- No Image on Monitor:
- Ensure the monitor is powered on (check cigarette lighter connection or direct wiring).
- Verify the camera is receiving power (check connection to reverse lights).
- Check for wireless signal interference. AHD technology is designed to minimize this, but extreme conditions or obstructions can affect it.
- Flickering or Unclear Image:
- Ensure the camera lens is clean and free from dirt or moisture.
- Check for strong electromagnetic interference from other vehicle electronics.
- Verify the wireless connection is stable.
- Guide Lines Not Displaying/Incorrect:
- Access the monitor menu to ensure guide lines are enabled.
- Adjust the guide line settings (height/width) via the monitor controls or remote.
8. Warranty and Support
SIXTOP is committed to providing high-quality products and excellent customer service.
- Warranty: This product comes with a 1-Year Replacement Warranty.
- Technical Support: Enjoy Lifetime Technical Support for your product.
- Online Support: For any inquiries or assistance, please contact us at SIXTOP123@163.com. Our support team is available 24 Hours/7 Days for quick response.


Figure 7: Support and Warranty details.
Ask a question about this manual
Ask about setup, troubleshooting, compatibility, parts, safety, or missing instructions. Manuals+ will review the question and use this page’s manual context to help answer it.