
Introduction
This manual provides essential instructions for the installation, operation, and maintenance of your Fermax Sup Milo Digital Intercom System. Please read this manual thoroughly before installation and use to ensure proper function and safety. Keep this manual for future reference.
The Fermax Sup Milo Digital Intercom System is designed to provide clear communication and enhanced security for residential and commercial premises. It integrates advanced technology with a robust design to offer reliable access control and communication solutions.
Safety Information
Always follow basic safety precautions to reduce the risk of fire, electric shock, and injury to persons. This product should only be installed and serviced by qualified personnel.
- Disconnect power before installation or servicing.
- Do not expose the unit to rain or moisture.
- Ensure all wiring connections are secure and comply with local electrical codes.
- Do not attempt to repair the unit yourself. Refer all servicing to qualified service personnel.
Package Contents
Verify that all components are present before beginning installation. The package typically includes:
- Fermax Sup Milo Digital Intercom Unit (Aluminum Plate)
- Mounting hardware
- Connection cables (may vary by kit)
- User Manual (this document)
Note: Specific components may vary based on the purchased kit.
Setup and Installation
This section outlines the general steps for installing the Fermax Sup Milo Digital Intercom System. Professional installation is recommended.
1. Site Preparation
- Choose a suitable mounting location, typically near an entrance, at an accessible height.
- Ensure the surface is flat and stable.
- Verify access to necessary power and communication wiring.
2. Mounting the Unit
- Carefully remove the front panel of the intercom unit to access mounting holes.
- Position the unit and mark the drilling points on the wall.
- Drill holes and insert appropriate wall anchors if necessary.
- Secure the intercom unit to the wall using the provided mounting screws.
3. Wiring Connections
Refer to the wiring diagram specific to your system configuration. General connections include:
- Power Supply: Connect to a stable 100V power source. Ensure correct polarity.
- Communication Bus: Connect the digital bus lines to the indoor units and central control unit.
- Door Release: Connect the door release mechanism (e.g., electric strike) to the designated terminals.
- Auxiliary Inputs/Outputs: Connect any additional devices such as external cameras or sensors as required.
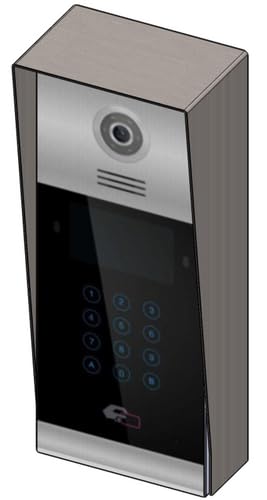 Image 1: Front view of the Fermax Sup Milo Digital Intercom System, showing the aluminum plate and digital keypad. This image illustrates the exterior design of the main unit.
4. Initial Power-Up and Configuration
- Once all wiring is complete and secure, restore power to the system.
- The unit will perform a self-test. Observe any indicator lights or sounds.
- Follow the system's programming guide (usually provided separately or accessible via a master unit) to configure apartment numbers, access codes, and other settings.
Operating Instructions
Making a Call from the Outdoor Panel
- To call an apartment: Enter the apartment number using the digital keypad.
- Press the "Call" button (often represented by a bell icon or similar).
- The indoor unit will ring. Once answered, communication can begin.
Receiving a Call and Opening the Door (Indoor Unit)
- When the indoor unit rings, press the "Answer" button to establish communication with the visitor.
- To open the door, press the "Door Release" button on your indoor unit.
- The door will unlock for a short period.
Using Access Codes
If configured, authorized users can enter a pre-programmed access code on the outdoor digital keypad to unlock the door without needing to call an indoor unit.
- Enter your personal access code using the digital keypad.
- Press the "Enter" or "Door Release" button.
- The door will unlock.
Maintenance
Regular maintenance ensures the longevity and optimal performance of your Fermax intercom system.
Cleaning
- Clean the exterior of the unit with a soft, damp cloth.
- Do not use abrasive cleaners, solvents, or chemical sprays, as these can damage the finish and electronic components.
- Ensure no liquid enters the unit's openings.
Inspections
- Periodically check for any visible damage to the unit or wiring.
- Ensure all mounting screws are tight.
- Test the communication and door release functions regularly.
Software Updates
If applicable, consult your installer or Fermax support for information on firmware updates that may improve performance or add new features.
Troubleshooting
This section addresses common issues you might encounter. For more complex problems, contact technical support.
| Problem | Possible Cause | Solution |
|---|---|---|
| No communication with indoor unit. |
|
|
| Door release not working. |
|
|
| Keypad unresponsive. |
|
|
Specifications
Technical specifications for the Fermax Sup Milo Digital Intercom System (Model: 8424299951713).
- Model: Fermax Sup Milo Digital Intercom System
- Part Number: 8424299951713
- Manufacturer: Fermax
- Dimensions (Package): Approximately 0.1 x 0.1 x 0.1 cm
- Weight (Unit): 108 Grams
- Material: Metal, Plastic, Polycarbonate (Aluminum Plate)
- Power Source: External Power Supply (100V)
- Voltage: 100V
- Wattage: 100W
- Batteries Required: No
- Color: Multicolored (referring to internal components or subtle design elements, main plate is aluminum)
Warranty Information
Fermax products are manufactured to high-quality standards. For specific warranty terms and conditions, please refer to the warranty card included with your product or visit the official Fermax website. Keep your proof of purchase for warranty claims.
Typically, warranty covers manufacturing defects for a specified period from the date of purchase. Damage due to improper installation, misuse, or unauthorized repairs is generally not covered.
Customer Support
If you require technical assistance, have questions about your product, or need to report a problem, please contact your local Fermax distributor or visit the official Fermax website for support resources.
Website: www.fermax.com
Please have your model number (8424299951713) and purchase details ready when contacting support.