
Unifit 139aca90-1bf5-452b-bad8-46eae0b6f6c6
Unifit Digital Thermostat Control Board User Manual
Model: 139aca90-1bf5-452b-bad8-46eae0b6f6c6
Introduction
This manual provides detailed instructions for the installation, operation, and maintenance of the Unifit Digital Thermostat Control Board. This replacement part is specifically designed for Pit Boss 2-series digital electric vertical smokers, including the Pit Boss PBV2D1 Controller. It features a bright LED display for easy readability and offers four distinct cooking modes.
Compatibility
This control board is compatible with Pit Boss 2-series digital electric vertical smokers. It is a direct replacement for the original control panel found in models such as the Pit Boss PBV2D1. Please note that this controller is not compatible with other vertical smoker controllers or models outside the specified 2-series.

Image: The Unifit control board shown installed in the lower front panel of a compatible Pit Boss 2-series digital electric vertical smoker, illustrating its intended placement.
Features
- Bright LED Display: Provides clear and easy-to-read information, even in direct sunlight.
- Durable Construction: Designed with high-temperature resistance for long service life.
- Temperature Readout: Displays internal temperatures and supports two wired meat probes (probes not included).
- Four Temperature Modes: Offers a temperature range from 100°F to 400°F, with cooking modes including smoking, baking, braising, and roasting.
- Push-Button Digital Control: Intuitive interface for setting temperature and timer.

Image: A direct front view of the Unifit Digital Thermostat Control Board, showcasing its LED display, control buttons, and integrated power cord.
Setup and Installation
Installation of the Unifit Digital Thermostat Control Board is designed to be straightforward. Ensure the smoker is unplugged from the power source before beginning any installation or maintenance.
Required Tools (Not Included):
- Screwdriver (appropriate for your smoker's fasteners)
- Pliers (optional, for wire connections)
Installation Steps:
- Disconnect Power: Ensure the smoker is completely unplugged from the electrical outlet.
- Access Control Panel: Locate and remove the screws or fasteners securing the existing control panel on your Pit Boss 2-series vertical smoker. Carefully pull the old control panel out.
- Disconnect Old Wiring: Note the connections of the existing wires (heating element, temperature probe, etc.) to the old control board. Disconnect all wires from the old board. It is recommended to take a photo before disconnecting for reference.
- Connect New Control Board: Connect the corresponding wires from the smoker to the new Unifit control board. Refer to the wiring diagram below for proper connections. Ensure all connections are secure.
- Secure New Control Board: Carefully insert the new Unifit control board into the designated slot on the smoker. Secure it with the original screws or fasteners.
- Initial Power-Up: Once the new control board is securely installed and all connections are verified, plug the smoker back into a grounded electrical outlet.
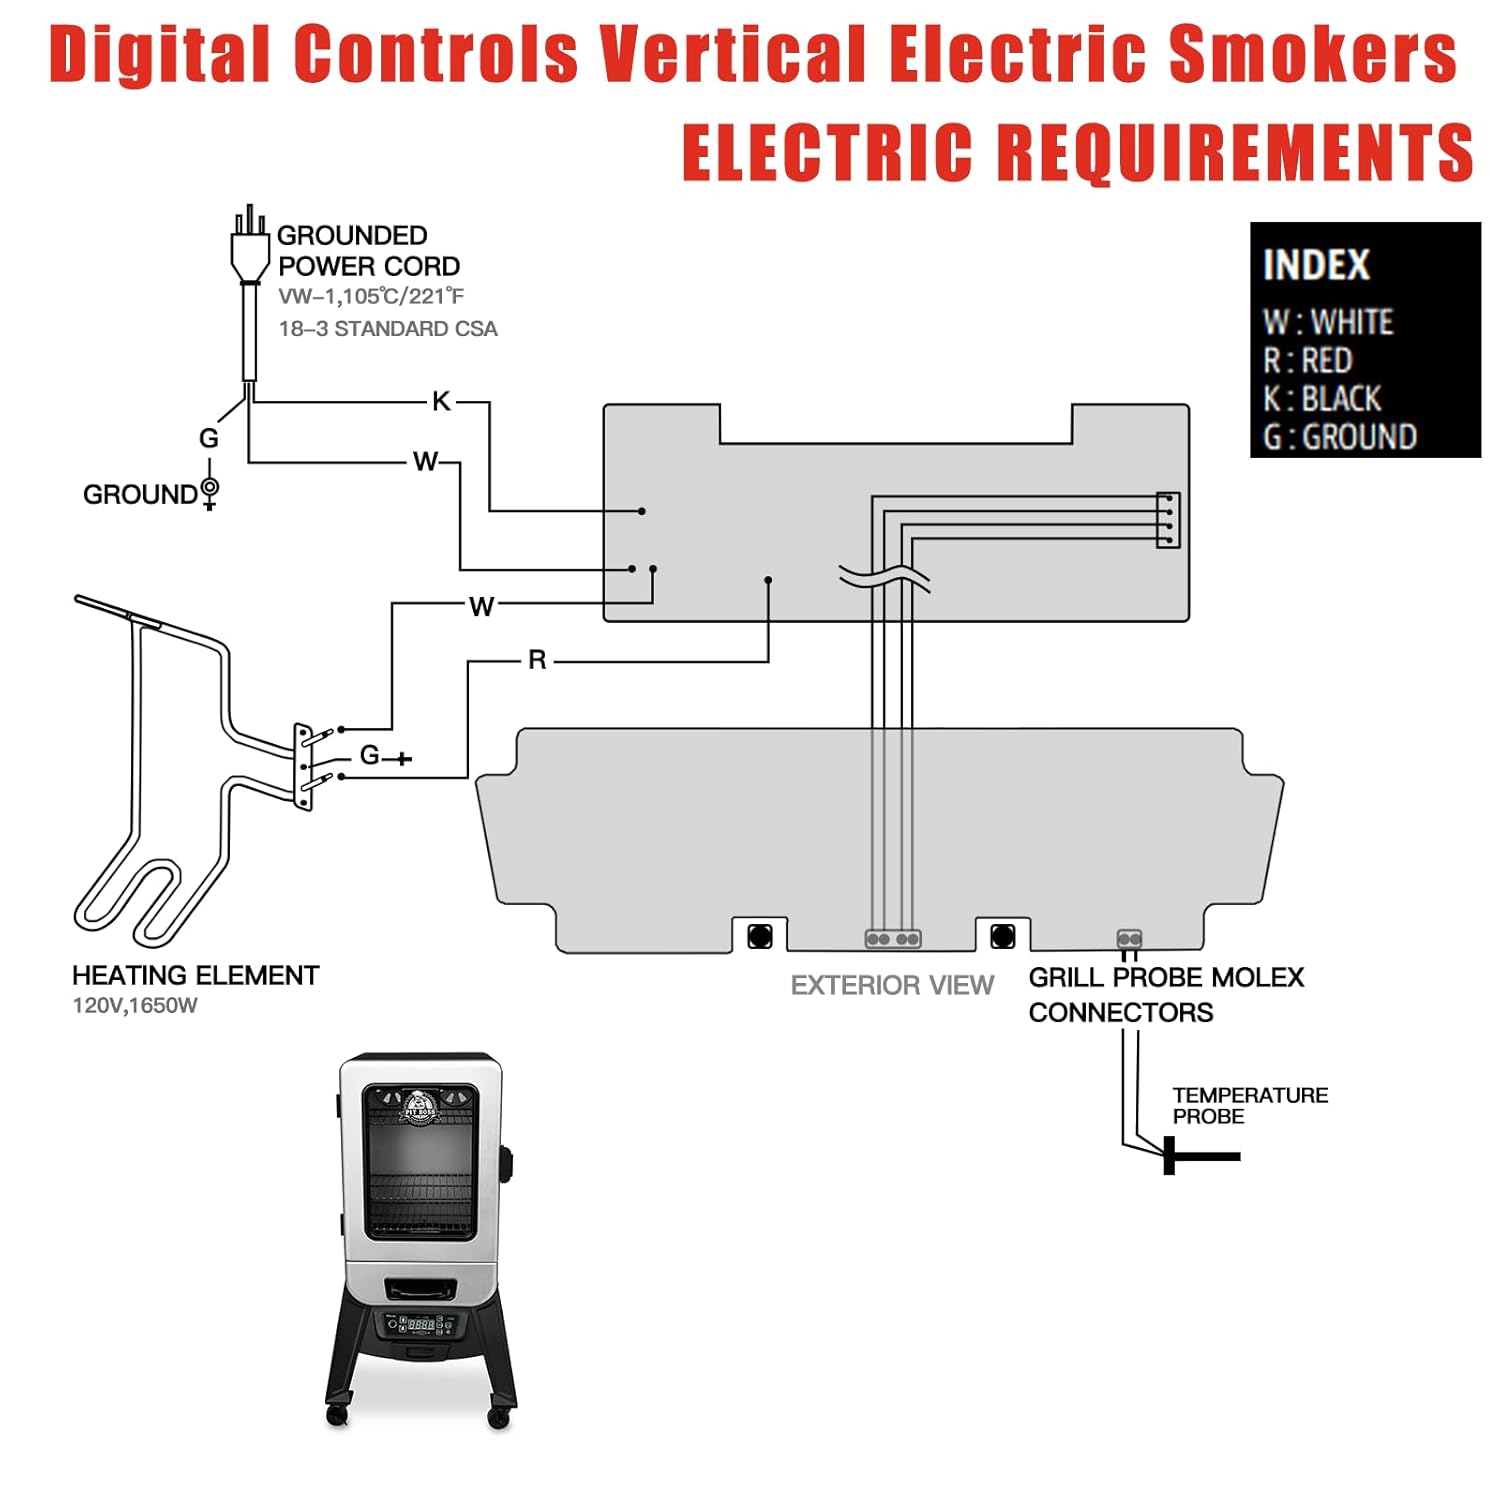
Image: A detailed wiring diagram illustrating the electrical connections between the digital control board, heating element, and temperature probes for a vertical electric smoker. Key color codes for wires (White, Red, Black, Ground) are provided.
Operating Instructions
The Unifit control board provides intuitive digital controls for precise temperature management and cooking settings.

Image: A visual guide to the control board's buttons, including Power, Temperature (Temp), Time, Set/Act, Smoke, and Adjustment Arrows, along with a description of the Element Light Indicator.
Control Panel Functions:
- Power Button (⏻): Turns the smoker on or off.
- Temperature (Temp) Button: Press to adjust the desired cooking temperature. Use the Up/Down arrows to change the value.
- Time Button: Press to set the cooking timer. Use the Up/Down arrows to adjust the time.
- Set/Act Button: Used to confirm temperature or time settings after adjustment. Press immediately after setting to save.
- Smoke Button: Activates the smoking mode.
- Adjustment Arrows (▲ / ▼): Increase or decrease temperature and time values.
- F/C Button: Press this button to switch the temperature display between Celsius (°C) and Fahrenheit (°F). The default setting is Fahrenheit.
- Element Light Indicator: Illuminates when the heating element is active.
Setting Temperature and Time:
- Press the Temp button to enter temperature setting mode.
- Use the ▲ or ▼ arrows to select your desired temperature (100°F – 400°F).
- Immediately press the Set/Act button to confirm the temperature.
- To set a timer, press the Time button.
- Use the ▲ or ▼ arrows to adjust the cooking time.
- Immediately press the Set/Act button to confirm the timer.
Note: The window of time to set the temperature and timer is brief. Ensure you press the Set/Act button immediately after adjusting your desired value.

Image: A close-up view of the digital display on the Unifit control board, showing current temperature readings (e.g., 080°F) and indicators for two meat probes (PROBE1, PROBE2).
Maintenance
Proper maintenance ensures the longevity and optimal performance of your control board.
- Cleaning: Wipe the control panel surface with a soft, damp cloth. Do not use abrasive cleaners or immerse the unit in water. Ensure the unit is unplugged before cleaning.
- Storage: If the smoker is stored for an extended period, ensure the control board is clean and dry. Store in a cool, dry place.
- Inspection: Periodically inspect the wiring connections for any signs of wear or damage.
Troubleshooting
This section addresses common issues you might encounter with the control board.
| Problem | Possible Cause | Solution |
|---|---|---|
| Control board does not power on. | No power to the smoker; loose wiring connection; faulty control board. | Check power outlet and cord. Verify all wiring connections are secure. If issues persist, the board may need replacement. |
| Temperature display is inaccurate. | Faulty temperature probe; loose probe connection. | Ensure meat probes are fully inserted. Check the RTD temperature probe connection to the board. Replace probe if necessary. |
| Cannot set temperature or timer. | Set/Act button not pressed immediately after adjustment. | After using the Up/Down arrows to adjust temperature or time, immediately press the "Set/Act" button to confirm the setting. |
| Display is dim or hard to read. | Direct sunlight interference; potential display issue. | Relocate the smoker to a shaded area if possible. While the display is designed to be bright, extreme direct sunlight can affect visibility. |
Specifications
| Attribute | Detail |
|---|---|
| Brand | Unifit |
| Model Number | 139aca90-1bf5-452b-bad8-46eae0b6f6c6 |
| Compatible Smoker Series | Pit Boss 2-series Digital Electric Vertical Smokers (e.g., PBV2D1) |
| Temperature Range | 100°F – 400°F |
| Cooking Modes | Smoking, Baking, Braising, Roasting |
| Display Type | Digital LED |
| Connectivity Technology | Wired |
| Included Components | 1x Control Board |
| Outer Material | Plastic |
| Certification | UL Specification Met |
| Product Dimensions (approx.) | 10.94 x 6.1 x 3.74 inches (Package) |
| Item Weight (approx.) | 1.87 Pounds |
| Care Instructions | Wipe Clean |

Image: A diagram showing the approximate dimensions of the Unifit control board, including length (8.07 inches), height (2.75 inches), and the length of the RTD Temp Probe wire (8.46 inches) and power cord (8.85 inches).
Warranty and Support
For warranty information or technical support, please refer to the contact details provided by the manufacturer, Lear Outdoor Products, or the retailer from whom the product was purchased. Keep your purchase receipt for warranty claims.
For further assistance, you may visit the Unifit Store on Amazon.
Ask a question about this manual
Ask about setup, troubleshooting, compatibility, parts, safety, or missing instructions. Manuals+ will review the question and use this page’s manual context to help answer it.