
BESULEN V519
BESULEN V519 OBD2 Scanner User Manual
Model: V519
1. Introduction
Thank you for choosing the BESULEN V519 OBD2 Scanner. This professional diagnostic tool is designed to help you diagnose and clear automotive engine faults, read real-time vehicle data, and perform various diagnostic tests on OBDII compliant vehicles. This manual provides detailed instructions for setting up, operating, maintaining, and troubleshooting your device to ensure optimal performance and longevity.
2. Product Overview
2.1 Package Contents
- 1 x BESULEN V519 Car OBD2 Scanner
2.2 Key Features
- Professional vehicle code reader for diagnosing and clearing engine failures.
- Real-time reading of battery voltage and vehicle information.
- Accurate reading of error codes with real-time data plotting and recording.
- User-friendly interface for easy navigation and data interpretation.
- Constructed from high-quality ABS material, resistant to cold and heat.
- Features a non-slip protective sleeve design for durability.
- Plug-and-play operation, no batteries required; powered directly from the vehicle's OBD2 port.
- Reinforced wire for stable and durable connection.
- Quickly reads and erases error codes via a 16-PIN interface.
- Built-in library of 35,901 fault codes for quick query.
- 2.8-inch color screen for clear display.
- Supports 10 languages: English, German, French, Spanish, Italian, Russian, Dutch, Chinese, Japanese, Portuguese.
- Supports all OBDII compliant models with functions including:
- Automotive engine fault diagnosis
- Car engine failure cleared
- Car malfunction freeze frame
- Vehicle I/M ready status
- Vehicle information reading
- Car real-time data stream reading
- Car battery voltage reading
- Mode 6 detection
- Oxygen sensor test
- Mode 8 detection
- Fault code query
- Playback function
2.3 Product Diagram

Figure 2.3.1: Front view of the BESULEN V519 OBD2 Scanner with key components labeled, including the 2.8-inch color screen, navigation buttons (up, down, left, right, OK), function buttons (F1, F2, EXIT), and the 16-pin OBD2 interface cable.
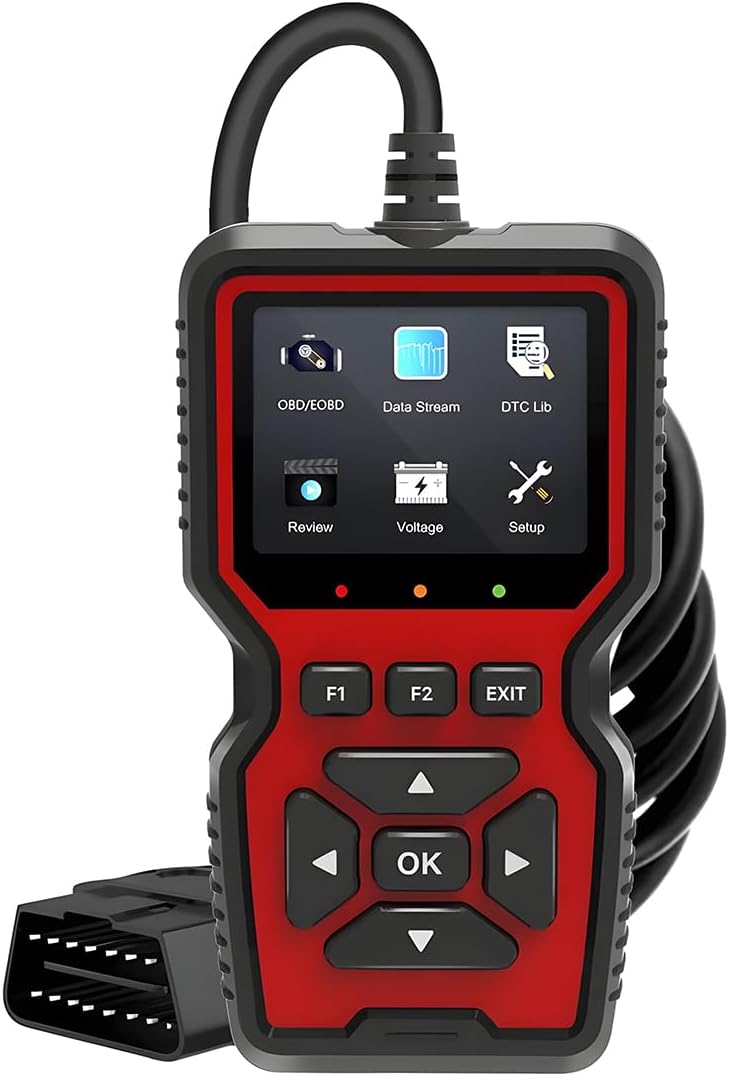
Figure 2.3.2: The BESULEN V519 OBD2 Scanner, showcasing its compact design, red and black color scheme, and integrated OBD2 cable.

Figure 2.3.3: Dimensions of the BESULEN V519 OBD2 Scanner, indicating an overall length of approximately 20 inches (including cable), a height of 6.1 inches, and a width of 3.43 inches for the main unit.

Figure 2.3.4: Close-up views highlighting the anti-slip and anti-fall protective cover, the reinforced and durable wire, the accurate and responsive button design, and the cold and temperature-resistant ABS material of the scanner.

Figure 2.3.5: An illustrative diagram showing the various full OBD2 modes supported by the BESULEN V519 scanner, including Read Codes, Clear Codes, Mode 6, Mode 8, O2 Sensor Test, Freeze Frame, I/M Readiness, Vehicle Info, Live Data Graph, Battery Voltage Test, DTC Library, Data Playback, Print, Upgrade Function, and 10 Languages Support.
3. Setup
The BESULEN V519 OBD2 Scanner is designed for simple plug-and-play operation. Follow these steps to set up and begin using your scanner:
- Locate the OBD2 Port: The OBD2 port is typically located under the dashboard on the driver's side of the vehicle. Refer to your vehicle's owner's manual if you cannot locate it.
- Connect the Scanner: Plug the 16-pin connector of the BESULEN V519 scanner firmly into your vehicle's OBD2 port.
- Turn On Ignition: Turn the vehicle's ignition to the "ON" position (do not start the engine unless instructed by a specific diagnostic procedure). The scanner will power on automatically.
- Language Selection (First Use): If this is your first time using the scanner, you may be prompted to select your preferred language. Use the navigation buttons to select and confirm.

Figure 3.1: Illustration demonstrating the typical location of the OBD2 port in a vehicle (often under the dashboard on the driver's side) and how to connect the scanner.
4. Operating Instructions
4.1 Basic Navigation
- Up/Down Arrows: Navigate through menu options.
- Left/Right Arrows: Move cursor, change values, or navigate sub-menus.
- OK Button: Confirm selection or enter a menu.
- EXIT Button: Return to the previous screen or exit a function.
- F1/F2 Buttons: Function-specific buttons, their purpose will be displayed on the screen.
4.2 Diagnostic Functions
Once connected and powered on, the main menu will appear. Select the desired function using the navigation buttons and press OK.
- OBD/EOBD: This is the primary function for engine diagnostics.
- Read Codes: Displays Diagnostic Trouble Codes (DTCs) stored in the vehicle's computer. Each code will have a description.
- Clear Codes: Erases DTCs from the vehicle's computer. Warning: Clearing codes does not fix the underlying problem. Ensure the issue is resolved before clearing codes.
- I/M Readiness: Checks the status of emission-related monitors to determine if they have run and completed their diagnostic testing. Useful for emissions testing.
- Live Data Stream: Displays real-time data from the vehicle's sensors (e.g., engine RPM, vehicle speed, oxygen sensor readings). Data can be displayed as values or graphs.
- Freeze Frame: Shows a snapshot of sensor data at the moment a fault code was set, providing context for the fault.
- O2 Sensor Test: Retrieves O2 sensor monitor test results for the most recently completed tests from the vehicle's on-board computer.
- Mode 6 Test Results: Retrieves test results for emission-related powertrain components and systems that are not continuously monitored.
- Mode 8 Component Test: Allows initiation of a leak test for the vehicle's EVAP system.
- Vehicle Information: Retrieves the Vehicle Identification Number (VIN), Calibration ID (CALID), and Calibration Verification Number (CVN) of the vehicle.
- Data Stream: Directly access real-time data stream display.
- DTC Lib (DTC Library): Allows you to look up the meaning of a Diagnostic Trouble Code (DTC) by entering the code number.
- Review: Access previously saved diagnostic data or freeze frame data for review.
- Voltage: Displays the current battery voltage of the vehicle.
- Setup: Configure scanner settings such as language, unit of measure, and sound.
5. Maintenance
- Cleaning: Wipe the scanner with a soft, damp cloth. Do not use abrasive cleaners or solvents.
- Storage: Store the device in a dry, cool place away from direct sunlight and extreme temperatures. Keep it in its protective sleeve or original packaging when not in use.
- Software Updates: The scanner supports firmware upgrades via its USB-C port. Check the manufacturer's website for available updates to ensure optimal performance and compatibility with newer vehicles.
- Cable Care: Avoid bending or twisting the cable excessively. Do not pull the cable to disconnect the scanner from the vehicle; always grasp the connector.
6. Troubleshooting
| Problem | Possible Cause | Solution |
|---|---|---|
| Scanner does not power on. |
|
|
| "Link Error" or "Communication Error" message. |
|
|
| Cannot clear codes. |
|
|
7. Specifications
| Attribute | Value |
|---|---|
| Material | ABS |
| Color | Black+Red |
| Operating Voltage | 9-16V |
| Operating Environment Temperature | -4~149℉ (-20~65℃) |
| Storage Temperature | -22~158℉ (-30~70℃) |
| Product Size | 7.9 x 5.1 x 1.7 inches (approx. 20 x 13 x 4.3 cm) |
| Product Weight | 246g (approx. 0.54 lbs) |
| Screen Size | 2.8 inch color screen |
| Supported Languages | English, German, French, Spanish, Italian, Russian, Dutch, Chinese, Japanese, Portuguese |
| Fault Code Library | 35,901 codes |
8. Warranty and Support
For warranty information, technical support, or any inquiries regarding your BESULEN V519 OBD2 Scanner, please contact BESULEN customer service through the retailer's platform or the official BESULEN website. Please have your product model and purchase details ready when contacting support.
Ask a question about this manual
Ask about setup, troubleshooting, compatibility, parts, safety, or missing instructions. Manuals+ will review the question and use this page’s manual context to help answer it.