
1. Introduction
This manual provides detailed instructions for the installation, operation, and maintenance of your MagniumGear Neo Air 2 ATX Mid-Tower PC Case. Please read this manual thoroughly before beginning assembly to ensure proper setup and to prevent damage to your components or the case.
The MagniumGear Neo Air 2 is designed for high airflow performance, featuring a distinctive wood texture front panel and a tempered glass side panel. It supports a wide range of components, including E-ATX motherboards and extensive cooling solutions.
2. Package Contents
Carefully unpack the case and verify that all listed items are present. If any items are missing or damaged, please contact your retailer or MagniumGear support.
- Neo Air 2 Chassis
- 3x D-RGB 120mm Fans (pre-installed)
- 1x Triple SSD bracket
- 2x HDD brackets
- Accessory Box/Bag containing:
- 6x Zip ties
- 22x Motherboard/SSD Screws
- 4x PSU Screws
- 1x Stand-off
- 2x HDD Locking Screws
Important: Please check the accessory box thoroughly for all screws and components before discarding packaging. Missing screws have been reported in some instances.
3. Setup and Installation
Before beginning installation, ensure your workspace is clean and static-free. It is recommended to wear an anti-static wrist strap.
3.1 Case Overview
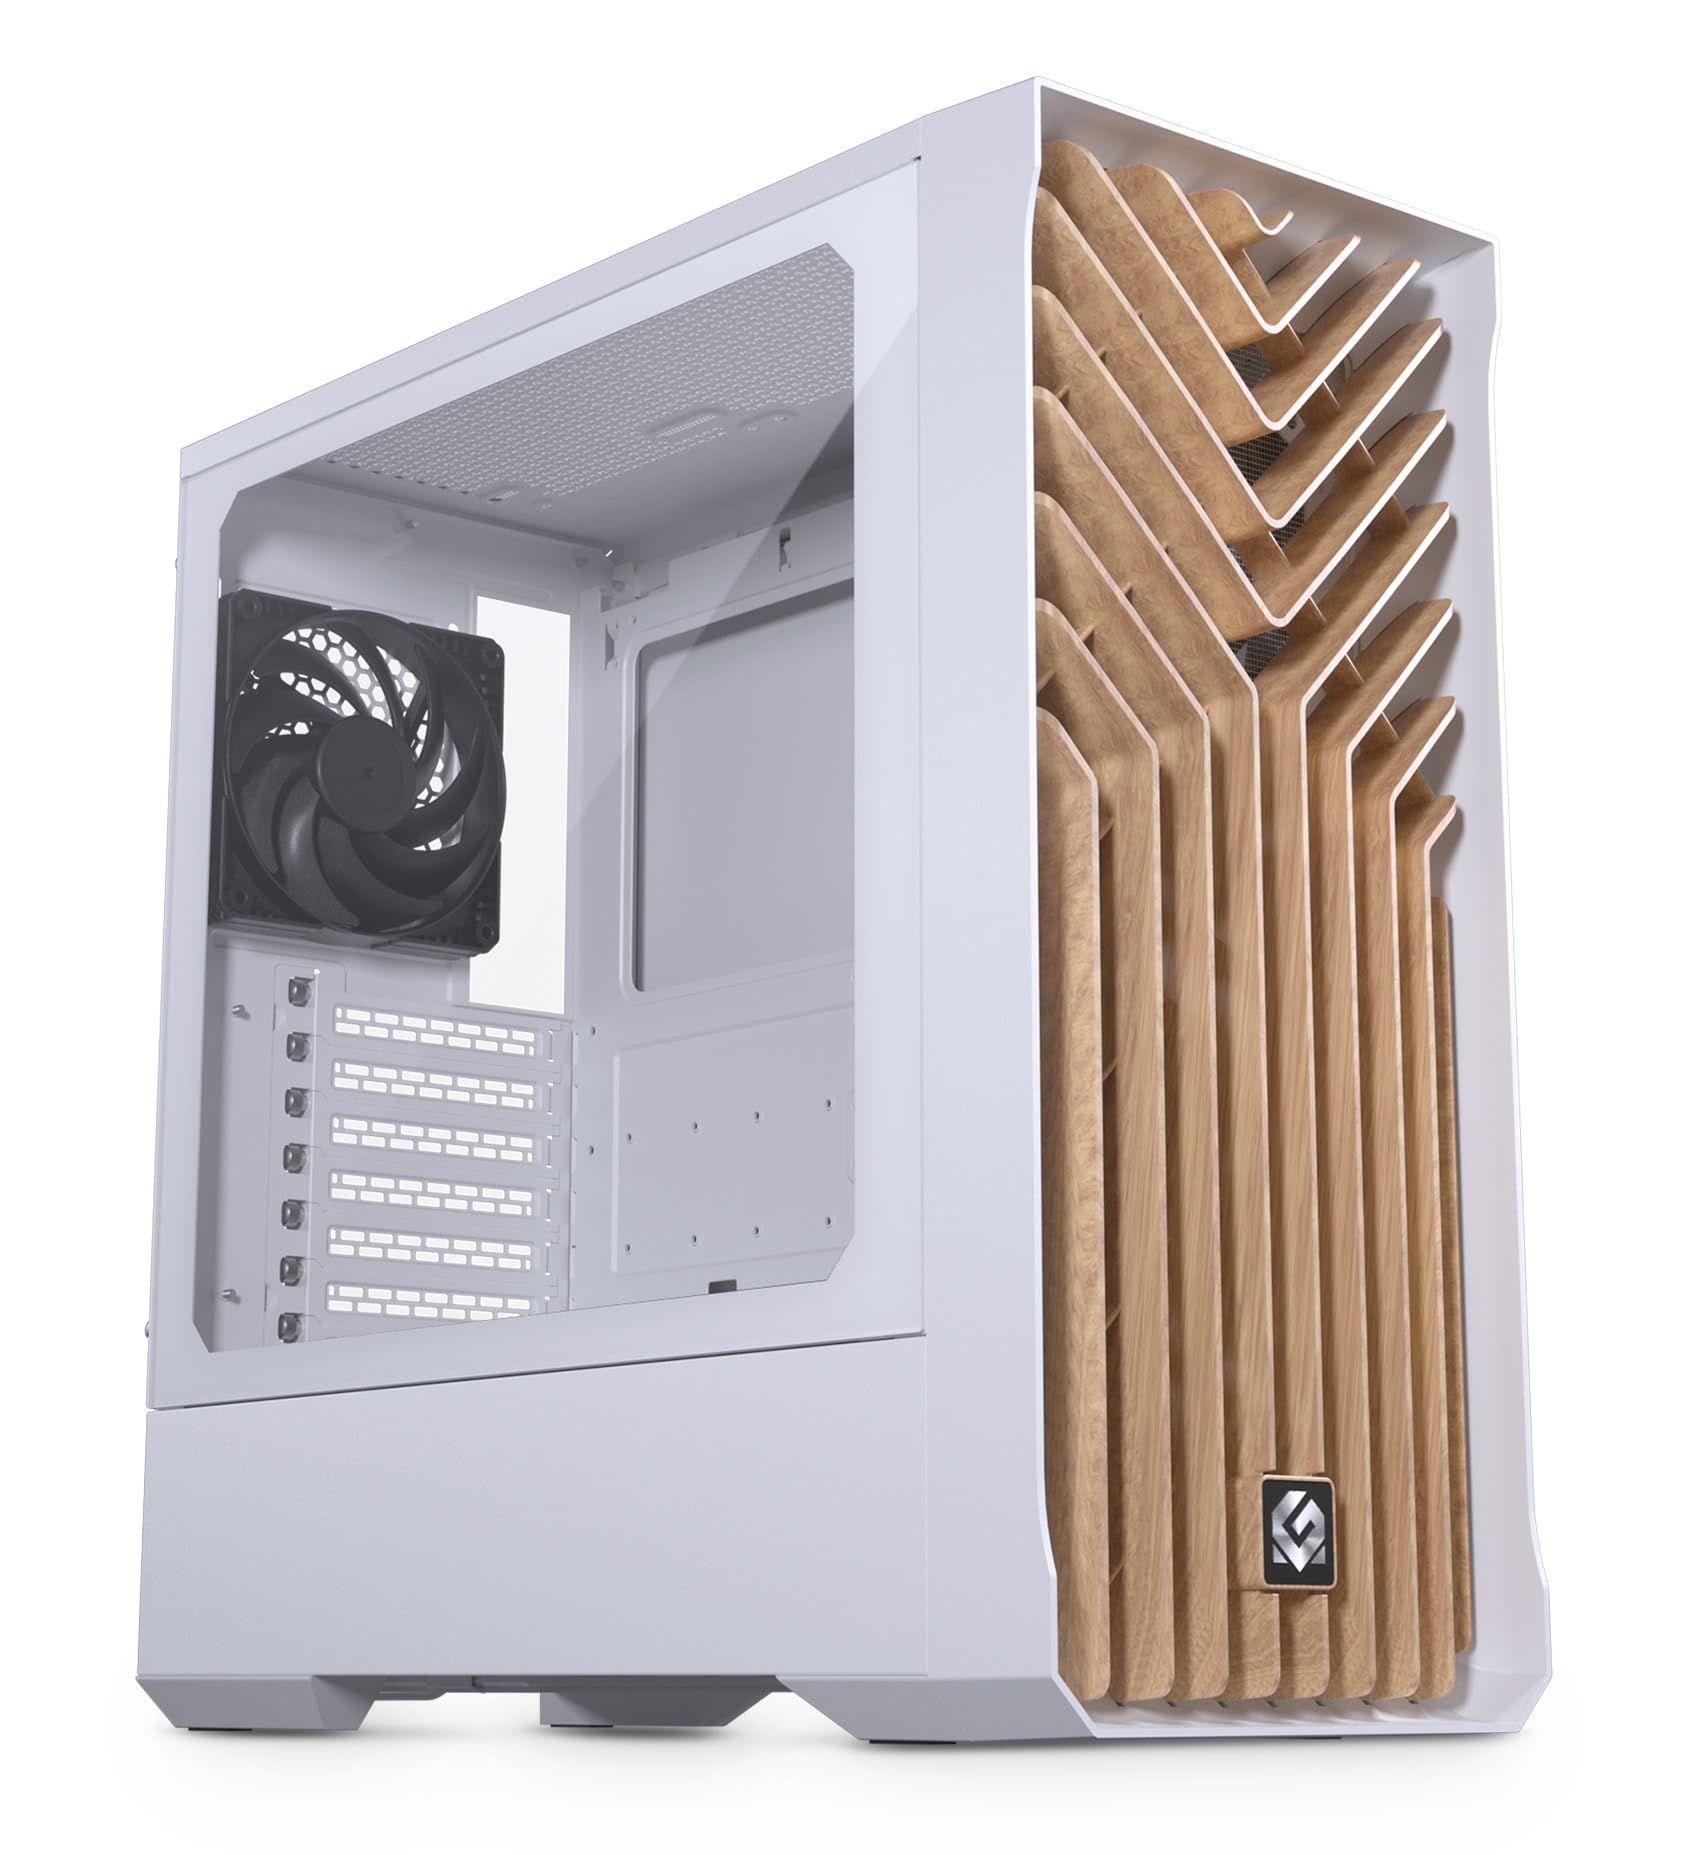
Main view of the MagniumGear Neo Air 2 ATX Mid-Tower case in white, featuring a wood texture front panel and a tempered glass side panel. A black fan is visible at the rear.
3.2 Removing Side Panels
- Carefully remove the tempered glass side panel by unscrewing the thumb screws located at the rear of the case. Slide the panel backward and lift it off. Place it on a soft, flat surface to prevent scratches.
- Remove the solid steel side panel by unscrewing the thumb screws and sliding it backward.
3.3 Motherboard Installation
The Neo Air 2 supports ATX, micro-ATX, mini-ITX, and E-ATX motherboards (up to 280mm wide).
- Install the necessary motherboard standoffs into the motherboard tray. The case may have some pre-installed.
- Align your motherboard with the standoffs and the rear I/O shield opening.
- Secure the motherboard using the provided motherboard screws. Do not overtighten.
3.4 Storage Device Installation
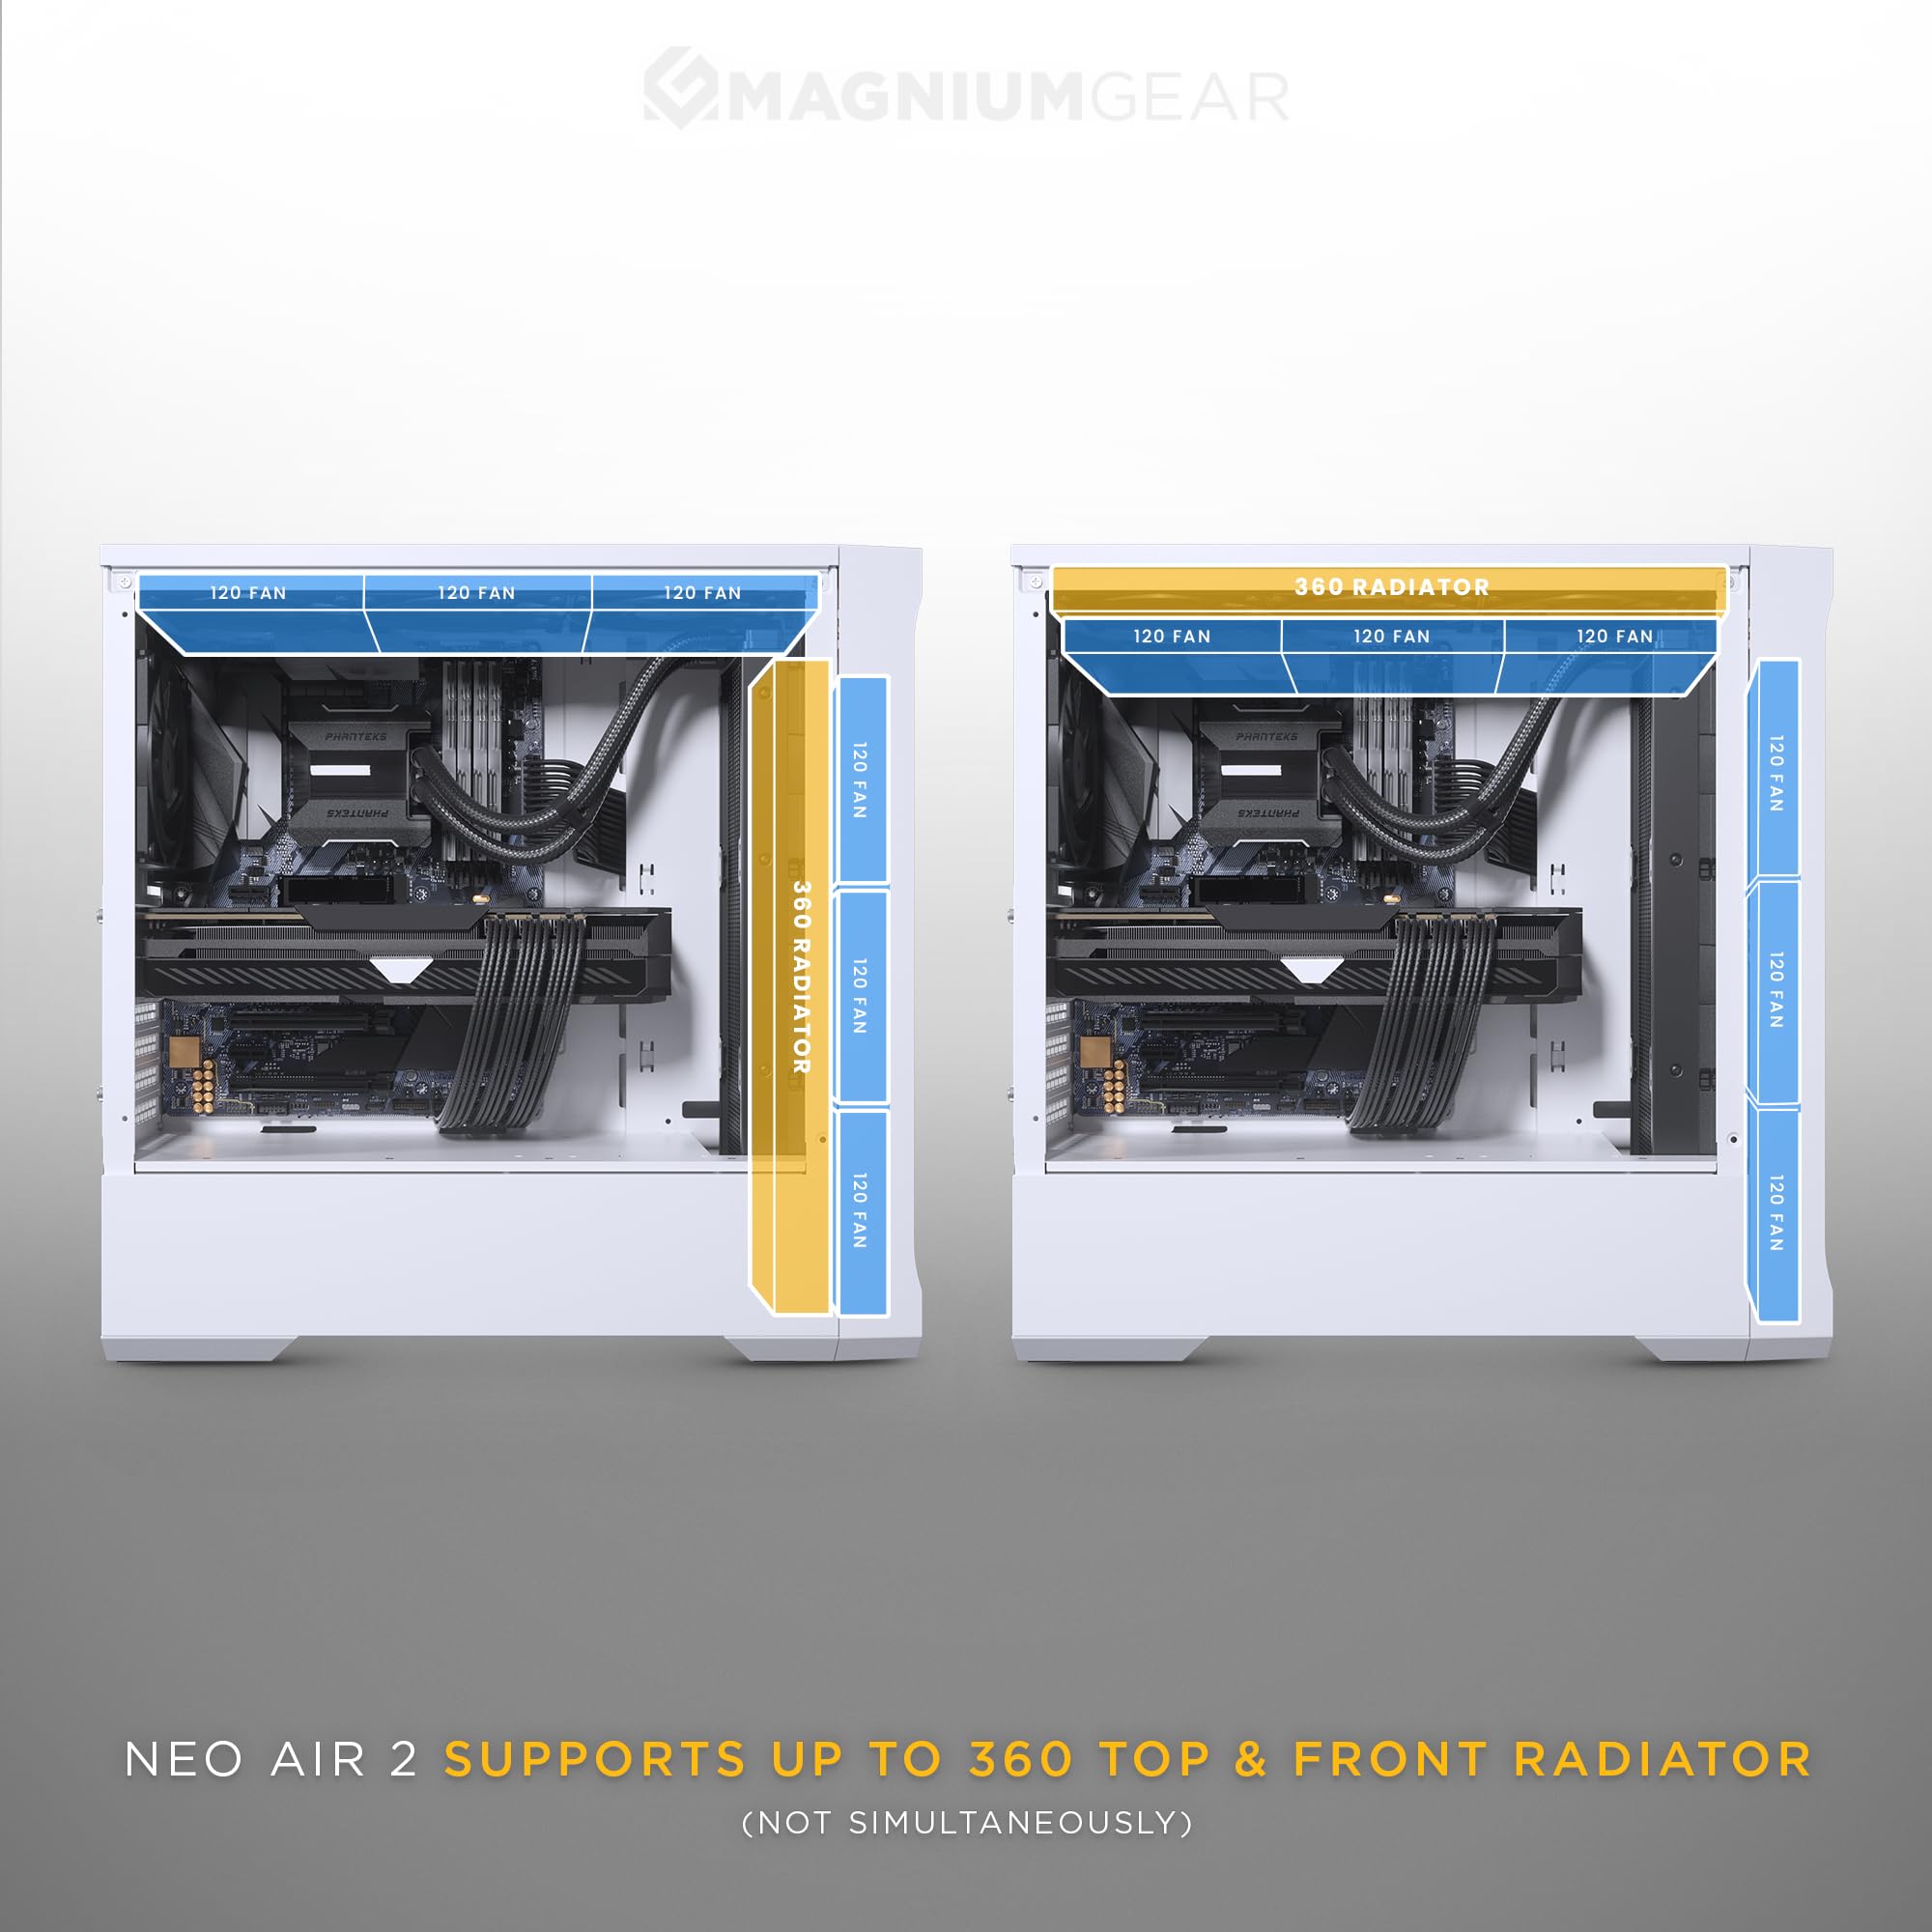
A diagram detailing the multiple storage options within the Neo Air 2 case, including bays for 2.5-inch and 3.5-inch drives.
The case supports up to 5x 2.5" drives or 3x 2.5" + 2x 3.5" drives.
- 2.5" SSDs: Use the included triple SSD bracket or mount directly to designated 2.5" locations on the motherboard tray.
- 3.5" HDDs: Install HDDs into the included HDD brackets and secure them in the PSU shroud area. The HDD cage is flexible and can be repositioned to accommodate front radiators or larger PSUs.
3.5 GPU Installation
The Neo Air 2 offers generous GPU clearance of up to 400mm.
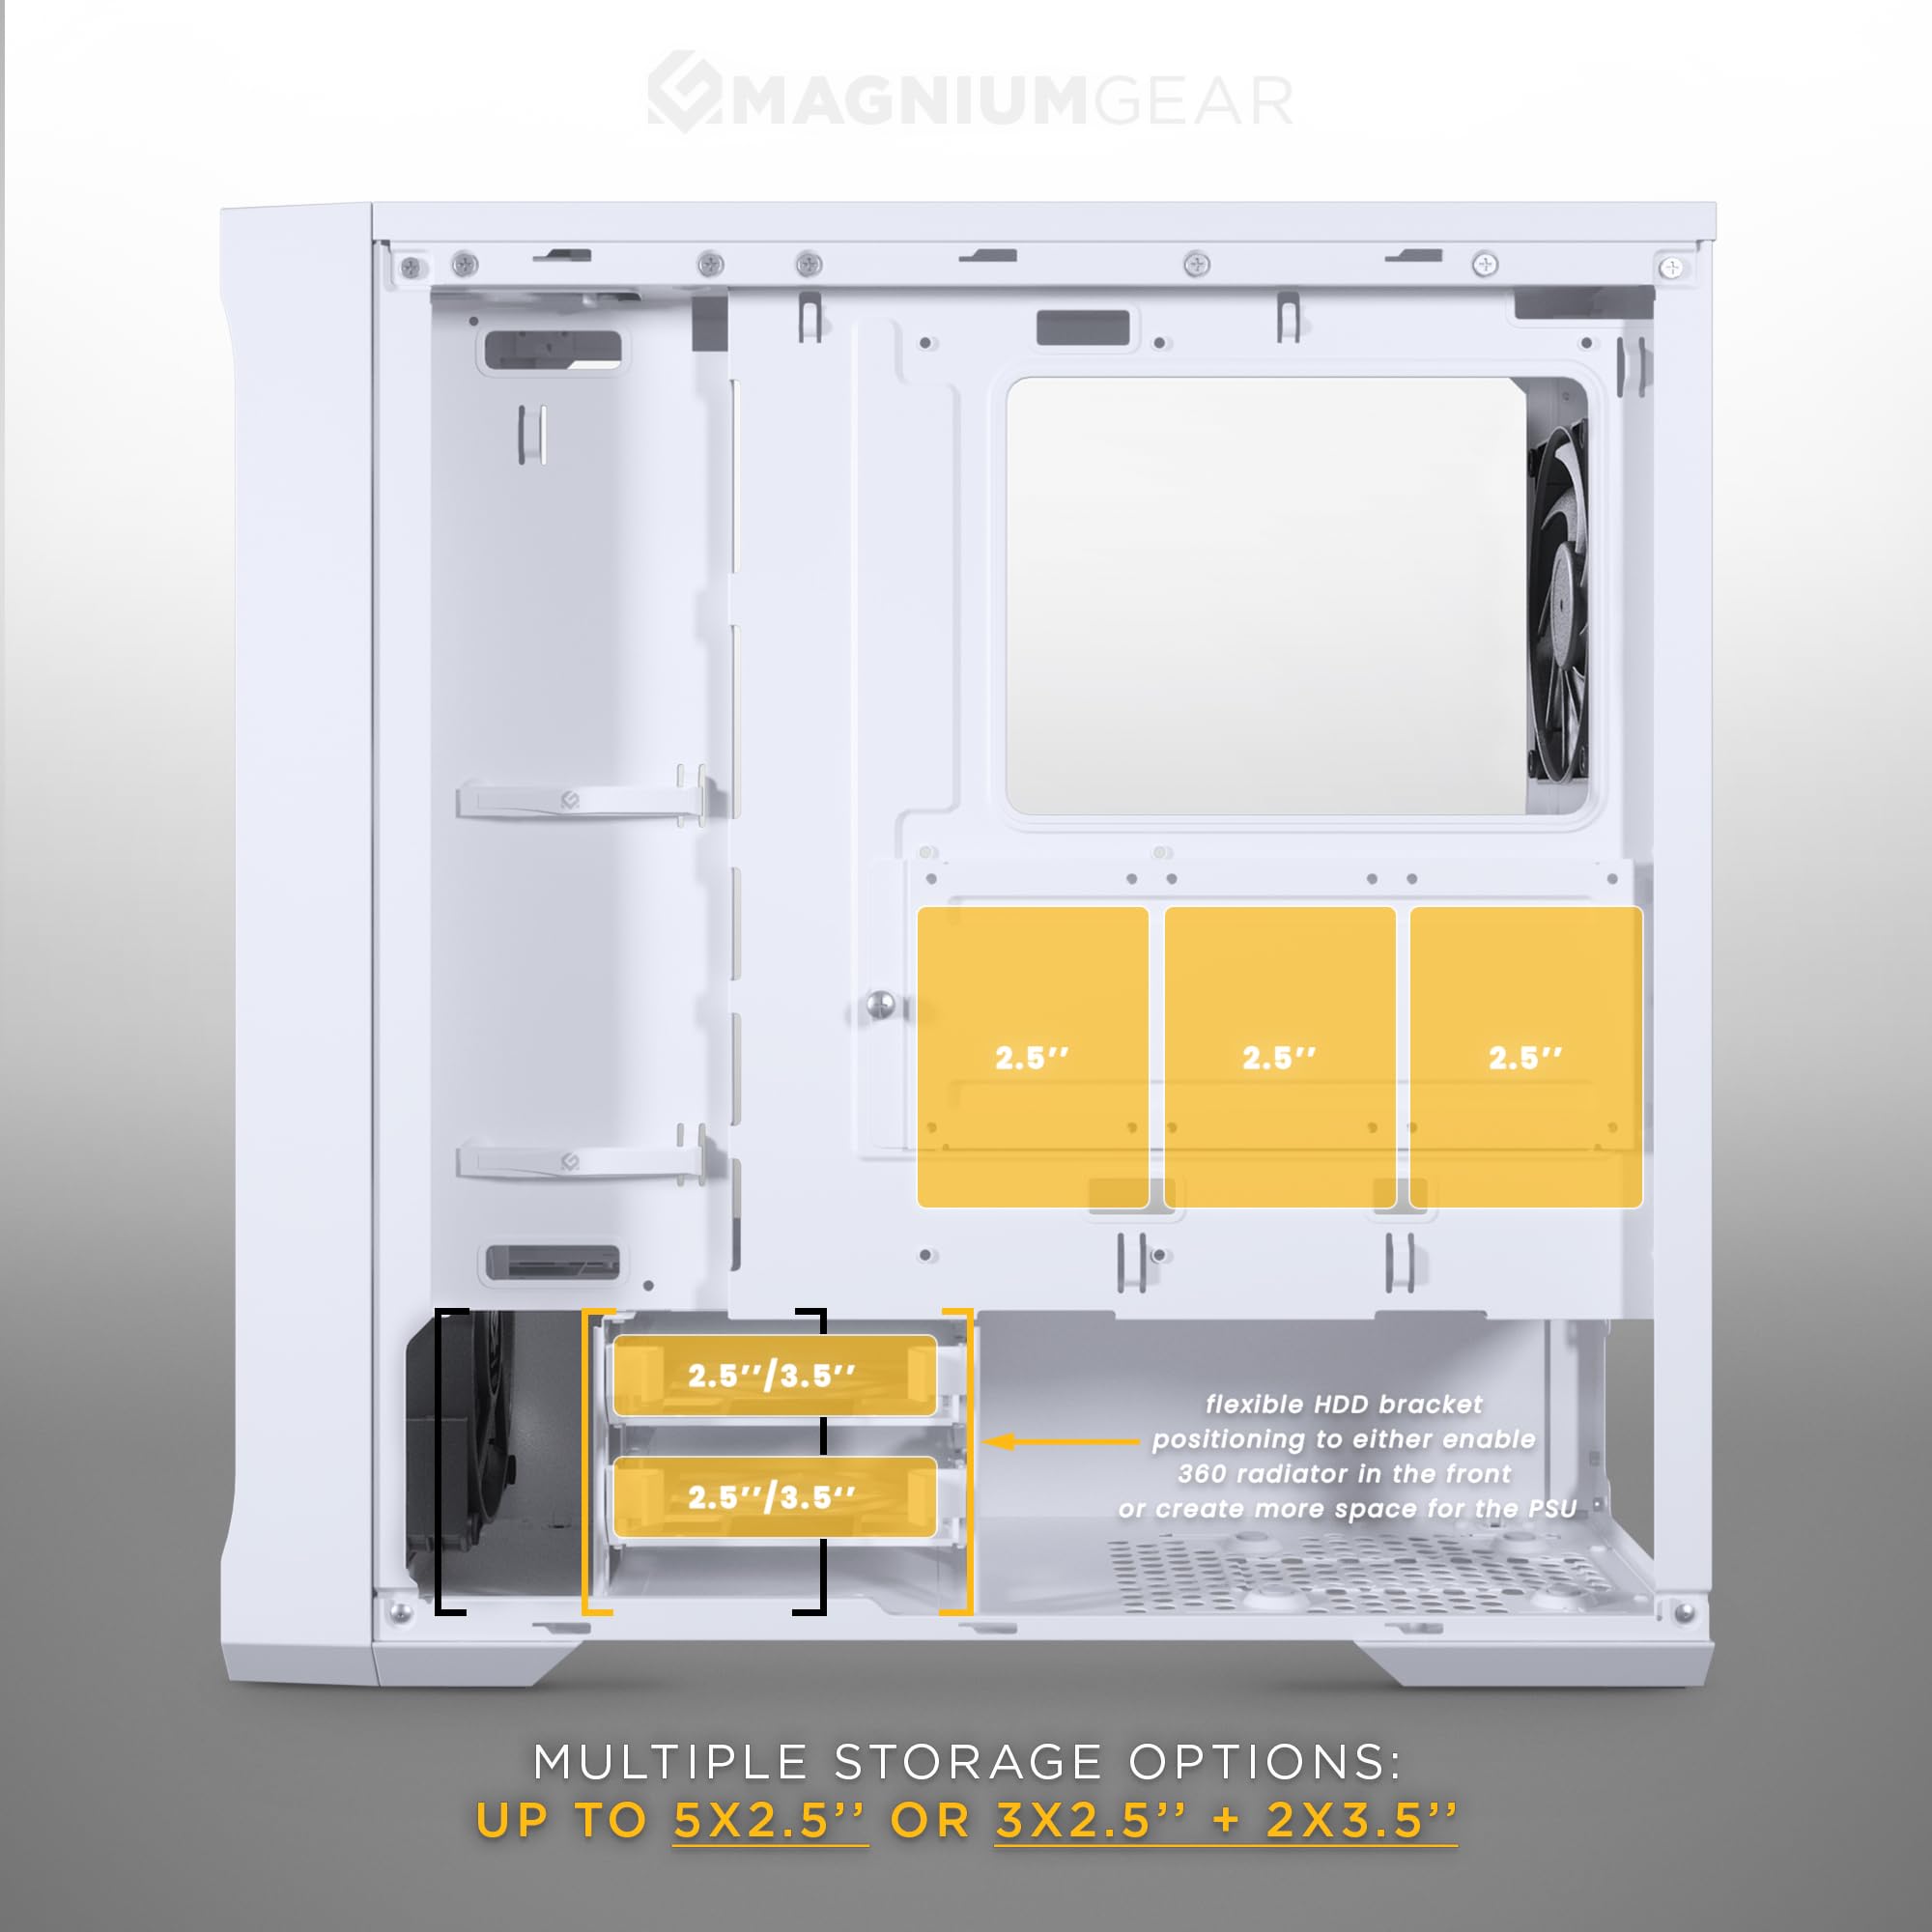
An internal view of the Neo Air 2 case showcasing the ample space for graphics cards, indicating a maximum GPU length clearance of 400mm.
- Remove the necessary expansion slot covers at the rear of the case.
- Insert your graphics card into the PCIe slot on your motherboard and secure it with screws.
- Vertical GPU Mounting: Vertical GPU mounting is supported with an optional bracket (PH-VGPUKT4.0_03, sold separately).
3.6 PSU Installation
The power supply unit (PSU) is mounted at the bottom of the case. PSU length clearance is 220mm, or 280mm depending on the HDD cage location.
- Slide the PSU into the designated compartment from the rear of the case.
- Secure the PSU to the case using the provided PSU screws.
3.7 Fan and Radiator Installation

An illustration of the MagniumGear Neo Air 2 case highlighting the inclusion of four pre-installed 120mm black fans.
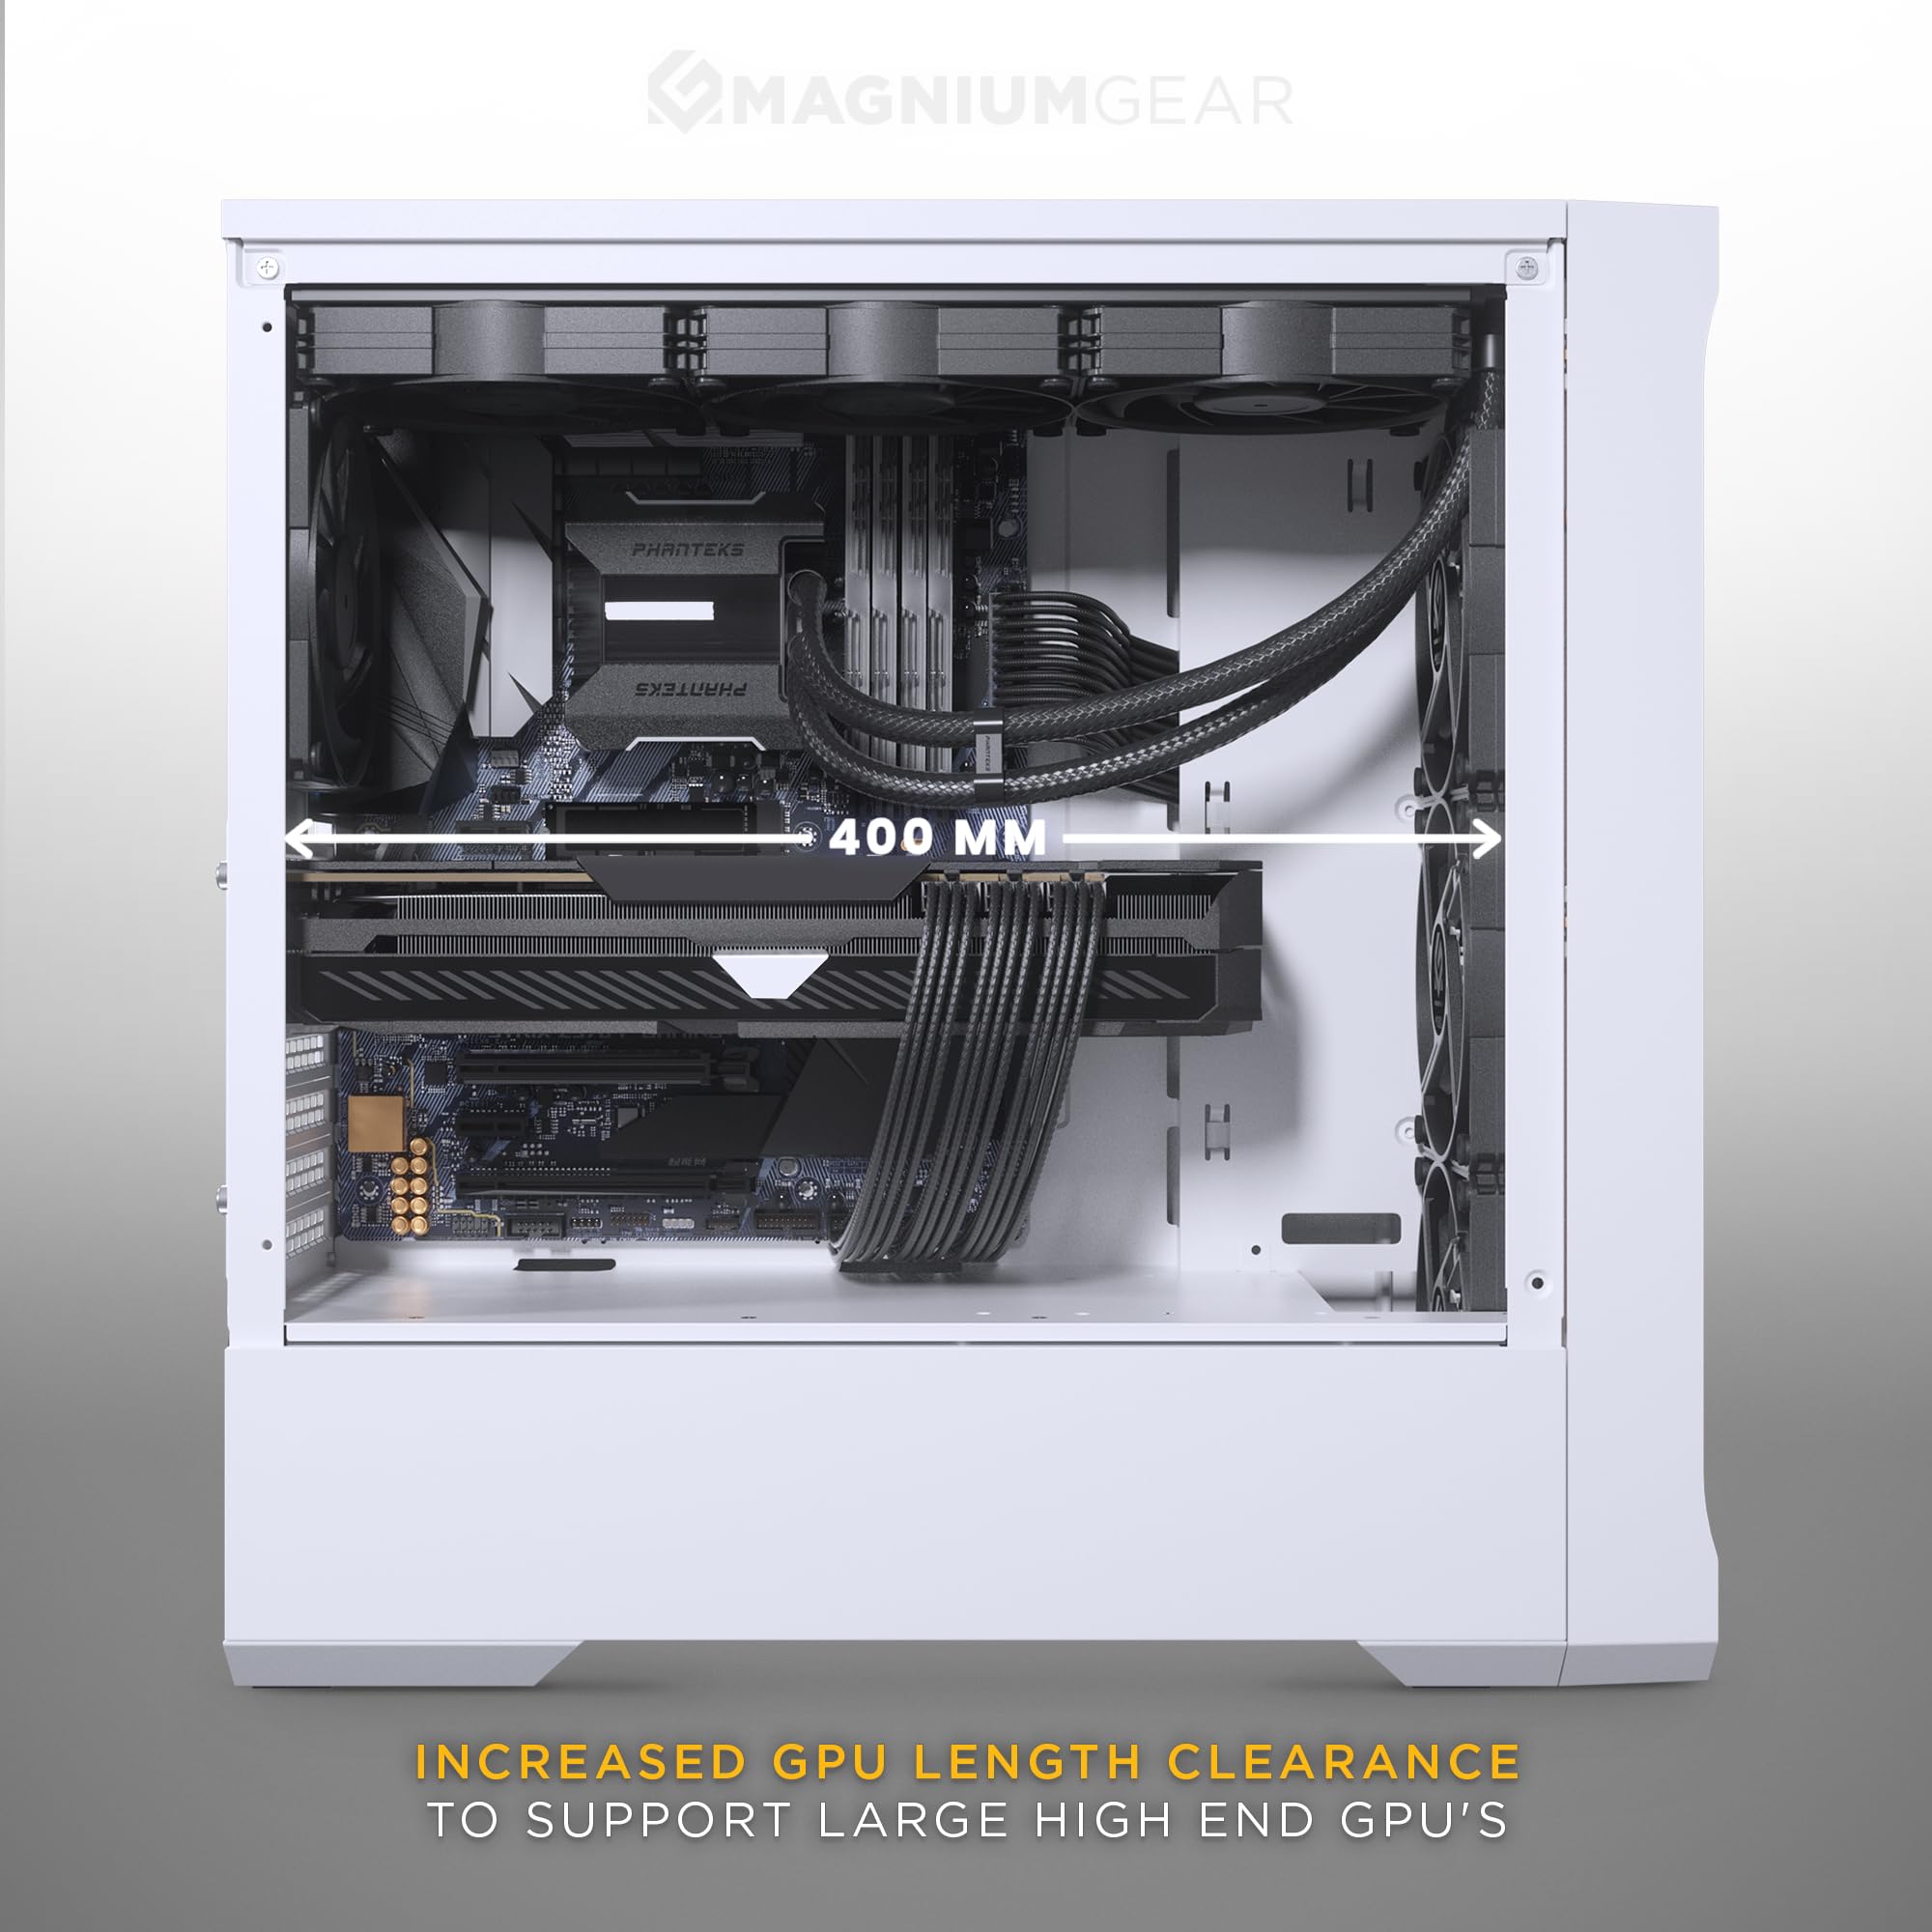
A diagram demonstrating the radiator compatibility of the Neo Air 2 case, showing support for up to 360mm radiators at both the top and front (not simultaneously).
An exploded view of the Neo Air 2's front panel, illustrating the removable front bracket, dust filter, and fan mounting points for easy installation.
The case comes with 4x 120mm black fans pre-installed (3x front, 1x rear).
- Front: Supports 3x 120mm fans or 2x 140mm fans. Radiator support up to 360mm (122x398x65mm) or 280mm (142x330mm). The front fan bracket is removable for easier installation.
- Top: Supports 3x 120mm fans. Radiator support up to 360mm (122x398mm with 42mm RAM height clearance).
- Rear: Supports 1x 120mm fan or 120mm radiator.
3.8 Front I/O and Internal Connections
Connect the front I/O cables to their respective headers on your motherboard:
- Front I/O: 1x USB-A 3.0, 1x USB-C Charging port, Microphone/Headphone Combo, Power Button, Reset Button.
- Internal Connectors: Power Switch, Reset Switch, Power LED, HD-audio, USB 3.0, D-RGB MB Adapter.
- Ensure the D-RGB MB Adapter is connected to a compatible D-RGB header on your motherboard for lighting control.
3.9 Cable Management
The case provides 36mm (1.4 inches) of cable management space behind the motherboard tray. Utilize the included zip ties and cable routing cutouts to organize cables for improved airflow and aesthetics.
4. Operating Instructions
4.1 Powering On
Once all components are installed and cables are connected, replace the side panels. Press the power button on the front I/O panel to turn on your system.
4.2 Front I/O Usage
- USB-A 3.0: For high-speed data transfer with compatible devices.
- USB-C Charging Port: Provides power for charging compatible USB-C devices. Note: This is a charging port, not a data port.
- Microphone/Headphone Combo Jack: Connect your headset for audio input and output.
- Reset Button: Initiates a system restart.
5. Maintenance
Regular maintenance helps ensure optimal performance and longevity of your PC components.
- Dust Filters: The Neo Air 2 features dust filters on the front and top panels. Regularly remove and clean these filters with compressed air or water (ensure they are completely dry before reinstallation).
- Fans: Periodically inspect fans for dust buildup and clean them using compressed air.
- Exterior Cleaning: Wipe the exterior of the case, including the wood texture front panel and tempered glass, with a soft, damp cloth. Avoid abrasive cleaners.
6. Troubleshooting
This section addresses common issues you might encounter during setup or operation.
- System Not Powering On:
- Ensure the PSU is switched on and properly connected to the wall outlet.
- Verify all power cables (24-pin ATX, 8-pin CPU, PCIe power) are securely connected to the motherboard and components.
- Check that the front panel power switch cable is correctly connected to the motherboard's front panel header.
- Fans Not Spinning:
- Confirm fan cables are securely connected to the motherboard fan headers or a fan controller.
- Check BIOS/UEFI settings for fan speed control.
- Front I/O Ports Not Working:
- Ensure the USB 3.0 and HD-audio cables from the front panel are correctly connected to their respective headers on the motherboard.
- The USB-C port is for charging only; it does not support data transfer.
- Missing Accessories/Screws:
- Thoroughly inspect all packaging and the accessory box. If items are still missing, contact your retailer or MagniumGear support with your proof of purchase.
- Sharp Edges or Flimsy Panels:
- Handle the case with care during installation. If sharp edges are present, use caution to avoid injury.
- Ensure all screws are tightened appropriately to secure panels and components.
- Airflow Issues / Gaps in Panels:
- Ensure all panels are properly seated and secured. While the case is designed for high airflow, minor gaps may exist. For optimal performance, ensure fans are correctly oriented for intake and exhaust.
7. Specifications
| Feature | Specification |
|---|---|
| Model Name | Neo Air 2 |
| Model Number | MG-NE523A_WT06W |
| Form Factor | Mid Tower |
| Dimensions (WxDxH) | 200 x 455 x 460 mm (7.87 x 17.9 x 18.11 inches) |
| Materials | Steel Chassis, Tempered Glass |
| Motherboard Support | ATX, micro-ATX, mini-ITX, E-ATX (up to 280mm wide) |
| Front I/O | 1x USB-A 3.0, 1x USB-C Charging port, Microphone/Headphone Combo, Power Button, Reset Button |
| Expansion Slots | 7 |
| Internal 3.5" Drive Bays | 2 (2x included) |
| Internal 2.5" Drive Bays | 3 (3x included) |
| Pre-installed Fans | Front: 3x 120mm D-RGB, Rear: 1x 120mm |
| Fan Support (Total) | Front: 3x 120mm / 2x 140mm, Top: 3x 120mm, Rear: 1x 120mm |
| Radiator Support | Front: Up to 360mm / 280mm, Top: Up to 360mm, Rear: 120mm |
| Max GPU Length | 400 mm (15.7 inches) |
| Max CPU Cooler Height | 162 mm (6.3 inches) |
| Cable Management Space | 36 mm (1.4 inches) |
| Max PSU Length | 220 mm / 280 mm (depends on HDD cage location) |
| Net Weight | 6.9 kg (15.2 lbs) |
8. Warranty and Support
For warranty information and technical support, please refer to the official Phanteks website or contact your local retailer. Keep your proof of purchase for warranty claims.


