
XXK RC03RF
XXK RC03RF RF Remoter Instruction Manual
Model: RC03RF | Brand: XXK
1. Product Overview
The XXK RC03RF RF Remoter is a 4-zone 2.4G handheld remote control designed for compatible RGBCCT, RGBW, CCT, and RGB LED controllers. It utilizes advanced RF radio frequency technology, providing an effective control range of up to 99 feet (30 meters) with 360° coverage, allowing control even through walls. This remote simplifies the management of LED lighting systems, offering features such as color and temperature adjustment, brightness control, and group management.

Figure 1: XXK RC03RF RF Remoter
This image displays the RC03RF RF Remoter, a white handheld device with a circular color wheel and various control buttons, presented with its packaging.
Key Features:
- 2.4G Wireless RF Control: Offers a control distance of up to 99 ft (30m) with 360° signal penetration.
- Wide Compatibility: Compatible with various LED strip controllers, including WB5 WIFI controller, LM053 Bluetooth Mesh controller, and LM052 Zigbee controller.
- 4-Zone Group Control: Allows simultaneous control of up to four distinct lighting zones.
- Integrated Touch Screen Design: Features a sensitive color adjustment touch wheel and physical buttons for intuitive control.
- Quick Link Pairing: Enables fast connection to controllers without the need for Wi-Fi, Bluetooth, or app downloads.
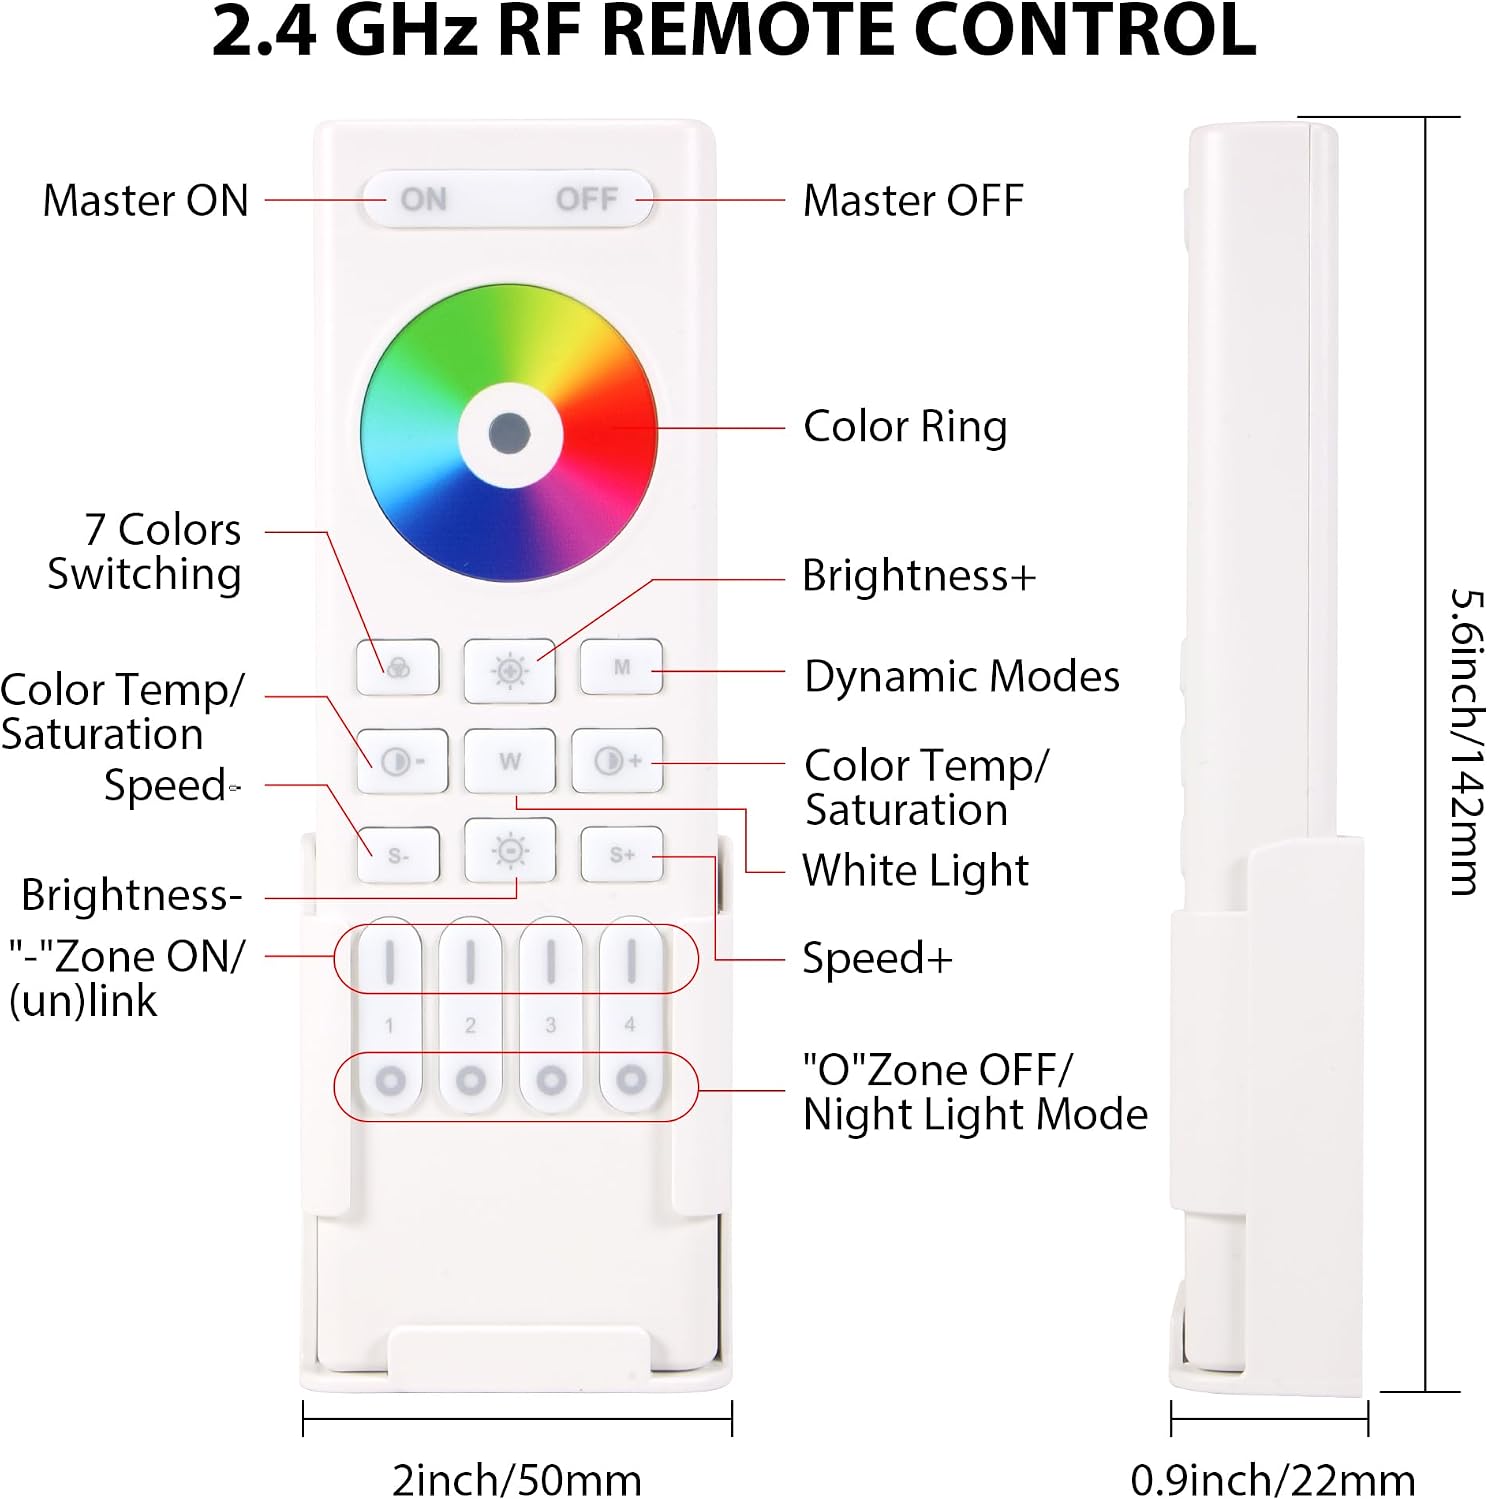
Figure 2: RC03RF Remote Control Button Layout and Dimensions
This image illustrates the various buttons and their functions on the RC03RF remote, including Master ON/OFF, Color Ring, Brightness controls, Dynamic Modes, Color Temperature/Saturation, White Light, Speed controls, and Zone ON/OFF (un)link buttons. It also shows the remote's dimensions: 5.6 inches (142mm) in length, 2 inches (50mm) in width, and 0.9 inches (22mm) in thickness.
2. Setup
2.1 Battery Installation
The RC03RF remote control requires batteries for operation. To install or replace batteries:
- Locate the battery compartment on the back of the remote control.
- Slide open the battery cover.
- Insert the required batteries (typically AAA, refer to specifications for exact type) ensuring correct polarity (+/-).
- Close the battery cover securely.
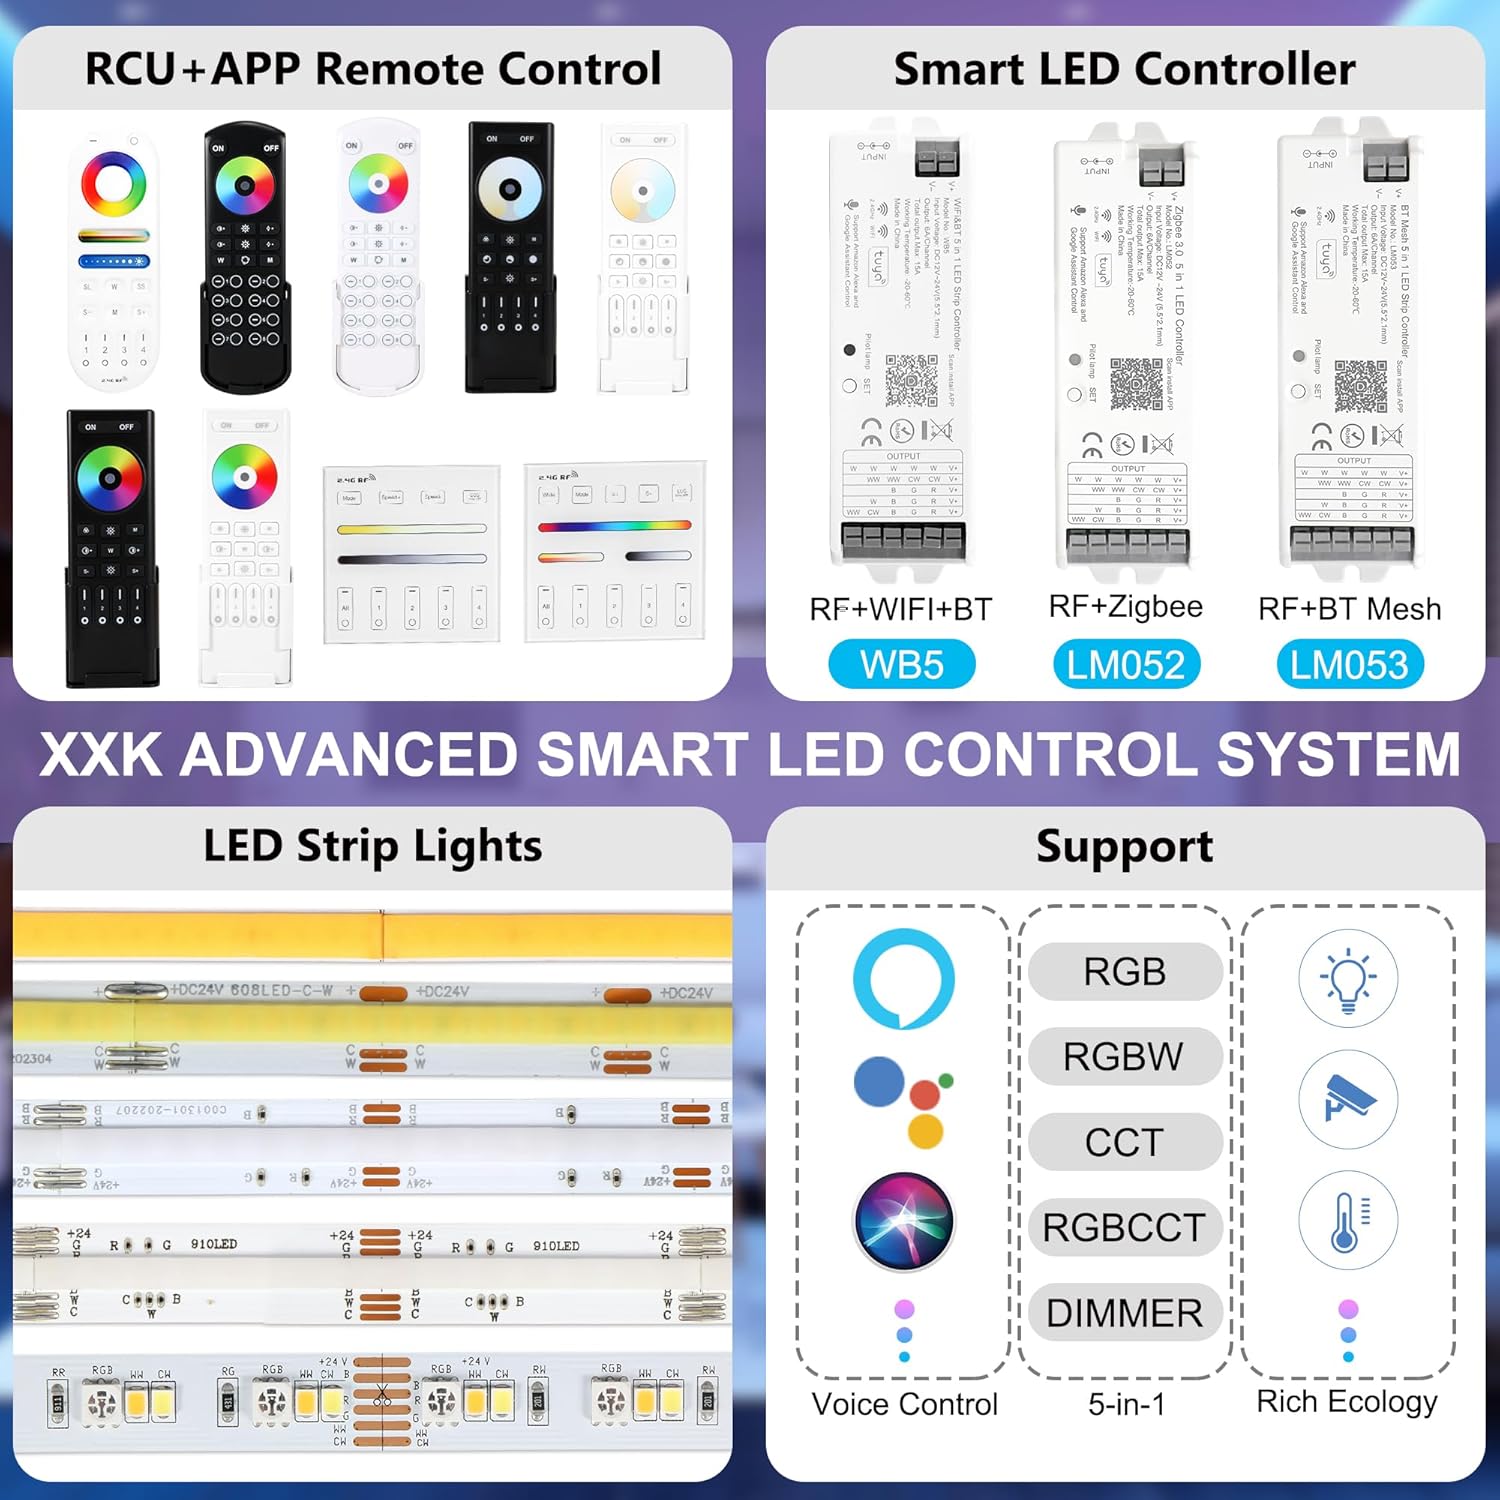
Figure 3: Battery Compartment of the RC03RF Remote
This image shows the open battery compartment on the back of the RC03RF remote, indicating where batteries should be inserted.
2.2 Pairing with LED Controller
The RC03RF remote control must be paired with a compatible LED controller (e.g., WB5, LM053, LM052) to function. Follow these steps for quick linking:
- Ensure the LED controller is powered off.
- Turn on the LED controller. Within 3 seconds of powering on, quickly press the "Zone ON" button (e.g., Zone 1 ON button) on the RC03RF remote control 3 times.
- If pairing is successful, the connected LED strip light will blink 3 times slowly.
- Repeat this process for each zone you wish to control with the remote.
To unlink a zone, follow the same steps but press the "Zone OFF" button 3 times instead of the "Zone ON" button.

Figure 4: Visual Guide for Linking Instructions
This diagram visually explains the pairing process, showing the power supply, LED strip light, LED controller, and the remote control with highlighted "Link/Unlink Button" area. It details the three steps: turning off/on the controller, pressing the ON button 3 times, and observing the light blinking for successful linking.
Video 1: Remote Control Pairing to LED Controller
This video demonstrates the step-by-step process of pairing the RC03RF remote control with an LED controller and LED strip light. It shows how to power cycle the light and press the zone ON button on the remote to establish a connection, indicated by the light blinking.
3. Operating Instructions
The RC03RF remote provides comprehensive control over your LED lighting system. Familiarize yourself with the button functions as shown in Figure 2.
3.1 Power Control
- ON Button: Press to turn on the lights for the selected zone(s).
- OFF Button: Press to turn off the lights for the selected zone(s).
3.2 Color and Brightness Adjustment
- Color Ring: Touch the color ring to select from 16 million colors.
- Brightness +/-: Use the brightness buttons to adjust the light intensity from 0% to 99%.
- White Light (W) Button: Press to switch the lights to pure white.
- Color Temperature/Saturation (S-/S+) Buttons: Adjust the color temperature or saturation depending on the LED strip type.
3.3 Dynamic Modes and Speed
- Mode (M) Button: Cycle through various pre-programmed dynamic lighting modes.
- Speed +/-: Adjust the speed of the dynamic modes.
3.4 Zone Control
The remote supports controlling up to 4 independent zones. Use the numbered buttons (1, 2, 3, 4) to select a zone or group of zones. Once a zone is selected, any adjustments made will apply only to that zone.
- Press a numbered button (1-4) to select a specific zone.
- Press and hold a numbered button to turn on/off the night light mode for that zone.

Figure 5: Example of 4-Zone Group Control
This image illustrates the concept of 4-zone group control within a room setting, showing different lighting zones (Zone 1, 2, 3, 4) and highlighting the remote's ability to control lights up to 100ft away, ignoring walls, across 4 channels.

Figure 6: Remote Control Usage in Various Rooms
This image collage demonstrates the versatility of the remote control, showing its use in a bedroom, living room, games room, and kitchen, emphasizing its ability to control lights anywhere within range.
4. Maintenance
To ensure the longevity and optimal performance of your RC03RF RF Remoter, follow these maintenance guidelines:
- Cleaning: Wipe the remote with a soft, dry cloth. Do not use abrasive cleaners or solvents.
- Battery Replacement: Replace batteries when the remote's response becomes sluggish or it stops functioning. Always use the specified battery type (e.g., AAA). Dispose of old batteries responsibly.
- Storage: Store the remote in a cool, dry place away from direct sunlight and extreme temperatures.
- Avoid Moisture: Do not expose the remote to water or high humidity.
- Physical Damage: Avoid dropping the remote or subjecting it to strong impacts.
5. Troubleshooting
If you encounter issues with your RC03RF RF Remoter, refer to the following common troubleshooting steps:
| Problem | Possible Cause | Solution |
|---|---|---|
| Remote not responding | Low or dead batteries; Remote not paired; Out of range. | Replace batteries. Re-pair the remote with the controller (refer to Section 2.2). Ensure the remote is within the 99 ft (30m) operating range. |
| Lights flicker or behave erratically | Interference; Controller issue; Remote malfunction. | Ensure no strong RF interference sources are nearby. Power cycle the LED controller (unplug for 30 seconds, then plug back in). If the issue persists, the remote or controller may be faulty. |
| Cannot change color/brightness | Incorrect mode selected; Remote not properly paired to the zone. | Ensure the correct zone is selected. Verify the remote is paired to the specific zone you are trying to control. |
| Pairing fails repeatedly | Incorrect pairing procedure; Faulty controller or remote. | Carefully re-read and follow the pairing instructions (Section 2.2). Ensure the timing for pressing the ON button is precise (within 3 seconds of power-on). Try with a different controller if available to isolate the issue. |
6. Specifications
| Attribute | Detail |
|---|---|
| Model Number | RC03RF |
| Brand | XXK |
| Control Type | RF Remoter (2.4G Wireless) |
| Control Distance | Up to 99 ft (30m) |
| Number of Zones | 4 |
| Compatible Devices | WB5 WIFI controller, LM053 Bluetooth Mesh controller, LM052 Zigbee controller |
| Power Source | Battery Powered (Batteries not included) |
| Dimensions | 1 x 1 x 0.5 inches (approximate) |
| Item Weight | 3.2 ounces |
7. Warranty and Support
For warranty information or technical support, please refer to the product packaging or contact the manufacturer directly. You can also visit the official XXK store on Amazon for additional resources and contact details:
Ask a question about this manual
Ask about setup, troubleshooting, compatibility, parts, safety, or missing instructions. Manuals+ will review the question and use this page’s manual context to help answer it.