1. Introduction
This manual provides detailed instructions for the Alacrity 3-in-1 Bluetooth Pet Microchip Reader (Model MJ-Q30). This device is designed for reading animal microchips, supporting ISO11784, ISO11785, FDX-B, and EMID standards. It features a 1.44-inch TFT screen, an 800mAh rechargeable battery, and offers versatile connectivity options including 2.4GHz wireless, Bluetooth, and USB wired connections. The reader can store up to 240 pieces of data and supports both hexadecimal and decimal data output.

Image: The Alacrity 3-in-1 Bluetooth Pet Microchip Reader, showcasing its compact design and integrated screen.
2. Package Contents
Please verify that all items listed below are present in your package:
- 1 x Pet Microchip Scanner (Alacrity MJ-Q30)
- 1 x English User Manual
- 1 x USB Cable
- 1 x 2.4GHz Wireless Dongle

Image: Contents of the product package, including the scanner, user manual, USB cable, and 2.4GHz wireless dongle.
3. Product Features
- Multi-Standard Support: Compatible with ISO11784 / ISO11785 / FDX-B and EMID microchips. (Note: Does not read AVID microchips.)
- Dual Data Output: Supports both hexadecimal and decimal data output, selectable by the user.
- 1.44" TFT Screen: Displays battery level, working mode, connection status, and microchip data clearly.
- 3-in-1 Connectivity: Offers USB wired, 2.4GHz wireless, and Bluetooth connections for versatile use. Plug and play, no driver installation required.
- Two Working Modes:
- Upload Instantly Mode: Data is transmitted immediately upon scanning.
- Storage Mode: Stores up to 240 pieces of data internally for later upload.
- Long Battery Life: Equipped with an 800mAh rechargeable battery, providing up to 16 hours of continuous working time and 3 days of standby time.
- Portable Design: Compact and lightweight for easy carrying and use in various environments.

Image: Illustration of the upgraded RFID technology, demonstrating effective reading distances for 2-12mm glass tube labels (>8mm) and 30mm animal ear marks (>20mm).

Image: Visual representation of the 800mAh battery capacity, indicating 15 hours of continuous working time and 3 days of standby time.
4. Product Overview
Familiarize yourself with the components of your Alacrity Pet Microchip Reader:

Image: A detailed diagram of the microchip reader with the following labeled parts: (1) Scan Position, (2) Page Up button, (3) TFT Display Screen, (4) Scan Button, (5) Page Down button, and (6) Type-C Interface.
- Scan Position: The area where the microchip is read.
- Page Up Button: Used to navigate up through menus or stored data.
- TFT Display Screen: Shows device status, menu options, and scanned data.
- Scan Button: Initiates the microchip scanning process.
- Page Down Button: Used to navigate down through menus or stored data.
- Type-C Interface: For charging the device and connecting via USB.
5. Setup
5.1 Initial Charging
Before first use, fully charge the device. Connect the provided USB cable to the Type-C interface (6) on the reader and the other end to a USB power adapter (not included) or a computer's USB port. The screen will indicate charging status.
5.2 Powering On/Off
To power on the device, press and hold the Scan Button (4) for a few seconds until the TFT Display Screen (3) illuminates. To power off, press and hold the Scan Button (4) again until the screen turns off.
6. Operating Instructions
6.1 Connecting the Reader
The Alacrity Pet Microchip Reader offers three connection methods:
- 2.4GHz Wireless Connection:
Insert the 2.4GHz wireless dongle into a USB port on your computer. The reader will automatically connect to the dongle. This connection is ideal for stable, short-range wireless data transfer to a PC.

Image: Demonstrates the 2.4GHz wireless connection by plugging the USB dongle into a laptop, with the scanner displaying connection status.
- Bluetooth Wireless Connection:
On the reader's TFT screen, navigate to the Bluetooth option using the Page Up/Down buttons (2, 5) and select it with the Scan Button (4). On your smartphone or computer, enable Bluetooth and search for "Alacrity Reader" or similar. Pair with the device. This connection is suitable for mobile devices.

Image: Shows the three connection methods: 2.4GHz wireless via dongle, Bluetooth wireless connecting to a smartphone, and USB wired connection to a laptop.
- USB Wired Connection:
Connect the reader directly to your computer using the provided USB cable via the Type-C interface (6). The device will function as a standard USB input device, allowing direct data transfer.
6.2 Scanning Microchips
To scan a microchip:
- Ensure the reader is powered on.
- Position the Scan Position (1) of the reader close to the animal's microchip implant site.
- Press the Scan Button (4). The reader will emit a beep and display the microchip ID on the TFT Display Screen (3) if a chip is detected. The reading time is typically less than 100ms.
- The displayed ID can be in hexadecimal or decimal format, depending on your selected setting.

Image: A user scanning a pet's microchip with the Alacrity reader, showing the device's screen displaying the scanned barcode content.
6.3 Data Storage and Upload
The reader supports two data handling modes:
- Upload Instantly Mode: In this mode, each scanned microchip ID is immediately transmitted to the connected device (computer or smartphone). This is the default mode for real-time data capture.
- Storage Mode: To use this mode, select "Storage Mode" from the reader's menu. Scanned microchip IDs will be saved internally. The device can store up to 240 pieces of data. To upload stored data, connect the reader to a computer via USB or 2.4GHz wireless dongle, navigate to "Upload Data" on the reader's screen, and confirm the upload. The data will be transferred to your computer.
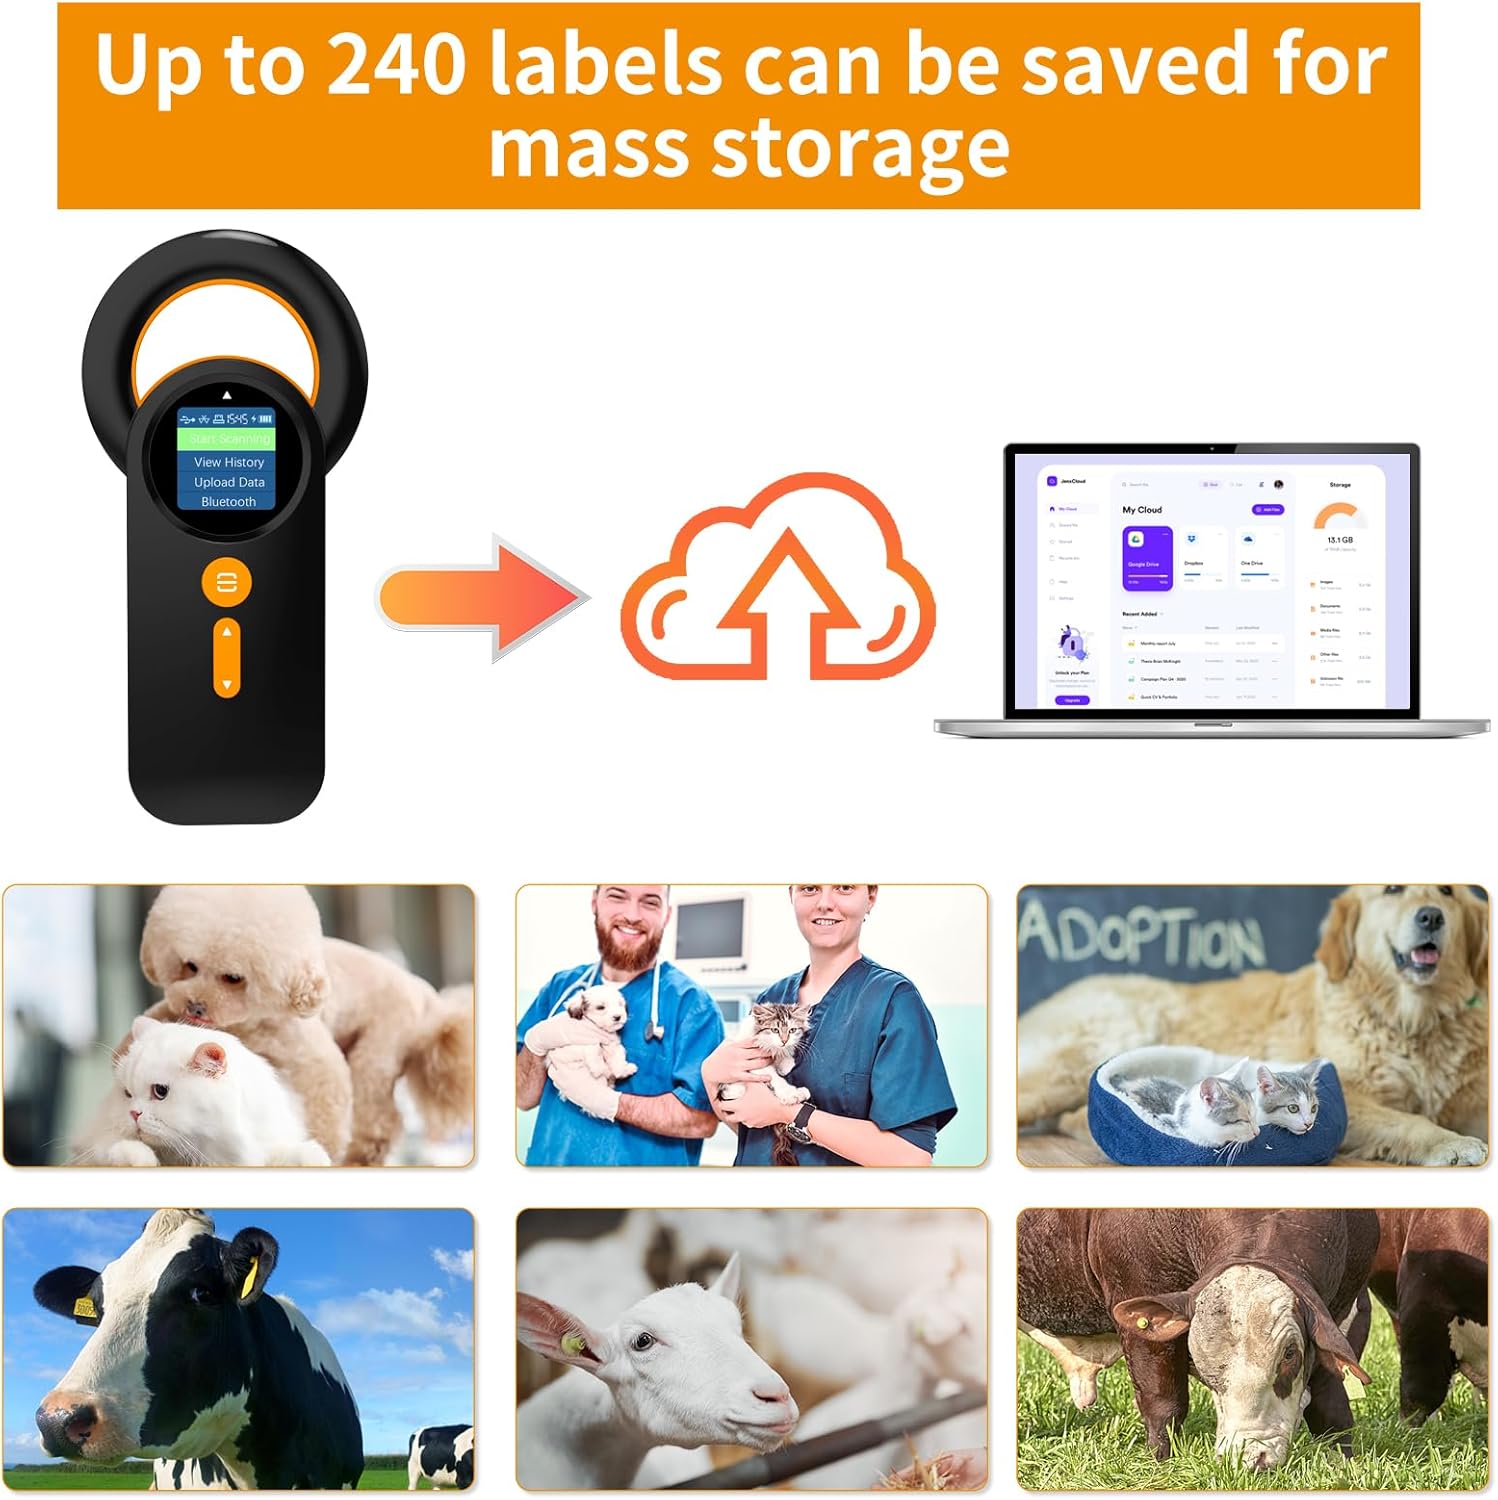
Image: Illustrates the data storage capability, showing the scanner saving up to 240 labels and the process of uploading data to a computer, suitable for various animal types.
7. Maintenance
- Keep the device clean by wiping it with a soft, dry cloth. Avoid using abrasive cleaners or solvents.
- Store the reader in a cool, dry place away from direct sunlight and extreme temperatures.
- Protect the TFT display screen from scratches.
- Do not attempt to disassemble or repair the device yourself, as this will void the warranty.
- Ensure the Type-C port is free of dust and debris.
8. Troubleshooting
| Problem | Possible Cause | Solution |
|---|---|---|
| Device does not power on. | Low battery or no charge. | Charge the device fully using the provided USB cable. |
| Cannot read microchip. |
|
|
| 2.4GHz/Bluetooth connection fails. |
|
|
| Data not uploading. |
|
|
9. Specifications
| Feature | Detail |
|---|---|
| Model | MJ-Q30 |
| Supported Microchips | ISO11784 / ISO11785 / FDX-B, EMID (Does not read AVID) |
| Display Screen | 1.44-inch TFT Screen |
| Connectivity | 2.4GHz Wireless, Bluetooth, USB Wired |
| Battery Capacity | 800mAh Rechargeable Lithium Polymer Battery |
| Continuous Working Time | Up to 16 hours |
| Standby Time | Up to 3 days |
| Data Storage Capacity | 240 pieces of data |
| Data Output Format | Hexadecimal & Decimal |
| Item Weight | 4.2 ounces (approx. 119 grams) |
| Package Dimensions | 6.57 x 4.61 x 1.06 inches |
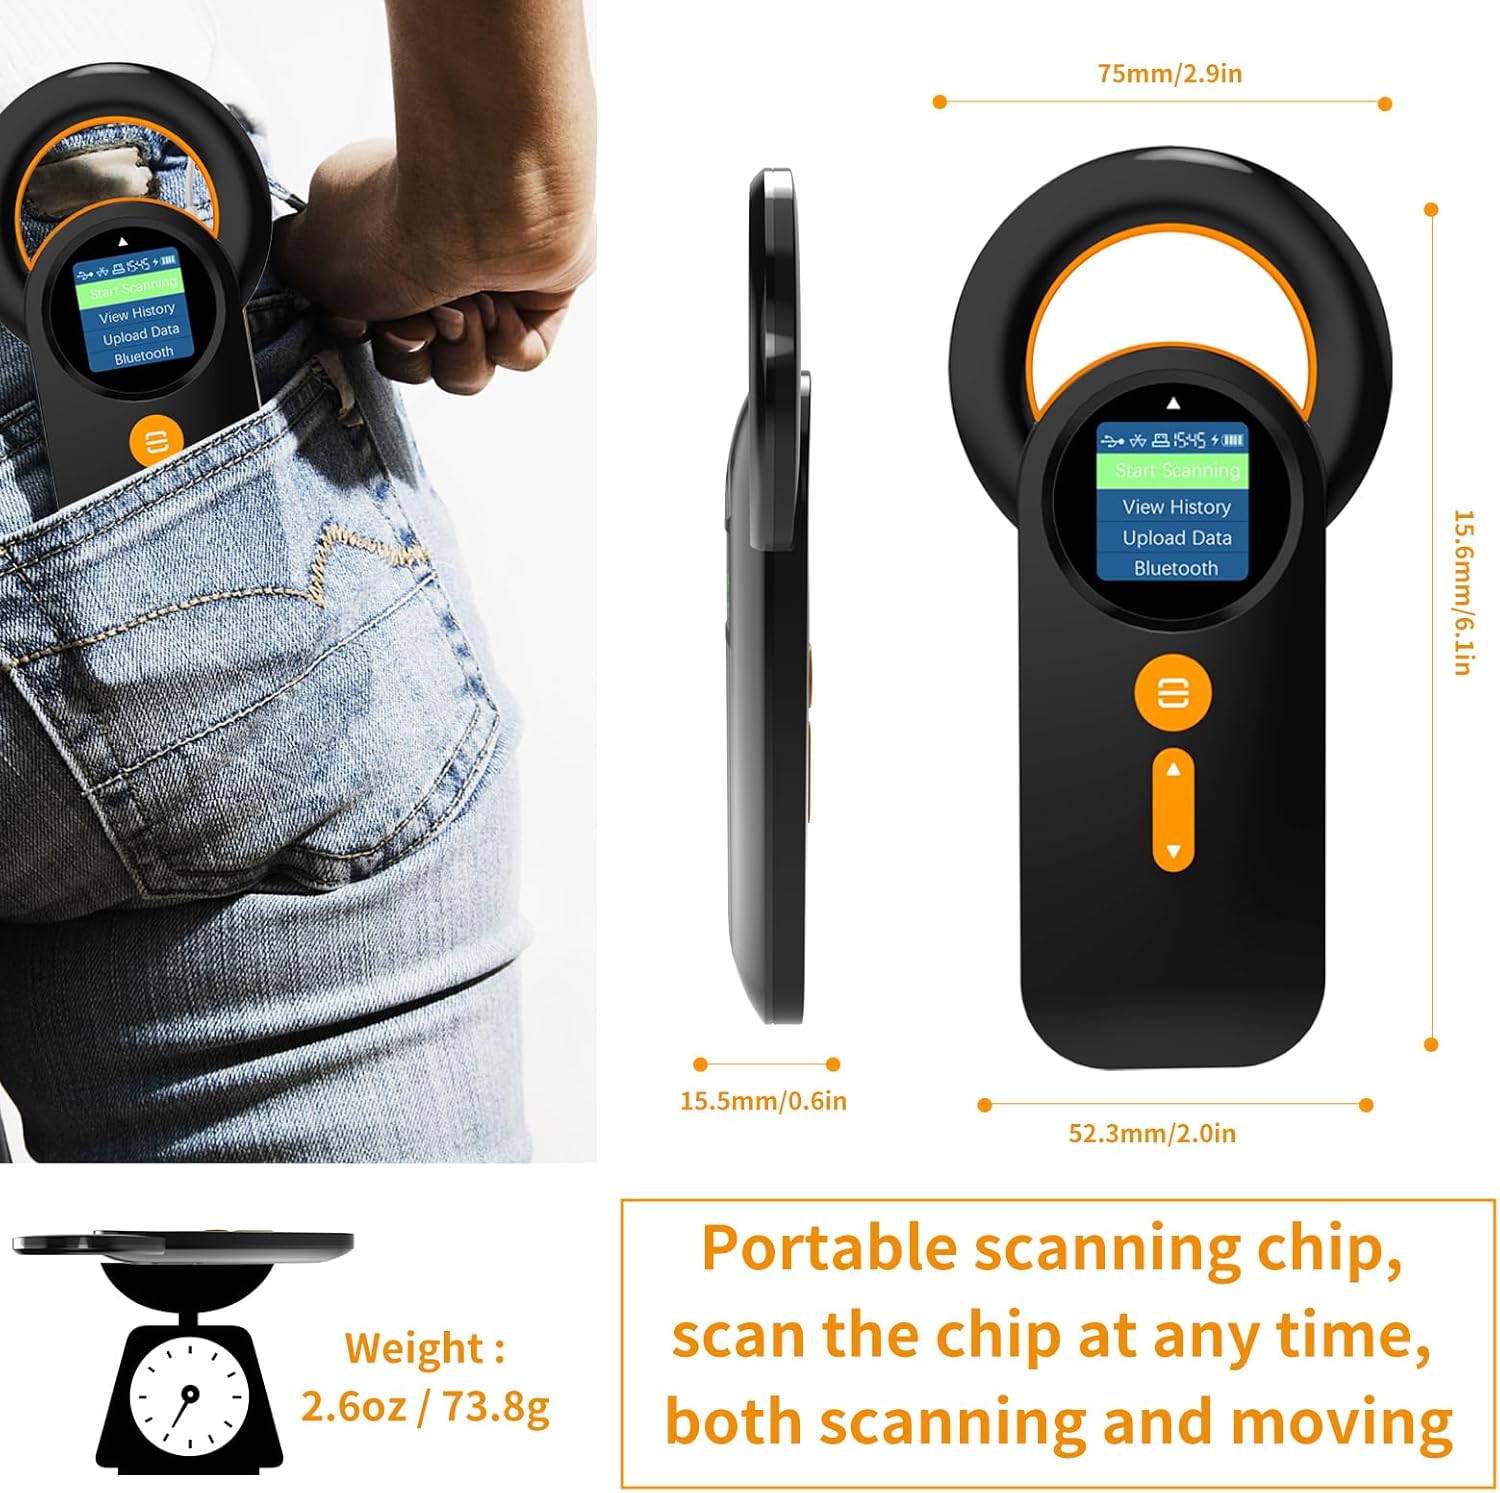
Image: Technical drawing showing the dimensions of the Alacrity Pet Microchip Reader (15.8mm/6.1in height, 52.3mm/2.0in width, 15.5mm/0.6in thickness) and its weight (2.6oz / 73.8g), highlighting its portability.
10. Warranty and Support
For warranty information and technical support, please refer to the contact details provided with your purchase or visit the official Alacrity website. Keep your purchase receipt as proof of purchase for warranty claims.
Manufacturer: alacrity
Date First Available: September 23, 2023


