
1. Product Overview
This KiriNavi car radio is designed for Toyota Highlander models from 2015 to 2019. It features a 13.1-inch 2K screen, Android 13 operating system, Octa-Core CPU, 6GB RAM, and 128GB ROM. Key functionalities include wireless CarPlay, wired Android Auto, built-in DSP, Bluetooth 5.0, 4G LTE support, and GPS navigation. It is compatible with original car features such as the JBL Amplifier and 360-view camera.

Image: KiriNavi Car Stereo installed in a Toyota Highlander dashboard, showcasing the large screen display and integration.
2. Package Contents
Verify that all components are present in the package before beginning installation.
- 1 x Power Cable
- 1 x RCA Input / Output Cable
- 1 x Rear Camera Input Cable
- 1 x 4G Module
- 2 x USB Cables
- 1 x GPS Antenna
- 1 x User Manual (this document)
- 1 x External Microphone
- 1 x Installation Tool (Crowbar)
- 1 x CANBUS Decoder (integrated with Power Cable)
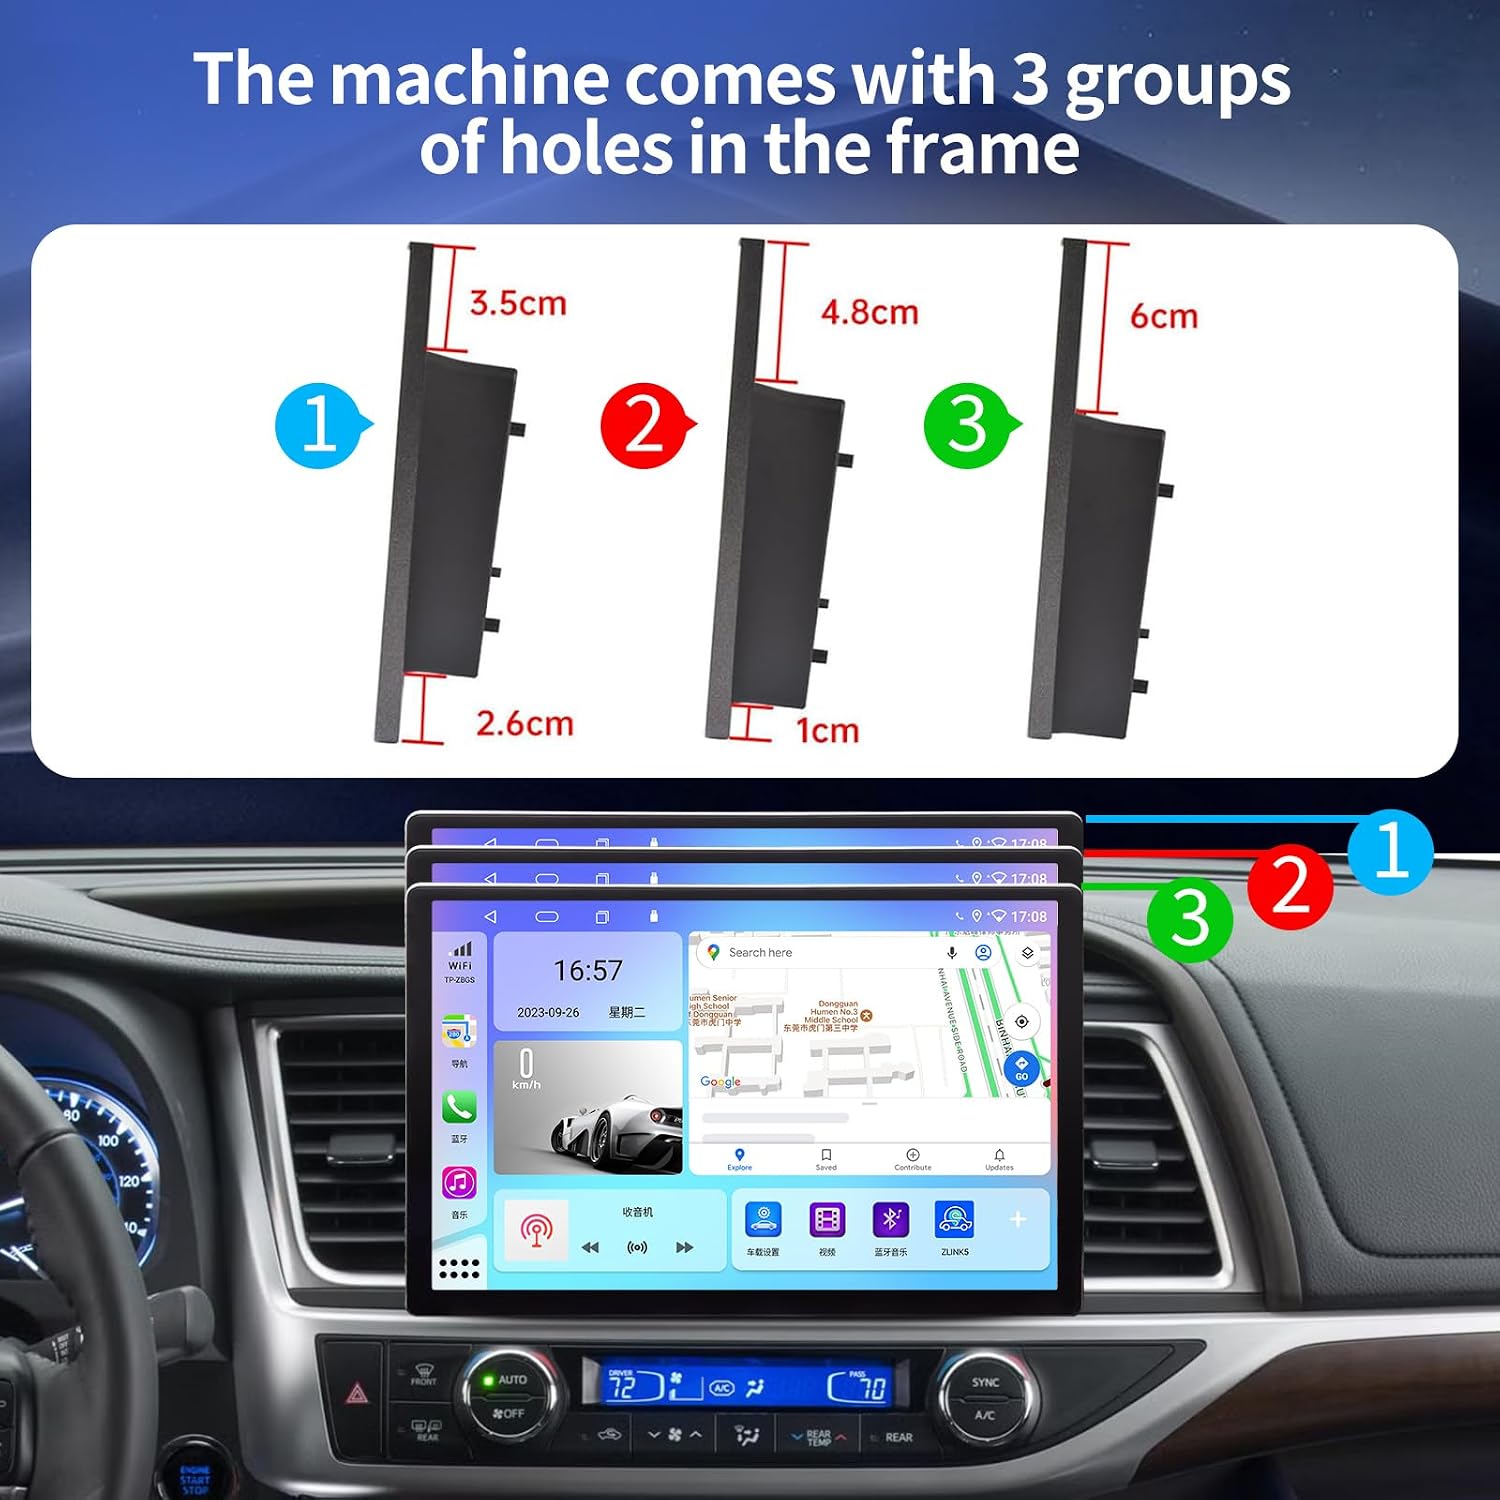
Image: All components included in the KiriNavi car radio package, including cables, antennas, microphone, and installation tools.
3. Setup and Installation
Installation of the KiriNavi car radio is designed to be plug-and-play for compatible Toyota Highlander models (2015-2019). Professional installation is recommended if you are unfamiliar with car audio systems.
3.1 Pre-Installation Checks
- Ensure the vehicle's ignition is off and the battery is disconnected before starting.
- Confirm compatibility with your specific Toyota Highlander model and year (2015-2019).
- If your vehicle has a JBL amplifier or 360-view camera, ensure the provided wiring harness supports these features.
3.2 Installation Steps (General)
- Carefully remove the original car radio unit and trim panels using the provided installation tool (crowbar).
- Connect the main power cable harness from the KiriNavi unit to the vehicle's factory harness. Ensure all connections are secure.
- Connect the GPS antenna and position it in a location with a clear view of the sky (e.g., on the dashboard).
- Connect the 4G module and its antenna for cellular data connectivity.
- Connect the RCA input/output cables and rear camera input cable as needed for external devices or the vehicle's existing rear camera.
- Connect the external microphone for improved call quality.
- Mount the KiriNavi unit into the dashboard opening. Ensure the frame fits correctly. The unit comes with 3 groups of holes in the frame for adjustment.
- Reconnect the vehicle's battery and test the unit's functionality before fully reassembling the dashboard.

Image: Visual comparison of the car dashboard before and after the KiriNavi car radio installation, highlighting the integrated large screen.

Image: Diagram illustrating the three adjustable frame hole positions (3.5cm, 4.8cm, 6cm) for precise mounting of the car radio.
3.3 Initial Power-On
Upon first power-on, the system may take a moment to boot up. Follow any on-screen prompts for initial setup, such as language selection and network configuration.
4. Operating Instructions
4.1 Touchscreen Interface
The unit features a capacitive touchscreen. Navigate through menus and applications by tapping, swiping, and pinching (for zoom, where applicable) similar to a smartphone or tablet.
4.2 Wireless CarPlay & Wired Android Auto
Connect your smartphone for seamless integration:
- Wireless CarPlay: For iPhone users, enable Bluetooth and Wi-Fi on your phone. Pair your iPhone with the car radio via Bluetooth. Once paired, CarPlay should automatically launch wirelessly.
- Wired Android Auto: For Android users, connect your phone to one of the USB ports using a high-quality USB cable. Android Auto should launch automatically. Ensure Android Auto is installed on your phone.

Image: The car radio screen showing the CarPlay interface, providing access to phone, music, maps, and messages.
Video: Demonstration of the KiriNavi car radio's features, including Bluetooth calling and CarPlay functionality.
4.3 Bluetooth 5.0 Hands-Free
Pair your phone via Bluetooth for hands-free calling and audio streaming:
- Go to the Bluetooth settings on the car radio.
- Enable Bluetooth on your mobile phone and search for available devices.
- Select "KiriNavi" (or similar device name) from the list on your phone and confirm pairing.
- Once connected, you can make/receive calls, access your phonebook, and stream music directly from your phone.
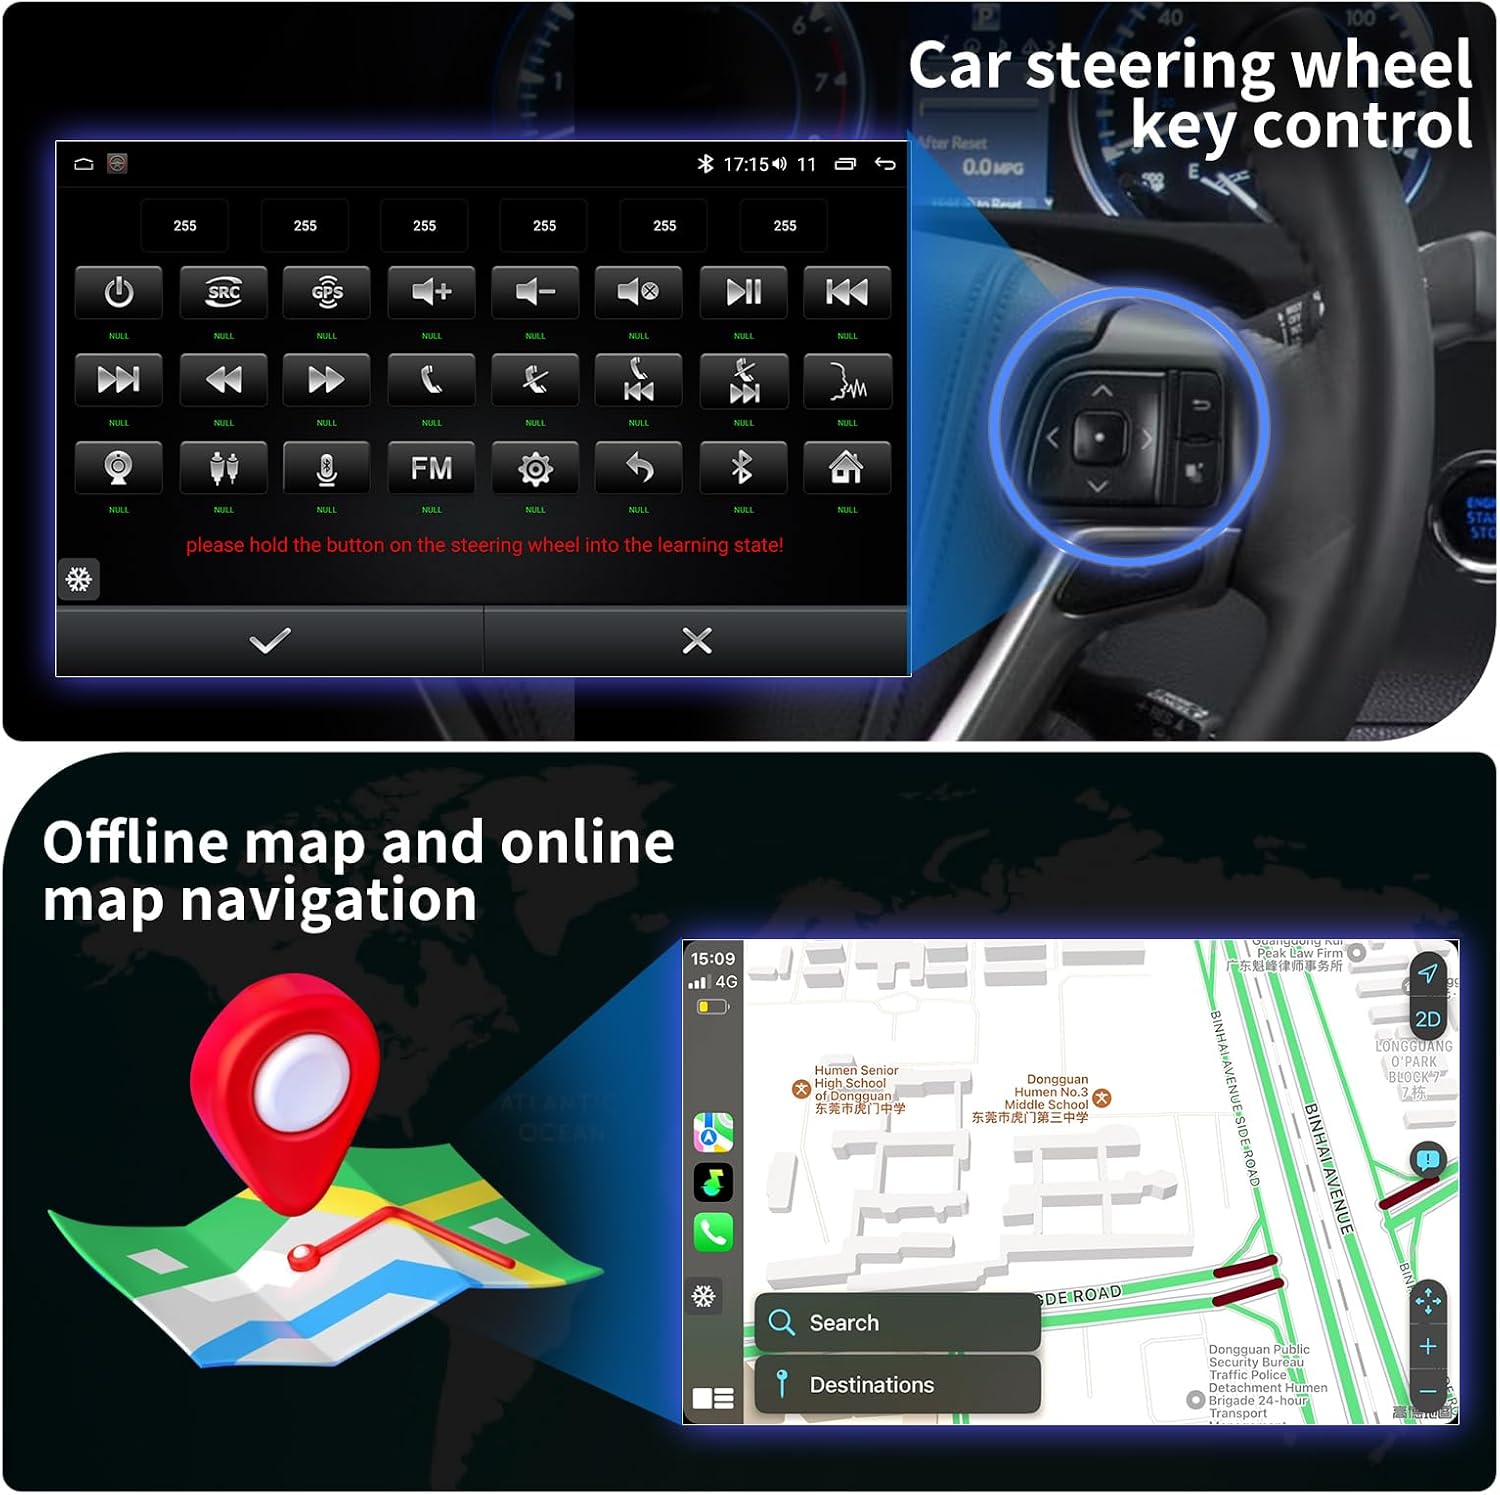
Image: The car radio displaying the Bluetooth dialing interface, allowing users to make calls directly from the unit.
4.4 GPS Navigation
The unit comes with built-in GPS and supports offline maps (North America pre-installed) and online navigation applications. Ensure the GPS antenna is properly installed for optimal signal reception.

Image: The car radio displaying a map application, demonstrating its GPS navigation capabilities with search and destination options.
4.5 Split Screen Functionality
The 2K screen supports smart split-screen, allowing two applications to run simultaneously. For example, you can view navigation on one side and media playback on the other. To activate, drag an app icon to one side of the screen or use the dedicated split-screen button (if available).
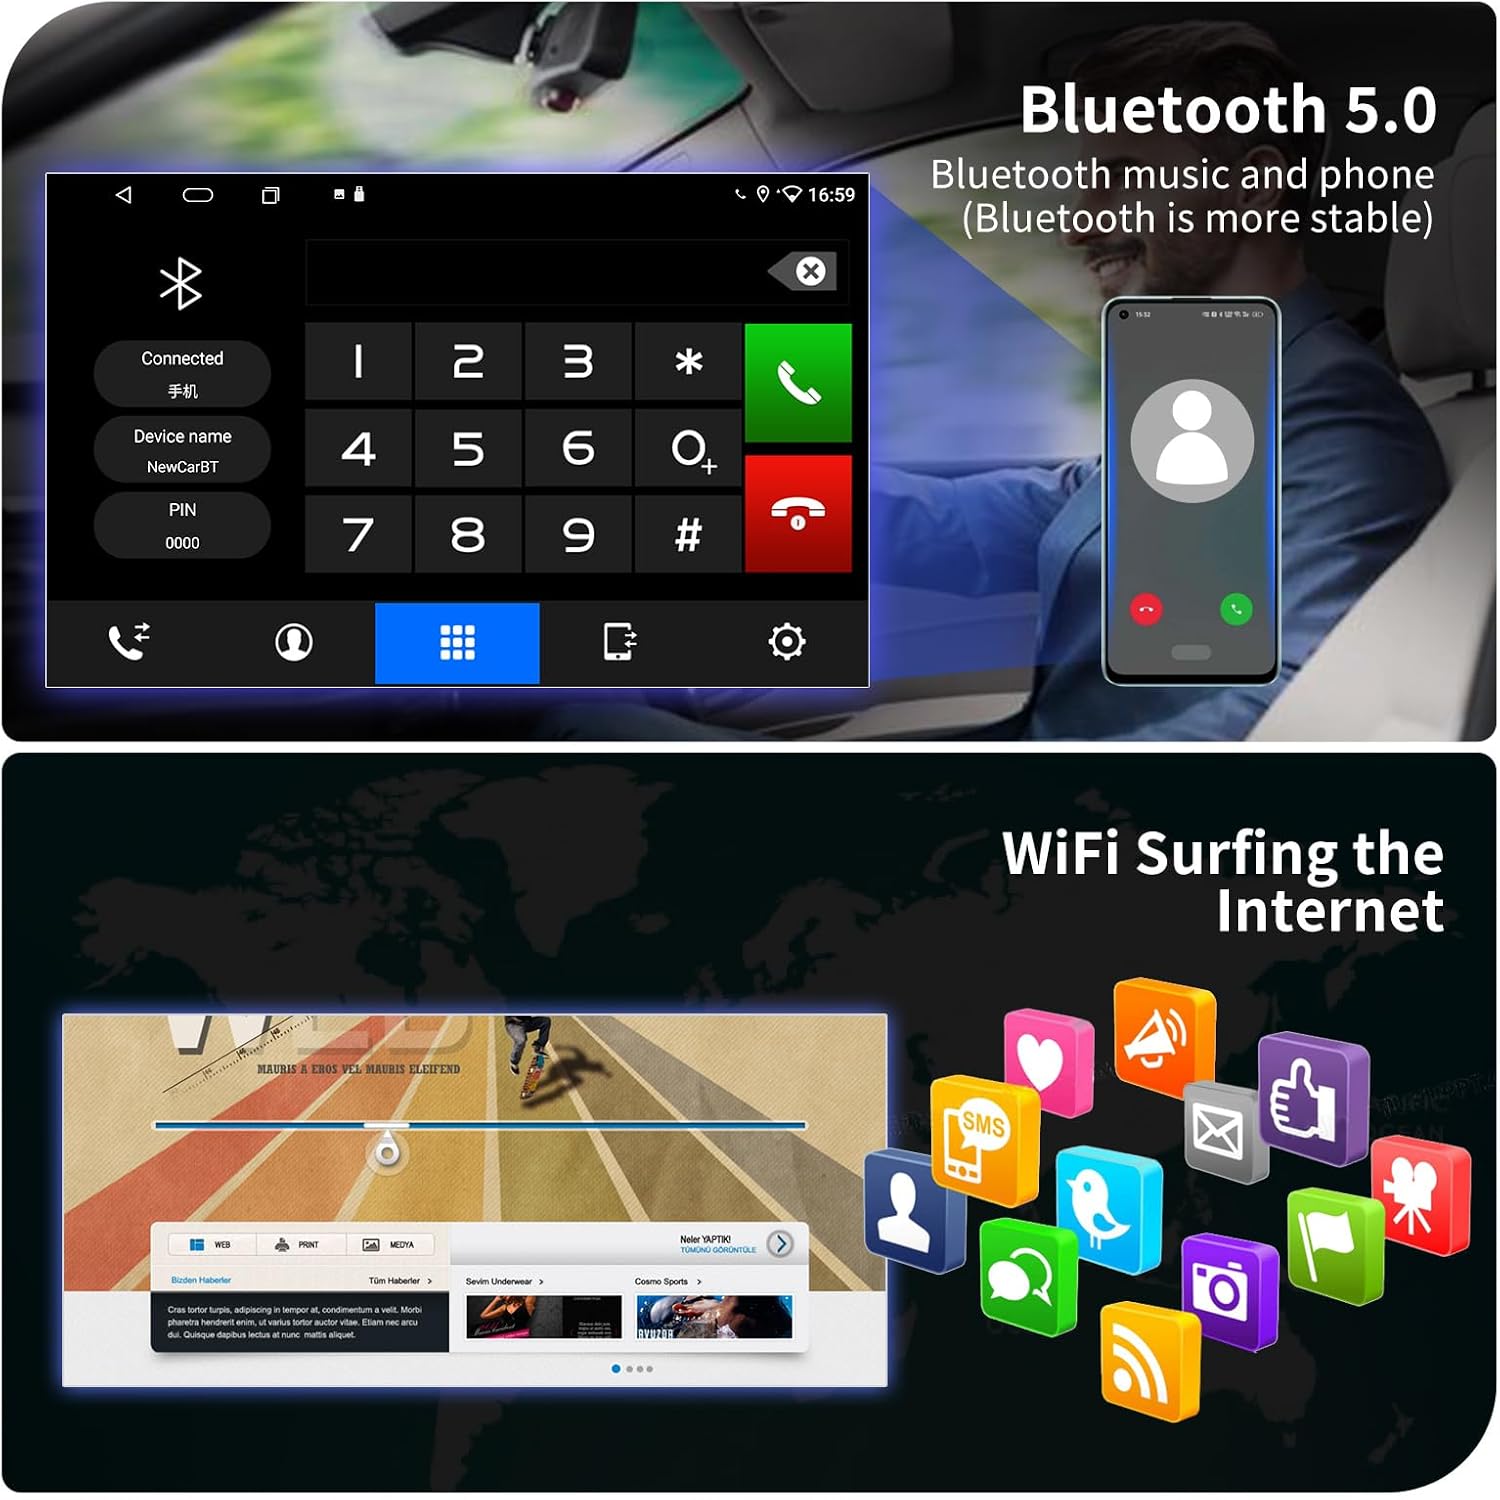
Image: The car radio screen demonstrating the split-screen feature, showing a video playing concurrently with a navigation map.
4.6 Steering Wheel Control (SWC)
The unit supports factory steering wheel controls. After installation, you may need to configure the SWC settings within the unit's system menu. Follow the on-screen instructions to map your vehicle's steering wheel buttons to the corresponding functions on the radio.

Image: The car radio displaying the interface for learning steering wheel controls, with an overlay of a hand on a steering wheel.
4.7 4G LTE & Wi-Fi Connectivity
Connect to the internet via the 4G module (requires a SIM card, not included) or by tethering to your phone's Wi-Fi hotspot. This enables online navigation, app downloads, and internet browsing.

Image: The car radio screen displaying a variety of application icons, illustrating the unit's 4G and Wi-Fi internet capabilities.
4.8 Digital Sound Processor (DSP)
The built-in DSP allows for advanced audio customization. Access the equalizer and position adjustment settings to fine-tune the sound output for a personalized listening experience.
5. Maintenance
- Screen Cleaning: Use a soft, lint-free cloth specifically designed for electronic screens. Do not use abrasive cleaners or solvents.
- Software Updates: Periodically check for system software updates through the unit's settings menu to ensure optimal performance and access to new features.
- Cable Connections: Ensure all cables remain securely connected. Loose connections can lead to intermittent issues.
- Environmental Conditions: Avoid exposing the unit to extreme temperatures, direct sunlight for prolonged periods, or excessive moisture.
6. Troubleshooting
| Problem | Possible Cause | Solution |
|---|---|---|
| Unit does not power on. | Loose power connection, blown fuse, vehicle battery disconnected. | Check all power cable connections. Verify vehicle battery is connected. Inspect vehicle fuses. |
| No sound or poor audio quality. | Incorrect wiring, volume too low, DSP settings misconfigured, JBL amplifier not properly integrated. | Check speaker wiring. Adjust volume. Reset DSP settings. Ensure JBL amplifier integration is correct (if applicable). |
| Steering Wheel Controls not working. | Incorrect CANBUS connection, SWC not configured in settings. | Verify CANBUS connection. Go to unit settings and perform SWC learning/configuration. If issues persist, try changing RX and TX settings as per manufacturer guidance. |
| CarPlay/Android Auto connection issues. | Bluetooth/Wi-Fi off, incorrect pairing, faulty USB cable, outdated phone OS/app. | Ensure Bluetooth and Wi-Fi are enabled on phone and unit. Re-pair devices. Try a different USB cable. Update phone's operating system and CarPlay/Android Auto app. |
| GPS signal is weak or inaccurate. | GPS antenna improperly placed or disconnected. | Ensure GPS antenna is securely connected and placed in a location with a clear view of the sky. |
| 360-view camera not connecting. | Incorrect wiring, compatibility issue, software configuration. | Verify all camera input cables are correctly connected. Check unit settings for camera input configuration. Consult professional installer if problem persists. |
7. Specifications
| Brand | KiriNavi |
| Model Name | Car Stereo For Toyota Highlander |
| Screen Size | 13.1 inches |
| Operating System | Android 13 |
| CPU | Octa Core |
| RAM | 6GB |
| ROM | 128GB |
| Display Type | LCD, Capacitive Touchscreen |
| Resolution | 2000*1200P (2K) |
| Connectivity Technology | Bluetooth 5.0, USB, Wi-Fi, 4G LTE |
| Supported Navigation System | GPS (North America maps included) |
| Audio Output Mode | Stereo (Built-in DSP) |
| Compatible Vehicle Type | Toyota Highlander 2015-2019 |
| Item Weight | 2.94 kg |
8. Warranty Information
This KiriNavi car radio comes with a 1-Year Warranty from the date of purchase. This warranty covers manufacturing defects and malfunctions under normal use. It does not cover damage caused by improper installation, accident, misuse, abuse, unauthorized modifications, or natural disasters. Please retain your proof of purchase for warranty claims.
9. Customer Support
For technical assistance, troubleshooting, or warranty inquiries, please contact KiriNavi customer support through the retailer where the product was purchased or visit the official KiriNavi website for contact information. When contacting support, please have your product model number (B0CJC5F7JH) and proof of purchase readily available.
Online Resources: