Introduction
Thank you for choosing the LIORQUE Colorful Digital Alarm Clock. This manual provides detailed instructions for setting up and operating your new alarm clock. Please read it carefully to ensure proper use and to fully utilize all its features.

The LIORQUE Colorful Digital Alarm Clock features a vibrant LED display showing time and temperature.
Package Contents
- LIORQUE Colorful Digital Alarm Clock
- USB Charging Cable
- User Manual (this document)
Note: AAA batteries are not included and must be purchased separately for battery power option.
Product Overview
Familiarize yourself with the clock's components and controls.
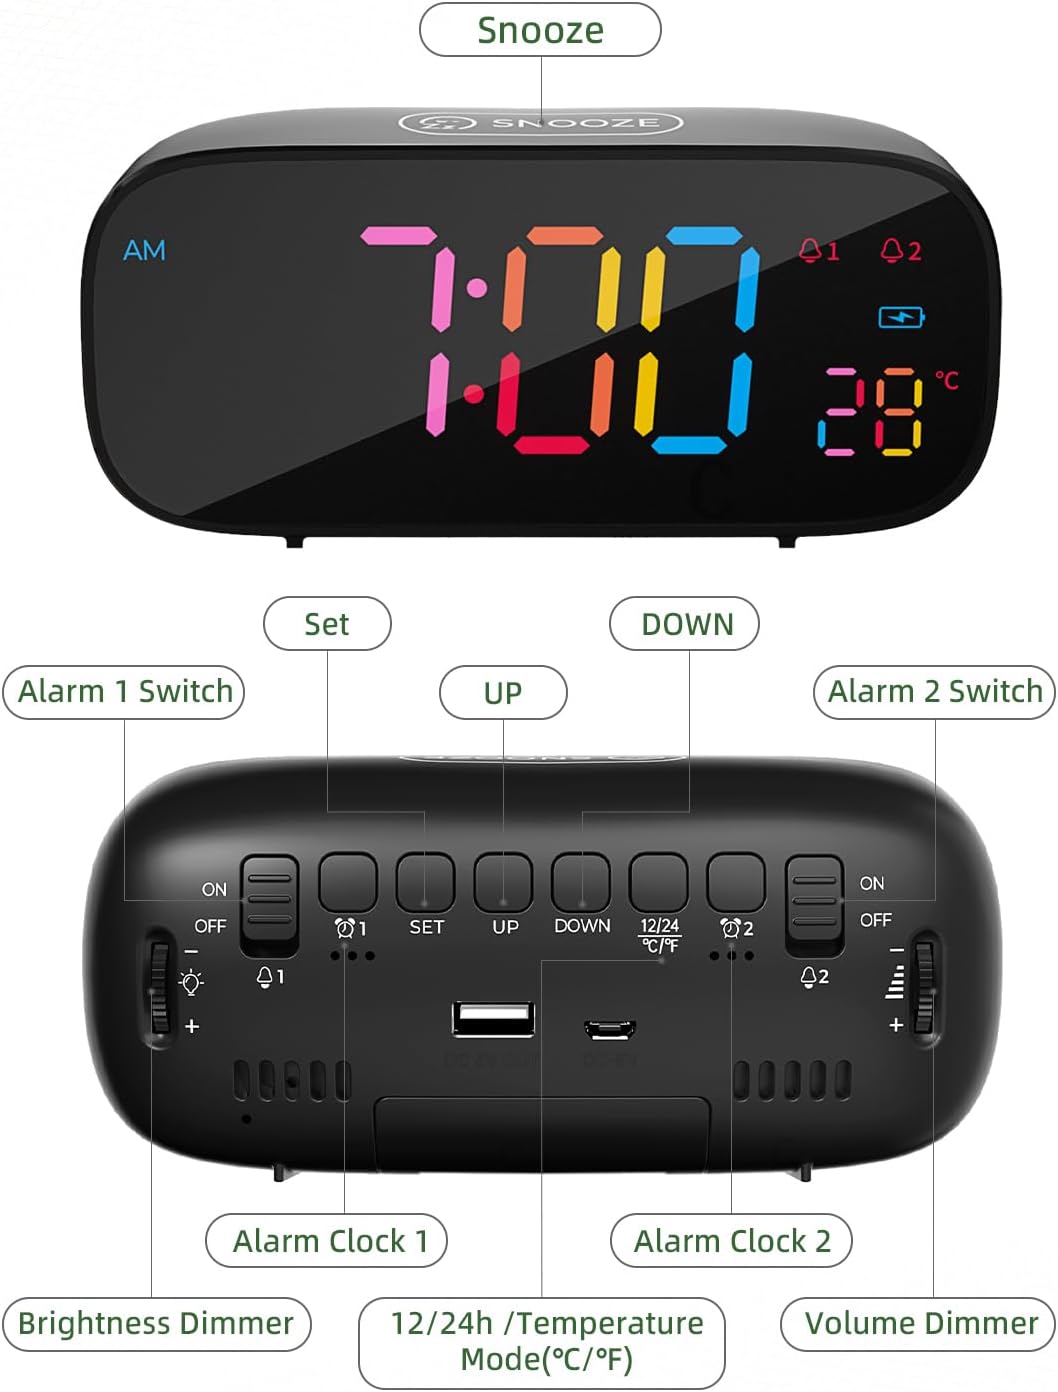
Detailed view of the alarm clock's top and rear controls.
Control Buttons:
- SNOOZE Button (Top): Activates snooze function, provides 10 extra minutes of sleep.
- ALARM 1 Switch (Rear): Toggles Alarm 1 ON/OFF.
- SET Button (Rear): Enters time/alarm setting mode.
- UP Button (Rear): Increases values during setting, switches 12/24H mode.
- DOWN Button (Rear): Decreases values during setting, switches Celsius/Fahrenheit.
- ALARM 2 Switch (Rear): Toggles Alarm 2 ON/OFF.
- Brightness Dimmer (Side): Rotary knob to adjust display brightness (0-100%).
- Volume Dimmer (Side): Rotary knob to adjust alarm volume.
- DC 5V Input (Rear): For USB power cable.
- USB Output (Rear): For charging external devices.
- Battery Compartment (Bottom): Holds 3x AAA batteries for backup power.
Setup
1. Powering the Clock
The LIORQUE alarm clock offers dual power options:
- Corded Electric: Connect the provided USB charging cable to the DC 5V input port on the back of the clock and plug the other end into a USB power adapter (not included) or a powered USB port. This is the primary power source.
- Battery Backup: For power outage protection and to retain settings, insert 3 AAA batteries (not included) into the battery compartment on the bottom of the clock. The clock can also operate solely on battery power, but the display will only light up briefly when a button is pressed to conserve energy.

The clock can be powered by USB cable and supports battery backup. It also features a USB output for charging other devices.
2. Initial Time Setting
- Press and hold the SET button on the back of the clock. The hour digits will begin to flash.
- Use the UP or DOWN buttons to adjust the hour.
- Press SET again to confirm the hour and move to minute setting. The minute digits will flash.
- Use the UP or DOWN buttons to adjust the minutes.
- Press SET again to confirm the minutes and exit time setting mode.
Operating Instructions
1. Setting Alarms (Alarm 1 & Alarm 2)
The clock features two independent alarms. The process is identical for both.
- To set Alarm 1, press the SET button once (do not hold). The Alarm 1 icon (A1) will appear, and the hour digits will flash.
- Use the UP or DOWN buttons to adjust the alarm hour.
- Press SET again to confirm the hour and move to minute setting. The minute digits will flash.
- Use the UP or DOWN buttons to adjust the alarm minutes.
- Press SET again to confirm the minutes and move to alarm tone selection.
- Use the UP or DOWN buttons to cycle through the 8 available alarm tones.
- Press SET again to confirm the alarm tone and exit alarm setting mode.
- To activate Alarm 1, slide the ALARM 1 Switch on the back to the ON position. The Alarm 1 icon will remain lit on the display.
- Repeat the process for Alarm 2 using the ALARM 2 Switch and corresponding settings.

Set two distinct alarms to manage your schedule effectively.

Choose from 8 diverse alarm tones, including natural sounds and melodies.
2. Snooze Function
When an alarm sounds, press the large SNOOZE button on the top of the clock. The alarm will pause and sound again after 10 minutes. To turn off the alarm completely, press any other button on the back of the clock, or slide the corresponding alarm switch to OFF.

Activate the snooze function for an additional 10 minutes of rest.
3. Adjusting Brightness
The display brightness can be adjusted from 0% to 100% using the rotary Brightness Dimmer knob located on the side of the clock. Rotate the knob to achieve your preferred comfort level.

Customize the display brightness for optimal visibility day or night.
4. Adjusting Volume
The alarm volume can be adjusted using the rotary Volume Dimmer knob located on the side of the clock. Rotate the knob to increase or decrease the alarm sound level.
5. 12/24 Hour Format
To switch between 12-hour and 24-hour time display formats, briefly press the UP button (labeled 12/24H) on the back of the clock when not in setting mode. In 12-hour format, an "AM" or "PM" indicator will be displayed.
6. Temperature Display
The clock displays the indoor temperature. To switch between Celsius (℃) and Fahrenheit (℉) units, briefly press the DOWN button (labeled ℃/℉) on the back of the clock when not in setting mode.

The clock provides an indoor temperature reading, switchable between Celsius and Fahrenheit.
7. USB Charging Port
The clock features a USB output port on the back, allowing you to charge external devices such as smartphones or tablets while the clock is powered via its USB cable.
Maintenance
- Clean the clock with a soft, dry cloth. Do not use abrasive cleaners or solvents.
- Avoid exposing the clock to extreme temperatures, direct sunlight, or high humidity.
- If using batteries, replace them annually or when the display becomes dim (in battery-only mode) to ensure proper function and prevent leakage.
Troubleshooting
| Problem | Possible Cause | Solution |
|---|---|---|
| Display is blank or dim. | No power, low batteries, or brightness set too low. | Ensure USB cable is connected and powered. Replace AAA batteries if using battery-only mode. Adjust Brightness Dimmer knob. |
| Alarm does not sound. | Alarm not activated, volume too low, or incorrect alarm time. | Check if Alarm 1/2 switch is ON. Adjust Volume Dimmer knob. Verify alarm time is set correctly. |
| Time/Alarm settings reset. | Power outage without battery backup, or dead backup batteries. | Ensure AAA batteries are installed and fresh for backup. |
| USB charging port not working. | Clock not powered by USB cable, or device incompatible. | Ensure the clock is connected to a power source via its USB cable. Try a different device or cable. |
Specifications
- Brand: LIORQUE
- Model: Colorful Digital Alarm Clock
- Display Type: Digital LED
- Color: Black
- Product Dimensions: 16.3 x 3.81 x 9.6 cm
- Item Weight: 290 g
- Special Features: Adjustable Brightness, Adjustable Volume, Dual Alarms, Snooze, Temperature Display (℃/℉), 12/24H Format, USB Charging Port
- Power Source: Corded Electric (USB DC 5V) & Battery Powered (3x AAA, not included)
- Room Type: Bedroom
Warranty and Support
LIORQUE products are designed for reliability and performance. For any questions, technical support, or warranty inquiries, please refer to the contact information provided with your purchase or visit the official LIORQUE website. Please retain your proof of purchase for warranty claims.


