
1. Product Overview
The ORICO 4-Bay Hard Drive Docking Station (Model 6646C3-C-US) is a versatile device designed for efficient data management and storage expansion. It supports both 2.5-inch and 3.5-inch SATA SSDs and HDDs, offering a maximum capacity of 20TB per bay, totaling up to 80TB. This docking station features a high-speed USB 3.2 Gen 1 Type-C interface, providing data transfer rates up to 5Gbps. A key functionality is its 1:3 offline clone capability, allowing direct disk duplication without a computer connection. Constructed from durable aluminum alloy, it ensures efficient heat dissipation and stable performance.

Image: The ORICO 4-Bay Hard Drive Docking Station with multiple hard drives inserted, showcasing its compact design.

Image: Visual representation of the docking station's 80TB capacity expansion, highlighting support for four 20TB drives.
2. What's in the Box
Upon unboxing your ORICO 4-Bay Hard Drive Docking Station, please verify that all the following components are included:
- 1 x Aluminum 4-Bay Hard Drive Docking Station
- 1 x 2-In-1 USB Type-C to Type-A/C Cable
- 1 x 12V Power Adapter
- 1 x User Manual (this document)

Image: A visual breakdown of the package contents, including the docking station, cables, power adapter, and user manual.
Video: This video demonstrates the unboxing experience and shows all the items included in the ORICO 4-Bay Hard Drive Dock package.
3. Setup
Follow these steps to set up your ORICO 4-Bay Hard Drive Docking Station:
- Connect Power: Connect the 12V power adapter to the DC input port on the back of the docking station. Plug the power adapter into a wall outlet.
- Connect to Host Device: Use the provided 2-in-1 USB Type-C to Type-A/C cable to connect the docking station to your computer (laptop, PC, Mac, etc.), game console (PS4, Xbox), or router. Ensure the cable is securely connected to both the docking station's Type-C interface and your host device's USB port.
- Insert Hard Drives: Gently insert your 2.5-inch or 3.5-inch SATA SSDs or HDDs into the drive bays. Ensure they are fully seated in the slots. The docking station supports up to four drives.
- Power On: Press the power switch on the back of the docking station to turn it on. The power indicator light will illuminate.

Image: The docking station with its power adapter and USB cable connected, illustrating the setup process.
Compatibility: The docking station is widely compatible with Windows XP/7/8/10/11, Mac OS 10 or later, and Linux. It supports various USB-C and USB-A devices such as laptops, PCs, Xbox, desktops, and routers. For phone connectivity, ensure your phone supports OTG (On-The-Go) functionality.

Image: A visual guide to the docking station's broad compatibility with different operating systems and device types.
4. Operating Instructions
4.1. Offline Clone Operation (1:3 Duplicator)
The ORICO docking station supports offline cloning, allowing you to duplicate hard drives without connecting to a computer. This function is ideal for backing up data or migrating systems.
- Prepare Drives:
- Insert the Source Disk into the "Source" bay (usually the first bay, labeled 'A').
- Insert one or more Target Disks into the "Target" bays (B, C, D).
- Important: Ensure the capacity of the Target Disk(s) is equal to or larger than the Source Disk. Data on the Target Disk(s) will be overwritten during the cloning process.
- Disconnect from PC: Ensure the docking station is NOT connected to any computer via the USB cable. The offline clone function operates independently.
- Power On: Connect the power adapter and turn on the docking station using the power switch.
- Switch to Clone Mode: On the back of the docking station, locate the "START CLONE / PC" switch. Slide it to the "CLONE" position.
- Initiate Clone: Press and hold the "START" button (usually located near the switch) for 3-5 seconds until the HDD LED lights begin to flash.
- Confirm Clone: Release the button, then press the "START" button again within 5 seconds to confirm and begin the cloning process.
- Monitor Progress: The percentage indicator lights (25%, 50%, 75%, 100%) on the front panel will illuminate sequentially as the cloning progresses. Once all lights are solid, the cloning process is complete.
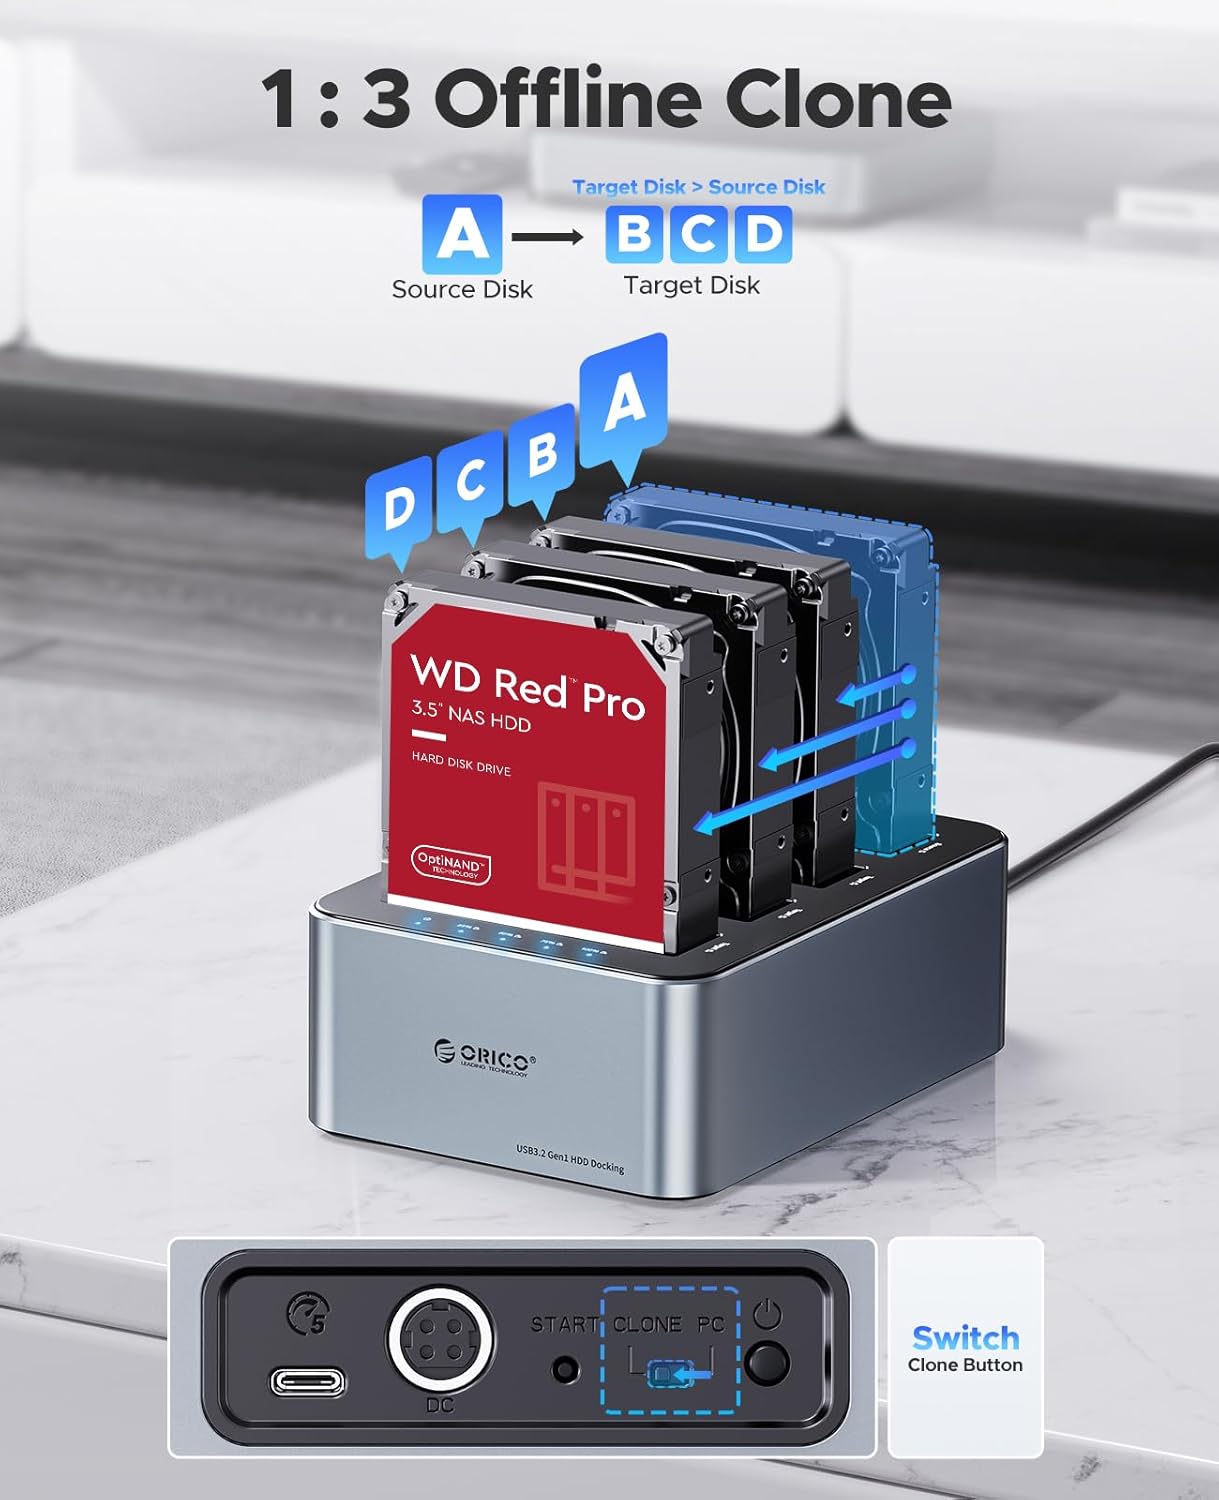
Image: A visual guide to setting up drives for the 1:3 offline cloning function.
Video: This video provides a step-by-step demonstration of the offline clone operation for the ORICO 4-Bay Hard Drive Docking Station.
4.2. Data Transfer / Docking Mode
To use the docking station for data transfer or as an external drive enclosure, connect it to your computer:
- Connect to PC: Ensure the "START CLONE / PC" switch on the back is set to the "PC" position. Connect the docking station to your computer using the provided USB cable.
- Insert Drives: Insert your 2.5-inch or 3.5-inch SATA SSDs or HDDs into any of the available bays.
- Access Drives: Your computer should automatically detect the inserted drives. You can now access them as external storage devices.
The USB 3.2 Gen 1 interface supports transfer speeds up to 5Gbps. It also supports S.M.A.R.T (Self-Monitoring, Analysis and Reporting Technology) and TRIM functionalities for optimal drive performance and health monitoring.

Image: Illustration of the high-speed data transfer capability of the docking station when connected to a computer.

Image: Detailed view of the docking station's front and rear panels, indicating the SATA interfaces, disk indicators, power indicator, Type-C interface, power input, clone START switch, mode switch, and ON/OFF button.
5. Maintenance
To ensure the longevity and optimal performance of your ORICO 4-Bay Hard Drive Docking Station, follow these maintenance guidelines:
- Cleaning: Regularly wipe the exterior of the docking station with a soft, dry cloth. Avoid using liquid cleaners or aerosols, which may damage the device.
- Dust Protection: The dust-proof shield helps keep the SATA interface clean. Periodically inspect the bays for dust accumulation and gently remove any debris using compressed air.
- Physical Protection: The shock-absorbing pad is designed to minimize vibrations and displacement. Avoid dropping the device or subjecting it to strong impacts.
- Ventilation: Ensure the docking station is placed in a well-ventilated area to allow for efficient heat dissipation, especially during prolonged operation.
6. Troubleshooting
If you encounter issues with your ORICO 4-Bay Hard Drive Docking Station, refer to the following common troubleshooting tips:
- Drives Not Detected:
- Ensure the power adapter is securely connected and the docking station is powered on.
- Verify that the USB cable is firmly connected to both the docking station and your computer.
- Check if the "START CLONE / PC" switch is set to "PC" mode for computer connection.
- Try inserting the hard drive into a different bay to rule out a faulty slot.
- Ensure the hard drive itself is functional and properly formatted.
- Offline Clone Fails or Does Not Start:
- Confirm the docking station is NOT connected to a computer during offline cloning.
- Ensure the "START CLONE / PC" switch is set to "CLONE" mode.
- Verify that the Target Disk(s) capacity is equal to or larger than the Source Disk.
- Press and hold the "START" button for 3-5 seconds, then release and press again within 5 seconds to initiate.
- Check the HDD LED lights for any error patterns.
- Slow Transfer Speeds:
- Ensure you are using a USB 3.0/3.2 compatible port on your computer.
- The actual transfer speed may vary depending on the hard drive's performance and your computer's USB interface.
- Note for Mac OS: If drive bays are not fully populated, formatting speed might be slower. This is normal.
- Note for Linux: In some Linux systems, only one hard drive may be readable at a time.
- Power Issues:
- Ensure a stable power supply. Inconsistent power can affect device reliability.
- If the device does not power on after a power outage, manually cycle the power switch.
7. Specifications
| Feature | Specification |
|---|---|
| Brand | ORICO |
| Model Number | 6646C3-C-US |
| Compatible Devices | PS4, Laptop, TV, Desktop, Router |
| Hard Disk Form Factor | 2.5 Inches, 3.5 Inches (SATA SSD/HDD) |
| Max Number of Supported Devices | 4 |
| Memory Storage Capacity | Up to 20 TB per bay (80 TB total) |
| Data Transfer Rate | Up to 5 Gbps (USB 3.2 Gen 1) |
| Hardware Interface | USB 3.0 Type A, USB 3.2 Gen 1 (Type-C) |
| Material | Aluminum Alloy |
| Product Dimensions | 7.87 x 5.67 x 2.76 inches |
| Item Weight | 2.75 pounds |
| Manufacturer | SHENZHEN ORICO TECHNOLOGIES CO.,LTD |
8. Warranty and Support
For detailed warranty information and customer support, please refer to the official ORICO website or the warranty card included with your product. You can also find additional support resources and FAQs on their website.
A digital version of the Instructions for Use (IFU) is available for download: