Introduction
This manual provides comprehensive instructions for the setup, operation, and maintenance of your Zalman i4 Airflow Full Mesh Mid Tower ATX Desktop PC Case. Designed for optimal cooling performance, the i4 case features a full mesh construction and pre-installed fans to ensure efficient airflow for your components. Please read this manual thoroughly before beginning assembly to ensure proper installation and safe operation.

Figure 1: The Zalman i4 Airflow Full Mesh Mid Tower ATX Desktop PC Case, showcasing its sleek black design and included 120mm fans.
Key Features
- Full Mesh Design: Engineered with a full mesh design on the front, top, and side panels for optimized ventilation and superior cooling performance.
- Pre-installed Fans: Comes with six (6) pre-installed 120mm ultra-quiet high-airflow case fans for immediate cooling capability.
- GPU Support Bracket: Includes a height-adjustable anti-sag GPU support bracket (Zalman VS-1) to prevent graphics card sag.
- Vertical GPU Mount Support: Features two (2) vertical PCI slot brackets to support vertical GPU mounting (riser cable not included).
- Top-Mounted I/O Panel: Conveniently located I/O panel with audio-in/out, two USB 3.0 ports, and one USB 2.0 port.
- Tool-less Design: Facilitates quick and easy component installation.
- Magnetic Dust Filters: Full-size magnetic dust filters on the front, top, and bottom (for PSU) ensure clean airflow and easy maintenance.

Figure 2: Exploded view illustrating the modular design and components of the Zalman i4 case, including the removable panels and fan locations.
Specifications
| Feature | Detail |
|---|---|
| Brand | Zalman |
| Model Name | i4 |
| Case Type | Mid Tower |
| Motherboard Compatibility | ATX |
| Dimensions (LxWxH) | 15.59 x 8.6 x 19.06 inches |
| Item Weight | 12.8 pounds |
| Color | Black |
| Material | Metal, Plastic |
| Pre-installed Fans | 6 x 120mm (Front: 3, Top: 2, Rear: 1) |
| Radiator Support | Up to 360mm (Front) |
| I/O Ports | 2x USB 3.0, 1x USB 2.0, Audio In/Out, Power Button, Reset Button, LED Button |
| Power Supply Mounting | Bottom Mount |
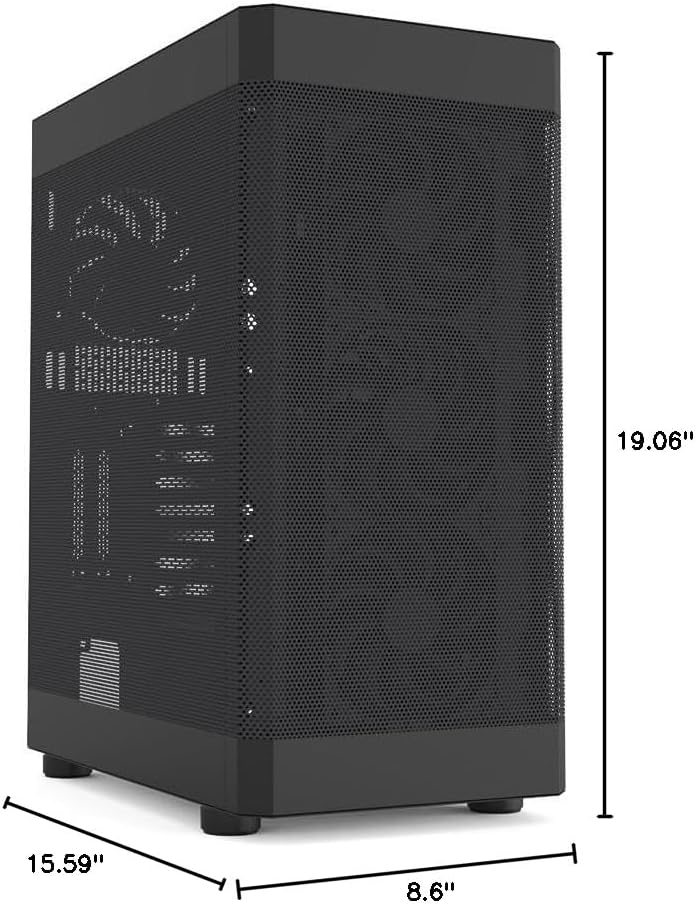
Figure 3: Detailed dimensions of the Zalman i4 PC case, providing measurements for planning your build.
Setup and Installation
Follow these steps for proper installation of your PC components into the Zalman i4 case.
1. Preparing the Case
- Place the case on a stable, flat surface.
- Remove the side panels. The main side panel (left side when facing the front) is typically secured with thumbscrews at the rear. The right side panel is a full mesh sliding panel, secured with two screws.
- Remove any internal packaging materials.

Figure 4: The full mesh sliding side panel of the Zalman i4 case, secured by two screws for durability and easy access.
2. Motherboard Installation
- Install the I/O shield into the motherboard cutout at the rear of the case.
- Align your ATX motherboard with the pre-installed standoffs inside the case.
- Secure the motherboard using the appropriate screws.
3. Power Supply Unit (PSU) Installation
- Locate the PSU mounting area at the bottom rear of the case.
- Slide the PSU into position from the rear of the case.
- Secure the PSU with screws from the exterior rear of the case.
4. Storage Drive Installation
The Zalman i4 supports various storage configurations:
- 2.5" SSD/HDD: Mount directly to the dedicated 2.5" drive trays located behind the motherboard tray.
- 3.5" HDD: Utilize the drive cage located beneath the PSU shroud.
Secure drives using the provided screws or tool-less mechanisms.
5. Graphics Card (GPU) Installation
The case supports both horizontal and vertical GPU mounting.
- Horizontal Mount: Remove the necessary PCI-E slot covers at the rear of the case. Insert the graphics card into the motherboard's PCI-E slot and secure it with screws.
- Vertical Mount: Use the two included vertical PCI slot brackets. Install your graphics card vertically using a compatible riser cable (not included).
- GPU Support Bracket: Install the height-adjustable anti-sag GPU support bracket (Zalman VS-1) beneath your graphics card to provide additional stability. Adjust its height to firmly support the GPU.

Figure 5: The included height-adjustable GPU support bracket (Zalman VS-1) installed within the case, designed to prevent graphics card sag.

Figure 6: Illustration of the vertical graphics card holder in the Zalman i4 case. Note that a riser cable is required and sold separately.
6. Cable Management
Utilize the cable routing cutouts and tie-down points behind the motherboard tray to manage cables neatly. This improves airflow and aesthetics.

Figure 7: An internal view of the Zalman i4 case, highlighting the ample space for cable routing and management behind the motherboard tray.
Operating Your PC Case
Once all components are installed and secured, replace the side panels. Connect your peripherals and power cable.
Front I/O Panel Usage
The top-mounted I/O panel provides convenient access to essential ports and controls:
- Power Button: Press to power on or off your system.
- Reset Button: Press to restart your system.
- USB 3.0 Ports (x2): For high-speed data transfer with compatible devices.
- USB 2.0 Port (x1): For standard data transfer and peripheral connections.
- Microphone Jack: Connect your microphone.
- Headphone Jack: Connect your headphones or speakers.
- LED Button: Controls the lighting effects of compatible RGB components (if connected).

Figure 8: Close-up view of the easily accessible top I/O ports on the Zalman i4 case, including USB, audio, and control buttons.
Maintenance
Regular maintenance ensures optimal performance and longevity of your PC components.
Dust Filter Cleaning
The Zalman i4 case is equipped with full-size magnetic dust filters on the front, top, and bottom (for the PSU intake). These filters are designed to prevent dust accumulation inside your system while maintaining excellent airflow.
- Top Filter: Gently lift the magnetic dust filter from the top panel.
- Front Filter: The front panel can be carefully pulled off to access the magnetic dust filter behind it.
- Bottom Filter: Slide out the magnetic dust filter located beneath the PSU intake.
- Clean the filters using compressed air, a soft brush, or by rinsing with water (ensure completely dry before re-installation).
- Re-attach the magnetic filters to their respective positions.

Figure 9: The full-size magnetic dust filters on the Zalman i4 case, designed for easy removal and cleaning to safeguard internal components.
Troubleshooting
This section addresses common issues you might encounter during or after building your PC in the Zalman i4 case.
Issue: System does not power on.
- Ensure the power supply is properly connected to the wall outlet and the PSU switch is in the "ON" position.
- Verify all power cables from the PSU are securely connected to the motherboard (24-pin ATX, 8-pin CPU) and graphics card (if applicable).
- Check that the front panel power switch cable is correctly connected to the motherboard's front panel header. Refer to your motherboard manual for correct pin alignment.
Issue: Fans are not spinning or RGB is not working.
- Confirm that the fan power cables are correctly connected to the motherboard fan headers or a fan controller.
- For RGB lighting, ensure the RGB cables are connected to the appropriate RGB headers on your motherboard or a dedicated RGB controller.
- Check the LED button on the top I/O panel to cycle through lighting modes or turn RGB on/off.
Issue: USB ports or audio jacks on the front panel are not working.
- Verify that the USB 3.0, USB 2.0, and HD Audio cables from the front I/O panel are securely connected to the corresponding headers on your motherboard.
- Ensure your motherboard drivers are up to date.
Warranty and Support
Zalman products are manufactured with high-quality materials and undergo rigorous testing to ensure durability and performance. For specific warranty details, including duration and coverage, please refer to the warranty card included with your product or visit the official Zalman website.
For technical support, troubleshooting assistance, or inquiries regarding replacement parts, please contact Zalman customer service. Contact information can typically be found on the Zalman website or on the product packaging.
Online Resources:


