
1. Product Overview
The AOPUTTRIVER AP-189A is a high-accuracy digital dual-port manometer designed for measuring differential, positive, and negative air pressure. It is suitable for a wide range of applications including HVAC system control, airflow measurement, air quality monitoring, and gas pressure system calibration.

Figure 1: AOPUTTRIVER AP-189A Digital Manometer and accessories.
Key Features:
- High Accuracy: ±0.3%FSO (at 25°C) with a measurement range of ±2.000psi.
- Multi-functional: Supports differential pressure, positive pressure, negative pressure, data hold, MAX/MIN/Average, and DIF functions.
- Data Recording and Zeroing: Ability to record data and view MAX/MIN/AVG values. Features a zeroing function for accurate measurements.
- 11 Selectable Units: Easily switch between psi, kPa, Kgfcm², ozin², Bar, mbar, inHg, mmHg, inH₂O, ftH₂O, cmH₂O.
- User-Friendly Display: Large LCD with backlight for clear readability.
- Power Management: Low battery indicator and automatic power-off after 25 minutes of inactivity.
Package Contents:
- 1x AP-189A Manometer
- 1x Protective Pouch
- 1x Small Screwdriver
- 2x 1.5V AAA Batteries
- 1x User Manual (6 languages)

Figure 2: Included items in the AP-189A package.
2. Device Layout and Dimensions
Familiarize yourself with the physical components and dimensions of the AP-189A manometer.

Figure 3: AP-189A Manometer dimensions and port details.
Button Functions and Display:
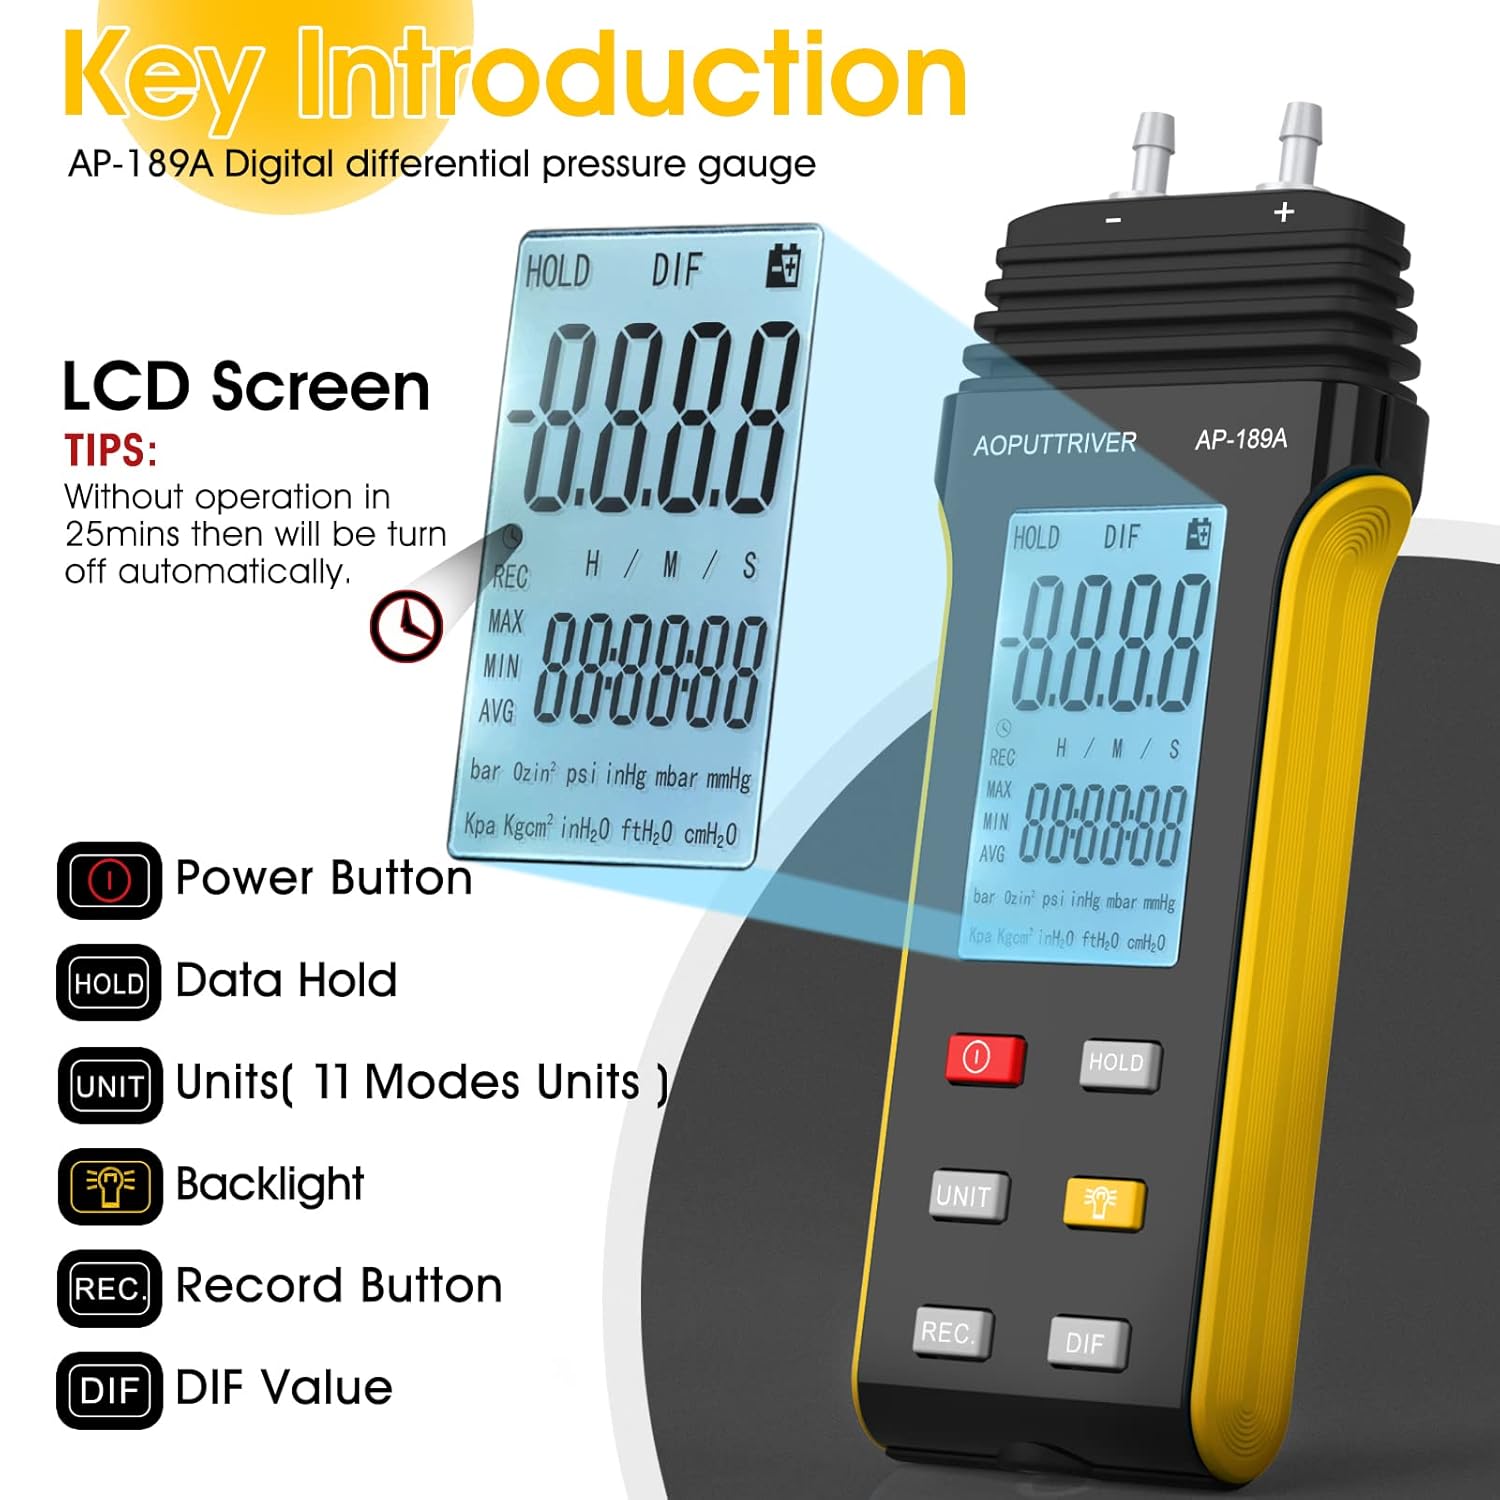
Figure 4: Key Introduction to AP-189A buttons and LCD screen.
- Power Button (ⓘ): Turns the device on or off.
- HOLD Button: Freezes the current reading on the display.
- UNIT Button: Cycles through the 11 available pressure units.
- Backlight Button (🔆): Activates or deactivates the LCD backlight.
- REC Button: Initiates or stops data recording (MAX/MIN/AVG).
- DIF Button: Displays the differential pressure value.
3. Setup and Battery Installation
3.1 Battery Installation:
- Locate the battery compartment on the back of the manometer.
- Use the included small screwdriver to open the battery compartment cover.
- Insert two 1.5V AAA batteries, ensuring correct polarity (+/-).
- Replace the battery compartment cover and secure it with the screw.
3.2 Connecting Pressure Hoses:
The AP-189A features dual ports for differential pressure measurement. Connect the pressure hoses to the (+) and (-) ports as required for your application. The (+) port measures positive pressure, and the (-) port measures negative pressure relative to the other port.
4. Operating Instructions
4.1 Power On/Off:
Press the Power Button (ⓘ) to turn the manometer on. Press and hold the same button to turn it off.
4.2 Unit Selection:
Press the UNIT button to cycle through the 11 available pressure units: psi, kPa, Kgfcm², ozin², Bar, mbar, inHg, mmHg, inH₂O, ftH₂O, cmH₂O. The selected unit will be displayed on the LCD.
4.3 Data Hold Function:
Press the HOLD button to freeze the current reading on the display. Press it again to release the hold and resume live readings.
4.4 Zero Setting:
To ensure accurate differential pressure measurements, it is crucial to zero the gauge before use. Ensure both pressure ports are open to atmospheric pressure or connected to the same pressure source before zeroing.
- First, briefly press the HOLD button.
- Then, press and hold the HOLD button for more than 5 seconds. The display will show a "---" symbol, indicating successful zeroing.

Figure 5: Zero Setting procedure.
4.5 MAX/MIN/AVG/DIF Functions:
Press the REC button to enter data recording mode. Subsequent presses will cycle through MAX (maximum), MIN (minimum), and AVG (average) values recorded during the session. The DIF button displays the differential pressure.
4.6 Backlight:
Press the Backlight Button (🔆) to illuminate the LCD for better visibility in low-light conditions. Press again to turn off the backlight.

Figure 6: Manometer with backlight and auto-shutdown reminder.
4.7 Automatic Power Off:
The device will automatically power off after approximately 25 minutes of no operation to conserve battery life. This feature can typically be disabled or enabled through specific button combinations (refer to the included 6-language manual for details if available).
5. Maintenance and Care
- Cleaning: Wipe the device with a soft, damp cloth. Do not use abrasive cleaners or solvents.
- Storage: Store the manometer in its protective pouch in a dry, cool place when not in use. Remove batteries if storing for extended periods to prevent leakage.
- Battery Replacement: Replace batteries when the low battery indicator appears on the display.
- Hose Care: Inspect pressure hoses regularly for cracks or damage. Replace if necessary to ensure accurate readings.
6. Troubleshooting
| Problem | Possible Cause | Solution |
|---|---|---|
| Device does not power on. | Dead or incorrectly installed batteries. | Check battery polarity. Replace with new 1.5V AAA batteries. |
| Inaccurate readings or "doesn't zero out". | Incorrect zeroing procedure; blocked or damaged pressure ports/hoses; device not at stable temperature. | Perform zero setting correctly (long press HOLD button for 5 seconds). Ensure ports are clear. Check hoses for leaks or blockages. Allow device to stabilize at ambient temperature. |
| Display is dim or flickering. | Low battery. | Replace batteries. |
| Automatic shutdown occurs too quickly. | Standard auto-off feature. | This is a power-saving feature. Refer to the full manual for options to disable or adjust auto-off if available. |
7. Specifications
| Parameter | Value |
|---|---|
| Measurement Range | ±2.000psi (±13.79Kpa) |
| Accuracy | ±0.3%FSO (at 25°C) |
| Repeatability | ±0.25%FSO |
| Linearity/Hysteresis | ±0.1%FSO of full scale |
| Limit Maximum Pressure | 6Psi |
| Selectable Units | psi, kPa, Kgfcm², ozin², Bar, mbar, inHg, mmHg, inH₂O, ftH₂O, cmH₂O (11 units) |
| Functions | Backlight, Data Hold, Auto Power Off (25 mins), MAX/MIN/AVG/DIF, Zero Setting |
| Power Supply | 2x 1.5V AAA Batteries |
| Item Model Number | AP-189A |
| Manufacturer | AOPUTTRIVER |
| Package Dimensions | 7.28 x 3.62 x 1.69 inches |
| Item Weight | 8.29 ounces |

Figure 7: Professional features and specifications overview.
8. Warranty and Support
The AOPUTTRIVER AP-189A manometer comes with a 365-day warranty and lifetime technical support. If you encounter any product quality issues, please contact AOPUTTRIVER customer service for assistance. They are committed to resolving problems promptly.
For further support or to explore other AOPUTTRIVER products, visit the official AOPUTTRIVER Store on Amazon.
9. Common Applications
The AP-189A differential pressure gauge is a versatile tool applicable in various professional and domestic settings:
- HVAC Systems: For balancing airflows, checking filter pressure drop, and verifying fan performance.
- Air Conditioning & Ventilation Systems: Monitoring pressure differences across coils and ducts.
- Clean Rooms: Maintaining precise pressure differentials to prevent contamination.
- Laboratory Testing: For various experiments requiring accurate pressure measurements.
- Gas Pressure Systems: On-site calibration and troubleshooting of gas appliances and lines.

Figure 8: Examples of common applications for the differential pressure gauge.