
Introduction
This manual provides detailed instructions for the safe and efficient installation, operation, and maintenance of your SpeaKa Professional SP-TVC-900 Motorized TV Mount. This mount is designed to support televisions ranging from 55 to 100 inches (139.7 cm to 254.0 cm) with a maximum load capacity of 120 kg. Please read this manual thoroughly before installation and keep it for future reference.
Safety Instructions
- Ensure all components are present and undamaged before beginning installation. Do not use damaged parts.
- Installation should be performed by at least two people to prevent injury or damage.
- Verify that the mounting surface can safely support the combined weight of the mount and the television.
- Do not exceed the maximum load capacity of 120 kg (264 lbs).
- Keep children and pets away during installation.
- Ensure all cables are properly routed and secured to prevent pinching or damage during operation.
- Only use the provided hardware or manufacturer-approved replacements.
Setup and Installation
Careful installation is crucial for the safe and proper functioning of your motorized TV mount. Follow these steps precisely.
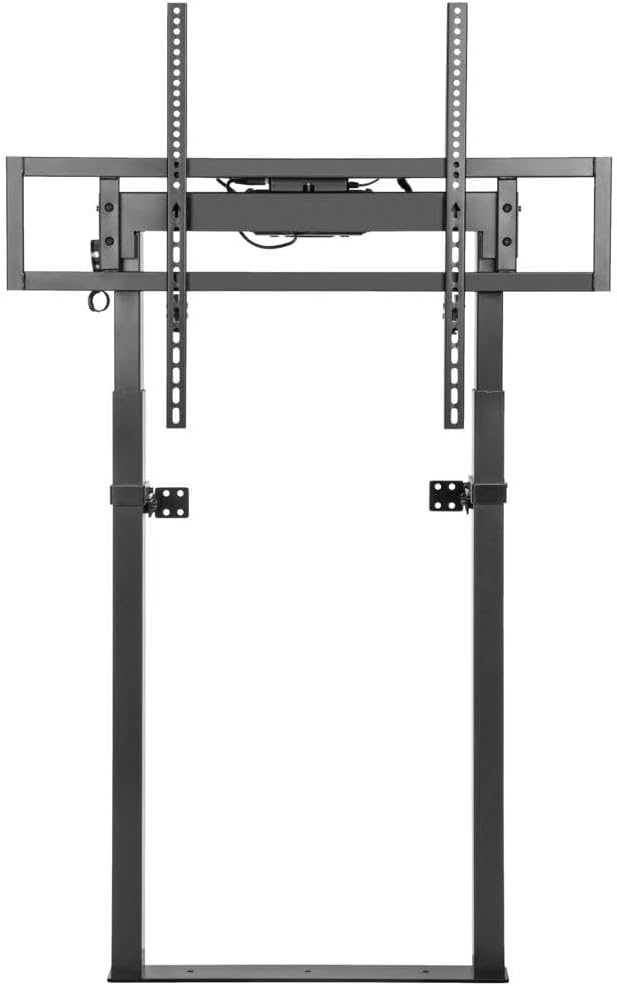
Figure 1: Front view of the SpeaKa Professional SP-TVC-900 motorized TV mount. This image displays the main structure, including the two vertical support columns and the horizontal bracket where the television will be attached. The VESA mounting arms are visible, ready for TV attachment.
Step 1: Unpacking and Component Check
Carefully unpack all components and compare them against the parts list (not provided in this document, refer to your product packaging for a complete list). Ensure no parts are missing or damaged. If any parts are missing or damaged, do not proceed with installation and contact customer support.
Step 2: Assembling the Base and Vertical Columns
Assemble the base frame and attach the vertical support columns. Ensure all screws are tightened securely. The motorized mechanism is integrated into these columns, allowing for height adjustment.

Figure 2: Angled view of the SpeaKa Professional SP-TVC-900 motorized TV mount. This perspective highlights the robust construction and the mechanism for height adjustment. The lower support brackets for additional equipment are also visible.
Step 3: Attaching the TV Mounting Bracket
Attach the horizontal TV mounting bracket to the top of the vertical columns. This bracket supports the VESA arms. Ensure it is level and securely fastened.
Step 4: Attaching VESA Arms to Your TV
Identify the VESA mounting holes on the back of your television. Select the appropriate screws and spacers (if necessary) from your TV's accessories or the mount's hardware kit. Attach the VESA arms to the back of your TV. This mount supports various VESA standards. Refer to your TV's manual and the mount's packaging for specific VESA compatibility and screw requirements.

Figure 3: Rear angled view of the SpeaKa Professional SP-TVC-900 motorized TV mount. This view illustrates the rear of the mounting plate and potential cable management options, ensuring a tidy setup once the TV is installed.
Step 5: Mounting the TV onto the Stand
With assistance, carefully lift the television with the attached VESA arms and hook it onto the horizontal mounting bracket of the stand. Secure the TV using the safety screws or locking mechanisms provided. Ensure the TV is centered and level.
Step 6: Connecting Power and Cables
Connect the power cable for the motorized mount to a suitable power outlet. Route all TV and mount cables neatly using the integrated cable management features to prevent interference with the motorized movement.
Operating Instructions
Your SpeaKa Professional SP-TVC-900 mount features motorized height adjustment and tilt functionality for optimal viewing.
Motorized Height Adjustment
Use the provided remote control (if applicable, refer to product packaging for remote details) to adjust the height of your television. Press the "Up" button to raise the TV and the "Down" button to lower it. The mount will move smoothly to your desired viewing height. Avoid placing obstacles in the path of the moving parts.
Tilt Adjustment
The mount also allows for tilt adjustment. Depending on the model, this may be motorized via the remote or require manual adjustment. If manual, loosen the tilt locking knobs on the side of the TV bracket, adjust the TV to the desired angle, and then securely tighten the knobs. Do not overtighten.
Memory Presets (If applicable)
Some motorized mounts offer memory presets to save your favorite viewing positions. Refer to your remote control's specific instructions for programming and recalling these presets.
Maintenance
Regular maintenance ensures the longevity and safe operation of your TV mount.
- Cleaning: Dust the mount regularly with a soft, dry cloth. For stubborn marks, use a slightly damp cloth with mild detergent, then wipe dry immediately. Avoid abrasive cleaners or solvents.
- Inspection: Periodically check all screws and connections to ensure they remain tight. Over time, vibrations can loosen fasteners.
- Cable Management: Ensure all cables are still securely routed and not interfering with the mount's movement.
- Motor Check: Listen for any unusual noises during operation. If you hear grinding or straining, discontinue use and consult the troubleshooting section or contact support.
Troubleshooting
If you encounter issues with your SpeaKa Professional SP-TVC-900 mount, refer to the following common problems and solutions.
- Mount is not responding to remote control:
- Check if the mount is properly plugged into a working power outlet.
- Ensure the remote control batteries are not depleted and are inserted correctly.
- Verify there are no obstructions between the remote and the mount's receiver.
- Try resetting the mount by unplugging it for 30 seconds and then plugging it back in.
- Mount makes unusual noises during operation:
- Check for any loose screws or components. Tighten if necessary.
- Ensure no cables or foreign objects are interfering with the moving parts.
- If the noise persists, discontinue use and contact customer support.
- TV appears uneven or tilted:
- Ensure the TV is properly centered on the mounting bracket.
- Check the tilt adjustment knobs (if manual) and ensure they are securely tightened after adjustment.
- Verify that the VESA arms are evenly attached to the TV.
If these steps do not resolve the issue, please contact SpeaKa Professional customer support for further assistance.
Specifications
| Feature | Detail |
|---|---|
| Brand | SpeaKa Professional |
| Model Number | SP-11198892 |
| ASIN | B0CHP1ZK16 |
| Mount Type | Motorized, Height Adjustable, Tiltable |
| Compatible Display Sizes | 139.7 cm (55 inches) - 254.0 cm (100 inches) |
| Maximum Load Capacity | 120 kg (264 lbs) |
| VESA Compatibility | Supports various VESA standards (e.g., 200x200mm, 300x300mm, 300x200mm, 400x200mm, etc.) |
| Material | Metal |
| Color | Matte Black |
| Compatible Devices | Monitor, Television |
Warranty and Support
Parts Availability: Spare parts for this product are guaranteed to be available for 1 year from the date of purchase.
For technical support, warranty claims, or further assistance, please contact SpeaKa Professional customer service. Refer to your product packaging or the official SpeaKa Professional website for contact details.


