
1. Introduction
This manual provides essential information for the safe and efficient use of your new AEG HDB64623NB Built-in 60 cm Combi Hob. Please read these instructions carefully before installation and operation, and keep them for future reference. This appliance combines both induction and gas cooking zones, offering versatility in your kitchen.
2. Safety Information
WARNING: Improper installation, adjustment, alteration, service, or maintenance can cause injury or property damage. Refer to this manual. For assistance or additional information, consult a qualified installer, service agency, or the gas supplier.
- Ensure the appliance is installed by a qualified professional in accordance with local regulations.
- Keep children away from the appliance during operation. The surface can become very hot.
- Do not store flammable materials near the hob.
- Always use appropriate cookware for each cooking zone (magnetic for induction, heat-resistant for gas).
- Never leave cooking unattended, especially when using high heat settings.
- In case of a gas leak, turn off the gas supply, open windows, and do not operate electrical switches. Contact emergency services.
- After use, ensure all controls are in the 'off' position.
3. Product Overview
The AEG HDB64623NB combi hob features two induction cooking zones and two gas burners, providing flexible cooking options. The controls are located at the front of the appliance.

Figure 1: Top view of the AEG HDB64623NB combi hob, showing two induction zones on the left and two gas burners on the right, with controls at the bottom front.

Figure 2: Close-up of the control panel, featuring touch controls for the induction zones and rotary knobs for the gas burners.
Components:
- Induction Cooking Zones: Two zones on the left side, controlled by touch sensors.
- Gas Burners: Two burners on the right side, with cast iron pan supports, controlled by rotary knobs.
- Control Panel: Integrated at the front for both induction and gas functions.
- Tempered Glass Surface: Easy to clean and durable.
4. Setup and Installation
Installation of this built-in hob requires specialized knowledge and should only be performed by a qualified technician or authorized service agent. Incorrect installation can lead to hazards and void the warranty.
4.1 Unpacking
- Carefully remove all packaging materials.
- Inspect the appliance for any signs of damage. Do not install a damaged appliance.
- Keep packaging materials out of reach of children.
4.2 Placement and Ventilation
- Ensure adequate ventilation around the appliance as per local building and gas regulations.
- The hob must be installed in a countertop with sufficient clearance from adjacent walls and cabinets.
4.3 Electrical Connection
- The appliance requires a dedicated electrical supply. Refer to the wiring diagram in the full installation manual.
- Ensure the voltage and frequency match the specifications on the rating plate.
4.4 Gas Connection
- Connect the appliance to the gas supply in accordance with local gas regulations.
- Check for gas leaks using a soapy water solution; never use an open flame.
4.5 Dimensions
The product dimensions are approximately 50 cm (Length) x 50 cm (Width) x 28 cm (Height). Refer to the detailed installation guide for precise cutout dimensions for your countertop.
5. Operating Instructions
5.1 Using the Gas Burners
The gas burners are equipped with an electronic ignition system and flame failure safety devices.

Figure 3: Close-up of a gas burner with the flame off, showing the burner cap and grate.

Figure 4: Close-up of a gas burner with a blue flame, indicating it is in operation.
- Ignition: Push down the corresponding control knob and turn it counter-clockwise to the maximum flame setting (large flame symbol). Hold the knob down for a few seconds until the flame ignites and stabilizes.
- Adjusting Flame: Once ignited, release the knob. You can then adjust the flame size by turning the knob between the maximum and minimum flame settings (small flame symbol).
- Turning Off: Turn the control knob clockwise until it clicks into the 'off' position (dot symbol).

Figure 5: A rotary control knob for a gas burner next to a wok being used on a gas flame, demonstrating active cooking.
5.2 Using the Induction Zones
The induction zones offer precise and rapid heating. They require cookware with a magnetic base.
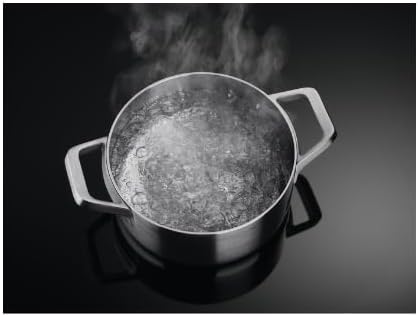
Figure 6: A pot of water boiling rapidly on an induction cooking zone, illustrating efficient heating.
- Power On: Place suitable cookware on the desired induction zone. Touch the main power symbol on the control panel.
- Select Zone and Power: Select the cooking zone by touching its corresponding sensor. Then, use the '+' or '-' symbols, or slide control (if available), to set the desired power level (typically 1-9).
- Bridge Function (if applicable): Some models feature a bridge function to combine two zones for larger cookware. Refer to the full manual for specific instructions on activating this feature.
- Turning Off: Touch the power symbol for the specific zone, or the main power symbol to turn off the entire hob. The residual heat indicator ('H') will remain lit until the zone has cooled down.

Figure 7: A small saucepan containing melting chocolate on an induction zone, demonstrating precise temperature control for delicate tasks.
6. Cleaning and Maintenance
Regular cleaning and maintenance will ensure the longevity and optimal performance of your hob.

Figure 8: Spilled milk on the black glass hob surface next to a cleaning cloth, illustrating the ease of cleaning the smooth surface.
6.1 Cleaning the Glass Surface
- Allow the hob to cool completely before cleaning.
- Use a soft cloth or sponge with a mild detergent and warm water.
- For stubborn stains, use a ceramic hob scraper (for induction zones) or a specialized hob cleaner.
- Avoid abrasive cleaners, scouring pads, or harsh chemicals that can scratch or damage the surface.
- Wipe dry with a clean cloth to prevent water marks.
6.2 Cleaning Gas Burners and Pan Supports
- Ensure the burners are cool and the gas supply is turned off.
- Remove the pan supports, burner caps, and burner rings.
- Wash these components in warm soapy water. For stubborn food residues, soak them before cleaning.
- Ensure all parts are completely dry before reassembling them. Incorrect reassembly can affect burner performance.
7. Troubleshooting
Before contacting service, please check the following common issues:
| Problem | Possible Cause | Solution |
|---|---|---|
| Gas burner does not ignite. | No gas supply, burner parts wet or blocked, control knob not held down long enough. | Check gas supply. Ensure burner parts are dry and clean. Hold knob down for 3-5 seconds after ignition. |
| Induction zone not heating. | Incorrect cookware, no cookware detected, power level not set. | Use magnetic cookware. Ensure cookware is centered on the zone. Set a power level. |
| Hob makes unusual noises. | Induction zones may produce a slight hum or click, which is normal. Gas burners may hiss if flame is too low. | This is often normal operation. If loud or persistent, consult a technician. |
| Error code displayed. | Specific fault detected by the appliance. | Refer to the full user manual for a list of error codes and their solutions. If persistent, contact service. |
8. Specifications
- Model: AEG HDB64623NB
- Type: Built-in Combi Hob (Gas and Induction)
- Color: Black
- Surface Material: Tempered Glass
- Dimensions (L x W x H): Approximately 50 x 50 x 28 cm
- Weight: Approximately 5.66 kg
- Number of Cooking Zones: 4 (2 Induction, 2 Gas)
- Control Type: Manual (Gas), Electronic Touch (Induction)
- Power Source: Electric and Gas
- Voltage: 230 Volts (for electric components)
- Power: 3000 Watts (for electric components)
- Special Features: Tempered Glass, Manual Control (Gas), Electronic Ignition (Gas)
9. Warranty and Support
For warranty information, please refer to the warranty card included with your appliance or visit the official AEG website. Keep your proof of purchase for any warranty claims.
For technical support, spare parts, or service requests, please contact AEG customer service or an authorized service center. Contact details can typically be found in the full product manual or on the AEG website.
When contacting support, please have your model number (HDB64623NB) and serial number ready.


