
1. Introduction
The SMARTGEN HT Series Water Heater is designed for preheating engine coolant. This device is crucial for ensuring reliable engine starting and operation in cold environments, specifically when the ambient temperature falls below 4℃ (39.2℉). In such conditions, engine coolant and lubricant can become viscous, impairing their effectiveness and potentially causing engine damage. The HT10M model is suitable for engines with a displacement of 0 to 7 liters.
Key features of the HT10M Water Heater include:
- Durable cast aluminum enclosure with a specialized surface treatment for high corrosion resistance and performance across a wide temperature range.
- Internal pipes and end closure constructed from stainless steel, offering high corrosion resistance.
- Integrated thermostat for precise coolant temperature control, ensuring simple connections and high reliability.
- Indicator lights for power, heating status, and overheat protection, providing clear operational feedback.
- An overheating thermostat mechanism that protects against dry heating and excessive temperatures.
2. Safety Information
Read all safety warnings and instructions carefully before installation and operation. Failure to follow these instructions may result in electric shock, fire, serious injury, or property damage.
- Electrical Shock Hazard: Ensure the power supply is disconnected before performing any installation, maintenance, or troubleshooting. Only qualified personnel should perform electrical connections.
- Hot Surface Hazard: The heater's surface and coolant lines can become very hot during operation. Avoid direct contact to prevent burns. Allow the unit to cool before handling.
- Dry Heating Protection: The heater is equipped with an overheating thermostat to prevent damage from dry heating. However, always ensure the heater is filled with coolant before applying power. Operating without coolant will damage the unit.
- Proper Coolant: Use only recommended engine coolant. Do not use water alone.
- Mounting: Mount the heater securely according to the instructions to prevent movement or damage.

Figure 2.1: HT10M Control Panel with Safety Warnings. This image displays the heater's control panel, featuring LED indicators for 'Heating', 'Overheat', and 'Power', along with 'Reset' and 'Test' buttons. Prominent safety symbols for 'Electric Shock' and 'Hot Surface' are visible, emphasizing the importance of caution during use.
3. Product Overview
3.1 Components
The SMARTGEN HT10M Water Heater consists of a robust housing, internal heating elements, a thermostat, and connection ports for the engine's coolant system and electrical supply.
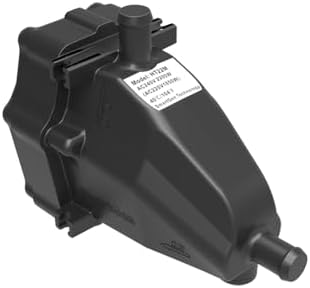
Figure 3.1: Main Product View. This image shows the overall design of the SMARTGEN HT10M Water Heater, a compact black unit with a visible product label detailing its model number and electrical ratings.

Figure 3.2: Side View with Coolant Ports. This image provides a side perspective of the HT10M heater, highlighting the two distinct ports for coolant circulation within the engine system.

Figure 3.3: Top View with Mounting Points. This image displays the top surface of the HT10M heater, clearly showing the integrated mounting brackets designed for secure installation.
4. Installation
4.1 Pre-installation Checklist
- Ensure the engine is cool and the ignition is off.
- Verify that the heater's voltage and power specifications match your electrical supply.
- Gather necessary tools: wrenches, screwdrivers, hose clamps, coolant, and appropriate electrical connectors.
- Confirm the engine's coolant system is compatible with the heater's flow requirements.
4.2 Mounting the Heater
- Select a suitable mounting location on the engine or chassis that is stable, free from excessive vibration, and allows for easy access to coolant lines and electrical connections.
- Ensure the heater is mounted in an upright position, as indicated by any 'THIS SIDE UP' markings, to facilitate proper coolant circulation and air bleeding.
- Secure the heater using appropriate fasteners through its designated mounting points.
4.3 Coolant Connections
- Drain a sufficient amount of coolant from the engine system to allow for heater installation without spillage.
- Connect the heater's inlet and outlet ports to the engine's coolant system using appropriate hoses and hose clamps. Refer to the engine manufacturer's recommendations for the optimal connection points to ensure effective coolant circulation through the heater. Typically, the heater should be installed in a bypass circuit or in line with a low-point return.
- Ensure all hose connections are tight and leak-free.
- Refill the engine's coolant system to the correct level with the recommended coolant, and bleed any air from the system according to the engine manufacturer's instructions.
4.4 Electrical Connections
- Ensure the power supply is disconnected at the source.
- Connect the heater to a dedicated electrical circuit with appropriate overcurrent protection (e.g., circuit breaker or fuse).
- Follow all local electrical codes and regulations. Use properly sized wiring for the heater's power requirements.
- Ensure all electrical connections are secure and insulated to prevent short circuits or electric shock.
4.5 Post-installation Checks
- Visually inspect all coolant and electrical connections for tightness and integrity.
- Check coolant levels and top up if necessary.
- Ensure there are no obstructions around the heater that could impede airflow or cause overheating.
5. Operation
5.1 Initial Start-up
- After successful installation and verification of all connections, restore power to the heater.
- The 'Power' indicator light should illuminate, confirming the unit is receiving electricity.
- The 'Heating' indicator light will illuminate when the heater is actively heating the coolant.
5.2 Indicator Lights
- Power Indicator: Illuminates when the heater is connected to a power source.
- Heating Indicator: Illuminates when the heating element is active. This light will cycle on and off as the thermostat maintains the desired coolant temperature.
- Overheat Protection Indicator: Illuminates if the heater detects an overheating condition, typically due to insufficient coolant or a malfunction. If this light illuminates, disconnect power immediately and investigate the cause.
5.3 Thermostat Control
The HT10M Water Heater features an internal thermostat that automatically regulates the coolant temperature. Once the coolant reaches the preset temperature (e.g., 40℃ for standard models), the heating element will switch off. It will reactivate when the coolant temperature drops below the set point, maintaining optimal engine readiness.
6. Maintenance
Regular maintenance ensures the longevity and efficient operation of your SMARTGEN HT10M Water Heater.
6.1 Regular Checks
- Monthly: Inspect all coolant hoses and clamps for signs of wear, leaks, or corrosion. Tighten clamps if necessary.
- Quarterly: Check electrical connections for tightness and signs of corrosion. Ensure wiring insulation is intact.
- Annually: Inspect the heater's housing for any physical damage. Verify that indicator lights function correctly.
6.2 Cleaning
Keep the exterior of the heater clean and free from dirt, debris, or oil buildup. Use a soft, damp cloth for cleaning. Do not use abrasive cleaners or solvents.
6.3 Coolant System Care
Ensure the engine's coolant system is properly maintained, including regular coolant changes as recommended by the engine manufacturer. Using the correct type and concentration of coolant is vital for the heater's performance and to prevent corrosion.
7. Troubleshooting
This section provides solutions to common issues encountered with the HT10M Water Heater.
| Problem | Possible Cause | Solution |
|---|---|---|
| Heater not turning on (Power indicator off) | No power supply; Blown fuse/tripped breaker; Loose electrical connection. | Check power source; Inspect fuse/breaker and reset if necessary; Verify all electrical connections are secure. |
| Heater not heating (Heating indicator off, Power indicator on) | Coolant already at temperature; Faulty thermostat; Faulty heating element. | Allow engine to cool and re-check; If problem persists, contact support for diagnosis. |
| Overheat Protection indicator on | Low coolant level; Air in the system; Restricted coolant flow; Faulty thermostat. | Immediately disconnect power. Check coolant level and refill; Bleed air from system; Inspect hoses for kinks; Contact support if issue persists. |
| Coolant leak | Loose hose clamps; Damaged hose; Cracked heater housing. | Tighten hose clamps; Replace damaged hoses; If housing is cracked, the unit requires replacement. |
8. Specifications
Technical specifications for the SMARTGEN HT10M Water Heater:
| Specification | Value |
|---|---|
| Model Number | HT10M |
| Manufacturer | SMARTGEN |
| Engine Displacement Compatibility | 0 - 7 Liters |
| Item Weight | 1.2 kg (2.65 lbs) |
| Enclosure Material | Cast Aluminum |
| Inner Pipes & End Closure Material | Stainless Steel |
| Temperature Control | Integrated Thermostat (e.g., 40℃ standard, 50℃ and 60℃ customizable) |
| Protection Features | Overheating Thermostat (dry heating protection) |
9. Warranty and Support
For warranty information and technical support regarding your SMARTGEN HT10M Water Heater, please refer to the documentation provided with your purchase or contact the authorized SMARTGEN distributor or reseller from whom the product was acquired.
For direct inquiries, you may contact SmartGen-America, the seller of this product, for assistance.


