
1. Introduction and Overview
The DANOPLUS Decibel Meter Recorder DP-389 is a high-definition sound level meter designed for precise noise monitoring and data logging. Featuring a large 13-inch display, a 16.4ft external sensor, and comprehensive alarm functions, this device is ideal for various environments including classrooms, studios, and homes. It offers both desktop and wall-mount installation options, along with advanced data recording and export capabilities for detailed analysis.

Figure 1: DANOPLUS Decibel Meter Recorder DP-389 main unit with external sensor.
Key Features:
- Decibel Data Logger: Records decibel data every 2 seconds, capable of storing one year of data. Real-time data display and export via PC software.
- 13-inch HD Screen: Large display with 4-inch digits for clear visibility from a distance.
- Audible & Visual Alarm: Emits alarms when the decibel level exceeds a user-defined threshold (default 120dB). Threshold and duration are adjustable.
- 16.4FT Sound Sensor: Equipped with an extra-long external sound sensor for flexible placement and detection of sound sources.
- Multi-Functional Design: Supports both desktop and wall-mount installations. Features an analog bar indication, 12V external alarm output (3.5mm port), and a 30~130dB measurement range.
2. Setup and Installation
The DANOPLUS DP-389 offers versatile installation options to suit your environment.
2.1 Package Contents
Before proceeding, ensure all components are present:
- Sound Level Meter Main Unit
- USB Power Cable
- User Manual (this document)
- 2 x Hanging Hooks
- 2 x Wallmount Screws
- Packaging Box

Figure 2: Detailed diagram showing components, dimensions, and ports of the DP-389.
2.2 Power Connection
Connect the provided USB power cable to the USB power port on the side of the unit and plug it into a suitable power adapter (not included) or USB port. The device will power on automatically.
2.3 Sensor Connection
The 16.4ft external sound sensor connects to the dedicated sensor port on the unit. Ensure the connection is secure. Position the sensor in the area where sound levels need to be measured.
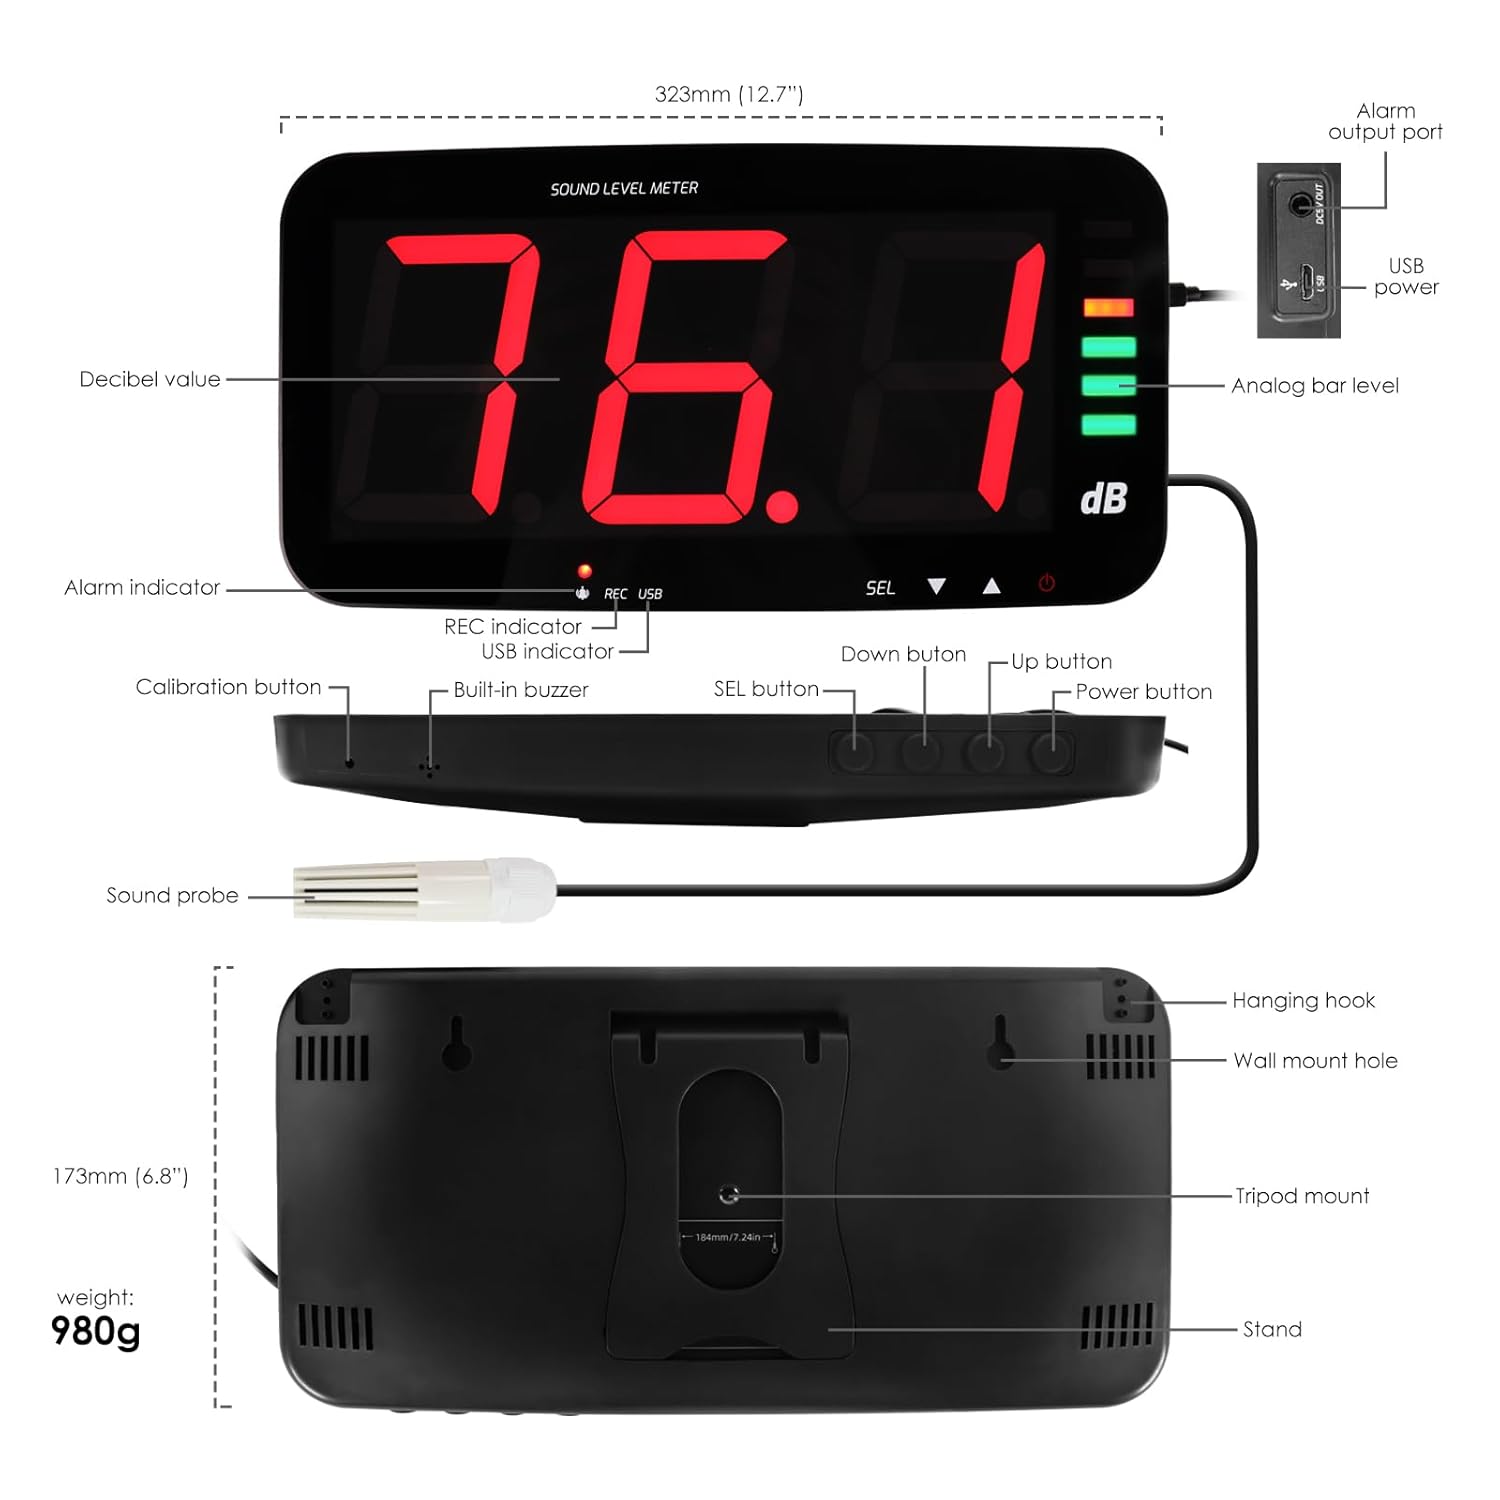
Figure 3: The 16.4-foot external noise sensor for flexible sound detection.
2.4 Mounting Options
The DP-389 can be used in several configurations:
- Desktop Placement: Utilize the integrated back stand for stable placement on any flat surface.
- Wall Mount: Use the provided wallmount screws and hanging hooks to securely attach the unit to a wall.
- Tripod Mount: The unit includes a tripod mount for additional positioning flexibility (tripod not included).

Figure 4: Illustration of wall-mount and desktop setup options for the decibel meter.
3. Operating Instructions
3.1 Display Overview
The 13-inch HD screen displays the current decibel level prominently. An analog bar level indicator on the right side provides a quick visual reference of the noise intensity range.

Figure 5: The large 13-inch HD display ensures clear visibility of sound levels.

Figure 6: Analog bar indicator showing decibel ranges (30-45dB green, 46-60dB green, 61-75dB green, 76-90dB orange, 91-105dB red, 106-130dB red).
3.2 Alarm Settings
The DP-389 features an audible and visual alarm system. To adjust alarm settings:
- Long press the "SEL" button to enter the alarm setting mode.
- Use the Up and Down buttons to adjust the decibel threshold.
- Press "SEL" again to confirm and exit.
When the measured decibel level exceeds the set threshold, the device will activate both an audible buzzer and a visual alarm indicator.

Figure 7: Alarm indicator and SEL button for alarm settings.
3.3 Data Logging and Export
The DP-389 can record decibel data every 2 seconds and store up to one year of data. To access and export this data, connect the device to a PC using the USB cable.
- Install the dedicated software on your PC (software details typically provided with the product or available for download from the manufacturer's website).
- Connect the decibel meter to your PC via the USB port.
- Launch the software to view real-time data, historical charts, and export data (e.g., to Excel files) for further analysis.

Figure 8: Software interface displaying real-time data and charts for analysis.

Figure 9: Detailed view of the software interface for online monitoring and data export to Excel.
3.4 External Alarm Output
The DP-389 includes a 3.5mm port for 12V external alarm output, allowing integration with other alarm systems or devices.

Figure 10: The 3.5mm external alarm output port for connecting to other alarm systems.
4. Maintenance
Proper maintenance ensures the longevity and accuracy of your DANOPLUS Decibel Meter Recorder.
- Cleaning: Wipe the display and casing with a soft, dry cloth. Do not use abrasive cleaners or solvents.
- Sensor Care: Keep the external sound sensor clean and free from dust or debris. Avoid exposing it to extreme temperatures or moisture.
- Storage: When not in use for extended periods, store the device in a cool, dry place, away from direct sunlight and excessive humidity.
- Calibration: While the device is factory calibrated, professional recalibration may be required periodically for applications demanding high precision. Refer to the manufacturer for calibration services.
5. Troubleshooting
If you encounter issues with your decibel meter, refer to the following common troubleshooting steps:
| Problem | Possible Cause | Solution |
|---|---|---|
| Device does not power on. | No power supply or faulty cable. | Ensure the USB power cable is securely connected and the power source is active. Try a different USB power adapter or port. |
| No decibel reading. | Sensor not connected or faulty. | Check if the external sound sensor is properly plugged into its port. Ensure the sensor is not obstructed. |
| Alarm not triggering. | Alarm threshold set too high or alarm function disabled. | Verify the alarm threshold setting (Section 3.2). Ensure the decibel level is actually exceeding the set threshold. |
| Cannot connect to PC/Export data. | Software not installed, incorrect cable, or driver issue. | Ensure the correct software is installed on your PC. Use the provided USB cable. Check device manager for driver issues. Try a different USB port on your PC. |
| Inaccurate readings. | Sensor obstruction, environmental factors, or need for calibration. | Ensure the sensor is not covered or placed in a confined space. Avoid strong vibrations or electromagnetic interference. Consider professional calibration if issues persist. |
6. Specifications
Detailed technical specifications for the DANOPLUS Decibel Meter Recorder DP-389:
| Parameter | Value |
|---|---|
| Measurement Range | 30dB ~ 130dB |
| Accuracy | ±1.5dB |
| Frequency Response | 31.5Hz ~ 8.5KHz |
| Frequency Weighting | A weighting |
| Response Time | Fast, 0.5s |
| Sensor Type | 6mm condenser microphone sensor |
| Digital Display | 3 digits |
| Resolution | 0.1dB (<100dB); 1dB (>100dB) |
| Alarm Mode | Sound + light |
| Alarm Output | 12V high level (3.5mm port) |
| Sampling Rate | 2 times/second |
| Product Dimensions | 12.6 x 6.3 x 1.37 inches (320 x 160 x 35 mm) |
| Weight | 2.76 Pounds (1.25 kg) |
| Manufacturer | DANOPLUS |
| First Available Date | September 1, 2023 |

Figure 11: Visual representation of the product specifications and included items.
7. Warranty and Support
DANOPLUS products are manufactured to high-quality standards. For warranty information and technical support, please refer to the contact details provided with your purchase or visit the official DANOPLUS website. Keep your purchase receipt as proof of purchase for warranty claims.
For additional protection, extended protection plans may be available for purchase. Please check with your retailer for details.