1. Introduction
This manual provides detailed instructions for the assembly, operation, and maintenance of your Mars Gaming MC-CORE Ultra-Compact Micro-ATX PC Case. Please read this manual thoroughly before beginning installation to ensure proper setup and optimal performance.
Video 1: Product Overview. This video provides a general overview of the Mars Gaming MC-CORE PC case, highlighting its compact design and key features.
2. Key Features
- Ultra-Compact Size: Designed for Micro-ATX and Mini-ITX motherboards, offering an efficient footprint for desktop setups.
- Metal-MESH Front Design: Innovative front grille for enhanced aesthetics and optimized airflow.
- Full Side Window: Provides a clear view of internal components.
- Pre-installed FRGB Fans: Includes two 120mm Fixed RGB fans at the front for cooling and lighting.
- Versatile Storage Options: Supports up to 3 x 2.5" SSDs and 3 x 3.5" HDDs.
- Front I/O Ports: Equipped with USB 3.0 for convenient connectivity.

Figure 1: Detail of the metal-mesh front panel, showcasing the design that aids in airflow and the integrated FRGB lighting from the pre-installed fans.

Figure 2: The two included 120mm FRGB fans, providing both cooling and aesthetic lighting to the interior of the case.
3. Specifications
| Feature | Specification |
|---|---|
| Model Name | MC-CORE |
| Case Type | Ultra-Compact Micro-ATX Tower |
| Motherboard Compatibility | Micro-ATX, Mini-ITX |
| Dimensions (LxWxH) | 10.24 x 6.3 x 13.78 inches (260 x 160 x 350 mm) |
| Item Weight | 4.51 pounds (2.05 kg) |
| GPU Length Support | Up to 235mm (260mm without front fan) |
| CPU Cooler Height Support | Up to 137mm |
| Drive Bays | 3 x 2.5" SSD, 3 x 3.5" HDD |
| Pre-installed Fans | 2 x 120mm FRGB (Front) |
| Additional Fan Support | Up to 3 fans total (e.g., 1x 80mm optional rear) |
| Front I/O Ports | 2 x USB 3.0, Audio In/Out |
| Material | Metal |
| Color | Black |
Note: The MC-CORE is designed for Micro-ATX and Mini-ITX motherboards only. Standard ATX motherboards or larger components are not compatible. For Micro-ATX motherboards with 24.4cm x 24.4cm dimensions, front fans may need to be uninstalled.

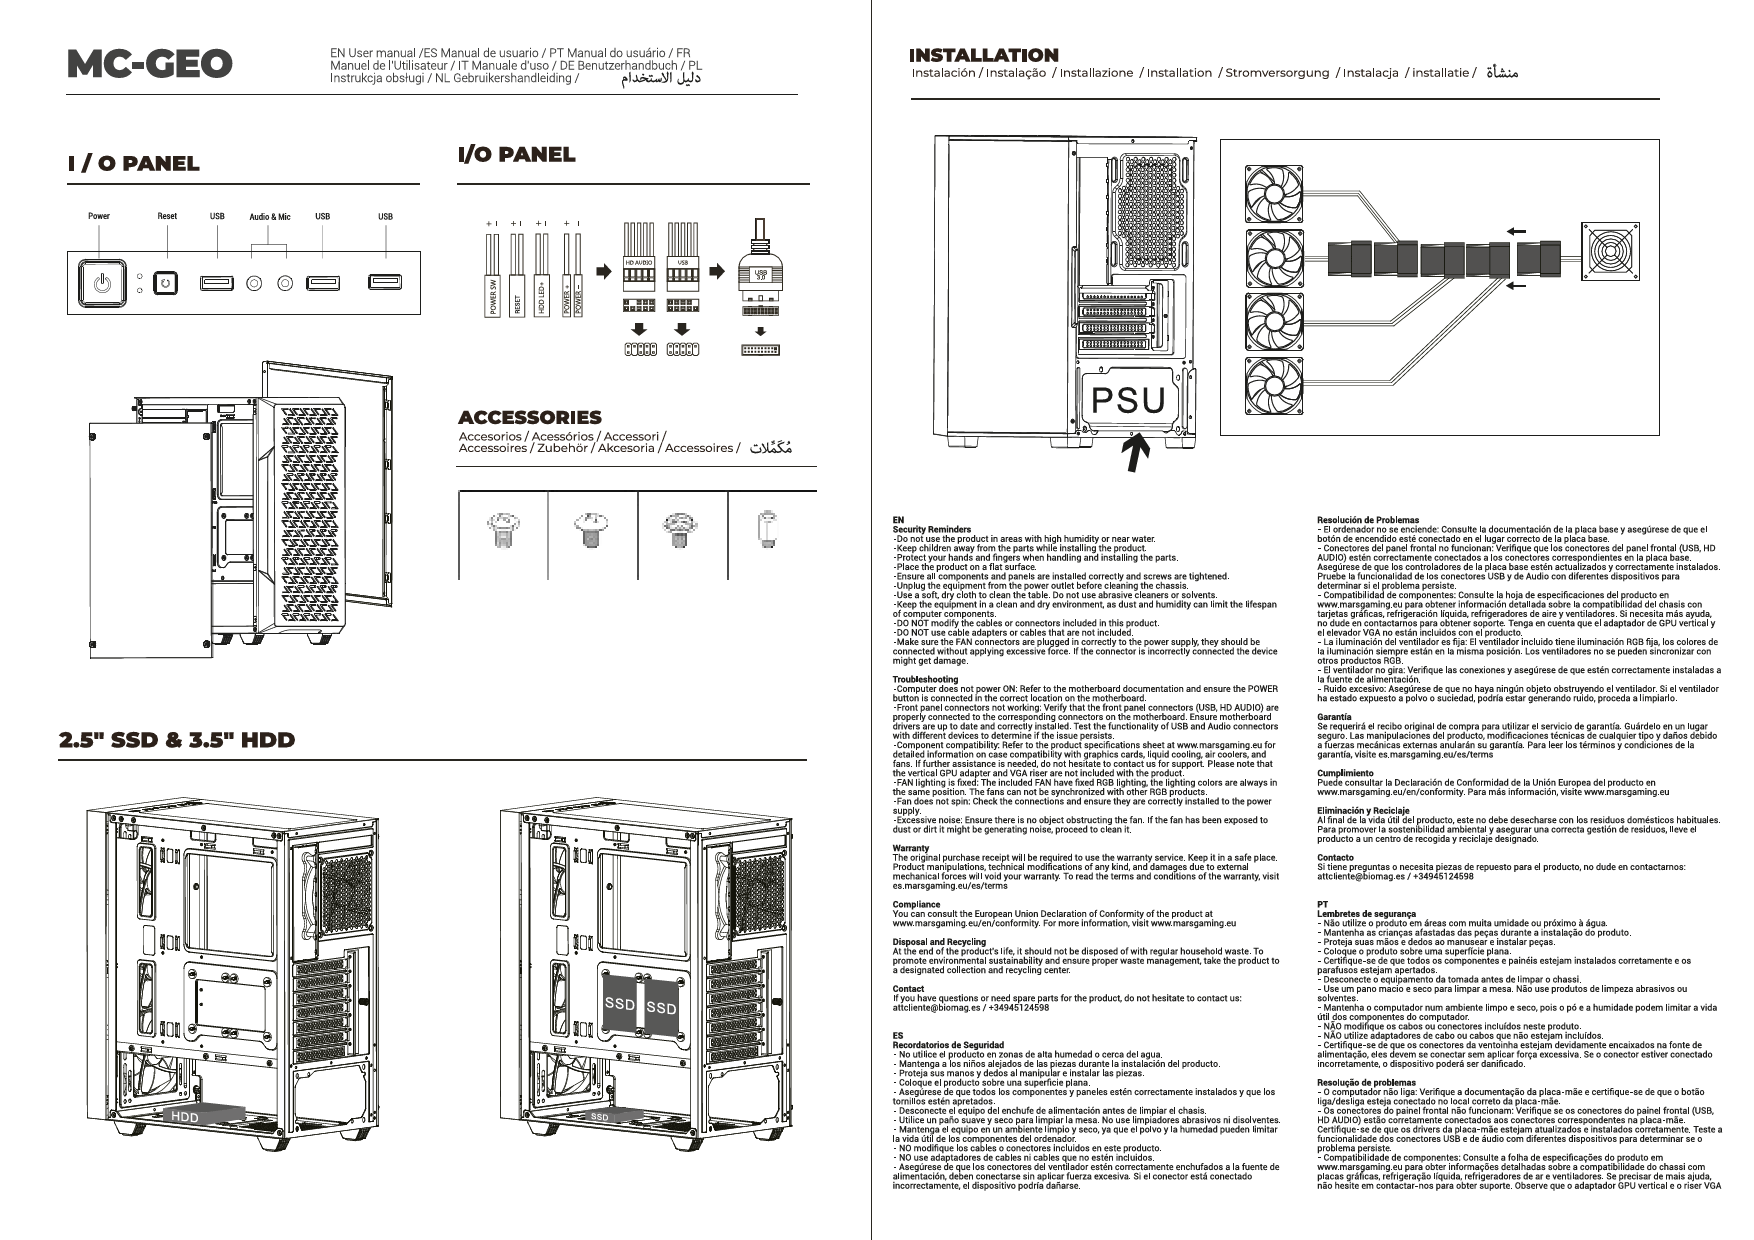
Figure 3: Internal layout and maximum component dimensions, including CPU cooler height, VGA length, and fan placements.
4. Setup and Installation
Follow these steps to install your components into the MC-CORE PC case:
- Prepare the Case: Carefully remove the side panels by unscrewing the thumbscrews at the rear of the case.
- Motherboard Installation: Align your Micro-ATX or Mini-ITX motherboard with the standoffs inside the case. Secure it with the provided screws.
- CPU Cooler Installation: Install your CPU cooler, ensuring it does not exceed the maximum height of 137mm.
- Graphics Card (GPU) Installation: Insert your graphics card into the appropriate PCIe slot. Ensure its length does not exceed 235mm (or 260mm if no front fan is installed). Secure the GPU with screws.
- Power Supply Unit (PSU) Installation: Install your PSU in its designated area. Connect all necessary power cables to your motherboard, GPU, and storage devices.
- Storage Device Installation: Mount your 2.5" SSDs and 3.5" HDDs into the available drive bays. Connect data and power cables.
- Cable Management: Utilize the space behind the motherboard tray for cable routing to maintain optimal airflow and a clean interior.
- Connect Front I/O: Connect the front panel cables (USB 3.0, audio, power/reset switches) to their respective headers on the motherboard.
- Close the Case: Once all components are installed and cables are managed, reattach the side panels and secure them with the thumbscrews.

Figure 4: The interior of the MC-CORE case with the side panel removed, illustrating the space available for component installation.
5. Operating Instructions
After successful assembly, connect your peripherals (monitor, keyboard, mouse) and power cable to the PC. Press the power button on the front panel to start your system. The pre-installed FRGB fans will illuminate, indicating power is on.
Use the front panel USB 3.0 ports for connecting compatible devices. Ensure proper drivers are installed for all components for optimal performance.

Figure 5: The full side window allows for a clear view of the internal components and their lighting effects.
6. Maintenance
Regular maintenance helps prolong the life of your PC components and ensures optimal performance:
- Dust Filter Cleaning: The metal-mesh front panel and other ventilation areas may accumulate dust. Regularly clean these areas using compressed air or a soft brush to maintain optimal airflow.
- Interior Cleaning: Periodically open the side panels and use compressed air to remove dust from internal components, especially CPU cooler fins and GPU heatsinks.
- Cable Management Check: Ensure all cables remain neatly routed and do not obstruct airflow.

Figure 6: The case design, including the mesh front and potential for additional fans, is optimized for maximum cooling performance.
7. Troubleshooting
If you encounter issues with your PC build, consider the following general troubleshooting steps:
- No Power: Double-check all power connections from the PSU to the motherboard, CPU, and GPU. Ensure the PSU switch is in the 'ON' position.
- No Display: Verify that your monitor is connected to the graphics card (not the motherboard's integrated graphics ports, unless you are using integrated graphics). Reseat the graphics card and RAM modules.
- Overheating: Ensure all case fans and CPU cooler fans are spinning correctly. Check for dust buildup on filters and heatsinks. Verify proper thermal paste application on the CPU.
- Component Fit Issues: Refer to the specifications section to ensure all components (GPU, CPU cooler) are within the case's maximum supported dimensions.
8. Warranty and Support
For warranty information and technical support, please refer to the official Mars Gaming website or contact your retailer. Keep your proof of purchase for warranty claims.