1. Introduction
Welcome to the user manual for your TENSSENX TSRC A6 GPS Drone. This foldable RC quadcopter is equipped with a 4K camera, brushless motors, and a suite of intelligent flight features designed to provide an exceptional flying experience. This manual will guide you through the setup, operation, maintenance, and troubleshooting of your drone to ensure safe and enjoyable use.
2. Important Safety Guidelines
Please read all safety warnings and precautions carefully before operating your drone. Failure to follow these instructions may result in injury or damage to the drone or property.
- Age Restriction: This product is intended for adults.
- Pre-Flight Check: Always ensure the drone, remote controller, and batteries are in good working condition before each flight.
- Environmental Conditions: Do not fly in strong winds, rain, snow, or other adverse weather conditions. Avoid flying near crowds, buildings, or high-voltage lines.
- Line of Sight: Always maintain visual line of sight with your drone during flight.
- Propeller Safety: Keep hands, face, and loose clothing away from rotating propellers.
- Battery Safety: Use only original TENSSENX batteries. Do not overcharge or over-discharge batteries. Store batteries in a cool, dry place away from direct sunlight.
- Respect Privacy: Be mindful of privacy laws when using the camera.
3. Package Contents
Verify that all items listed below are included in your package:
- TENSSENX TSRC A6 GPS Drone
- Remote Control
- 2 x Modular Batteries
- USB Charging Cables
- Spare Propellers
- Screwdriver
- User Manual
- Carrying Case

Image: All components included in the TENSSENX TSRC A6 drone package.
4. Product Overview
4.1 Drone Components

Image: The TENSSENX TSRC A6 drone in its unfolded state, showcasing its 4K camera and propeller arms.
- 4K UHD Camera: High-resolution camera with 120° wide-angle and 90° adjustable tilt.
- Brushless Motors: Provide powerful and stable flight.
- Foldable Arms: For compact storage and portability.
- Propellers: Four main propellers for lift and thrust.
- Battery Compartment: Houses the modular flight battery.
- Optical Flow Sensor: For stable hovering indoors or at low altitudes.
4.2 Remote Controller Components

Image: The remote controller for the TSRC A6 drone, featuring control sticks and function buttons, with a smartphone mounted.
- Left Control Stick: Controls throttle (up/down) and yaw (rotate left/right).
- Right Control Stick: Controls pitch (forward/backward) and roll (left/right).
- One Key Take-off/Landing Button: Initiates automatic take-off or landing.
- Return to Home (RTH) Button: Activates GPS-assisted return to home.
- Speed Switch Button: Toggles between different flight speeds.
- Phone Holder: For mounting your smartphone to view FPV feed.
5. Setup
5.1 Battery Installation & Charging
- Insert the modular flight battery into the drone's battery compartment until it clicks into place.
- To charge, connect the battery to the provided USB charging cable and plug it into a USB power adapter (5V/2A recommended).
- The battery indicator lights will show charging status. Charging typically takes 3-4 hours.
- For the remote controller, insert 3 AA batteries (not included) into the battery compartment.

Image: Two modular batteries for the TENSSENX TSRC A6 drone, highlighting the 40 minutes flight time and foldable design.
5.2 Propeller Installation
The propellers are typically pre-installed. If replacement is needed:
- Ensure the drone is powered off.
- Match the propeller type (A or B) to the corresponding motor arm. Each propeller has a small letter (A or B) printed on it.
- Securely attach the propellers using the provided screws and screwdriver.
5.3 App Download & Connection
- Scan the QR code in the quick start guide or search for the official TENSSENX drone app in your smartphone's app store (iOS/Android).
- Install and open the app.
- Power on the drone and the remote controller.
- On your smartphone, go to Wi-Fi settings and connect to the drone's Wi-Fi network (usually starts with 'TSRC-A6' or similar).
- Return to the app, and it should automatically connect to the drone, displaying the live camera feed.
6. Operating Instructions
6.1 Pre-Flight Checklist
- Ensure drone and remote batteries are fully charged.
- Propellers are correctly installed and free from damage.
- Fly in an open area, away from obstacles, people, and water.
- Check GPS signal strength (if flying outdoors).
- Connect the app to the drone's Wi-Fi.
6.2 Take-off and Landing
- Place the drone on a flat, level surface.
- Power on the drone and remote controller. Pair them by pushing the left stick up then down.
- Calibrate the gyroscope and compass as per app instructions (usually by rotating the drone).
- Press the One Key Take-off button on the remote or in the app. The drone will automatically ascend to a safe hovering altitude.
- To land, press the One Key Landing button. The drone will descend and land automatically. Alternatively, slowly pull down the left control stick to manually land.
6.3 Basic Flight Controls
- Throttle (Left Stick Up/Down): Controls altitude.
- Yaw (Left Stick Left/Right): Rotates the drone horizontally.
- Pitch (Right Stick Up/Down): Moves the drone forward/backward.
- Roll (Right Stick Left/Right): Moves the drone left/right (sideways).
6.4 Intelligent Flight Modes
GPS Auto Return Home (RTH)
When activated, or if the drone loses signal, goes out of range, or has low battery, the drone will automatically return to its take-off point using GPS. Ensure a strong GPS signal before flight for accurate RTH.

Image: Illustration of the GPS Auto Return Home function, showing the drone returning to its starting point due to signal loss, low battery, or one-key command.
Follow Me
In this mode, the drone will automatically follow the remote controller or the mobile device, capturing your movements from above. Ensure you are in an open area with no obstacles.
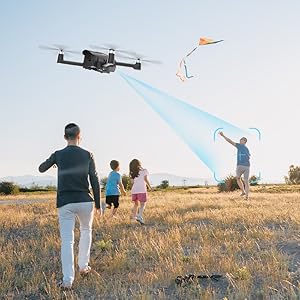
Image: A drone automatically following a person on a bicycle, demonstrating the Follow Me intelligent flight function.
Waypoint Fly
Draw a path on the app's map interface, and the drone will automatically fly along the designated route, allowing you to focus on capturing footage.

Image: A drone flying over a coastal landscape, following a path drawn on a smartphone screen, illustrating the Waypoint Fly feature.
Optical Flow Positioning
This feature uses a downward-facing camera to analyze ground patterns, providing stable hovering and precise positioning, especially useful for indoor flights or when GPS signal is weak.
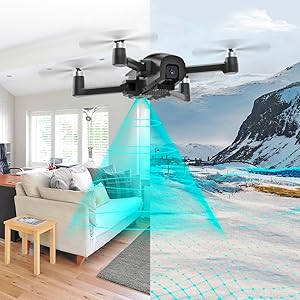
Image: A drone hovering stably using its optical flow sensor, depicted by a blue light beam projecting downwards, ensuring precise positioning.
Altitude Hold
The drone maintains a consistent altitude, allowing you to focus on directional control and camera operation without worrying about vertical stability.
Headless Mode
In Headless Mode, the drone's orientation is relative to the pilot, making it easier to control regardless of which way the drone's front is facing. This is particularly helpful for beginners.
6.5 Camera Operation
The TSRC A6 is equipped with a 4K UHD camera that offers a 120° wide-angle view and can be adjusted 90° vertically. The 5GHz FPV transmission ensures stable and smooth video streaming to your connected smartphone, even during high-speed flight.
- Photo Capture: Tap the camera icon in the app to take a photo.
- Video Recording: Tap the video icon to start/stop recording.
- Camera Angle Adjustment: Use the dedicated button on the remote or slider in the app to adjust the camera's vertical angle.

Image: The TSRC A6 drone flying over a lake, demonstrating its 5G FPV transmission capabilities with a control range of 1640ft and transmission distance of 984ft.
7. Maintenance
Regular maintenance ensures the longevity and optimal performance of your drone.
- Cleaning: Use a soft, dry cloth to clean the drone body and camera lens after each flight. Avoid using harsh chemicals.
- Propeller Inspection: Regularly check propellers for cracks, bends, or damage. Replace damaged propellers immediately.
- Motor Care: Keep motors free from dust and debris. Do not attempt to lubricate the motors.
- Battery Storage: Store batteries at approximately 50% charge in a cool, dry place if not used for extended periods.
- Firmware Updates: Check the official TENSSENX website or app for any available firmware updates to ensure optimal performance and new features.
8. Troubleshooting Guide
Refer to the table below for common issues and their solutions.
| Problem | Possible Cause | Solution |
|---|---|---|
| Drone does not power on | Battery not charged or not installed correctly. | Ensure battery is fully charged and securely inserted. |
| Remote controller not connecting | Remote batteries low or pairing failed. | Replace remote batteries. Re-pair drone and remote (power cycle both, then push left stick up/down). |
| Unstable flight / Drifting | Gyroscope not calibrated; Propellers damaged; Strong wind. | Perform gyroscope calibration. Check and replace damaged propellers. Fly in calm conditions. |
| No FPV image on app | Wi-Fi not connected; App not open; Interference. | Ensure phone is connected to drone's Wi-Fi. Restart app. Move to an area with less Wi-Fi interference. |
| GPS signal weak/lost | Flying indoors; Obstructions; Bad weather. | Fly outdoors in an open area. Avoid flying near tall buildings or dense foliage. |
9. Technical Specifications
| Feature | Specification |
|---|---|
| Model Name | A6 |
| Brand | TENSSENX |
| Video Capture Resolution | 4K UHD |
| Camera Angle | 120° Wide-angle, 90° Adjustable |
| Connectivity Technology | Wi-Fi (5GHz FPV) |
| Battery Capacity | 2000 mAh (per battery) |
| Flight Time | Up to 40 minutes (with 2 batteries) |
| Control Type | Remote Control, Gesture Control, Voice Control |
| Optical Sensor Technology | Optical Flow |
| Product Dimensions | 9.37"L x 8.15"W x 3.39"H |
| Item Weight | Less than 250g (FAA registration not required) |
| Material | Plastic |
10. Warranty and Support
10.1 Warranty Information
TENSSENX products are manufactured to high quality standards. Please refer to the product packaging or the official TENSSENX website for specific warranty terms and conditions. The warranty typically covers manufacturing defects for a specified period from the date of purchase.
10.2 Customer Support
If you encounter any issues or have questions not covered in this manual, please contact TENSSENX customer support. You can usually find contact information on the product packaging, the official TENSSENX website, or through your retailer's support channels.


