
MSI 306-7G23R21-809
MSI MAG Forge 320R Airflow Mid-Tower PC Case User Manual
Model: 306-7G23R21-809
1. Introduction
Welcome to the user manual for the MSI MAG Forge 320R Airflow Mid-Tower PC Case. This manual provides essential information for the proper setup, operation, and maintenance of your new PC case. The MAG Forge 320R Airflow is designed to provide excellent cooling performance with its pre-installed ARGB fans and optimized airflow design, ensuring your system runs efficiently. It supports various motherboard form factors and offers ample space for high-performance components.

Figure 1: Overview of the MSI MAG Forge 320R Airflow Mid-Tower PC Case, showcasing its tempered glass side panel and illuminated ARGB fans.
2. Setup and Installation
Follow these steps to properly set up and install your components into the MSI MAG Forge 320R Airflow PC case.
2.1 Component Compatibility
- Motherboard Support: This case supports ATX, Micro-ATX, and Mini-ITX motherboards.
- GPU Support: Designed to accommodate large graphics cards, including RTX 40 series GPUs.
- Cooling: Supports up to 11 system fans and 360mm AIO liquid coolers.
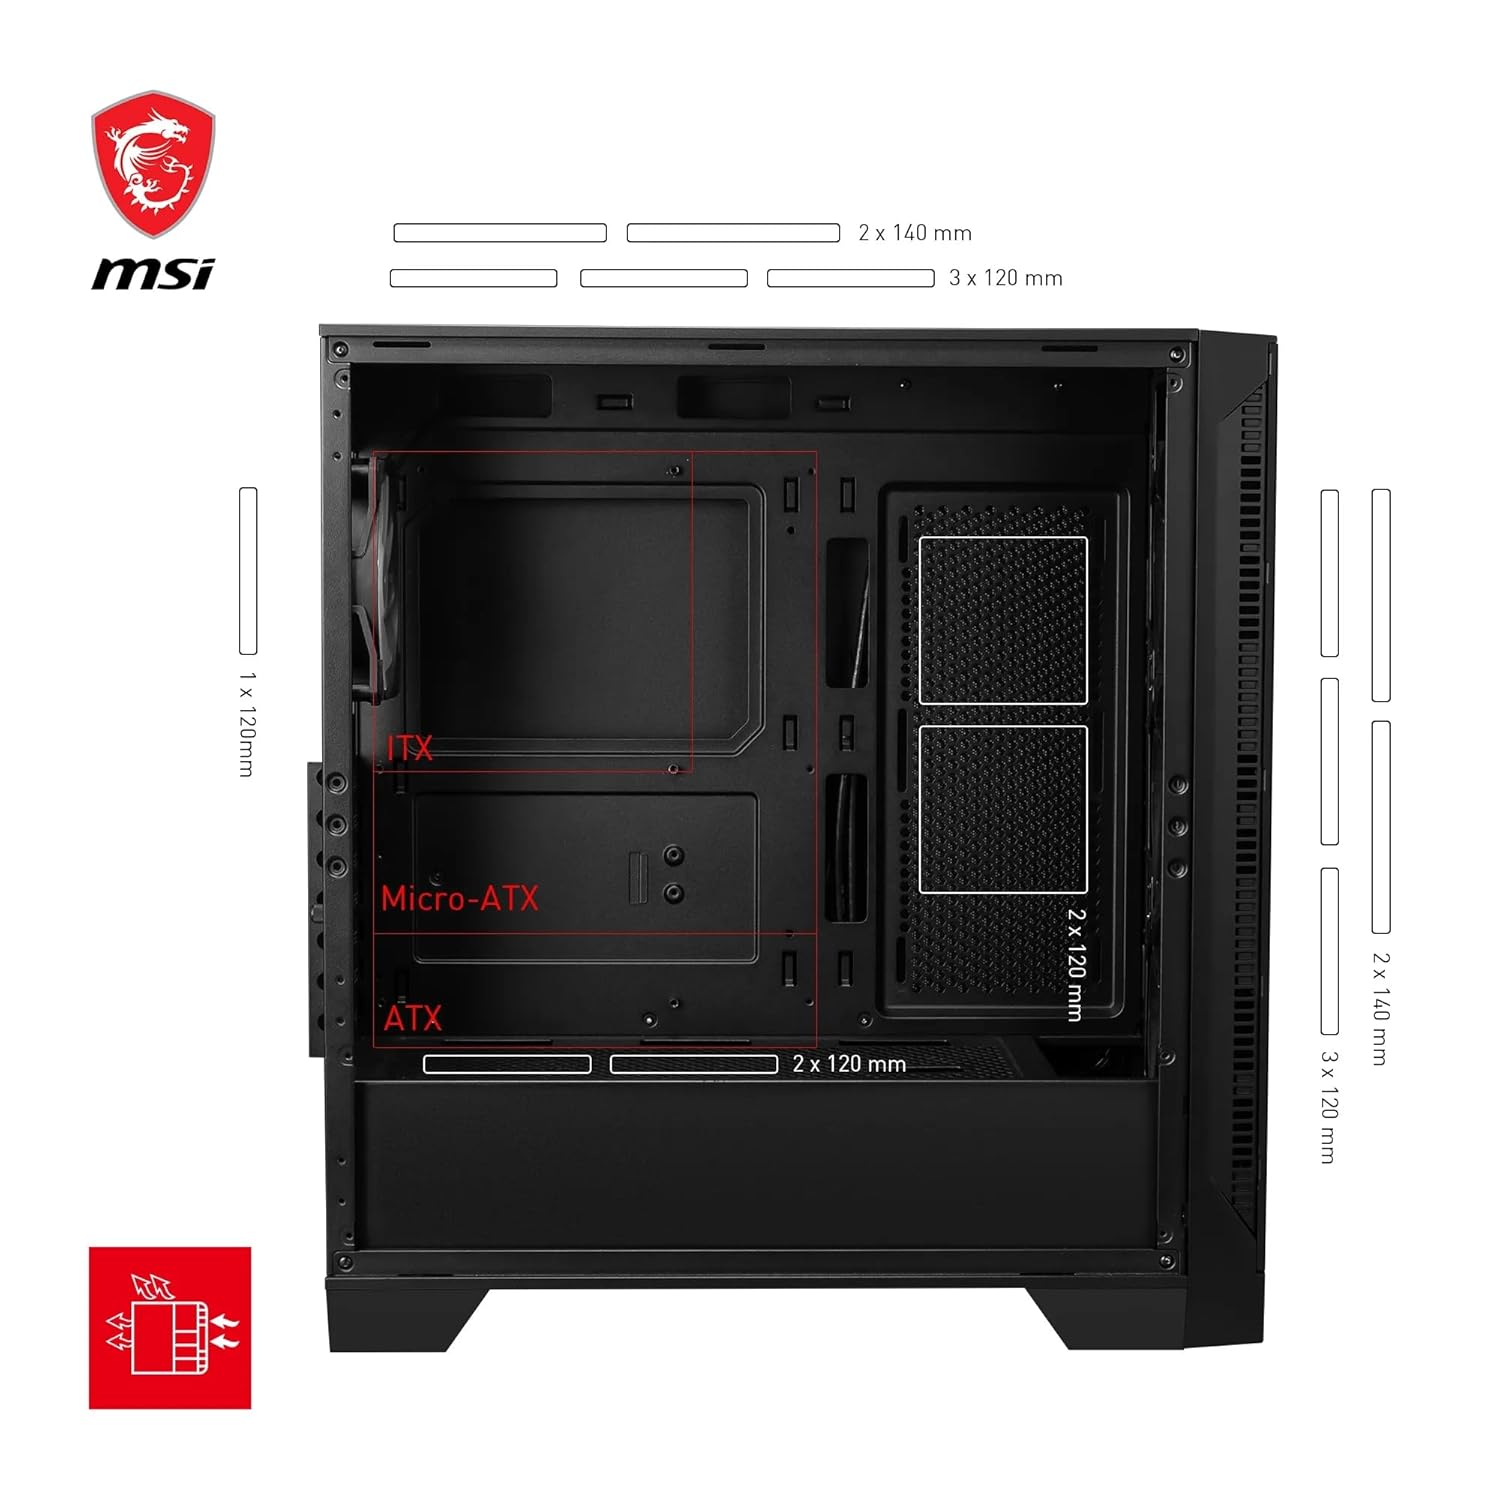
Figure 2: Internal layout indicating compatible motherboard sizes (ITX, Micro-ATX, ATX) and various fan mounting locations for optimal airflow.
2.2 Installation Steps
- Prepare the Case: Carefully remove the tempered glass side panel by unscrewing the two rear screws and sliding it open.
- Install Motherboard: Align your ATX, Micro-ATX, or Mini-ITX motherboard with the standoffs and secure it with screws.
- Install Storage Drives: Mount your 3.5-inch HDDs or 2.5-inch SSDs in the designated trays or mounting points.
- Install Power Supply Unit (PSU): Slide the PSU into its compartment at the bottom rear of the case and secure it.
- Install Graphics Card and Expansion Cards: Insert your graphics card and any other expansion cards into the PCIe slots on your motherboard and secure them.
- Connect Cables: Route all necessary power cables from the PSU to your components (motherboard, GPU, drives). Connect front panel I/O cables (USB, audio, power, reset, LED) to your motherboard.
- Cable Management: Utilize the ample space behind the motherboard tray and cable tie points to manage cables neatly for improved airflow and aesthetics.
- Close the Case: Reattach the tempered glass side panel and secure it with the screws.
3. Operating Instructions
Understand the functions of the front panel I/O and ARGB lighting control.
3.1 Front Panel I/O

Figure 3: Top I/O panel featuring USB 3.2 Gen 1 Type-A ports, Mic-in/Audio-out jacks, LED switch, and Power button.
- USB 3.2 Gen 1 Type-A (5Gbps): Connect high-speed USB devices.
- Mic-in / Audio-out: Connect headphones, speakers, or microphones.
- LED Switch: Cycle through various ARGB lighting effects for the pre-installed fans. Press and hold to sync with motherboard ARGB software.
- Power Button: Turn the system on or off.
3.2 ARGB Lighting Control
The case comes with an integrated 1-to-6 ARGB LED control board.

Figure 4: Front panel showcasing the vibrant ARGB lighting of the fans, compatible with Mystic Light synchronization.
- Manual Control: Use the dedicated LED switch on the top I/O panel to cycle through pre-set lighting effects and colors.
- Software Control: Connect the ARGB control board to a compatible motherboard's ARGB header. Press and hold the LED switch for 3 seconds to switch control to your motherboard's ARGB software (e.g., MSI Mystic Light), allowing for advanced customization and synchronization with other components.
4. Maintenance
Regular maintenance ensures optimal performance and longevity of your PC case.
4.1 Dust Filter Cleaning
The MSI MAG Forge 320R Airflow features magnetic dust filters for easy cleaning.

Figure 5: Detailed view of the magnetic dust filter on the top panel, designed for easy removal and cleaning.
- Top Filter: Gently lift the magnetic dust filter from the top panel.
- Front Filter: The front mesh panel acts as a filter. For deeper cleaning, the front panel can be carefully detached.
- Bottom Filter: Slide out the filter located under the PSU intake.
- Cleaning: Use a soft brush or compressed air to remove accumulated dust. Rinse with water if necessary, and ensure it is completely dry before reattaching.
4.2 General Cleaning
- Exterior: Wipe the exterior surfaces with a soft, damp cloth. Avoid abrasive cleaners.
- Interior: Periodically use compressed air to blow dust out of the case interior, especially from fan blades and heatsinks. Ensure the system is powered off and unplugged before cleaning.
5. Troubleshooting
This section addresses common issues you might encounter.
- System Does Not Power On:
- Check if the power supply unit (PSU) is properly connected and switched on.
- Ensure the front panel power button cable is correctly connected to the motherboard's F_PANEL header.
- Verify all power cables to components (motherboard, CPU, GPU) are securely seated.
- Fans Not Spinning / ARGB Not Lighting Up:
- Confirm that the fans are properly connected to the ARGB control board and the control board is powered.
- If using motherboard software control, ensure the ARGB control board is connected to the motherboard's ARGB header and the LED switch is held down for 3 seconds to switch control.
- Check fan and ARGB cable connections for looseness or incorrect orientation.
- Front Panel USB/Audio Ports Not Working:
- Ensure the USB 3.0/3.2 and HD Audio cables from the front panel are correctly connected to the corresponding headers on your motherboard.
6. Specifications
Detailed technical specifications for the MSI MAG Forge 320R Airflow PC Case.

Figure 6: Key dimensions of the MSI MAG Forge 320R Airflow case: 472mm (length), 210mm (width), 498mm (height).
| Feature | Specification |
|---|---|
| Brand | MSI |
| Model Number | 306-7G23R21-809 |
| Series | MAG FORGE 320R AIRFLOW |
| Case Type | Mid Tower |
| Color | Black |
| Motherboard Compatibility | ATX, Micro-ATX, Mini-ITX |
| Product Dimensions (LxWxH) | 47.25 x 21 x 49.8 cm |
| Item Weight | 5 kg |
| Front I/O Ports | 2x USB 3.2 Gen 1 Type-A, Mic-in, Audio-out, LED Switch, Power Button |
| Pre-installed Fans | 4x ARGB Fans |
| ARGB Control | 1-to-6 ARGB LED control board, Mystic Light Sync compatible |
| Dust Filters | Magnetic (top), Slide-out (bottom) |
| Side Panel | Tempered Glass |
7. Warranty and Support
For warranty information and technical support, please refer to the official MSI website or contact MSI customer service.
- Official Website: Visit www.msi.com for the latest drivers, software, and support resources.
- Customer Service: Contact MSI support for assistance with product issues, warranty claims, or technical inquiries.
- Product Registration: Consider registering your product on the MSI website to receive updates and support.
Related documents306-7G23R21-809


Ask a question about this manual
Ask about setup, troubleshooting, compatibility, parts, safety, or missing instructions. Manuals+ will review the question and use this page’s manual context to help answer it.