1. Introduction
This manual provides detailed instructions for the installation, operation, and maintenance of your ID-COOLING FROZN A620 Black Dual-Tower Air CPU Cooler. Please read this manual thoroughly before installation to ensure proper setup and optimal performance. This cooler is designed to provide efficient heat dissipation for your Central Processing Unit (CPU).
2. Product Overview and Features
The ID-COOLING FROZN A620 Black is a high-performance dual-tower air CPU cooler engineered for effective thermal management. Its all-black design integrates seamlessly into various PC builds.
- Dual-Tower Heatsink: Features a robust dual-tower heatsink design for enhanced heat dissipation capacity.
- Six Copper Heat Pipes: Equipped with six Φ6mm copper heat pipes that efficiently transfer heat from the CPU to the heatsink fins.
- Dual FDB Fans: Includes two 120x120x25mm Fluid Dynamic Bearing (FDB) fans for quiet operation and stable performance.
- PWM Functionality: Fans support Pulse Width Modulation (PWM) for automatic speed control, optimizing cooling performance and noise levels. Maximum airflow is 78.25 CFM, with a maximum noise level of 29.85 dB(A).
- Compact Height: With a total height of 153mm, this cooler is designed to fit into most standard tower cases.
- RAM Compatibility: Offers 36mm clearance for standard RAM modules and up to 63mm clearance with its cut-out fin design, allowing for compatibility with various memory configurations.
- Broad Socket Compatibility: Supports Intel LGA1700, LGA1851, LGA1200, LGA1150, LGA1151, LGA1155, LGA1156, and AMD AM4, AM5 sockets.

Image 2.1: The ID-COOLING FROZN A620 Black CPU Cooler, showcasing its dual-tower design and all-black aesthetic.

Image 2.2: Close-up view of the dual-tower heatsink and the six Φ6mm copper heat pipes designed for efficient heat transfer.

Image 2.3: Diagram illustrating the Fluid Dynamic Bearing (FDB) technology used in the fans, contributing to longer lifespan, quieter operation, and reduced vibration.
3. Package Contents
Verify that all components are present in the package before proceeding with installation:
- ID-COOLING FROZN A620 Black CPU Cooler (Heatsink with pre-attached fans)
- Mounting Brackets for Intel LGA1700/1851/1200/115X sockets
- Mounting Brackets for AMD AM4/AM5 sockets
- Backplate (for Intel sockets)
- Mounting Screws and Spacers
- Thermal Paste (syringe)
- Fan Clips (if fans are not pre-attached)
- User Manual (this document)
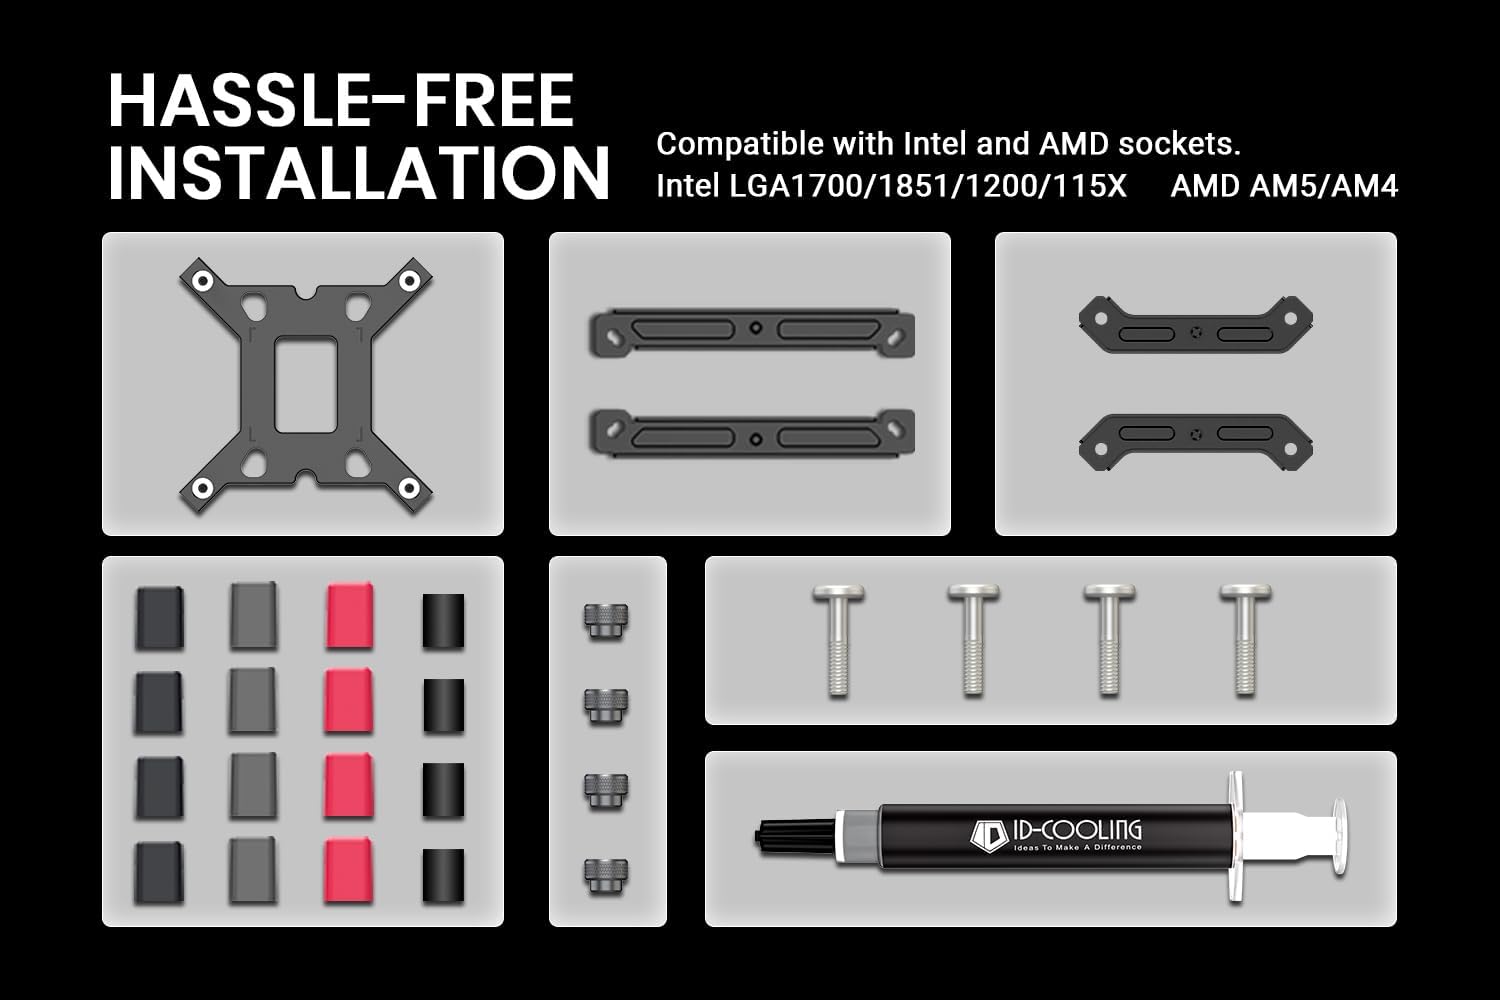
Image 3.1: Overview of the included mounting hardware and thermal paste for hassle-free installation on both Intel and AMD platforms.
4. Specifications
| Feature | Specification |
|---|---|
| Product Dimensions | 4.72"L x 0.98"W x 6.02"H (Heatsink only, fans add to width) |
| Cooling Method | Air Cooling |
| Heat Pipes | 6 x Φ6mm Copper Heat Pipes |
| Fan Size | 2 x 120x120x25mm |
| Fan Bearing Type | Fluid Dynamic Bearing (FDB) |
| Fan Speed | 500-2000 ±10% RPM (PWM Controlled) |
| Max. Air Flow | 78.25 CFM |
| Noise Level | 29.85 dB(A) Max. |
| Power Connector | 4-Pin PWM |
| Rated Voltage | 12V DC |
| TDP Compatibility | Up to 270W |
| Material | Aluminum (fins), Copper (heat pipes, base) |
| Height | 153mm |
| RAM Clearance | 36mm (standard), 63mm (with cut-out fin) |
| Compatible Sockets | Intel LGA1700/1851/1200/115X; AMD AM4/AM5 |

Image 4.1: Diagram illustrating the cooler's height (153mm) and RAM clearance (36mm standard, 63mm with fin cut-out).
5. Setup and Installation
Before beginning, ensure your system is powered off and disconnected from the power source. Refer to your motherboard manual for CPU and RAM installation if not already completed.
5.1. Prepare the Motherboard
- Remove any existing CPU cooler and thoroughly clean the CPU surface of old thermal paste using isopropyl alcohol.
- For Intel Sockets (LGA1700/1851/1200/115X): Install the appropriate backplate behind the motherboard. Secure the standoffs through the motherboard holes.
- For AMD Sockets (AM4/AM5): Remove the plastic retention clips from the stock AMD backplate (if present), but keep the stock backplate in place. Install the AMD standoffs directly into the backplate.
5.2. Apply Thermal Paste
- Apply a small amount of thermal paste (pea-sized dot or thin line) to the center of the CPU's Integrated Heat Spreader (IHS). Do not spread it manually; the pressure from the cooler will distribute it evenly.

Image 5.1: The included thermal paste, essential for efficient heat transfer between the CPU and the cooler's base.
5.3. Mount the Cooler
- Attach the correct mounting brackets to the base of the cooler using the provided screws.
- Carefully place the cooler onto the CPU, aligning the mounting holes on the brackets with the standoffs on the motherboard.
- Secure the cooler by tightening the mounting screws in a diagonal pattern (e.g., top-left, bottom-right, top-right, bottom-left) until snug. Do not overtighten.
5.4. Install and Connect Fans
- If the fans are not pre-attached, use the included fan clips to secure them to the heatsink towers. Ensure the fans are oriented to pull air through the front tower and push it through the rear tower, towards the rear exhaust fan of your PC case.
- Connect the 4-pin PWM fan cables to the CPU_FAN and CPU_OPT (or CHA_FAN) headers on your motherboard. Consult your motherboard manual for header locations.

Image 5.2: The FROZN A620 Black cooler installed within a PC case, demonstrating its fit and orientation.
6. Operating Instructions
Once installed, the ID-COOLING FROZN A620 Black operates automatically via the motherboard's PWM control. The fans will adjust their speed based on CPU temperature, providing optimal cooling while minimizing noise.
- BIOS/UEFI Settings: You may access your motherboard's BIOS/UEFI settings to fine-tune fan curves if desired. Most motherboards offer standard, silent, or performance profiles for CPU fan control.
- Temperature Monitoring: Use system monitoring software (e.g., HWMonitor, Core Temp) to observe CPU temperatures, especially during initial use and under load, to ensure proper cooling performance.
7. Maintenance
Regular maintenance helps ensure the longevity and optimal performance of your CPU cooler.
- Dust Removal: Periodically (e.g., every 3-6 months), power off your system and use compressed air to remove dust accumulated on the heatsink fins and fan blades. Hold the fan blades gently to prevent them from spinning rapidly during cleaning, which can damage the bearings.
- Fan Inspection: Check fan cables for secure connections and ensure no cables are obstructing fan rotation.
- Thermal Paste Reapplication: While not frequently necessary, if you remove the cooler for any reason (e.g., CPU upgrade), clean off the old thermal paste and reapply a fresh layer before reinstallation.
8. Troubleshooting
If you encounter issues with your CPU cooler, refer to the following common troubleshooting steps:
- High CPU Temperatures:
- Verify that the cooler is securely mounted and making full contact with the CPU.
- Ensure thermal paste was applied correctly and evenly.
- Check fan connections to the motherboard and confirm fans are spinning.
- Clean any dust accumulation from the heatsink and fans.
- Confirm proper airflow within your PC case (intake/exhaust fans).
- Fans Not Spinning or Spinning Slowly:
- Check fan cable connections to the motherboard's CPU_FAN/CPU_OPT headers.
- Verify fan control settings in BIOS/UEFI.
- Ensure no cables or obstructions are preventing fan rotation.
- Excessive Noise:
- Check for loose fan clips or vibrations.
- Ensure fan blades are clean and free of obstructions.
- Adjust fan curves in BIOS/UEFI to a quieter profile if temperatures allow.
9. Warranty and Support
For warranty information and technical support, please refer to the official ID-COOLING website or contact their customer service directly. Keep your proof of purchase for warranty claims.
ID-COOLING Official Website: www.idcooling.com


