
1. Introduction
This manual provides detailed instructions for the proper setup, operation, and maintenance of your UUQ 2.5-10x40 Rifle Scope. This scope features 2.5-10x magnification, a 40mm objective lens, a red/green illuminated Mil-dot reticle, and an integrated red/green laser. Designed for various shooting applications, it offers clear optics and durable construction. Please read this manual thoroughly before using the product to ensure safe and effective operation.

Image: The UUQ 2.5-10x40 Rifle Scope with an integrated red laser, mounted on a rifle, showcasing its design and primary function.
2. Package Contents
Verify that all items listed below are included in your package:
- 1 × UUQ 2.5-10x40 Rifle Scope
- 1 × Lens Cover Set
- 1 × Cleaning Cloth
- 1 × CR2032 Battery (for scope illumination)
- 3 × LR1130 Batteries (for laser)
- 1 × Allen Wrench
- 1 × User Manual

Image: A visual representation of the package contents, including the scope, lens covers, cleaning cloth, batteries, Allen wrench, and user manual.
Unboxing Video
Video: An unboxing video demonstrating the contents of the UUQ 2.5-10x40EG Green Laser Rifle Scope package.
3. Product Features
- Magnification and Objective Lens: 2.5-10x magnification with a 40mm objective lens, providing a field of view from 32.5' at 2.5x to 8.9' at 10x (at 100 yards).
- Integrated Laser: Features a 2mW Class IIIA red or green laser with a range exceeding 300 yards, enhancing target acquisition.
- Multi-Coated Green Lens: The objective lens features a multi-layer green coating for improved light transmission, clarity, and vivid image display, performing well in various lighting conditions.
- Durable Construction: Manufactured from aircraft-grade aluminum alloy, ensuring vibration resistance, waterproof, and fog-proof performance for reliability in diverse environments.
- Illuminated Mil-Dot Reticle: Offers five levels of red and green brightness settings for the Mil-dot reticle, optimizing visibility for long-range shooting.
- Mounting Compatibility: Includes two 1-inch mounting rings for easy installation on any standard 20mm Picatinny or Weaver rail.

Image: Comparison illustrating the superior light transmission and clarity of the UUQ multi-coated green objective lens compared to a common blue objective lens.
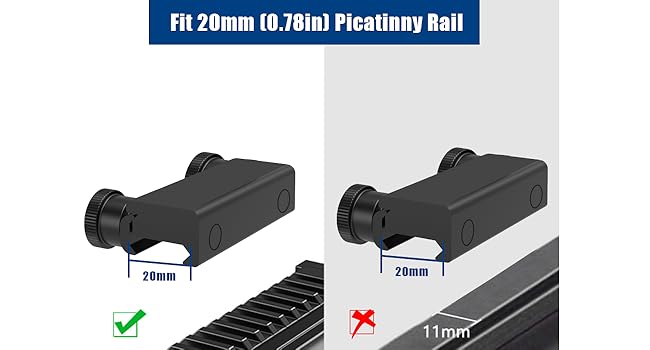
Image: Diagram showing the five levels of red and green illumination for the Mil-dot reticle, ensuring optimal visibility.

Image: Visual demonstration of the 2.5x and 10x magnification settings, showing the difference in target view at 300 yards.
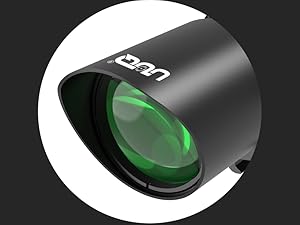
Image: The clear red laser sight in operation, demonstrating its long-range visibility up to 100 yards.
4. Setup
4.1. Battery Installation
The scope requires one CR2032 battery for reticle illumination and three LR1130 batteries for the laser.
- For Reticle Illumination: Locate the battery compartment on the illumination control knob (usually on the left side of the scope). Unscrew the cap, insert the CR2032 battery with the positive (+) side facing up, and securely replace the cap.
- For Laser: Locate the battery compartment on the laser module. Unscrew the cap, insert the three LR1130 batteries according to the polarity markings, and securely replace the cap.
4.2. Mounting the Scope
The scope is designed for 20mm Picatinny or Weaver mounting rails. Use the provided 1-inch mounting rings.
- Attach the mounting rings to your firearm's 20mm Picatinny or Weaver rail. Ensure they are spaced appropriately for the scope's length.
- Place the scope into the rings, ensuring the reticle is level.
- Securely tighten the ring screws using the provided Allen wrench. Do not overtighten.
- Adjust the eye relief by sliding the scope forward or backward until you achieve a full, clear field of view without any dark rings around the edges.

Image: A detailed view of the 20mm standard mount, compatible with Picatinny and Weaver rails.

Image: An illustration demonstrating the use of an Allen wrench for adjusting the laser sight, indicating the adjustment points.
5. Operating Instructions
5.1. Adjusting Magnification
Rotate the magnification ring, located near the eyepiece, to adjust the magnification from 2.5x to 10x. Turn clockwise for higher magnification and counter-clockwise for lower magnification.

Image: A close-up view of the magnification adjustment ring, showing the 2.5-10x markings and direction for adjustment.
5.2. Adjusting Reticle Illumination
The scope features a Mil-dot reticle with red and green illumination. The illumination control knob is typically on the left side of the scope body.
- Rotate the illumination knob to turn on the reticle.
- Select either red or green illumination.
- Adjust the brightness level (1-5) by rotating the knob. "OFF" positions are typically between each brightness setting.

Image: A detailed view of the illumination adjustment knob, showing the five levels for both red and green settings.
Reticle Illumination Adjustment Video
Video: A demonstration of adjusting the 7 levels of red illumination on a rifle scope, similar to the 5-level system on this model.
5.3. Using the Laser Sight
The integrated laser sight provides quick target acquisition.
- Activate the laser using its dedicated switch.
- To adjust the laser's point of impact, use the small adjustment screws on the laser module (windage and elevation). An Allen wrench is typically required for these adjustments.
- Align the laser dot with your point of impact at a desired range.

Image: A close-up view of the 2mW laser sight module, showing its position on the scope.
5.4. Windage and Elevation Adjustment
The windage and elevation turrets are used to zero the scope to your firearm.
- Remove the protective caps from the windage (side) and elevation (top) turrets.
- Make adjustments as needed to align your point of aim with your point of impact. Typically, turning the elevation turret clockwise moves the impact down, and counter-clockwise moves it up. Turning the windage turret clockwise moves the impact right, and counter-clockwise moves it left. Refer to the markings on the turrets for precise adjustments.
- After zeroing, replace the protective caps.
6. Maintenance
Proper maintenance ensures the longevity and performance of your scope.
- Cleaning Lenses: Use the provided cleaning cloth or a soft, lint-free cloth specifically designed for optics. Gently wipe the lens surfaces to remove dust and smudges. For stubborn marks, use a small amount of lens cleaning fluid. Avoid using harsh chemicals or abrasive materials.
- Cleaning Body: Wipe the scope body with a soft, damp cloth.
- Storage: Store the scope in a dry, cool place, away from direct sunlight and extreme temperatures. Use the lens covers to protect the objective and eyepiece lenses when not in use.
- Battery Replacement: Replace batteries when illumination or laser power diminishes. Dispose of used batteries responsibly.
7. Troubleshooting
| Problem | Possible Cause | Solution |
|---|---|---|
| Reticle illumination not working | Dead CR2032 battery; incorrect battery insertion; faulty illumination knob. | Check battery polarity and ensure it's fresh. Replace battery if necessary. Ensure the illumination knob is turned to a numbered setting, not "OFF". |
| Laser not working | Dead LR1130 batteries; incorrect battery insertion; laser switch off. | Check battery polarity and ensure batteries are fresh. Replace batteries if necessary. Ensure the laser switch is in the "ON" position. |
| Cannot adjust windage/elevation | Turret caps not removed; turrets stuck; internal mechanism issue. | Ensure protective caps are fully removed. If turrets are stiff, try gently turning them. If the issue persists, contact customer service. |
| Unclear or blurry image | Eyepiece not focused; dirty lenses; fogging. | Adjust the fast-focus eyepiece. Clean lenses with the provided cloth. Allow the scope to acclimate to temperature changes to reduce fogging. |
| Scope does not hold zero | Mounting rings loose; faulty scope. | Ensure mounting rings are securely tightened. If the problem continues after re-tightening, contact customer service. |
8. Specifications
| Feature | Detail |
|---|---|
| Model Number | 2.5-10X40E/R |
| Magnification | 2.5x - 10x |
| Objective Lens Diameter | 40 mm |
| Field of View (100 yards) | 32.5' @ 2.5x - 8.9' @ 10x |
| Reticle Type | Illuminated Mil-Dot (Red/Green) |
| Illumination Levels | 5 levels for Red, 5 levels for Green |
| Laser Power | 2mW |
| Laser Class | Class IIIA |
| Material | Aircraft-grade Aluminum Alloy |
| Waterproof/Fog-proof | Yes |
| Shock Resistance | Yes |
| Compatible Mounts | 20mm Picatinny/Weaver Rail |
| Scope Battery | 1 x CR2032 (Included) |
| Laser Battery | 3 x LR1130 (Included) |
| Product Dimensions (L x W x H) | 21.5L x 9.4W x 8H Centimetres |
| Item Weight | 1.23 Pounds (approx. 558 grams) |
| Manufacturer | NANTONG CHENGXIN OPTICAL INSTRUMENT CO., LTD |
9. Warranty & Support
The UUQ 2.5-10x40 Rifle Scope comes with a 1-year manufacturer's warranty. This warranty covers defects in materials and workmanship under normal use. For warranty claims or technical support, please contact UUQ customer service.
UUQ is committed to providing high-quality products and excellent customer service. If you encounter any issues or have questions regarding your product, please reach out to the seller or manufacturer for assistance.

Image: UUQ 1 Year Warranty badge, indicating the product's warranty coverage.

