1. Safety Information
Please read this manual carefully before installation and operation. Ensure all connections are secure and waterproof. Do not attempt to disassemble or modify the device. Always prioritize safety while riding.
2. Package Contents
Verify that all items listed below are included in your package:
- Monitor (1)
- Cameras (2)
- Power cable (1)
- Handbar mount (1)
- Wired remote (1)
- Tire pressure sensors (2)

Image: The VSYSTO F9L dash cam package contents, including the main unit, cameras, and various accessories.
Video: An unboxing video demonstrating the contents of the VSYSTO F9L package.
3. Product Overview
The VSYSTO F9L is a 2-channel full HD motorcycle dash cam designed to enhance safety and riding experience. It features a 4.0-inch large screen for real-time front and rear views, equipped with a SONY 307 Starvis sensor for clear footage in various lighting conditions.
Key Features:
- Bluetooth Connectivity: Seamless smartphone integration for calls, music control, and voice assistants via a wired remote.
- Smart Gauge Mode: Real-time display of speed, location, altitude, odometer, atmospheric pressure, and battery voltage.
- TPMS (Tire Pressure Monitoring System): Monitors tire pressure and temperature with included sensors, providing alerts for tire issues.
- Dual 1080p Cameras: Simultaneous recording with real-time previews and a backup camera function with grid lines for reversing.
- 24-Hour Parking Monitor: Automatic recording when parked or upon impact detection for motorcycle protection.
- WiFi App: View, playback, configure, and download videos wirelessly on your mobile device.
- Built-in G-sensor & Supercapacitor: Ensures loop recording and data protection during sudden impacts.
Image: The VSYSTO F9L main display unit with connected front and rear cameras.

Image: Illustration of the VSYSTO F9L's Bluetooth connectivity for hands-free calling, music streaming, and voice assistant activation.

Image: The Smart Gauge Mode display on the VSYSTO F9L, showing real-time data like speed, battery voltage, date, time, and call logs.
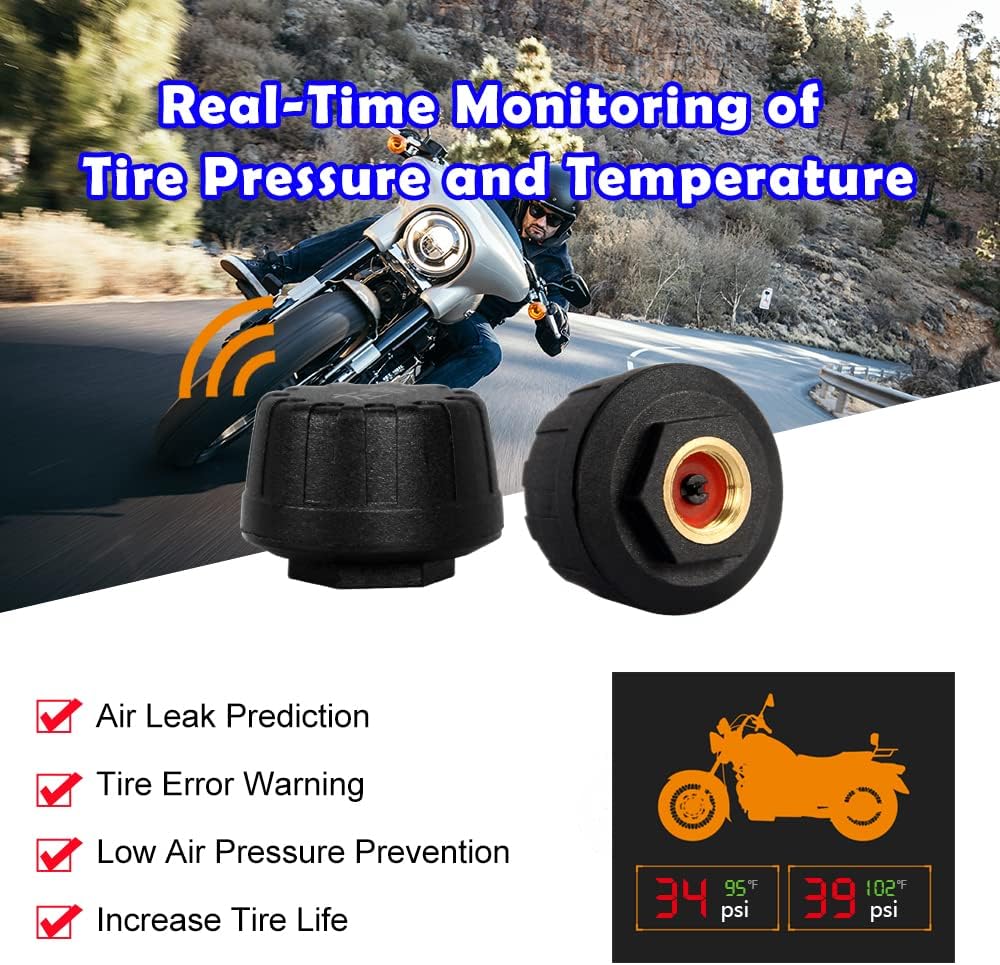
Image: Visual representation of the TPMS feature, highlighting air leak prediction, tire error warning, low pressure prevention, and increased tire life.

Image: The 24-hour Parking Monitor feature, showing recording in preset mode and upon impact detection.
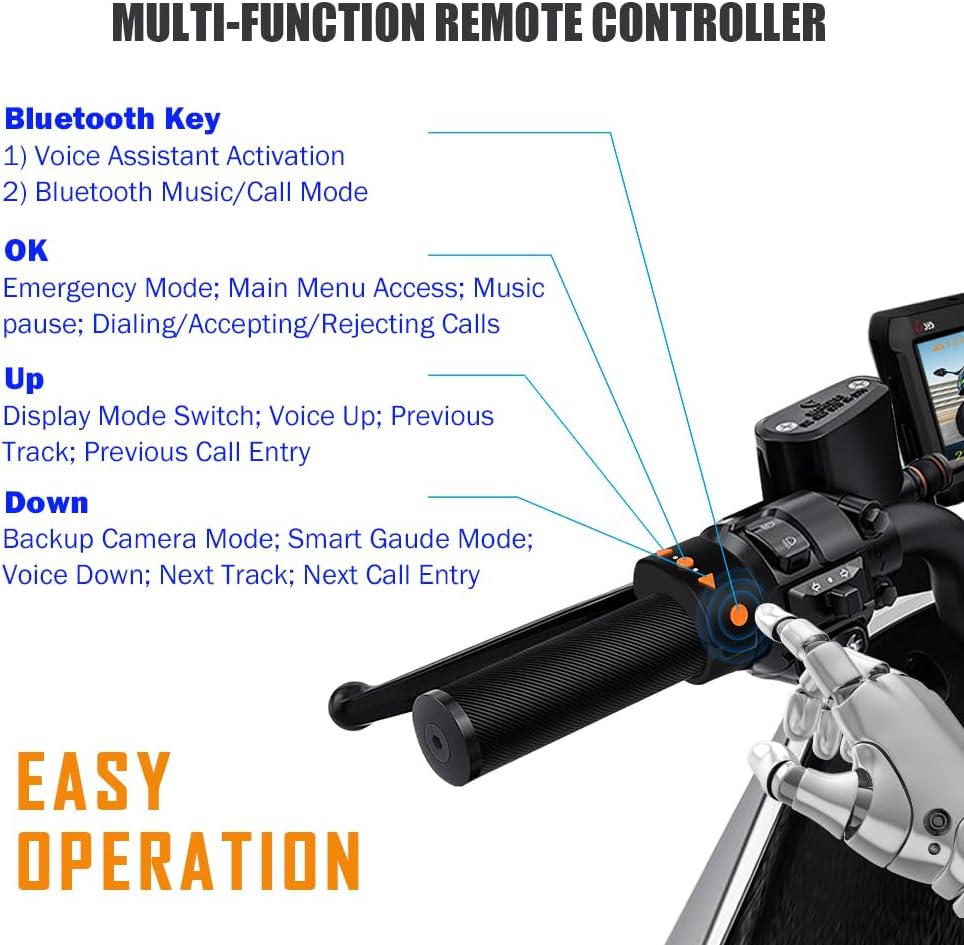
Image: Diagram of the multi-function remote controller, detailing buttons for Bluetooth, OK (emergency/menu/calls), Up (display mode/volume/track), and Down (backup camera/Smart Gauge/volume/track).
4. Installation Guide
Before beginning the full installation, it is recommended to test the dash cam's functionality using the provided USB test cable.
4.1 Main Unit Installation
Insert the storage card into the card slot, ensuring correct orientation. Attach the main unit bracket to the dash cam, then secure it to a suitable position under the motorcycle seat using the double-sided adhesive. Allow 24 hours for the adhesive to fully cure for maximum security.
4.2 Power Cable Installation
The dash cam is hard-wired to the motorcycle battery. Identify the ACC (Accessory) power wire on your motorcycle using a multimeter. Connect the black wire of the power cable to the negative terminal of the battery and the red wire to the positive terminal. Connect the yellow ACC wire to the identified ACC power source. Ensure the power module indicator light illuminates when the motorcycle is turned on and turns off when the motorcycle is off, confirming correct wiring.
Video: A detailed installation reference video for the VSYSTO CS5, demonstrating power cable wiring and main unit placement. (Note: This video is for a similar VSYSTO model, but the power wiring principles are applicable).
4.3 Camera Installation (Front & Rear)
Install the adhesive tape on the back of each camera bracket. Secure the front camera to a suitable position on the front of the motorcycle, ensuring a clear view. Repeat the process for the rear camera at the back of the motorcycle. Arrange and secure the camera cables along the motorcycle frame using cable ties.
Video: A reference video for WiFi motorcycle dash camera installation, showing camera placement and cable routing. (Note: This video is for a similar VSYSTO model, but the camera installation principles are applicable).
4.4 Wired Remote Installation
Attach the adhesive tape to the back of the wired remote. Mount the remote on your handlebar in a position that allows easy access to its buttons without compromising riding safety. Connect the remote's cable to the main unit.
4.5 TPMS Sensor Installation
Screw the metal gasket into the tire air outlet, then install the front tire pressure sensor. Repeat for the rear tire. After installation, move the metal gasket next to the tire pressure sensor, tighten and fix with a wrench. The tire pressure values will then be displayed on the monitor.
5. Operation Guide
5.1 Basic Operation (Wired Remote)
The wired remote allows control of key functions:
- Bluetooth Key: Activates voice assistant, switches between Bluetooth music/call modes.
- OK Button: Enters Emergency Recording Mode (short press), accesses Main Menu (long press), pauses music, dials/accepts/rejects calls.
- Up Button: Switches display modes, increases volume, navigates to previous track/call entry.
- Down Button: Activates Backup Camera Mode, enters Smart Gauge Mode, decreases volume, navigates to next track/call entry.
Video: An operation guide for the VSYSTO F9L, demonstrating button functions and menu navigation.
5.2 Smart Gauge Mode
Long press the Down button on the wired remote to enter Smart Gauge Mode. Short presses will cycle through various information displays such as speed, location, altitude, odometer, atmospheric pressure, and battery voltage. Long press again to exit this mode.
5.3 Bluetooth Connectivity
Pair your smartphone with the dash cam via Bluetooth. Connect your Bluetooth headphones to your phone. Use the wired remote to manage phone calls, control music playback, and activate your phone's voice assistant for safe operation while riding.
5.4 Parking Mode
With Parking Mode enabled, the dash cam automatically switches to surveillance mode when your bike is parked and the engine is off. It records video from both cameras for a preset duration or when physical movement/impact is detected, providing 24/7 protection.
5.5 WiFi App Usage
Download the "VSYSTO" or "WiFi camera" app from your app store. Connect your phone to the dash cam's WiFi network (default password: 1234567890). Once connected, open the app to view real-time footage, playback recorded videos, configure settings, and download files wirelessly. Note that the controller is non-operational when using the WiFi app.
6. Maintenance
- Regularly check and format the SD card to ensure optimal recording performance.
- Keep the camera lenses clean for clear footage.
- Ensure all cables and connections remain secure and waterproof.
7. Troubleshooting
- No Power: Check all power cable connections to the battery and ACC. Ensure the power module indicator light is on when the ignition is on.
- No Recording: Verify that an SD card is inserted and formatted. Check loop recording settings in the menu.
- Poor Video Quality: Clean camera lenses. Check resolution settings in the app.
- TPMS Alert: Check the set tire pressure threshold in the menu and ensure the motorcycle's tire pressure is normal.
- WiFi Connection Issues: Ensure you are connected to the correct WiFi network. Some phones may require turning off mobile data (4G/5G) to maintain the connection.
8. Specifications
| Feature | Detail |
|---|---|
| Product Dimensions | 0.7 x 4.4 x 3 inches |
| Item Weight | 2.64 pounds |
| Item Model Number | F9L |
| Video Capture Resolution | 1080p |
| Connectivity Technology | Hard-wired cable connection, wireless video preview and download |
| Special Features | Bluetooth phone call and music control, TPMS, Parking mode, SONY COMS, Reversing grid line |
| Included Components | Monitor, Cameras(2), Power cable, Handbar mount, Wired remote, Tire pressure sensors(2) |
9. Warranty and Support
VSYSTO products come with a manufacturer's warranty. For detailed warranty information, technical support, or service inquiries, please refer to the warranty card included in your package or visit the official VSYSTO website.


