
1. Introduction
Thank you for purchasing the Silva Schneider PCR 1980 BT Retro Portable Cassette Recorder. This device combines classic audio playback with modern connectivity, offering a versatile experience for music enthusiasts. Please read this manual carefully to ensure proper use and to maximize the lifespan of your product.
2. Safety Information
To prevent fire, electric shock, or product damage, please observe the following safety precautions:
- Do not expose this appliance to rain or moisture.
- Do not block any ventilation openings. Install in accordance with the manufacturer's instructions.
- Do not install near any heat sources such as radiators, heat registers, stoves, or other apparatus (including amplifiers) that produce heat.
- Protect the power cord from being walked on or pinched, particularly at plugs, convenience receptacles, and the point where they exit from the appliance.
- Only use attachments/accessories specified by the manufacturer.
- Unplug this appliance during lightning storms or when unused for long periods of time.
- Refer all servicing to qualified service personnel. Servicing is required when the apparatus has been damaged in any way, such as power-supply cord or plug is damaged, liquid has been spilled or objects have fallen into the apparatus, the apparatus has been exposed to rain or moisture, does not operate normally, or has been dropped.
3. Package Contents
Please check that all items are present:
- Silva Schneider PCR 1980 BT Cassette Recorder
- AC Power Cord
- User Manual (this document)
4. Product Overview
Familiarize yourself with the main components and controls of your cassette recorder.

Figure 4.1: Front View
This image displays the front of the Silva Schneider PCR 1980 BT, highlighting its retro design with two large speaker grilles, a central cassette deck, and a prominent radio tuner display. Various control knobs and buttons are visible above and below the cassette compartment.
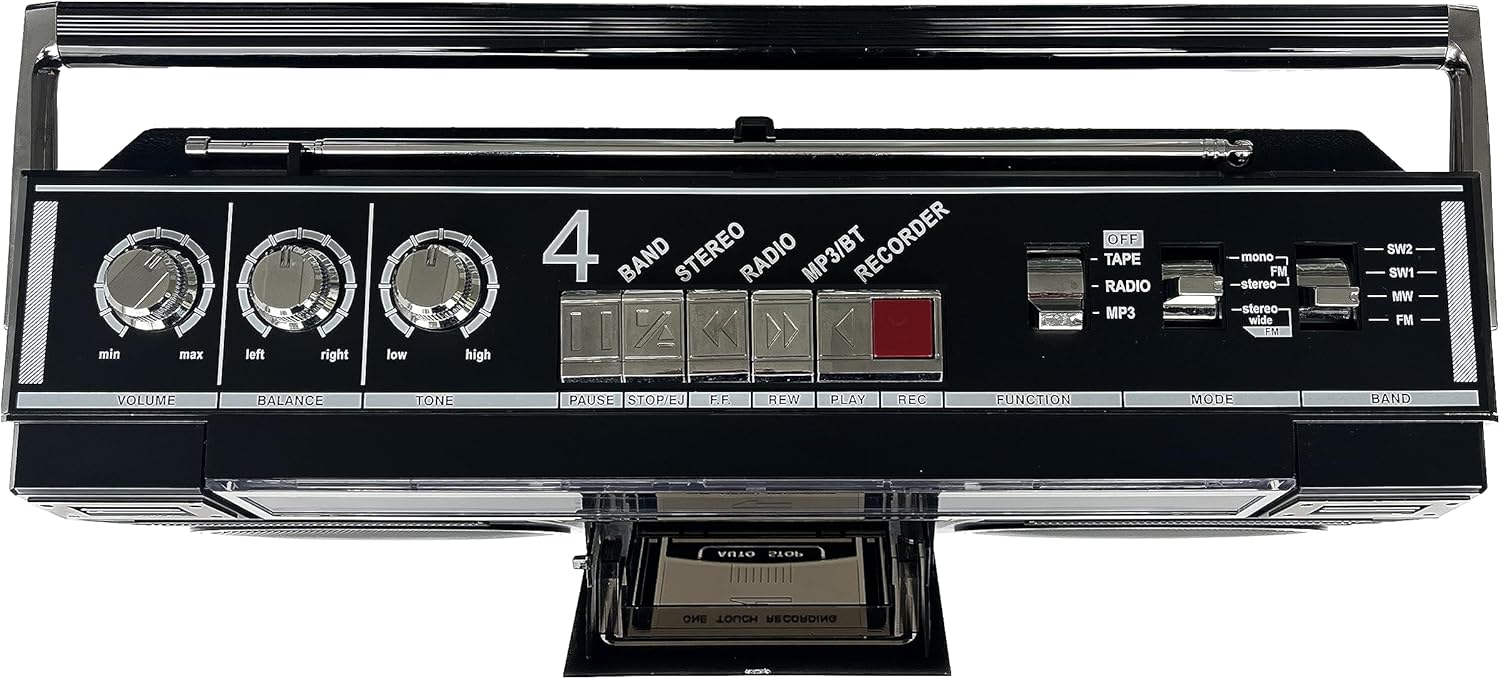
Figure 4.2: Top Controls
A view from the top of the unit, detailing the main control panel. This includes knobs for Volume, Balance, and Tone, along with buttons for Tape functions (Pause, Stop/Eject, FF, REW, Play, Rec) and mode selection (Function, Mode, Band) for Radio, MP3/Bluetooth, and Recorder modes.

Figure 4.3: Side Panel Connections and Controls
This image shows the right side of the cassette recorder, featuring the USB port, TF card slot, and additional control buttons. These buttons are labeled for Mode/Pause, Previous (PREV), Next (NEXT), and Recordable functions, primarily used for MP3/USB/TF card playback and recording.
5. Setup
5.1 Powering the Unit
The PCR 1980 BT can be powered by AC mains or batteries.
AC Power:
- Ensure the unit is switched OFF.
- Connect the supplied AC power cord to the AC IN socket on the back of the unit.
- Plug the other end of the power cord into a standard wall outlet (100-240V AC, 50/60Hz).
Battery Power:
- Ensure the unit is switched OFF.
- Open the battery compartment cover on the bottom of the unit.
- Insert 6 x 'D' size batteries (not included), ensuring correct polarity (+/-).
- Close the battery compartment cover securely.
5.2 Initial Setup
Before first use, extend the telescopic antenna for optimal radio reception.
6. Operating Instructions
6.1 Cassette Playback and Recording

Figure 6.1: Cassette Deck Open
This image shows the cassette compartment in an open state, ready for a cassette tape to be inserted or removed. The 'ONE TOUCH RECORDING' and 'AUTO STOP' labels are visible, indicating key features of the cassette deck.
Playing a Cassette:
- Press the 'STOP/EJECT' button to open the cassette door.
- Insert a cassette tape with the open edge facing upwards.
- Close the cassette door.
- Select 'TAPE' mode using the FUNCTION switch.
- Press the 'PLAY' button to start playback.
- Use 'FF' (Fast Forward) or 'REW' (Rewind) to navigate the tape.
- Press 'PAUSE' to temporarily stop playback, and 'PLAY' to resume.
- Press 'STOP/EJECT' to stop playback and eject the tape.
Recording to Cassette (One-Touch Recording):
- Insert a recordable cassette tape into the deck.
- Select the desired audio source (RADIO, MP3/BT, or external input via microphone).
- Press the 'REC' button. The 'PLAY' button will automatically engage, and recording will begin.
- Adjust the recording level if necessary (if an external microphone is used).
- Press 'STOP/EJECT' to end the recording.
6.2 Radio Operation
- Extend the telescopic antenna for optimal reception.
- Select 'RADIO' mode using the FUNCTION switch.
- Use the BAND switch to select FM, MW, SW1, or SW2.
- Rotate the TUNING knob to find your desired station.
- Adjust the VOLUME, BALANCE, and TONE knobs for preferred audio output.
6.3 Bluetooth Connectivity
- Select 'MP3/BT' mode using the FUNCTION switch. The unit will enter Bluetooth pairing mode, indicated by a flashing Bluetooth indicator.
- On your Bluetooth-enabled device (smartphone, tablet, etc.), enable Bluetooth and search for available devices.
- Select 'PCR 1980 BT' (or similar name) from the list of devices.
- Once paired, the Bluetooth indicator will stop flashing, and you can play audio from your device through the cassette recorder.
- Use your connected device or the unit's playback controls (PREV, NEXT, PLAY/PAUSE) to manage audio.
6.4 USB/TF Card Playback
- Insert a USB flash drive or TF card (with MP3 files) into the respective port on the side of the unit.
- Select 'MP3/BT' mode using the FUNCTION switch. The unit should automatically detect and begin playing MP3 files from the inserted media.
- Use the 'PREV', 'NEXT', and 'MODE/PAUSE' buttons on the side panel to control playback.
6.5 Recording to USB/MP3
This feature allows you to convert your cassette tapes to digital MP3 files on a USB drive or TF card.
- Insert a USB flash drive or TF card into the respective port.
- Insert the cassette tape you wish to record.
- Select 'TAPE' mode using the FUNCTION switch.
- Press the 'PLAY' button on the cassette deck.
- Press the 'RECORDABLE' button on the side panel (near the USB/TF slots) to start recording the cassette audio to MP3.
- Press the 'RECORDABLE' button again to stop the MP3 recording.
7. Maintenance
7.1 Cleaning
- Always unplug the unit before cleaning.
- Use a soft, dry cloth to clean the exterior surfaces.
- For the cassette deck, use a cotton swab lightly dampened with isopropyl alcohol to clean the tape heads, capstan, and pinch roller periodically.
- Do not use abrasive cleaners or solvents.
7.2 Storage
When not in use for extended periods, store the unit in a cool, dry place, away from direct sunlight and extreme temperatures. Remove batteries if storing for more than a few weeks to prevent leakage.
8. Troubleshooting
| Problem | Possible Cause | Solution |
|---|---|---|
| Unit does not power on. | No power connection / Dead batteries. | Check AC power cord connection. Replace batteries if using battery power. |
| No sound from speakers. | Volume too low / Incorrect mode selected / Headphones connected. | Increase volume. Ensure correct FUNCTION mode is selected. Disconnect headphones. |
| Poor radio reception. | Antenna not extended / Weak signal. | Fully extend the telescopic antenna. Reposition the unit for better signal. |
| Cassette tape not playing. | Tape not inserted correctly / Cassette deck dirty / Tape tangled. | Re-insert tape correctly. Clean tape heads. Check tape for damage. |
| Bluetooth pairing fails. | Unit not in pairing mode / Device too far / Already paired to another device. | Ensure unit is in MP3/BT mode and indicator is flashing. Move device closer. Disconnect from other devices. |
| USB/TF card not recognized. | Incorrect file format / Card not inserted correctly / Corrupted media. | Ensure files are MP3 format. Re-insert card/USB. Try a different card/USB. |
9. Specifications
| Feature | Detail |
|---|---|
| Brand | Silva Schneider |
| Model Number | PCR 1890 BT |
| Connectivity Technology | Bluetooth, Auxiliary, USB, TF Card |
| Radio Bands | FM, MW, 2 x SW (Shortwave) |
| Cassette Functions | Playback, Pause, Auto Stop, Fast Forward, Rewind, One-Touch Recording |
| Recording Functions | Cassette to Cassette, Cassette to USB/MP3 |
| Output Power | 80 Watts P.M.P.O. |
| Power Source | AC (Wired Electric), Battery (6 x 'D' cells) |
| Compatible Devices | MP3 Player, Personal Computer, Smartphone, Tablet |
| Dimensions (L x W x H) | 11.3 x 43 x 23.4 cm |
| Item Weight | 2.8 Kilograms |
| Special Features | Bluetooth, VU Meters |
10. Warranty and Support
Silva Schneider products are designed and manufactured to the highest quality standards. For warranty information and technical support, please refer to the warranty card included with your purchase or visit the official Silva Schneider website. Please retain your proof of purchase for any warranty claims.
