1. Important Safety Instructions
Please read these instructions carefully before using the product and retain them for future reference. Adhere to all warnings and follow all instructions.
- Do not use this apparatus near water.
- Clean only with a dry cloth.
- Do not block any ventilation openings. Install in accordance with the manufacturer's instructions.
- Do not install near any heat sources such as radiators, heat registers, stoves, or other apparatus (including amplifiers) that produce heat.
- Protect the power cord from being walked on or pinched, particularly at plugs, convenience receptacles, and the point where they exit from the apparatus.
- Only use attachments/accessories specified by the manufacturer.
- Unplug this apparatus during lightning storms or when unused for long periods of time.
2. Product Overview
The SeeYing Bluetooth Turntable is designed for high-fidelity vinyl playback with modern connectivity options. It features a belt-drive system, adjustable counterweight, and a high-quality magnetic cartridge for precise tracking.
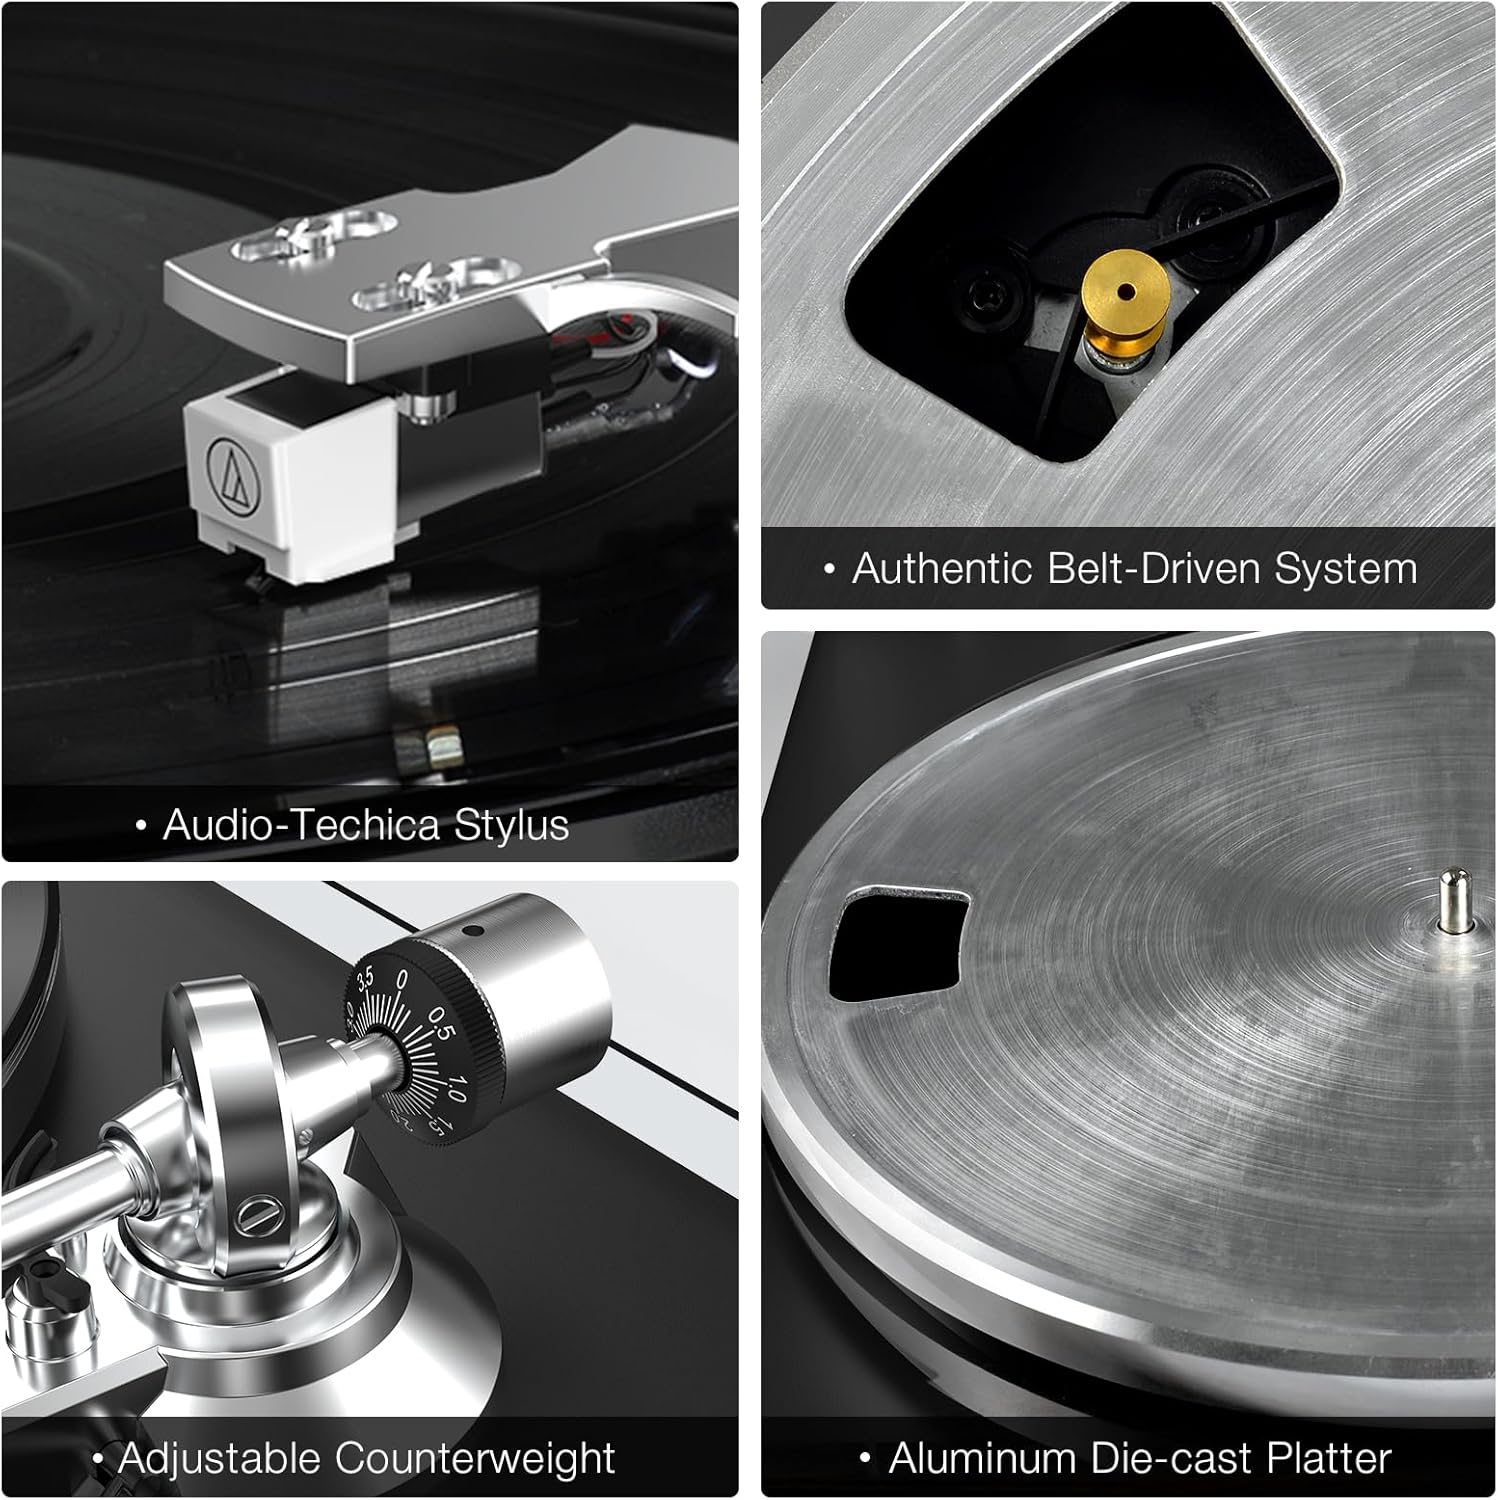
Key Components: This image displays the Audio-Technica stylus, the authentic belt-driven system, the adjustable counterweight, and the aluminum die-cast platter, highlighting the precision engineering of the turntable.

Rear Panel Connections: This diagram illustrates the various input and output ports on the rear of the turntable, including the ground connector, phono/line-out jacks, phono/line-out switch, USB port for PC link, 12V DC adapter jacks, and wireless output connectivity indicator.
3. Setup Guide
Follow these steps to set up your SeeYing Turntable for the first time.
- Unpacking: Carefully remove all components from the packaging. Ensure all parts listed in the packing list are present.
- Platter and Belt Installation:
Place the aluminum platter onto the spindle. Locate the drive belt and carefully stretch it around the motor pulley and the inner rim of the platter. Ensure the belt is not twisted.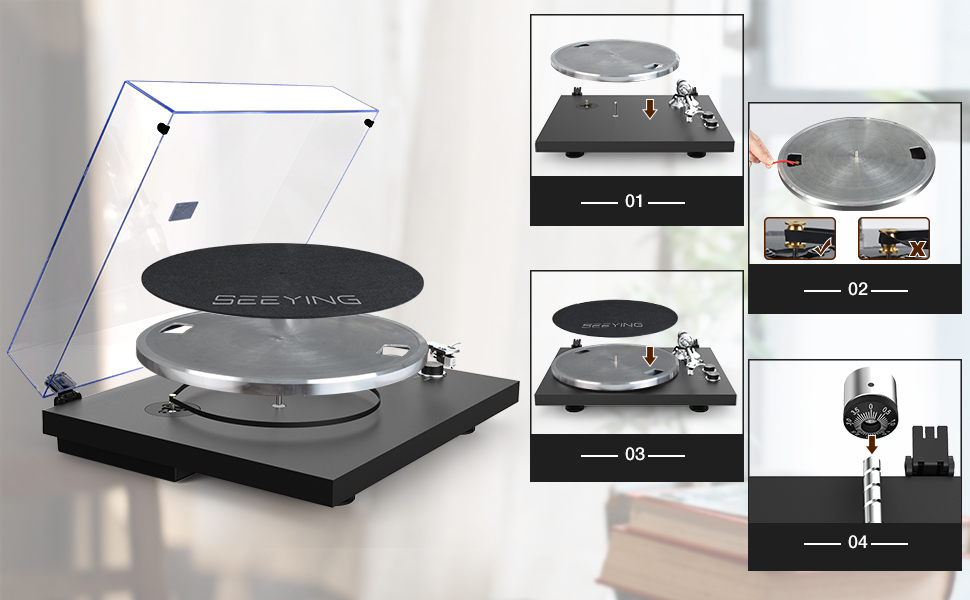
Setup Steps: This image provides a visual guide for the initial setup, including placing the platter, installing the belt, and adjusting the counterweight.
- Counterweight Adjustment: Slide the counterweight onto the rear of the tonearm. Rotate the counterweight until the tonearm is balanced and floats freely. Then, adjust the tracking force according to your cartridge's specifications (typically 1.5-2.5 grams for the included cartridge).
- Dust Cover Installation: Attach the dust cover hinges to the designated slots on the turntable base.
- Power Connection: Connect the provided power adapter to the 'DC IN 12V' port on the rear of the turntable and plug it into a wall outlet.
4. Operating Instructions
Learn how to play records and utilize the turntable's features.
4.1 Playing a Record
- Place a record on the platter.
- Select the appropriate speed (33 or 45 RPM) using the speed button. For 7-inch records, use the 45 RPM setting. For 12-inch records, use the 33 RPM setting.

Control Buttons: This image highlights the 33 & 45 speed selection button and the Start & Stop button for easy operation.
- Lift the tonearm using the cueing lever.
- Move the tonearm over the desired starting groove of the record.
- Gently lower the tonearm using the cueing lever. The record will begin to play.
- To stop playback, lift the tonearm using the cueing lever and return it to the tonearm rest.
4.2 Bluetooth Pairing
The turntable can wirelessly connect to Bluetooth speakers or headphones.
- Ensure your Bluetooth speaker/headphones are in pairing mode.
- Turn on the turntable. It will automatically search for and attempt to pair with nearby Bluetooth devices.
- Once connected, the Bluetooth indicator light on the turntable will illuminate steadily. Audio will now be streamed wirelessly.

Wireless Connectivity: This image demonstrates the turntable's ability to connect wirelessly to Bluetooth speakers, providing a convenient audio experience.
4.3 RCA Output Connection
For wired connections to external amplifiers or powered speakers, use the RCA output.
- Connect the RCA cables (red for right, white for left) from the turntable's RCA output jacks to the corresponding input jacks on your amplifier or powered speakers.
- Set the PHONO/LINE switch on the rear of the turntable to the appropriate setting (PHONO if connecting to a phono input on an amplifier, LINE if connecting to a line-level input or powered speakers).

RCA Output: This image illustrates the use of RCA output to connect the turntable to external speakers for enhanced sound quality.
4.4 USB to PC Recording
Convert your vinyl records to digital audio files on your computer.
- Connect the turntable to your computer using a USB cable (not always included, check 'Included Components').
- Install appropriate audio recording software on your computer (e.g., Audacity).
- Follow the software's instructions to record the audio playback from the turntable.
5. Maintenance
Proper maintenance ensures the longevity and performance of your turntable.
5.1 Cleaning the Turntable
- Wipe the dust cover and cabinet with a soft, dry cloth.
- For the stylus, use a soft brush and brush gently from back to front.
- Avoid using harsh chemicals or abrasive cleaners.
5.2 Stylus Replacement
The stylus (needle) should be replaced after approximately 300-500 hours of playback to maintain sound quality and prevent record wear.
- Carefully grasp the stylus housing and pull it downwards and forwards to remove it from the cartridge.
- Insert the new stylus by pushing it upwards and backwards into the cartridge until it clicks into place.
- Ensure the new stylus is securely seated.

Detachable Stylus: This image shows the detachable high-end AT3600L stylus, emphasizing its precision tracking and ease of replacement.
6. Troubleshooting
If you encounter issues with your turntable, refer to the following common problems and solutions.
| Problem | Possible Cause | Solution |
|---|---|---|
| No power | Power adapter not connected; Power outlet not active | Ensure power adapter is securely connected; Try a different power outlet. |
| No sound or low volume | Incorrect input selection on amplifier; RCA cables loose; PHONO/LINE switch incorrect; Bluetooth not paired | Select correct input on amplifier; Check RCA cable connections; Set PHONO/LINE switch correctly; Re-pair Bluetooth device. |
| Sound distorted or skipping | Stylus dirty or worn; Tracking force incorrect; Record dirty or damaged | Clean or replace stylus; Adjust counterweight/tracking force; Clean record or try a different one. |
| Platter not spinning | Drive belt dislodged or broken; Motor issue | Check and re-seat drive belt; Contact customer support if motor issue suspected. |
7. Specifications
| Feature | Detail |
|---|---|
| Brand | SeeYing |
| Model Name | SeeYing (HP-H0056) |
| Connectivity Technology | Bluetooth |
| Maximum Rotational Speed | 45 Revolutions Per Minute (supports 33 1/3 RPM) |
| Included Components | USB Conversion, RCA Cable |
| Special Features | Integrated Preamplifier, Adjustable Speed |
| Material | Aluminum |
| Color | Black |
| Compatible Devices | Bluetooth speakers, Bluetooth headphones, Computers, Active speakers with RCA input, USB-compatible devices (e.g., smartphone, tablet) |
| Product Dimensions (approx.) | 48.9 x 42.29 x 19.8 cm |
| Product Weight (approx.) | 6.14 Kilograms |
8. Warranty and Support
SeeYing is committed to product quality and customer satisfaction. While specific warranty terms are not detailed here, the manufacturer provides excellent 1-to-1 after-sales support for all customers.
For any inquiries or support needs, please contact SeeYing customer service through your purchase platform or the official SeeYing website.


