1. Introduction
The BRC1E63 Wired Remote Controller is designed as the standard wall-mounted interface for Daikin ducted air conditioning systems. It provides intuitive control over your home's climate, featuring an easy-to-use backlit LED display for enhanced visibility and ergonomic buttons for comfortable operation. This manual provides essential information for the proper installation, operation, and maintenance of your controller.
2. Included Components
The package for your BRC1E63 Wired Remote Controller includes the following items:
- BRC1E63 Controller Unit
- Mounting Plate
- Installation Hardware (screws, anchors, etc.)
3. Setup and Installation
Installation of the BRC1E63 controller should ideally be performed by a qualified HVAC technician to ensure proper wiring and system integration. This section provides general guidelines.
3.1. Mounting Location
- Choose a central location in the primary living area, away from direct sunlight, heat sources, or drafts that could affect temperature readings.
- Ensure the wall surface is flat and stable.
- Verify that the communication wiring from the indoor unit can reach the chosen location.
3.2. Wiring
- Always turn off power to the air conditioning system at the main circuit breaker before beginning any wiring.
- Connect the communication wires from the indoor unit to the designated terminals on the BRC1E63 controller's mounting plate. Refer to the Daikin indoor unit's installation manual for specific wiring diagrams.
3.3. Mounting the Controller
- Secure the mounting plate to the wall using the provided hardware.
- Carefully attach the BRC1E63 controller unit to the mounted plate, ensuring all connections are secure and the unit clicks firmly into place.
- Restore power to the air conditioning system after installation is complete.
4. Operating Instructions
The BRC1E63 controller features a clear display and intuitive buttons for easy control of your Daikin air conditioning system.
4.1. Controller Overview
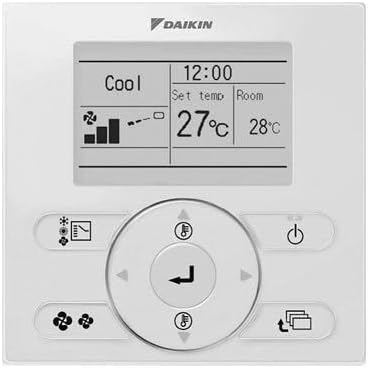
Image: Front view of the Daikin BRC1E63 Wired Remote Controller. The controller is white with a central backlit LED display showing 'Cool', '12:00', 'Set temp 27°C', 'Room 28°C', fan speed indicators, and an airflow icon. Below the display are several white oval-shaped buttons and a circular navigation pad with a central 'Enter' button and directional arrows. Buttons include Power, Mode, Fan Speed, Airflow, and Timer functions.
4.2. Display Information
The backlit LED display provides real-time information about your system's status:
- Current Time: Displays the current time.
- Operation Mode: Indicates the active mode (e.g., Cool, Heat, Fan, Dry, Auto).
- Set Temperature: The desired temperature for the room.
- Room Temperature: The actual temperature detected in the room.
- Fan Speed: Shows the current fan speed setting.
- Airflow Direction: Indicates the louver position or swing function.
- Error Codes/Indicators: Displays system warnings or malfunctions.
4.3. Button Functions
The controller features intuitive buttons for easy operation:
- Power Button (On/Off): Turns the air conditioning system on or off.
- Mode Button: Cycles through available operation modes (Cool, Heat, Fan, Dry, Auto).
- Temperature Adjustment Buttons (Up/Down Arrows): Increases or decreases the set temperature.
- Fan Speed Button: Adjusts the fan speed (e.g., Low, Medium, High, Auto).
- Airflow Direction/Louver Button: Controls the direction of airflow or activates the swing function.
- Timer Button: Accesses timer settings for scheduled operation.
- Menu/Enter Button (Center Button): Confirms selections or accesses sub-menus.
- Navigation Buttons (Arrows around center): Navigates through menu options.
4.4. Basic Operation
- Turning On/Off: Press the Power button.
- Changing Mode: Press the Mode button repeatedly until the desired mode (e.g., Cool, Heat, Fan) is displayed.
- Setting Temperature: Use the Up/Down arrow buttons to adjust the set temperature to your desired level.
- Adjusting Fan Speed: Press the Fan Speed button to cycle through available fan speed options.
- Setting Timer: Press the Timer button and use the navigation buttons to set desired on/off times for automated operation.
5. Maintenance
Regular maintenance ensures optimal performance and longevity of your BRC1E63 controller and the connected air conditioning system.
- Cleaning the Controller: Wipe the surface of the controller with a soft, dry cloth. For stubborn marks, use a slightly damp cloth with mild soap, then wipe dry immediately. Do not use abrasive cleaners, solvents, or spray liquids directly onto the unit, as this can damage the display or internal components.
- Air Filter Maintenance: While the controller itself does not have filters, ensure the air filters of your Daikin indoor unit are cleaned or replaced regularly as per your air conditioning system's manual. Clogged filters can reduce system efficiency and affect temperature readings.
- Avoid Obstruction: Ensure no objects block the temperature sensor on the controller (if visible) or obstruct airflow around the unit, as this can lead to inaccurate temperature readings.
6. Troubleshooting
If you experience issues with your BRC1E63 controller, refer to the following common troubleshooting steps. For complex issues or system malfunctions, contact a qualified service technician.
| Problem | Possible Cause / Solution |
|---|---|
| Controller display is blank. |
|
| Controller not responding to button presses. |
|
| Incorrect room temperature displayed. |
|
| System not cooling/heating effectively. |
|
| Error code displayed. |
|
7. Specifications
| Feature | Specification |
|---|---|
| Model Number | BRC1E63C |
| Manufacturer | DAIKIN |
| Dimensions (L x W x H) | 22 x 16 x 6 cm |
| Colour | White |
| Material | Plastic |
| Display Type | LED, Backlit |
| Special Features | Ergonomic, Backlit |
| Compatibility | Daikin Ducted Air Conditioning Systems |
8. Safety Information
Please read and adhere to the following safety precautions to ensure safe operation and prevent damage to the unit or injury.
- Electrical Safety: Always disconnect power to the air conditioning system at the main circuit breaker before performing any installation, wiring, or maintenance.
- Professional Installation: Installation and wiring should be performed by a qualified and licensed HVAC technician in accordance with local electrical codes and regulations.
- Indoor Use Only: This controller is designed for indoor use only. Do not expose it to water, excessive humidity, or extreme temperatures.
- Cleaning: Use only a soft, dry cloth for cleaning. Do not use liquid cleaners, aerosols, or harsh chemicals.
- Children: Keep the controller out of reach of small children to prevent accidental operation or damage.
- Modifications: Do not attempt to modify or disassemble the controller. Unauthorized modifications can void the warranty and pose safety risks.
- Disposal: Dispose of the product according to local electronic waste regulations at the end of its service life.
9. Warranty and Support
For warranty information and technical support regarding your BRC1E63 Wired Remote Controller, please refer to the documentation provided with your Daikin air conditioning system or contact your authorized Daikin dealer or installer. This manual provides general operational guidance for the BRC1E63 controller.


