1. Introduction
Thank you for choosing the Yoidesu 720P 360-Degree Household Surveillance Camera. This manual provides essential information for the safe and efficient use of your new security camera. Please read it thoroughly before installation and operation, and retain it for future reference.
This camera is designed for household surveillance, offering a 720P resolution for clear monitoring. Key features include 360-degree horizontal and 65-degree vertical rotation, 2.4GHz Wi-Fi connectivity for stable image transmission, two-way voice communication, and infrared night vision for round-the-clock monitoring. It supports power via USB or an AC adapter and allows for local video storage using a memory card.
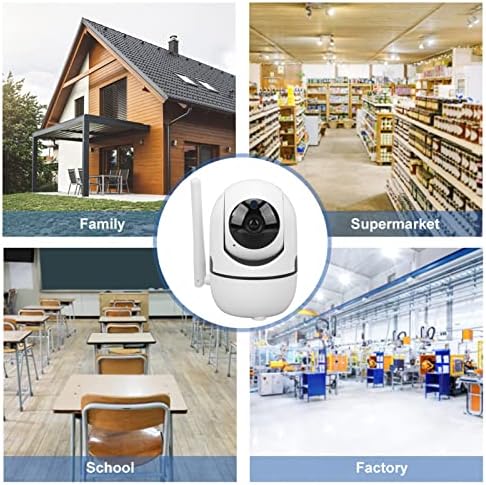
Figure 1.1: Yoidesu 720P 360-Degree Household Surveillance Camera
2. Safety Information
- Power Supply: Use only the provided power adapter (US Plug, AC 100-240V, 5V 1A output) or a compatible USB power source. Incorrect voltage may damage the device or pose a safety risk.
- Water and Moisture: This camera is not waterproof. Do not expose it to rain, moisture, or immerse it in water. Operate in dry indoor environments only.
- Temperature: Avoid extreme temperatures. Do not install the camera near heat sources or in direct sunlight for prolonged periods.
- Ventilation: Ensure proper ventilation around the camera. Do not block ventilation openings.
- Cleaning: Disconnect power before cleaning. Use a soft, dry cloth. Do not use liquid or aerosol cleaners.
- Disassembly: Do not attempt to disassemble or modify the camera. This will void the warranty and may cause damage or injury.
- Children: Keep the camera and its accessories out of reach of children. Small parts may pose a choking hazard.
3. Package Contents
Verify that all items are present in the package:
- 1 x Yoidesu Security Camera
- 1 x Installation Screw
- 1 x Base
- 1 x Power Cable (USB)
- 1 x Power Adapter (US Plug, AC 100-240V)
- 2 x Expansion Tube
- 2 x Mounting Screw
- 1 x Reset Pin
- 1 x User Manual

Figure 3.1: Included components
4. Setup
4.1 Physical Installation
The camera can be placed on a flat surface or mounted to a wall or ceiling. Choose a location that provides the desired viewing angle and is within range of your 2.4GHz Wi-Fi network.
- Mounting (Optional): If mounting, use the provided screws and expansion tubes to secure the base to the desired surface. Then, attach the camera to the base.
- Power Connection: Connect the USB power cable to the camera's power port and the other end to the power adapter. Plug the adapter into a standard AC 100-240V power outlet. The camera will power on and initiate its startup sequence.
4.2 Memory Card Installation
For local video storage, install a compatible memory card (not included).
- Locate the memory card slot on the camera. This is typically found by gently tilting the camera lens upwards or rotating the head.
- Insert the memory card into the slot with the contacts facing the correct direction until it clicks into place.
- The camera will automatically detect and format the card.
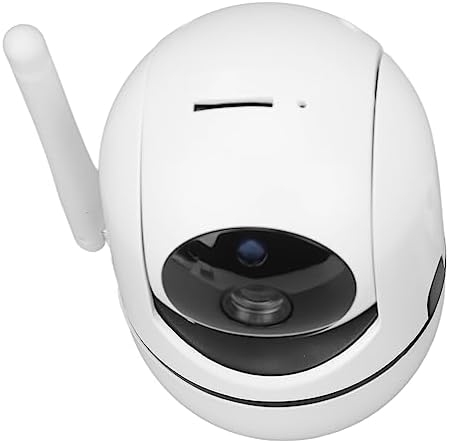
Figure 4.1: Memory card slot location
4.3 Network Connection (Wi-Fi)
To connect the camera to your Wi-Fi network and enable remote access:
- Download App: Download the recommended mobile application (refer to the packaging or quick start guide for the app name) from your smartphone's app store.
- Create Account: Open the app and create a user account if you don't already have one.
- Add Device: Follow the in-app instructions to add a new device. This usually involves scanning a QR code on the camera or manually selecting the camera model.
- Connect to Wi-Fi: When prompted, enter your 2.4GHz Wi-Fi network name (SSID) and password. Ensure your smartphone is also connected to the same 2.4GHz Wi-Fi network during setup.
- Pairing: The app will guide you through the pairing process, which may involve holding your phone near the camera or listening for a confirmation sound.

Figure 4.2: Connecting to the camera via smartphone app
5. Operation
5.1 Remote Control and Viewing
Once connected to the app, you can remotely control and view the camera feed:
- Live View: Open the app to access the live video feed from your camera.
- Pan and Tilt: Use the controls within the app to adjust the camera's viewing angle. The camera supports 360-degree horizontal rotation and 65-degree vertical rotation.
- Zoom: Digital zoom may be available through the app.
5.2 Two-Way Audio
The camera features a built-in speaker and microphone for two-way communication:
- Initiate Call: In the live view, tap the microphone icon in the app to speak through the camera's speaker.
- Listen: The camera's microphone will pick up audio from its surroundings, which you can hear through your smartphone app.
5.3 Night Vision
The camera is equipped with infrared night vision lights:
- Automatic Activation: The infrared night vision will automatically activate in low-light conditions, providing clear black and white video.
- Adjustment: The camera automatically adjusts its infrared illumination based on ambient light.
5.4 Video Recording and Motion Detection
The camera can record video to a local memory card and detect motion:
- Continuous Recording: If a memory card is installed, the camera can be configured for continuous recording via the app settings.
- Motion-Activated Recording: Set up motion detection in the app to trigger recording only when movement is detected.
- Alerts: Configure the app to send notifications to your smartphone when motion is detected.
- Playback: Access recorded footage through the app's playback feature.

Figure 5.1: Versatile application scenarios for the camera
6. Maintenance
- Cleaning: Periodically wipe the camera's exterior with a soft, dry cloth. Do not use harsh chemicals or abrasive materials. Ensure the lens is clean for optimal image quality.
- Firmware Updates: Check the mobile application regularly for available firmware updates. Keeping the firmware updated ensures optimal performance and security.
- Memory Card Management: If using a memory card, periodically review and back up important footage. Consider formatting the card through the app every few months to maintain performance.
7. Troubleshooting
| Problem | Possible Cause | Solution |
|---|---|---|
| Camera not powering on | No power, faulty adapter/cable | Check power connection, try a different outlet, ensure adapter is working. |
| Unable to connect to Wi-Fi | Incorrect Wi-Fi password, 5GHz network, weak signal | Ensure correct 2.4GHz Wi-Fi password. Move camera closer to router. Restart router and camera. |
| Poor image quality | Dirty lens, low bandwidth, insufficient lighting | Clean the camera lens. Check Wi-Fi signal strength. Ensure adequate lighting or verify night vision is active. |
| Two-way audio not working | Microphone/speaker muted in app, app permissions | Check app settings for audio controls. Grant microphone permissions to the app on your smartphone. |
| Motion detection not triggering | Sensitivity too low, detection zone not set | Adjust motion detection sensitivity in the app. Define or expand the detection zone. |
8. Specifications
- Model: Yoidesu8mazwti2er
- Pixels: 1MP
- Resolution: 720P
- Video Mode: High Definition, Low Definition
- Image Code: H.264
- Wi-Fi: 2.4GHz
- Power Input: 5V, 1A
- Adapter: US Plug, AC 100-240V
- Pan/Tilt Angle: Horizontal 360 Degree, Vertical 65 Degree
- Network Mode Support: TCP, TP, IPV4, DHCP, RTSP, P2P
- Connectivity Protocol: Wi-Fi
- Mounting Type: Wall Mount
- Wireless Communication Technology: Wi-Fi
- Voltage: 240 Volts (Adapter input range)
- Batteries Required: No
- Focus Type: Manual Focus
- Alert Type: Motion Only
- Recommended Uses: Surveillance
- Compatible Devices: Smartphone
- Item Weight: 9.8 ounces
- Manufacturer: Yoidesu
9. Warranty & Support
For warranty information and technical support, please refer to the documentation included with your purchase or contact Yoidesu customer service through the official website or your retailer. Please have your model number (Yoidesu8mazwti2er) and purchase date available when contacting support.
