1. Introduction
Thank you for choosing the RG RayGalax 2x4 LED Flat Panel Light. This product is designed to provide efficient, adjustable, and high-quality illumination for various indoor environments. With selectable color temperatures (CCT) and power modes, along with 0-10V dimming capability, this LED panel light offers versatile lighting solutions while significantly reducing energy consumption.
This manual provides detailed instructions for the safe installation, operation, and maintenance of your new LED panel light. Please read it thoroughly before installation and retain it for future reference.
2. Safety Information
WARNING: Risk of electric shock. Disconnect power at the fuse or circuit breaker before installing or servicing.
- Read all instructions carefully before installation.
- Installation must be performed by a qualified electrician in accordance with national and local electrical codes.
- Ensure the supply voltage is compatible with the fixture's requirements (120-277V AC).
- Do not install in wet locations. This product has an IP40 moisture-proof rating, suitable for indoor use only.
- Do not handle the fixture with wet hands.
- Avoid looking directly into the LED light source when illuminated.
- Ensure the fixture is securely mounted to prevent falling.
- Do not modify the fixture in any way. Unauthorized modifications may void the warranty and create safety hazards.
3. Package Contents
The RG RayGalax 2x4 LED Flat Panel Light package typically includes:
- 2 x RG RayGalax 2x4 LED Flat Panel Light Fixtures
- 1 x User Manual
- Mounting clips for recessed installation
Note: Hanging and flush mounting kits are not included and must be purchased separately if required for your installation type.
4. Product Features
Adjustable Color Temperature (CCT)
Select from 5 color temperatures to suit your environment and preference:
- 3500K (Warm White)
- 4000K (Neutral White)
- 5000K (Bright White)
- 5700K (Daylight White)
- 6500K (Cool White)
The CCT selection switch is located on the side of the driver. Adjust before installation.
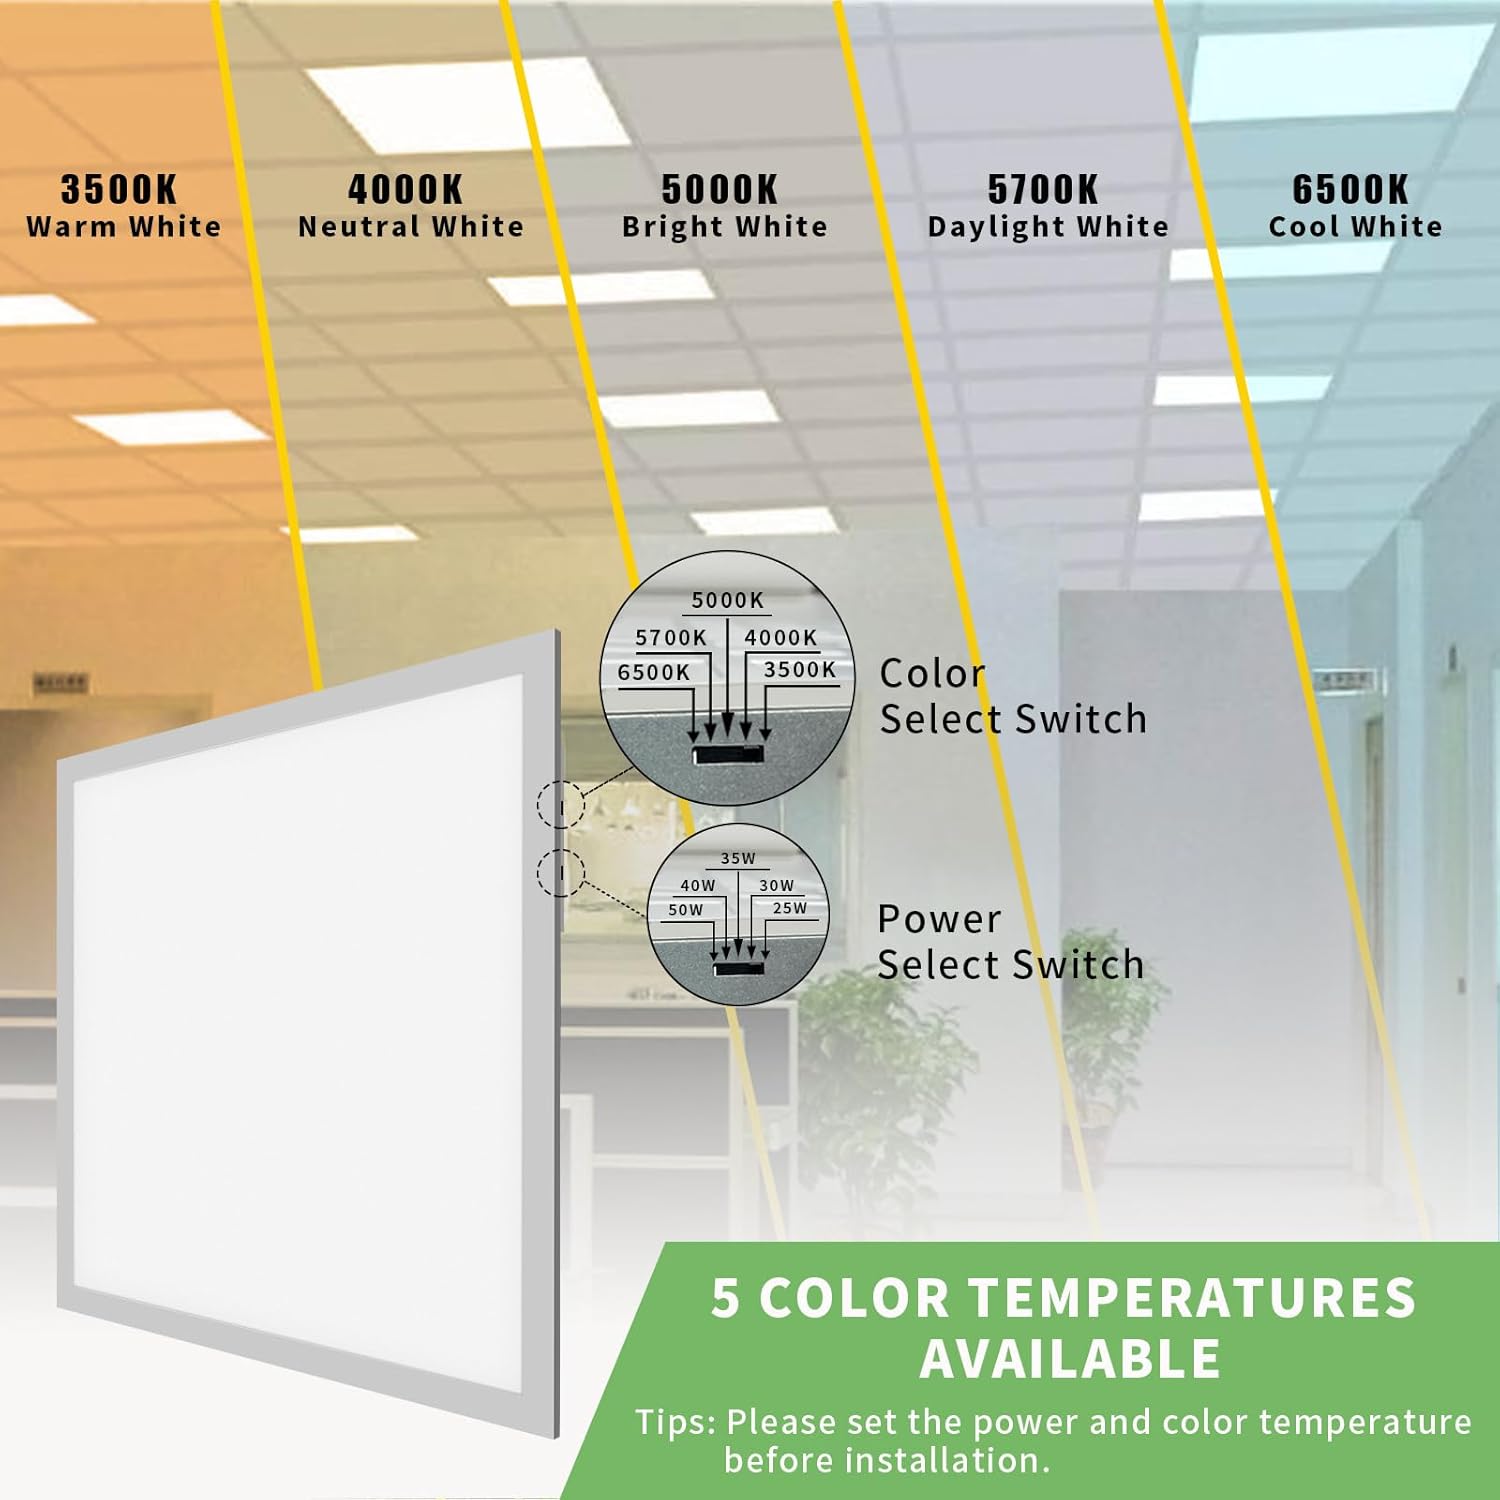
Image: Detail of the switches for adjusting color temperature and wattage on the light fixture's driver.
Adjustable Power Modes (Wattage)
Choose from 5 wattage settings to control brightness and energy consumption:
- 25W (3250 LM)
- 30W (3900 LM)
- 35W (4550 LM)
- 40W (5080 LM)
- 50W (6250 LM)
The wattage selection switch is also located on the side of the driver. Adjust before installation.

Image: Illustration demonstrating the visual difference in brightness for each of the 5 selectable wattage modes (25W to 50W).
0-10V Dimmable
Enjoy smooth, continuous dimming from 5% to 100% when connected to a compatible 0-10V dimmer (dimmer not included). This feature allows for precise control over lighting levels without flicker or noise.

Image: Visual representation of the 0-10V dimming capability, showing the light fixture at various brightness levels from 100% down to 5%.
Energy Saving & Long Lifespan
Designed with high-efficiency LED chips, this panel light can save up to 72% on electricity bills compared to traditional 140W fluorescent lamps. With a lifespan of over 50,000 hours, it eliminates frequent bulb replacements and maintains light quality without yellowing or darkening.

Image: A side-by-side comparison illustrating the energy efficiency of the RG RayGalax LED panel light (72% energy saving) against a traditional 140W fluorescent fixture.
Certifications & Quality
This product is ETL, FCC, RoHS, and CE certified, ensuring high standards of safety and performance. It also features an IP40 moisture-proof rating, making it suitable for various indoor environments.
Versatile Installation
Supports three installation methods: Recessed, Surface Mounted, and Drop Mounted. Recessed installation hardware is included. Surface and Drop mounting kits are sold separately.

Image: Illustrations depicting the three possible installation types for the LED panel light: Surface Mounted (frame not included), Recessed Mounted (direct use with clips), and Drop Mounted (cables not included).
5. Specifications
| Attribute | Value |
|---|---|
| Brand | RG RayGalax |
| Model Number | RG-524-2P |
| Product Dimensions | 50.19"L x 27.16"W x 3.93"H |
| Item Weight | 18.51 pounds |
| Material | Aluminum, Acrylic |
| Color | White |
| Light Source Type | LED |
| Voltage | 120-277 Volts AC |
| Wattage (Adjustable) | 25W, 30W, 35W, 40W, 50W |
| Brightness (Max) | 6250 Lumens (at 50W) |
| Color Temperature (Adjustable) | 3500K, 4000K, 5000K, 5700K, 6500K |
| Dimmability | 0-10V Dimmable (dimmer not included) |
| Lifespan | 50,000 hours |
| Certifications | ETL, FCC, RoHS, CE |
| IP Rating | IP40 (Moisture-proof) |
| Installation Type | Recessed (clips included), Surface/Drop (kits not included) |
| Indoor/Outdoor Usage | Indoor use only |
6. Setup & Installation Guide
This section details the recessed installation process. For surface or drop mounting, please refer to the instructions provided with the respective mounting kits (sold separately).
Pre-Installation Steps:
- Safety First: Turn off the power at the circuit breaker before beginning any installation work.
- Unpack: Carefully remove the LED panel light from its packaging. Inspect for any damage.
- Adjust Settings: Before installation, use the switches on the side of the driver to select your desired Color Temperature (CCT) and Wattage. These settings are difficult to change once the panel is installed.

Image: Close-up of the Color Select Switch and Power Select Switch on the LED panel light. Ensure these are set before installation.
Recessed Installation Steps:
This method is for installation into a T-grid ceiling system.
- Step 1: Prepare the Ceiling
Turn off the power at the breaker. Remove the existing ceiling tile from the desired installation location.

Image: Illustration of turning off power and removing a ceiling tile to prepare for recessed light installation.
- Step 2: Wire Connections
Open the driver box cover. Connect the AC power wires (Live, Neutral, Ground) from the building's electrical supply to the corresponding wires on the LED panel's driver. If using a 0-10V dimmer, connect the dimming wires (purple and gray) to the dimmer circuit. Ensure all connections are secure and insulated.
Image: Illustration showing the process of opening the driver box and connecting electrical wires to the LED panel light.
- Step 3: Secure the Panel
Place the LED panel light into the T-grid ceiling opening. Bend each T-grid clip 90° away from the fixture housing, then bend the top part 90° again. Secure these clips onto the T-grid railing to hold the fixture in place.
Image: Illustration demonstrating how to place the LED panel into the ceiling grid and secure it using the integrated mounting clips.
- Step 4: Power On
Once the fixture is securely installed and all wiring is complete, restore power at the circuit breaker. Test the light and dimming function.
Image: Illustration showing the final step of turning on the power after successful installation of the LED panel light.
7. Operating Instructions
Adjusting Color Temperature (CCT) and Wattage:
The CCT and wattage settings are adjusted via switches located on the side of the LED driver. These adjustments should ideally be made before installation for convenience, but can be accessed if the panel is removed or if the driver is accessible.
- CCT Selection: Locate the "Color Select Switch" on the driver. Slide the switch to choose between 3500K, 4000K, 5000K, 5700K, or 6500K.
- Wattage Selection: Locate the "Power Select Switch" on the driver. Slide the switch to select your desired wattage: 25W, 30W, 35W, 40W, or 50W.
Note: Changes to CCT and wattage will take effect immediately upon selection.
0-10V Dimming:
If your fixture is connected to a compatible 0-10V dimmer switch (not included), you can control the brightness level from 5% to 100%. Operate the dimmer switch according to its manufacturer's instructions.
Ensure the dimmer is compatible with 0-10V LED drivers for optimal performance and to avoid damage.
8. Maintenance
The RG RayGalax LED Flat Panel Light requires minimal maintenance due to its long lifespan and durable construction.
- Cleaning: Ensure the power is off before cleaning. Use a soft, dry, or slightly damp cloth to wipe the surface of the panel. Do not use harsh chemicals, abrasive cleaners, or solvents, as these can damage the finish or acrylic diffuser.
- Inspection: Periodically inspect the fixture for any signs of damage or loose connections. If any issues are found, disconnect power and consult a qualified electrician.
- No User-Serviceable Parts: There are no user-serviceable parts inside the fixture. Do not attempt to open or repair the unit yourself.
9. Troubleshooting
If you encounter issues with your LED panel light, refer to the following common problems and solutions:
| Problem | Possible Cause | Solution |
|---|---|---|
| Light does not turn on. |
|
|
| Light flickers or dims unexpectedly. |
|
|
| Light output is too low/high. |
|
|
| Color temperature is not as expected. |
|
|
If the problem persists after attempting these solutions, please contact RG RayGalax customer support for assistance.
10. Warranty & Support
RG RayGalax stands behind the quality of its products. This LED drop ceiling light comes with ETL, FCC, RoHS, and CE certifications, ensuring its reliability and safety.
For any quality issues or concerns, please do not hesitate to contact us. Your satisfaction is our primary concern. Please refer to your purchase documentation or the RG RayGalax official website for specific warranty terms and contact information.
Contact Information:
- Website: Visit the RG RayGalax Store on Amazon
- Email: (Refer to product packaging or official website)
- Phone: (Refer to product packaging or official website)


