Introduction
This manual provides detailed instructions for the installation, operation, and maintenance of your Sygonix SY-5470190 Wireless Thermostat. This device is designed to control your heating system efficiently, offering features such as weekly programming and a holiday function. Please read this manual thoroughly before using the product to ensure correct operation and to prevent damage.
Safety Information
- Ensure all electrical connections are made by a qualified electrician if you are unsure.
- Disconnect power to the heating system before installation or maintenance.
- Do not expose the thermostat or receiver to moisture, extreme temperatures, or direct sunlight.
- Use only the specified battery type for the thermostat unit.
- Keep the device out of reach of children.
- Do not attempt to repair the device yourself. Contact qualified service personnel.
Package Contents
Please check that all items are present and undamaged:
- Wireless Thermostat Unit (with display)
- Receiver Unit (for connection to heating system)
- Instruction Manual (this document)
- Mounting accessories (screws, wall plugs - typically included)
Product Overview
The Sygonix SY-5470190 system consists of two main components: the wireless thermostat unit and the receiver unit.
Thermostat Unit
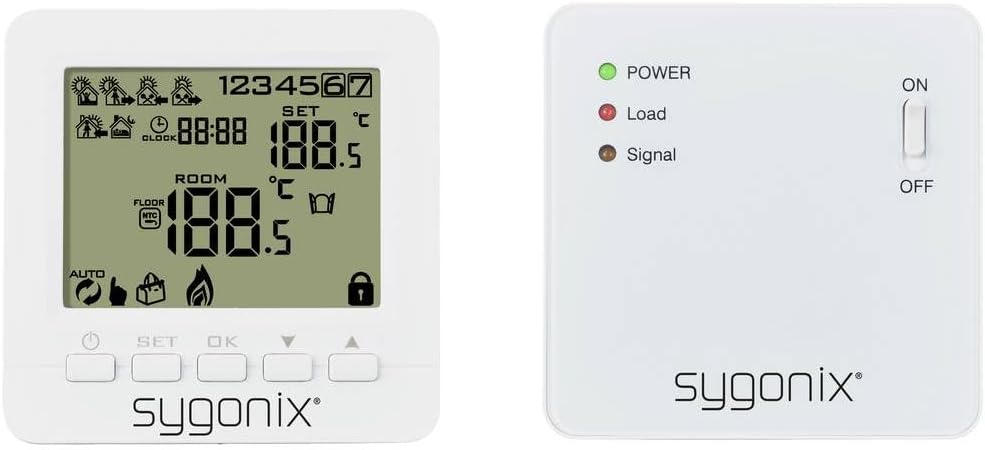
Image: Front view of the Sygonix SY-5470190 wireless thermostat unit, showing its LCD display with temperature, time, and various icons, along with control buttons below the screen.
The thermostat unit features an LCD display showing current room temperature, set temperature, time, and various operational icons (e.g., heating active, battery low, programming mode). It has buttons for setting the temperature, navigating menus, and confirming selections. This unit is battery-powered and communicates wirelessly with the receiver.
Receiver Unit

Image: Front view of the Sygonix SY-5470190 receiver unit, displaying three LED indicators (Power, Load, Signal) and an ON/OFF toggle switch on the right side.
The receiver unit connects directly to your heating system. It has LED indicators for Power (green), Load (red, indicating heating is active), and Signal (amber, indicating wireless communication). An ON/OFF switch controls the power to the receiver. This unit is typically rack-mounted or wall-mounted near the heating appliance.

Image: Both the Sygonix SY-5470190 wireless thermostat unit (right) and its receiver unit (left) are shown side-by-side, illustrating their relative sizes and designs.
Setup
1. Battery Installation (Thermostat Unit)

Image: Rear view of the Sygonix SY-5470190 thermostat unit, showing the open battery compartment designed for multiple AA or AAA batteries, and the back of the receiver unit with mounting points.
- Gently remove the back cover of the thermostat unit.
- Insert the required batteries (e.g., AA or AAA, typically 2 or 3 depending on model) into the battery compartment, observing the correct polarity (+/-).
- Replace the back cover securely. The display should now power on.
2. Receiver Unit Installation
- The receiver unit is designed for rack or wall mounting. Choose a location near your heating system (e.g., boiler, electric heater) that is free from obstructions and within wireless range of the thermostat unit.
- Important: Ensure the main power supply to your heating system is switched off before proceeding with electrical connections.
- Connect the receiver unit to your heating system according to the wiring diagram provided in the full product manual (not included here). This typically involves connecting live, neutral, and switched live wires.
- Secure the receiver unit to the wall or rack using the provided mounting accessories.
- Once wired, switch on the main power supply to the heating system. The green POWER LED on the receiver should illuminate.
3. Pairing the Units
The thermostat and receiver units typically come pre-paired. If they do not communicate or if you are replacing a unit, follow these general pairing steps (refer to your full manual for specific button sequences):
- On the receiver unit, press and hold the pairing button (location varies by model, often a small recessed button) until the Signal LED starts flashing.
- On the thermostat unit, enter pairing mode (usually by pressing a combination of buttons like SET and OK, or a dedicated pairing option in the menu).
- Once pairing is successful, the Signal LED on the receiver will stop flashing and remain solid, and the thermostat display may show a confirmation icon.
- Test the connection by adjusting the set temperature on the thermostat and observing if the Load LED on the receiver responds (turns red when heating is requested).
Operating Instructions
Setting the Time and Day
Access the time/day setting mode (usually by pressing a 'CLOCK' or 'SET' button) and use the arrow buttons to adjust the current time and day of the week. Confirm each setting with 'OK' or 'SET'.
Adjusting the Temperature
- In normal operating mode, use the Up and Down arrow buttons to increase or decrease the desired set temperature.
- The new set temperature will be displayed, and the thermostat will automatically adjust the heating to reach and maintain this temperature.
Weekly Programming
The thermostat supports weekly programming, allowing you to set different temperatures for various times of the day across the week. This feature helps optimize energy consumption.
- Enter programming mode (refer to your full manual for the specific button, often 'PROG' or holding 'SET').
- Select the day or group of days you wish to program (e.g., weekdays, weekends, or individual days).
- Set the desired time periods and corresponding temperatures for each period.
- Save your settings and exit programming mode.
Holiday Function
The holiday function allows you to set a constant, energy-saving temperature for an extended period when you are away. This prevents the heating from running unnecessarily while protecting your home from freezing temperatures.
- Activate the holiday mode (usually via a dedicated button or menu option).
- Set the desired constant temperature for the holiday period.
- Specify the duration of the holiday period (e.g., number of days).
- The thermostat will revert to its normal programming after the set duration.
Backlight
The thermostat display features a backlight for improved visibility in low-light conditions. It typically activates automatically when a button is pressed and turns off after a short period of inactivity to conserve battery life.
Maintenance
- Cleaning: Wipe the thermostat and receiver units with a soft, dry cloth. Do not use abrasive cleaners or solvents.
- Battery Replacement: When the low battery indicator appears on the thermostat display, replace the batteries promptly to ensure continuous operation. Refer to the "Battery Installation" section for instructions.
- Regular Checks: Periodically check the wireless connection and ensure the receiver's LEDs are functioning as expected.
Troubleshooting
| Problem | Possible Cause | Solution |
|---|---|---|
| Thermostat display is blank. | Dead or incorrectly inserted batteries. | Replace batteries, ensuring correct polarity. |
| Heating system not responding to thermostat. |
|
|
| Incorrect temperature reading. | Thermostat placed near heat source/draft, or sensor malfunction. | Relocate thermostat to a central area away from direct heat/cold sources. If problem persists, contact support. |
| Cannot program weekly schedule or holiday function. | Incorrect mode or user error. | Refer to the "Operating Instructions" section and your full product manual for detailed programming steps. Ensure you are in the correct programming mode. |
Specifications
| Brand | Sygonix |
| Model Number | SY-5470190 |
| Product Dimensions (L x W x H) | 3 x 8.6 x 8.6 cm |
| Item Weight | 290 g |
| Voltage | 230 Volts |
| Power | 280 (Unit not specified, typically Watts for heating load) |
| Control Method | Remote Control (Wireless Thermostat) |
| Backlight | Yes |
| Noise Level | 1 Decibel (Receiver operation) |
Warranty and Support
Warranty information is typically provided with your purchase documentation or on the product packaging. For specific warranty terms and conditions, please refer to these documents.
For technical support, troubleshooting assistance beyond this manual, or spare parts inquiries, please contact Sygonix customer service. Contact details can usually be found on the manufacturer's website or your purchase receipt.


