1. Introduction
This manual provides detailed instructions for the installation, operation, and maintenance of your PWAYTEK HDMI Extender Splitter 1x4. This device is designed to distribute a single HDMI source to four displays over long distances using CAT5e/6/7 Ethernet cables, supporting resolutions up to 4K@60Hz. It also includes features such as HDMI loop out, bi-directional IR control, Power over Cable (POC), and EDID management for enhanced flexibility.
2. Package Contents
Please verify that all items listed below are included in your package:
- 1x HDMI Extender Splitter Transmitter (PW-HT247P4IR)
- 4x HDMI Extender Receivers
- 1x DC 12V Power Adapter
- 1x IR TX Cable (for transmitter)
- 4x IR RX Cables (for receivers)
- 1x User Manual
- 1x Warranty Card

Image: Contents of the PWAYTEK HDMI Extender Splitter 1x4 package, showing the main transmitter unit, four receiver units, power adapter, IR cables, and user manual.
3. Product Overview
The PWAYTEK HDMI Extender Splitter system consists of a transmitter unit and four receiver units. The transmitter connects to your HDMI source and distributes the signal, while each receiver connects to a display.
Transmitter Unit (TX)
- DC 12V: Power input port.
- HD IN: HDMI input from source device.
- HD OUT: HDMI loop out to a local display.
- UTP (x4): RJ45 outputs for connecting to receivers via CAT5e/6/7 cable.
- IR OUT: Port for connecting the IR TX cable to control the source device.
- EDID: EDID management switch.
- ON/OFF: Power switch.
- PWR LED: Power indicator.
- STA LED: Status indicator.
Receiver Unit (RX)
- UTP: RJ45 input from the transmitter via CAT5e/6/7 cable.
- IR IN: Port for connecting the IR RX cable to receive IR signals from the remote.
- HD OUT: HDMI output to display device.
- PWR LED: Power indicator.
- STA LED: Status indicator.
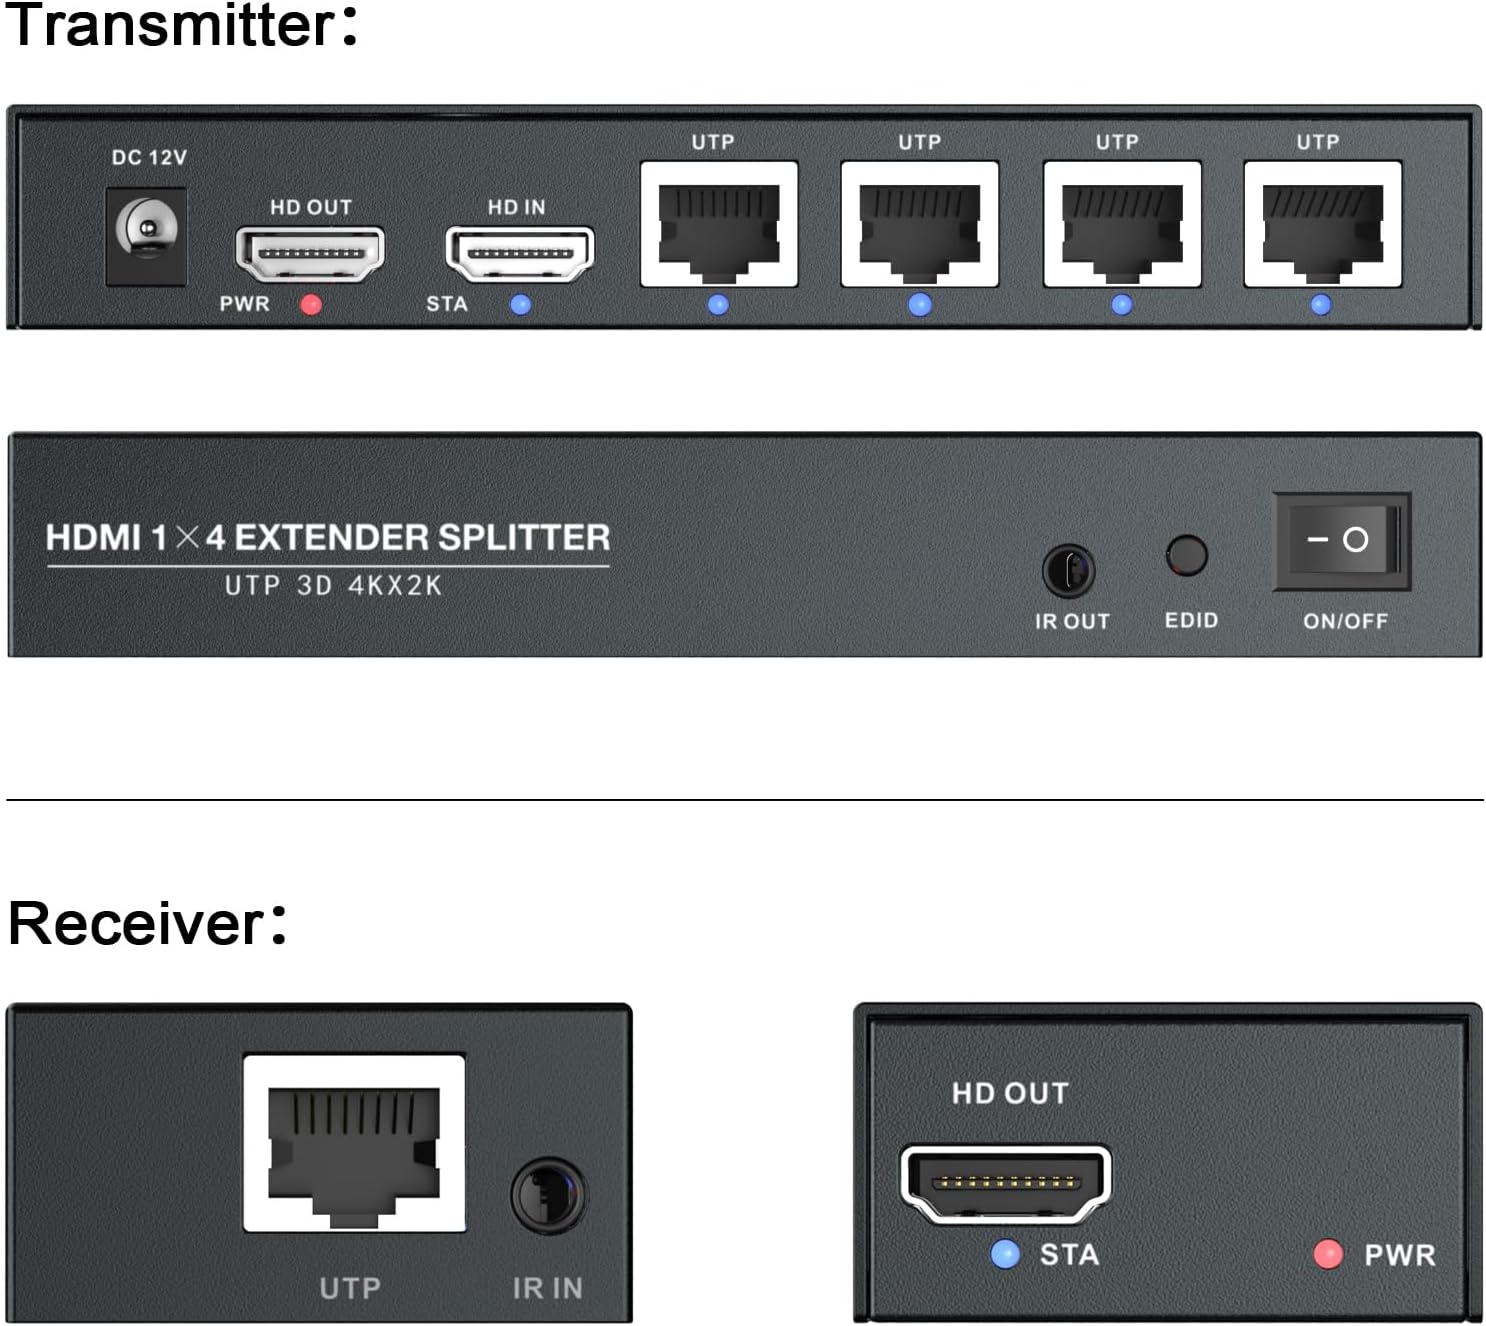
Image: Detailed view of the ports on both the transmitter and receiver units, including HDMI In/Out, UTP (Ethernet), DC 12V, IR In/Out, EDID switch, and power/status indicators.
4. Setup Instructions
Follow these steps to set up your HDMI Extender Splitter system:
- Power Off Devices: Ensure all HDMI source devices, displays, and the extender units are powered off before making any connections.
- Connect HDMI Source to Transmitter: Connect your HDMI source (e.g., Blu-ray player, PC, game console) to the HD IN port on the transmitter unit using an HDMI cable.
- Connect Local Display (Optional): If you wish to have a local display near the source, connect it to the HD OUT (loop out) port on the transmitter unit using an HDMI cable.
- Connect Ethernet Cables: Connect up to four CAT5e/6/7 Ethernet cables from the UTP output ports on the transmitter to the UTP input ports on each of the four receiver units. Ensure the cables are of good quality and within the maximum recommended length (up to 196ft for 4K@60Hz).
- Connect Receivers to Displays: Connect each receiver unit's HD OUT port to its respective display (e.g., TV, monitor, projector) using an HDMI cable.
- Connect IR Cables (Optional):
- Connect the IR TX cable to the IR OUT port on the transmitter. Position the IR emitter head near the IR sensor of your source device.
- Connect the IR RX cables to the IR IN ports on each receiver. Position the IR receiver head in a location where it can easily receive signals from your remote control.
- Power On: Connect the DC 12V power adapter to the transmitter unit. The PWR LED on the transmitter should illuminate. Since the receivers are powered via POC (Power over Cable), they do not require separate power adapters.
- Power On Displays and Source: Power on all connected displays and your HDMI source device.
- Verify Signal: Check each display for the video signal. The STA LEDs on both the transmitter and receivers should indicate a stable connection.
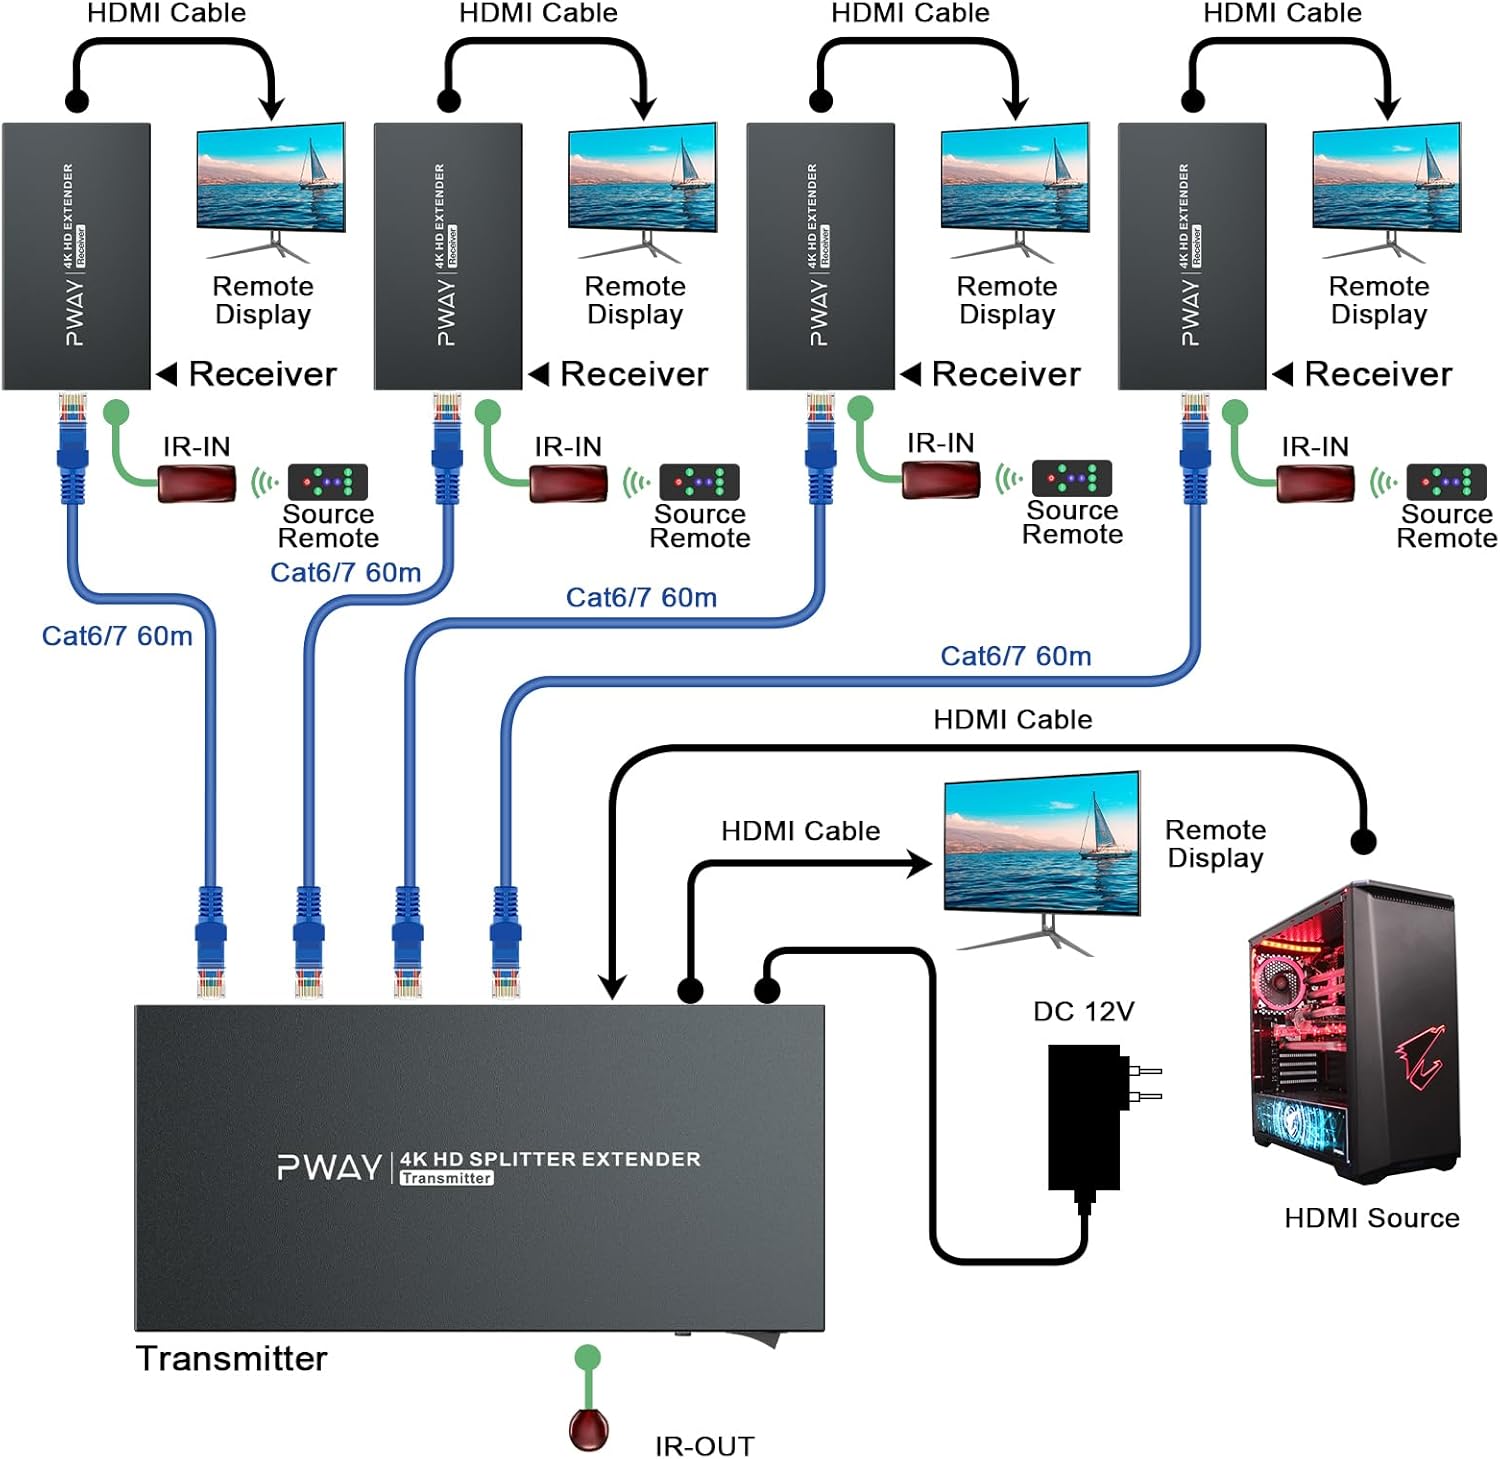
Image: A detailed connection diagram illustrating how to connect the HDMI source to the transmitter, the transmitter to multiple receivers via CAT6/7 cables, and each receiver to a remote display, including IR connections.
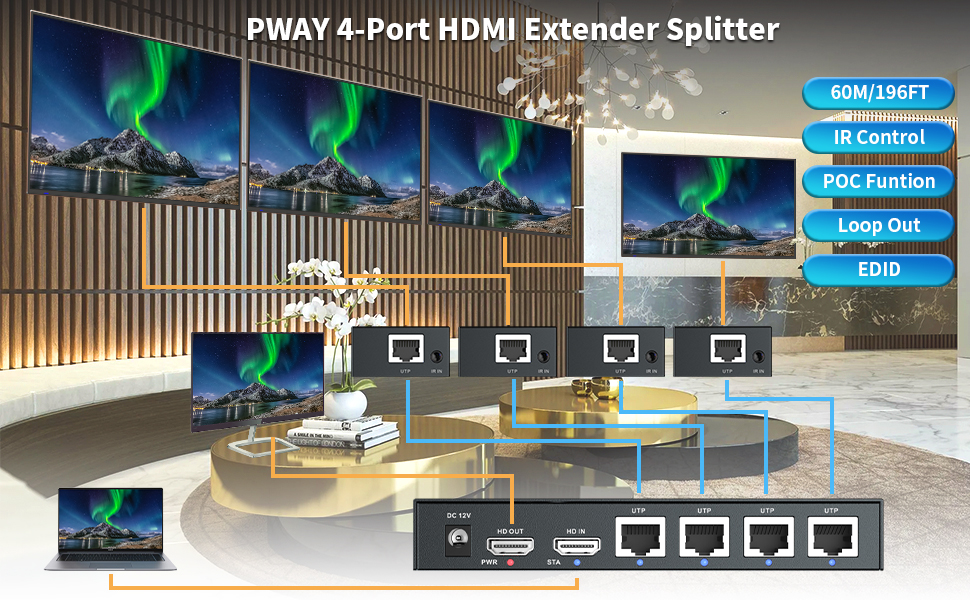
Image: An illustrative diagram showing the PWAYTEK 4-Port HDMI Extender Splitter connecting a laptop to four remote displays, highlighting the use of UTP cables for extended reach and features like IR control, POC, Loop Out, and EDID.
5. Operating Instructions
Once the system is set up, operation is straightforward:
- Video Distribution: The HDMI signal from your source will be automatically distributed to all connected displays via the transmitter and receivers.
- IR Control: Use your original remote control at any receiver location. The IR RX cable will capture the signal, send it back through the Ethernet cable to the transmitter, and the IR TX cable will relay it to your source device, allowing you to control the source remotely.
- EDID Management: The EDID switch on the transmitter allows you to manage the Extended Display Identification Data. This can help resolve compatibility issues between the source and displays by ensuring the source outputs a resolution and format supported by all connected displays. Refer to the specific EDID settings in the full user manual for advanced configurations.
- HDMI Loop Out: The HDMI loop out port on the transmitter provides a convenient way to connect a local display, allowing you to monitor the source content directly at the transmitter location.

Image: An example application of the HDMI Extender Splitter in a security monitoring environment, demonstrating its ability to provide stable video across multiple screens for extended periods.
6. Key Features
- 4K@60Hz Resolution: Supports high-definition video transmission up to 4K@60Hz, ensuring clear and smooth visuals.
- Long Distance Transmission: Extends HDMI signals up to 196ft (60m) over a single CAT5e/6/7 Ethernet cable.
- Bi-Directional IR Control: Allows control of the source device from any remote display location and vice-versa.
- Power over Cable (POC): Receivers are powered directly from the transmitter via the Ethernet cable, eliminating the need for separate power adapters at each display location.
- EDID Management: Built-in EDID switch for display compatibility and optimal video output.
- HDMI Loop Out: Provides an additional HDMI output on the transmitter for a local display.

Image: A television screen displaying a high-resolution image, with text indicating support for 4K@60Hz YUV 4:4:4, demonstrating the device's advanced video capabilities.
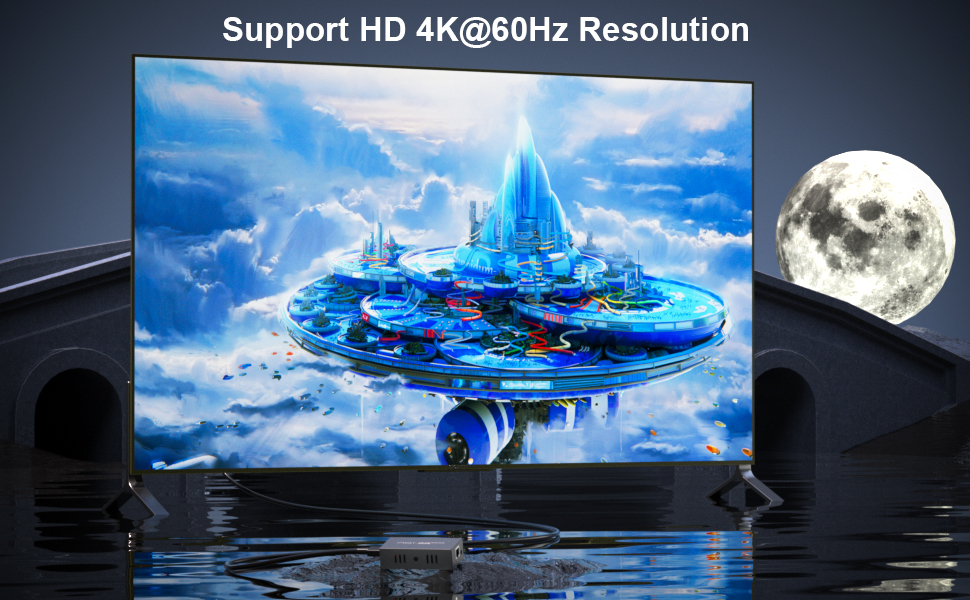
Image: A large display showcasing vibrant, high-definition content, with an overlay confirming support for HD 4K@60Hz Resolution, emphasizing the visual quality provided by the extender.

Image: The PWAYTEK HDMI Extender Splitter units with graphical overlays emphasizing key features: 4K@60Hz resolution, 60M/196FT extension distance, IR Control, POC Function, Loop Out, and EDID support.

Image: A setup demonstrating the IR Control and Loop Out features, showing a remote control interacting with a receiver unit, and the signal being looped out to a local display, indicating flexible control options.
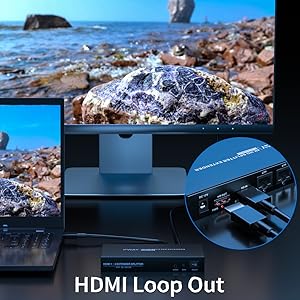
Image: Multiple displays connected to receiver units, illustrating the IR Control Function, which allows users to control the source device from any of the remote display locations.

Image: A visual representation of the POC (Power over Cable) Function, showing the transmitter powering the receiver units through the Ethernet cable, simplifying installation by reducing power outlet requirements.
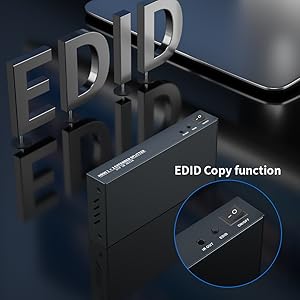
Image: A close-up of the transmitter unit, highlighting the EDID Copy function, which allows for intelligent management of display capabilities to ensure optimal video signal compatibility.
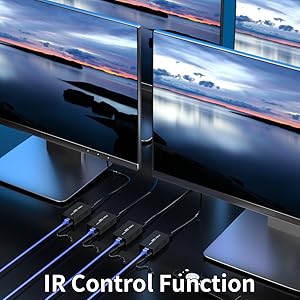
Image: A close-up of the transmitter unit, showing the HDMI Loop Out port in use, allowing a local display to be connected directly to the source unit.
7. Maintenance
To ensure optimal performance and longevity of your PWAYTEK HDMI Extender Splitter, follow these maintenance guidelines:
- Cleaning: Use a soft, dry cloth to clean the units. Avoid using liquid or aerosol cleaners.
- Ventilation: Ensure the units are placed in a well-ventilated area to prevent overheating. Do not block any ventilation openings.
- Cable Management: Keep cables organized and free from kinks or excessive bending to prevent damage.
- Power: Always use the provided power adapter. Disconnect power during electrical storms or when unused for long periods.
8. Troubleshooting
If you encounter issues, refer to the following common problems and solutions:
- No Picture on Display:
- Check all HDMI and Ethernet cable connections to ensure they are secure.
- Verify that the transmitter is powered on (PWR LED illuminated).
- Ensure the source device and displays are powered on and set to the correct input.
- Try adjusting the EDID switch on the transmitter to a different setting.
- Test with shorter Ethernet cables or different cable types (CAT6/7 recommended for longer distances and higher resolutions).
- Poor Picture Quality (Flickering, Distortion):
- Ensure you are using high-quality CAT5e/6/7 cables.
- Check the length of the Ethernet cable; exceeding the maximum recommended distance (196ft) can degrade signal quality.
- Verify that the source resolution is compatible with all displays. Adjust the EDID switch if necessary.
- IR Control Not Working:
- Ensure the IR TX cable emitter is correctly positioned directly over the IR sensor of the source device.
- Ensure the IR RX cable receiver is positioned to receive signals from your remote control.
- Check that the IR cables are securely connected to their respective ports.
- Intermittent Signal:
- Check for loose cable connections.
- Ensure there are no strong electromagnetic interference sources nearby.
- Try restarting all devices (source, extender, displays).
9. Specifications
| Feature | Specification |
|---|---|
| Product Dimensions | 8.98 x 6.5 x 2.95 inches |
| Item Weight | 2.42 pounds |
| Brand | PWAYTEK |
| Model | 1x4 4K60Hz 196FT |
| Connector Type | HDMI |
| Cable Type | HDMI, CAT5e/6/7 Ethernet |
| Color | Black |
| Max Resolution | 4K@60Hz |
| Max Extension Distance | 196ft (60m) |
| Features | HDMI Loop Out, Bi-Directional IR, POC, EDID |
10. Warranty and Support
Your PWAYTEK HDMI Extender Splitter comes with a warranty. Please refer to the included Warranty Card in your package for specific terms and conditions, including warranty period and coverage details. For technical support, troubleshooting assistance, or any product-related inquiries, please contact PWAYTEK customer service through the contact information provided on the Warranty Card or the official PWAYTEK website.


