
1. Introduction
This manual provides detailed instructions for the installation, operation, and maintenance of the SmallRig Cage Kit 4308. This kit is designed to enhance the functionality and protection of your Sony Alpha 7R V, Alpha 7 IV, or Alpha 7S III camera by providing multiple accessory mounting points and a robust frame.

Figure 1: SmallRig Cage Kit 4308 installed on a Sony Alpha camera.
2. Compatibility
The SmallRig Cage Kit 4308 is specifically designed for the following camera models:
- Sony Alpha 7R V
- Sony Alpha 7 IV
- Sony Alpha 7S III
The dedicated cable clamp included in this kit protects interfaces and ensures stable signal transmission. Note: The cable clamp may interfere with the synchronous terminal interface when used on the Alpha 7R V camera.

Figure 2: Visual representation of camera compatibility for the SmallRig Cage Kit 4308.
3. Package Contents
Verify that all components are present in your package:
- Camera Cage (ID: 4308) x 1
- Cable Clamp x 1

Figure 3: Contents of the SmallRig Cage Kit 4308 package.
4. Setup and Installation
Follow these steps to securely install the cage onto your camera:
- Step 1: Lock the camera via a 1/4"-20 screw at the bottom of the cage.
- Step 2: Lock the camera via a locating pin at the bottom of the cage.
- Step 3: Lock the camera via an M2.5 screw at the left side of the cage.
A magnetic wrench is included for convenient disassembly and assembly. Important Note: Before installing the side lock adapter, remove the left split D-ring from your camera.

Figure 4: Step-by-step guide for securing the camera within the cage.
Cable Clamp Installation
The included cable clamp is designed to secure HDMI or USB-C cables, preventing accidental disconnections and protecting the camera's ports. Attach the cable clamp to the designated mounting point on the side of the cage and tighten the screw to secure your cable.
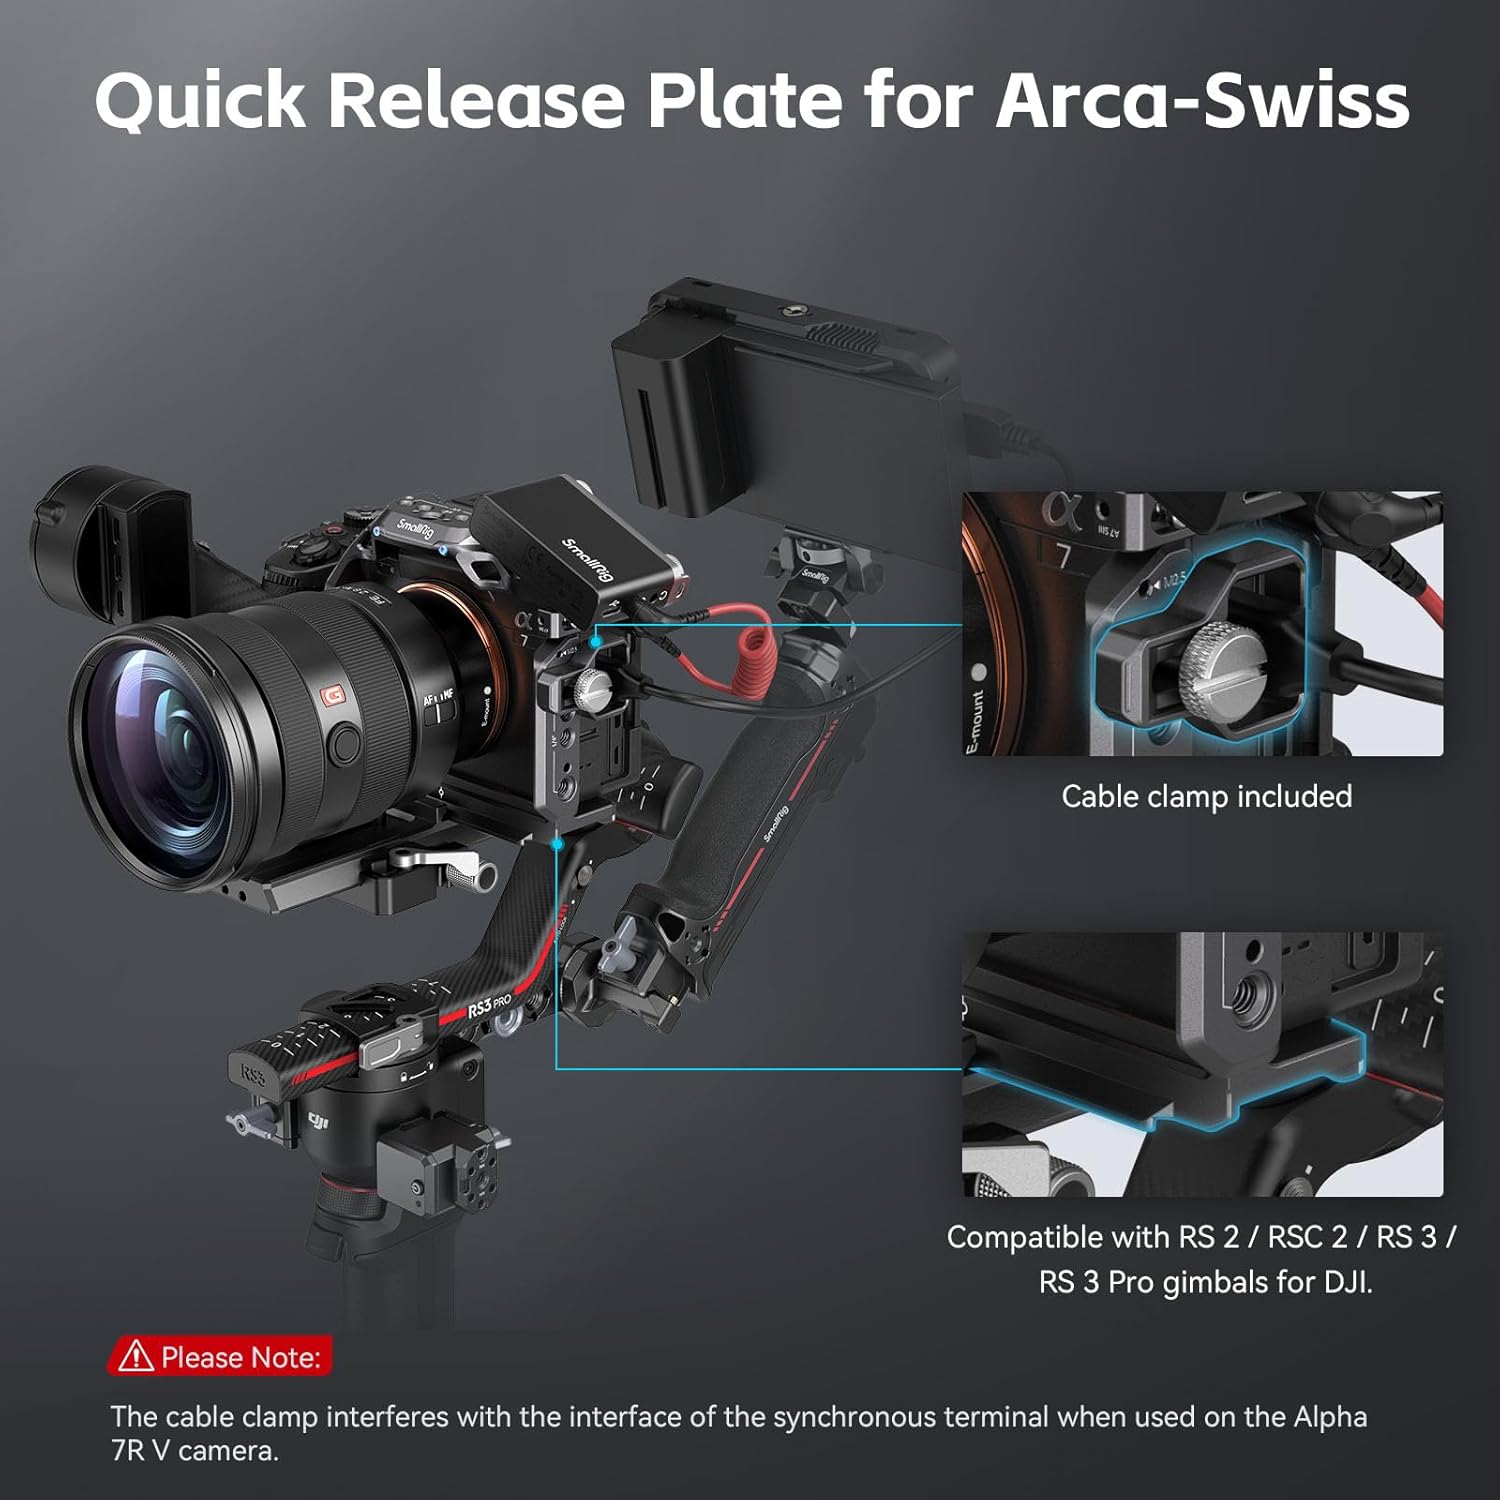
Figure 5: Cable clamp in use, securing a cable to the cage.
5. Features and Accessory Mounting Points
The cage provides numerous mounting options for various camera accessories:
- 1/4"-20 Threaded Holes: For attaching accessories such as top handles (e.g., SmallRig 2165C) and side handles (e.g., SmallRig 2093C).
- 3/8"-16 ARRI Locating Holes: Located on the top for anti-twist mounting of accessories like monitor mounts (e.g., SmallRig 2903B).
- Built-in Cold Shoe Mount: For microphones, LED video lights, or other cold shoe compatible accessories.
- NATO Rail: Provides quick attachment and release for NATO rail compatible accessories.
- Strap Slots: Located on both sides and the bottom for hand straps (e.g., SmallRig 3848) and shoulder straps (e.g., SmallRig PSC2428).
- QD Socket: For quick-release strap systems.
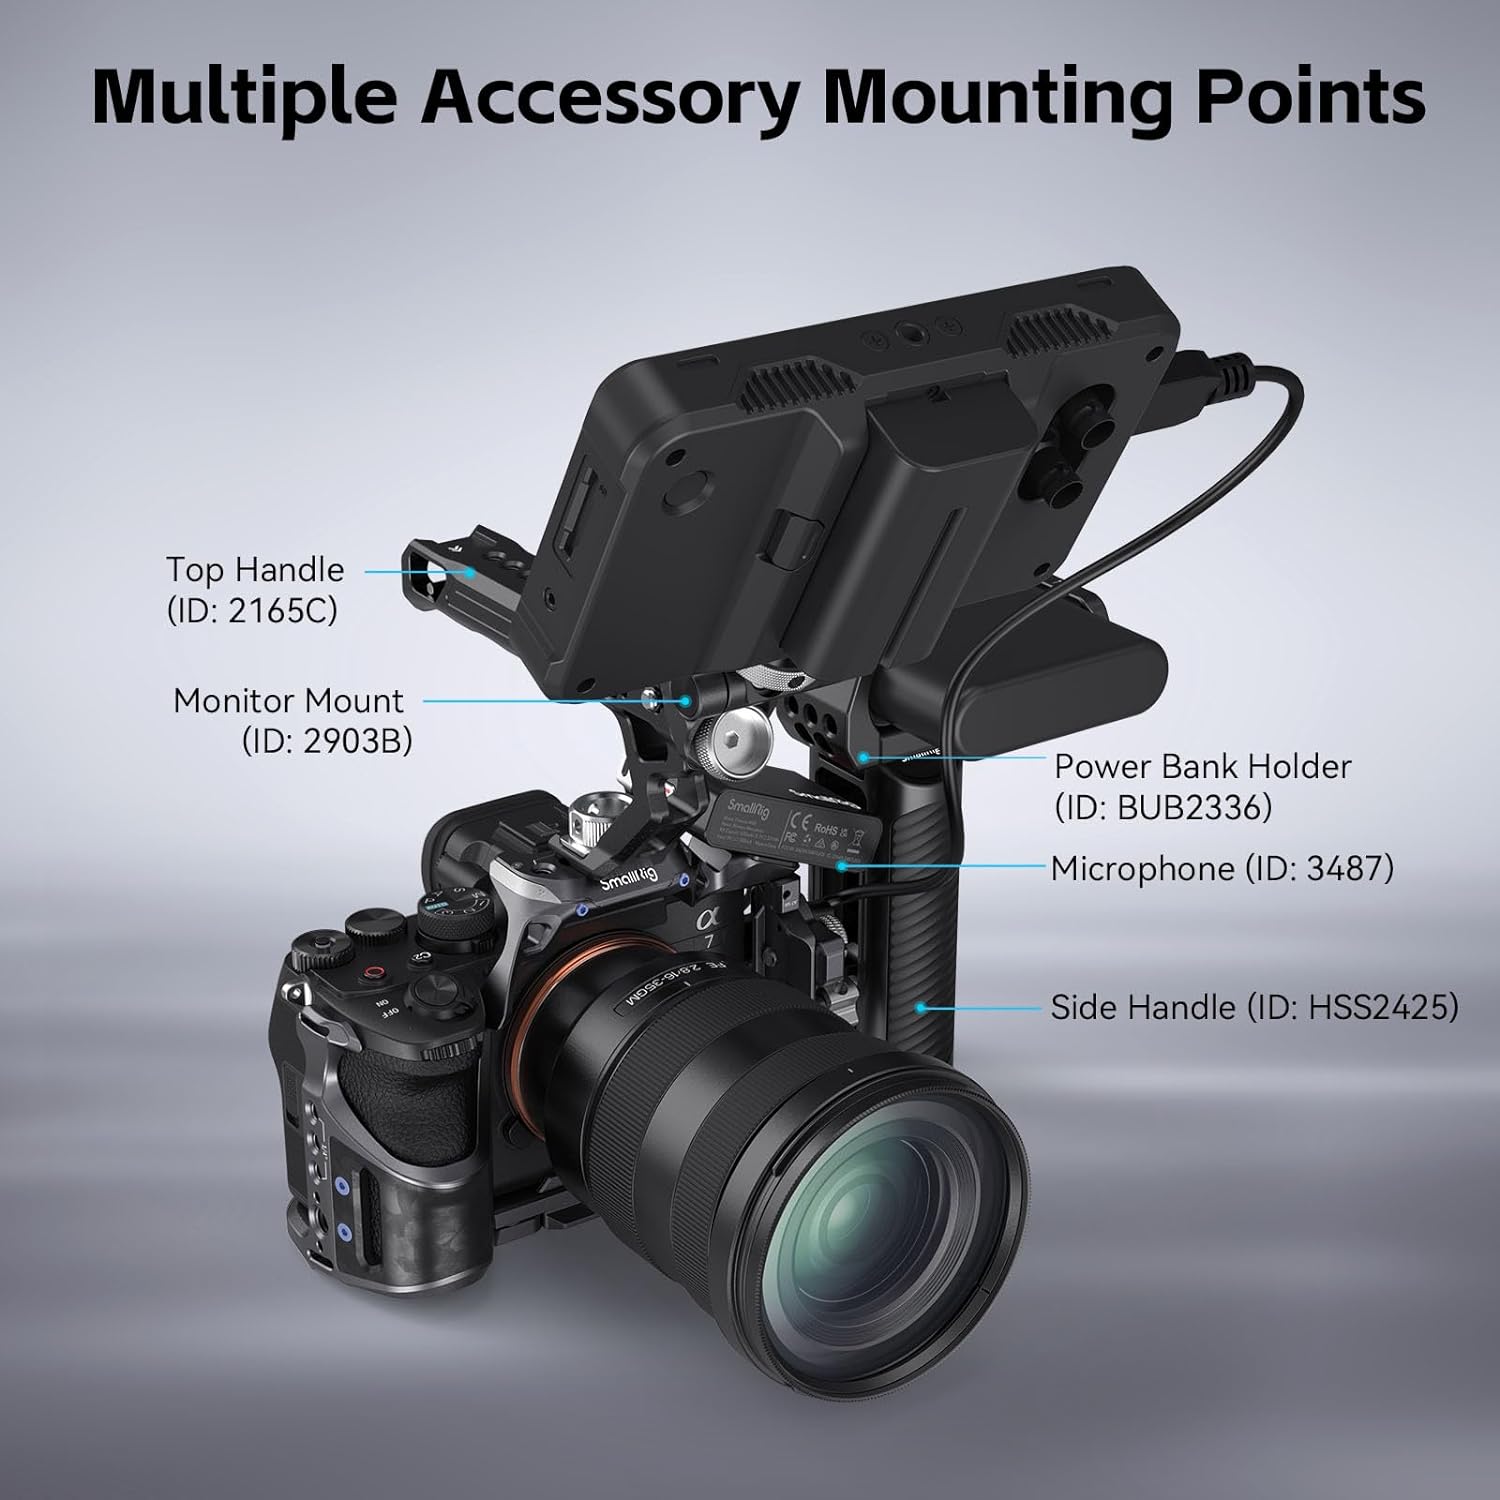
Figure 6: Overview of accessory mounting points and their typical uses.
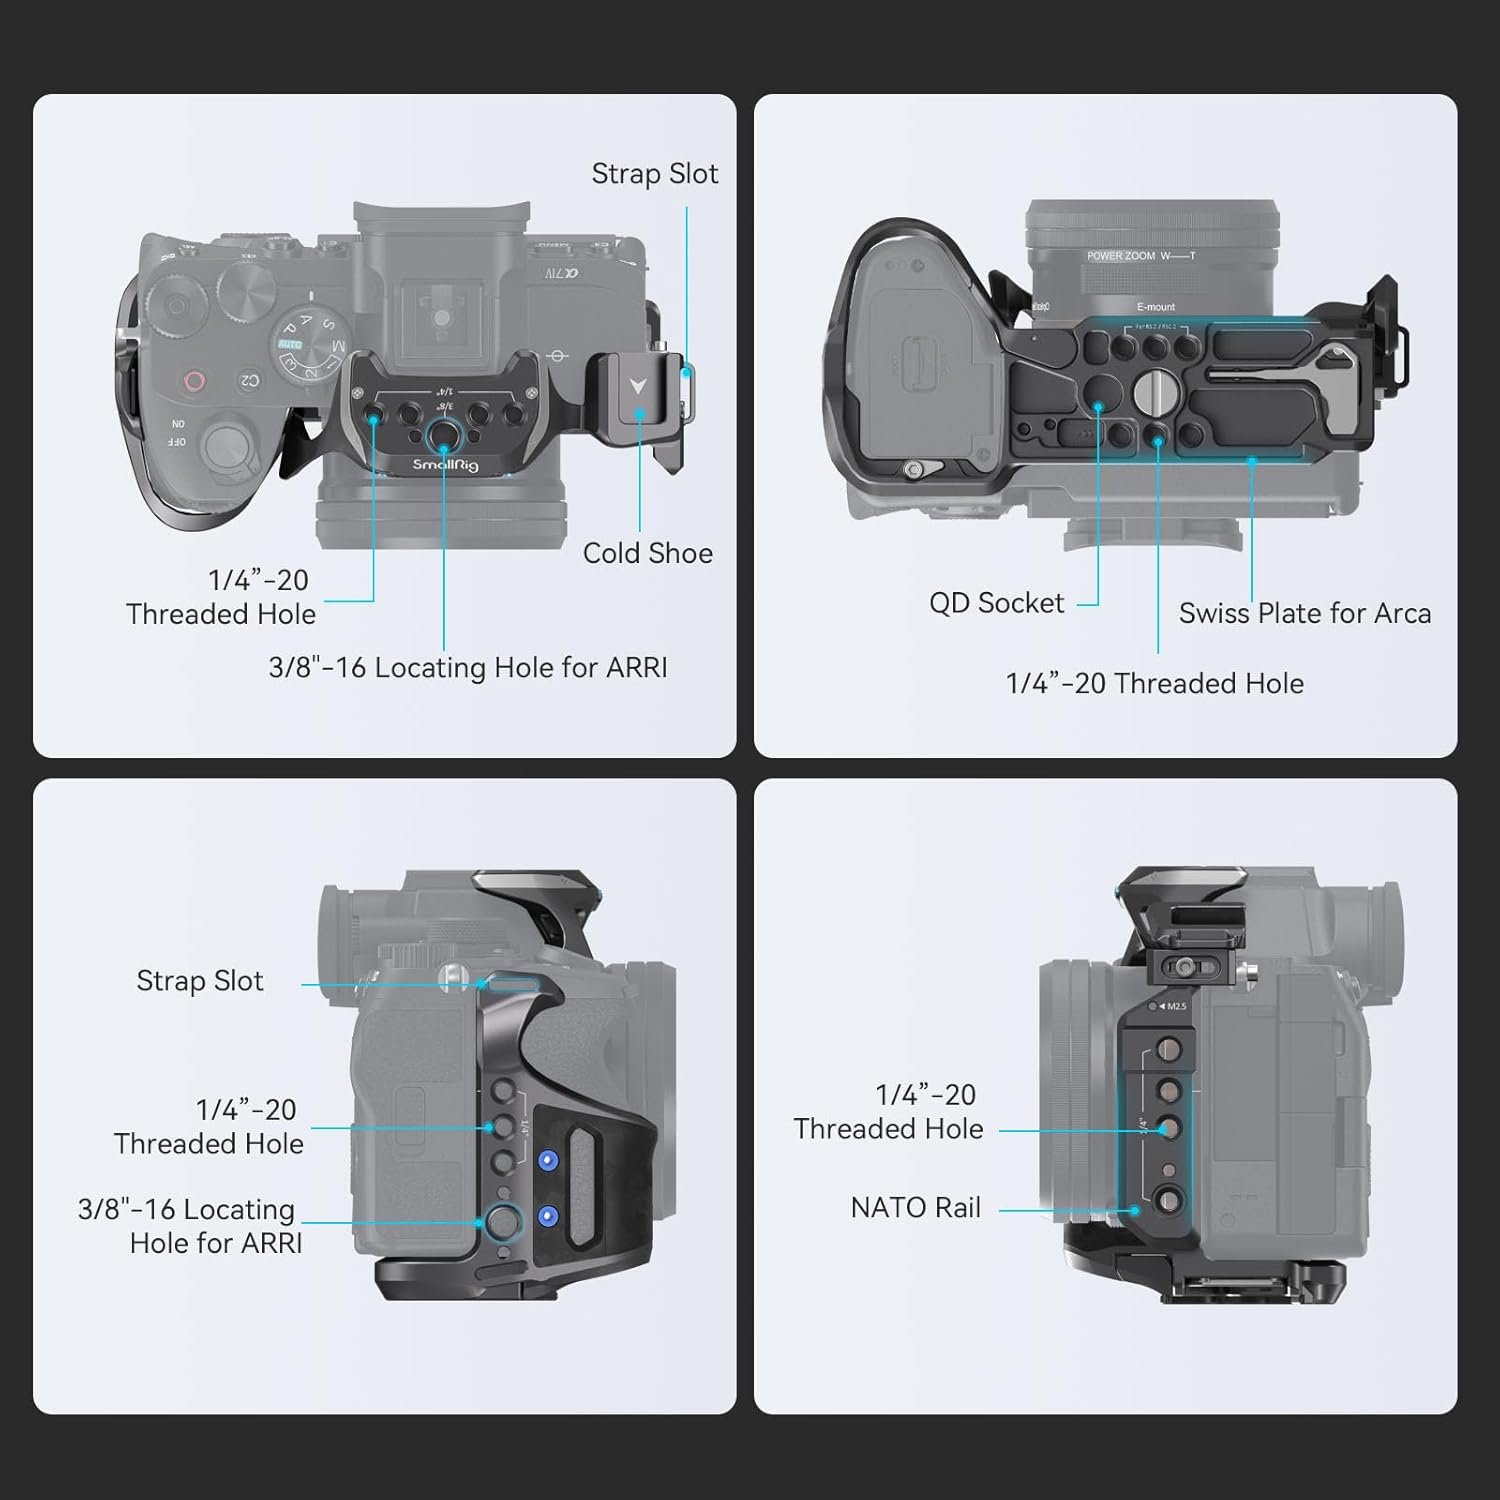
Figure 7: Detailed views of the cage's various mounting interfaces.
6. Operating the Quick-Release Plate
The bottom of the cage features an integrated Arca-Swiss quick-release plate. This design allows for rapid transitions between tripod and gimbal setups, including compatibility with DJI RS 2, RSC 2, RS 3, and RS 3 Pro gimbals. It is also compatible with quick-release plates of stabilizers (height increase pad) for DJI RS 2 / RSC 2 and Arca-Type 3154 quick release plates.
7. Maintenance
To ensure the longevity and optimal performance of your SmallRig Cage Kit 4308, follow these maintenance guidelines:
- Regularly inspect all screws and connections for tightness. Re-tighten as necessary using the provided magnetic wrench.
- Clean the cage with a soft, dry cloth. Avoid abrasive cleaners or solvents that could damage the finish.
- Store the cage in a dry environment when not in use to prevent corrosion.
- Avoid dropping or subjecting the cage to excessive force, as this may cause deformation or damage to your camera.
8. Troubleshooting
If you encounter issues with your SmallRig Cage Kit 4308, consider the following:
- Loose Fit: Ensure all three locking points (bottom 1/4"-20 screw, bottom locating pin, and left M2.5 screw) are properly engaged and tightened.
- Cable Clamp Interference: As noted in the compatibility section, the cable clamp may interfere with the synchronous terminal interface on the Alpha 7R V. If this occurs, adjust the cable clamp position or consider alternative cable management solutions if the synchronous terminal is in use.
- Accessory Mounting Issues: Verify that accessories are compatible with the specific mounting type (e.g., 1/4"-20, 3/8"-16 ARRI, cold shoe, NATO rail) and that screws are tightened securely.
For further assistance, please contact SmallRig customer support.
9. Specifications
| Parameter | Detail |
|---|---|
| Product ID | 4308 |
| Net Weight | 180.0 ± 5.0g / 6.3 ± 0.1oz |
| Product Dimensions | 161.4 mm (L) x 71.2 mm (W) x 107.9 mm (H) / 6.3 x 2.8 x 4.2 inches |
| Package Weight | 320.0 ± 5.0g / 11.2 ± 0.1oz |
| Material(s) | Aluminum Alloy, Carbon Fiber, Stainless Steel, Silicone |
| Compatibility | Sony Alpha 7R V / Alpha 7 IV / Alpha 7S III |
| ASIN | B0CCNVLYGF |
| Item Model Number | 4308-SR |
| Color | Black |
10. Warranty and Support
SmallRig products are manufactured to high-quality standards. For information regarding warranty coverage, returns, or technical support, please refer to the official SmallRig website or contact their customer service directly. Keep your purchase receipt for warranty claims.


