
Wouxun KG UVD1P
Wouxun KG-UVD1P FM Transceiver User Manual
1. Introduction
This manual provides detailed instructions for the safe and effective operation of your Wouxun KG-UVD1P FM Transceiver. Please read this manual thoroughly before using the device to ensure proper functionality and to prevent damage.
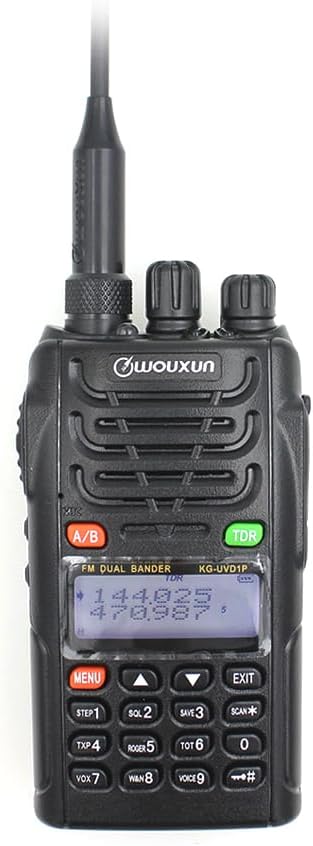
Image Description: A front view of the Wouxun KG-UVD1P FM Transceiver, showcasing its black casing, antenna, LCD display, keypad, and control knobs. The display shows frequency information.
2. Package Contents
Verify that all items listed below are included in your package:
- Radio Body
- Battery
- Antenna
- Belt Clip
- Charger (Desktop Charger and Power Adaptor)
- User Manual
- Hand Strap
- Car Charger Cable

Image Description: An overhead view displaying all components included in the standard Wouxun KG-UVD1P package. Items are numbered and include the radio, battery, antenna, belt clip, desktop charger, power adaptor, hand strap, and car charger cable.
3. Product Overview
3.1. Radio Components
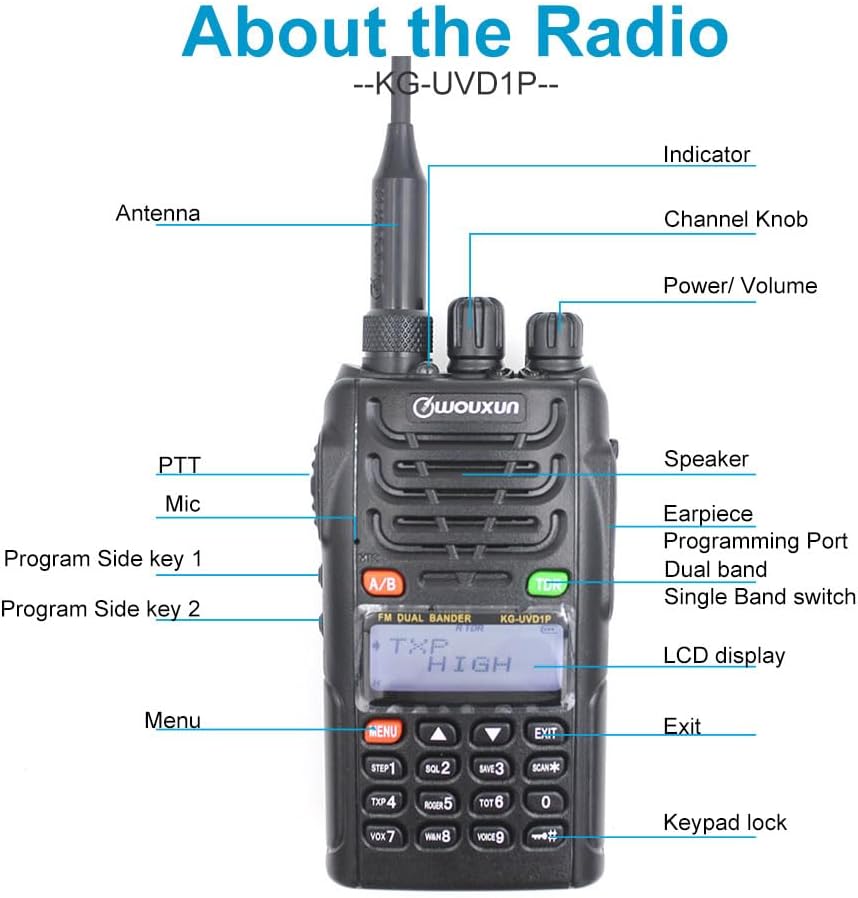
Image Description: A detailed diagram of the Wouxun KG-UVD1P radio with various parts labeled, including the antenna, indicator light, channel knob, power/volume knob, speaker, earpiece, programming port, dual band switch, LCD display, PTT button, microphone, program side keys, Menu button, Exit button, and keypad lock.
- Antenna: For transmitting and receiving radio signals.
- Indicator: LED light indicating transmission (red) or reception (green).
- Channel Knob: Used to select channels or adjust settings.
- Power/Volume: Rotates to turn the radio on/off and adjust volume.
- Speaker: Outputs audio.
- Earpiece/Programming Port: Connects accessories or programming cable.
- Dual Band Switch (A/B): Toggles between VHF and UHF bands or display modes.
- LCD Display: Shows frequency, channel, and status information.
- PTT (Push-To-Talk): Press and hold to transmit.
- Mic: Microphone for voice input.
- Program Side Keys: Customizable function buttons.
- Keypad: For entering frequencies, channels, and accessing menu functions.
3.2. Physical Dimensions

Image Description: Multiple views of the Wouxun KG-UVD1P radio, including front, left side, right side, and back, illustrating its compact design and the placement of the belt clip and battery pack.
4. Setup
4.1. Battery Installation
- Align the battery pack with the grooves on the back of the radio.
- Slide the battery pack upwards until it clicks into place.
- To remove, press the battery release latch (if present) and slide the battery downwards.
4.2. Antenna Attachment
- Screw the antenna clockwise into the connector on top of the radio until it is finger-tight.
- Do not overtighten.
4.3. Charging the Battery

Image Description: The Wouxun smart charger in use, showing the radio docked for charging and a separate battery pack being charged simultaneously. The image highlights the 7.4V 1700mAh Lithium-ion battery.
- Connect the power adaptor to the desktop charger and plug it into a power outlet.
- Place the radio with the battery installed, or the battery alone, into the charging slot.
- The charger indicator light will typically show red during charging and turn green when fully charged.
- A full charge typically takes several hours.
5. Operating Instructions
5.1. Power On/Off and Volume Control
- Power On: Rotate the Power/Volume knob clockwise until a click is heard and the display illuminates.
- Power Off: Rotate the Power/Volume knob counter-clockwise until a click is heard and the display turns off.
- Volume Adjustment: Rotate the Power/Volume knob to increase (clockwise) or decrease (counter-clockwise) the audio output.
5.2. Channel and Frequency Selection
- Frequency Mode: Directly enter frequencies using the keypad.
- Channel Mode: Use the Channel knob or keypad to select pre-programmed channels.
- Multi-step Frequency: Supports 5K/6.25K/10K/12.5K/25K/50K/100K steps for precise frequency tuning.
5.3. Transmit and Receive (PTT)
- To transmit, press and hold the PTT button on the side of the radio. Speak clearly into the microphone.
- Release the PTT button to receive.
- The indicator light will be red during transmission and green during reception.
5.4. Dual Band, Dual Frequency, Dual Display, and Dual Standby
- The radio supports simultaneous monitoring of two different frequencies (VHF&UHF, UHF&UHF, or VHF&VHF).
- Use the A/B button to switch between the primary and secondary display frequencies.
- The radio will automatically switch to the active frequency when a signal is detected.
5.5. VOX Transmission
- VOX (Voice Operated Transmit) allows hands-free transmission.
- Activate VOX through the menu. The radio will transmit automatically when it detects your voice.
- Adjust VOX sensitivity in the menu to prevent accidental transmissions or missed voice activation.
5.6. Digital FM Radio
- The radio includes a digital FM radio function.
- Access the FM radio through the menu. It supports automatic tuning and storing of radio frequencies.
5.7. Other Functions
- High/Low Power Selection: Adjust transmit power via the menu for battery conservation or extended range.
- Wide/Narrow Bandwidth: Select 25KHz (wide) or 12.5KHz (narrow) bandwidth based on channel requirements.
- Channel Name Edit: Customize channel names for easier identification.
- D.C.S/CTCSS: Utilize 105 groups of D.C.S (Digital Coded Squelch) and 50 groups of CTCSS (Continuous Tone-Coded Squelch) for selective calling.
- Stopwatch Function: Integrated stopwatch utility.
- Low-voltage Voice Prompt: Alerts the user when the battery level is low.
- Busy Channel Lockout (BCL): Prevents transmission on an already occupied channel.
- Transmit Over Timer (TOT): Limits continuous transmission time to prevent channel hogging and overheating.
- Keyboard Lock: Prevents accidental key presses (Auto/Manual options).
- Multiple Scan Modes: Scan channels or frequencies for activity.
- Wire Clone Function: Allows copying settings from one radio to another using a cloning cable.
- Bright Flashlight Illumination: Built-in LED flashlight for convenience.
- SOS Function: Activates an emergency signal.
- 1750Hz Tone: Used for repeater access.
- DTMF Encoding Function: For sending Dual-Tone Multi-Frequency signals.
- English Voice Guide: Provides audible prompts for menu navigation and settings.
6. Maintenance
6.1. Cleaning
- Clean the radio's surface with a soft, damp cloth.
- Do not use harsh chemicals or abrasive cleaners.
- Ensure the radio is powered off and the battery is removed before cleaning.
6.2. Battery Care
- Avoid overcharging or completely discharging the battery.
- Store batteries in a cool, dry place when not in use.
- If storing for extended periods, charge the battery to approximately 50% capacity.
6.3. Storage
- Store the radio in a dry, dust-free environment.
- Keep away from direct sunlight and extreme temperatures.
- Remove the battery if the radio will not be used for an extended period.
7. Troubleshooting
| Problem | Possible Cause | Solution |
|---|---|---|
| Radio does not power on | Battery discharged or improperly installed | Charge the battery; ensure battery is correctly seated. |
| Cannot transmit or receive | Incorrect frequency/channel; antenna not attached; low battery; Busy Channel Lockout active | Verify frequency/channel; attach antenna securely; charge battery; disable BCL. |
| Poor audio quality | Weak signal; incorrect squelch level; antenna issue | Move to an area with better signal; adjust squelch; check antenna connection. |
| Keypad is unresponsive | Keypad lock is active | Unlock the keypad (refer to operating instructions). |
8. Specifications
| Feature | Detail |
|---|---|
| Model Number | KG UVD1P |
| Frequency Range | 30-300 MHz |
| Number of Channels | 40 |
| Battery Type | 1700mAh Lithium-ion (1 A battery required, included) |
| Voltage | 1.2 Volts (DC) |
| Water Resistance Level | Waterproof |
| Item Weight | 1.65 pounds |
| Package Dimensions | 10.12 x 9.53 x 4.53 inches |
| Manufacturer | WOUXUN |
| UPC | 781912417284 |
| Compatible Devices | Two-way radios with compatible frequencies and bandwidths, external antennas |
9. Warranty and Support
9.1. Warranty Information
The Wouxun KG-UVD1P FM Transceiver comes with a 1-year warranty from the date of purchase. This warranty covers manufacturing defects under normal use. Please retain your proof of purchase for warranty claims.
9.2. Customer Support
For technical assistance, troubleshooting beyond this manual, or warranty inquiries, please contact your authorized Wouxun dealer or visit the official Wouxun website for support resources.
Related documentsKG UVD1P


Ask a question about this manual
Ask about setup, troubleshooting, compatibility, parts, safety, or missing instructions. Manuals+ will review the question and use this page’s manual context to help answer it.