1. Introduction
This manual provides essential information for the safe and effective operation of the KAIWEETS HT206D Smart Digital Clamp Meter. Please read this manual thoroughly before use and retain it for future reference.
2. Safety Information
Always adhere to local and national safety codes. Use appropriate personal protective equipment (PPE) when working with electrical circuits. This device is designed for professional use and requires a basic understanding of electrical principles.
- Do not exceed the maximum input values specified for each measurement range.
- Exercise extreme caution when working with live circuits.
- Inspect test leads for damage before each use. Replace damaged leads immediately.
- Do not operate the meter if it appears damaged or is not functioning correctly.
- Ensure the battery cover is securely closed before operation.
- Avoid using the meter in environments with high humidity, extreme temperatures, or explosive gases.
3. Product Overview
The KAIWEETS HT206D is a smart digital clamp meter designed for accurate electrical measurements. It features a D-shaped jaw for easy clamping and a clear display for readings.

Image 3.1: KAIWEETS HT206D Smart Digital Clamp Meter highlighting key features like 6000 Counts T-RMS, Auto Shutdown, CAT.IV 600V safety rating, and Auto-ranging capability.
Key features include:
- Smart Mode: Automatically identifies AC/DC voltage/current, resistance, and continuity.
- True RMS: Provides accurate measurements for non-linear loads.
- 6000 Counts Display: High-resolution digital display.
- D-Shaped Jaws: Designed for secure clamping and holding test leads.
- Non-Contact Voltage (NCV) Detection: Detects electrical status without direct contact.
- Low Pass Filter (LPF): For accurate measurements on variable frequency drives.
- Additional Functions: MAX/MIN, Data Hold, Flashlight, Auto-Off.

Image 3.2: Overview of the KAIWEETS HT206D's multi-functional capabilities, showing icons for AC/DC voltage, resistance, continuity, frequency, temperature, NCV, and inrush current measurements.
4. Setup
4.1. Battery Installation
The meter requires batteries for operation. To install or replace batteries:
- Ensure the meter is powered off.
- Locate the battery compartment on the back of the meter.
- Use a screwdriver to open the battery compartment cover.
- Insert new batteries, observing correct polarity.
- Securely close the battery compartment cover.
4.2. Initial Power On
Press the power button to turn on the meter. The default intelligent mode will activate, automatically identifying common measurement signals.
5. Operating Instructions
5.1. Smart Mode
When the meter is powered on, it defaults to Smart Mode. In this mode, the meter automatically detects and measures AC/DC voltage, AC/DC current, resistance, and continuity, simplifying operation.
5.2. Function Selection
Rotate the rotary dial to select specific measurement functions as needed. Press the SEL/FUNC button to cycle through sub-functions within a selected range (e.g., AC/DC voltage).
5.3. AC/DC Voltage Measurement
To measure voltage:
- Insert the red test lead into the "VΩHz" input jack and the black test lead into the "COM" input jack.
- Select the voltage measurement function using the rotary dial.
- Connect the test leads in parallel to the circuit or component under test.
- Read the voltage value on the display.

Image 5.1: Demonstrations of AC/DC Voltage Test (top) and AC/DC Current Test (bottom) using the KAIWEETS HT206D clamp meter.
5.4. AC/DC Current Measurement
To measure current:
- Select the current measurement function (A~) or (A=) using the rotary dial.
- Open the clamp jaws and enclose only one conductor of the circuit. Ensure the jaws are fully closed.
- Read the current value on the display.
5.5. Resistance and Continuity Measurement
To measure resistance or check continuity:
- Insert the red test lead into the "VΩHz" input jack and the black test lead into the "COM" input jack.
- Select the resistance/continuity function using the rotary dial.
- Connect the test leads across the component. For continuity, a beep indicates a continuous circuit.
5.6. Non-Contact Voltage (NCV) Detection
The NCV function allows detection of AC voltage without direct contact.
- Press the NCV button on the right side of the meter.
- Move the meter's NCV sensor close to the conductor.
- The meter will indicate the presence of AC voltage through audible beeps and visual indicators (Low Voltage 'L' or High Voltage 'H').

Image 5.2: Non-contact Voltage Test demonstrating the meter's ability to detect both low and high voltage without physical contact.
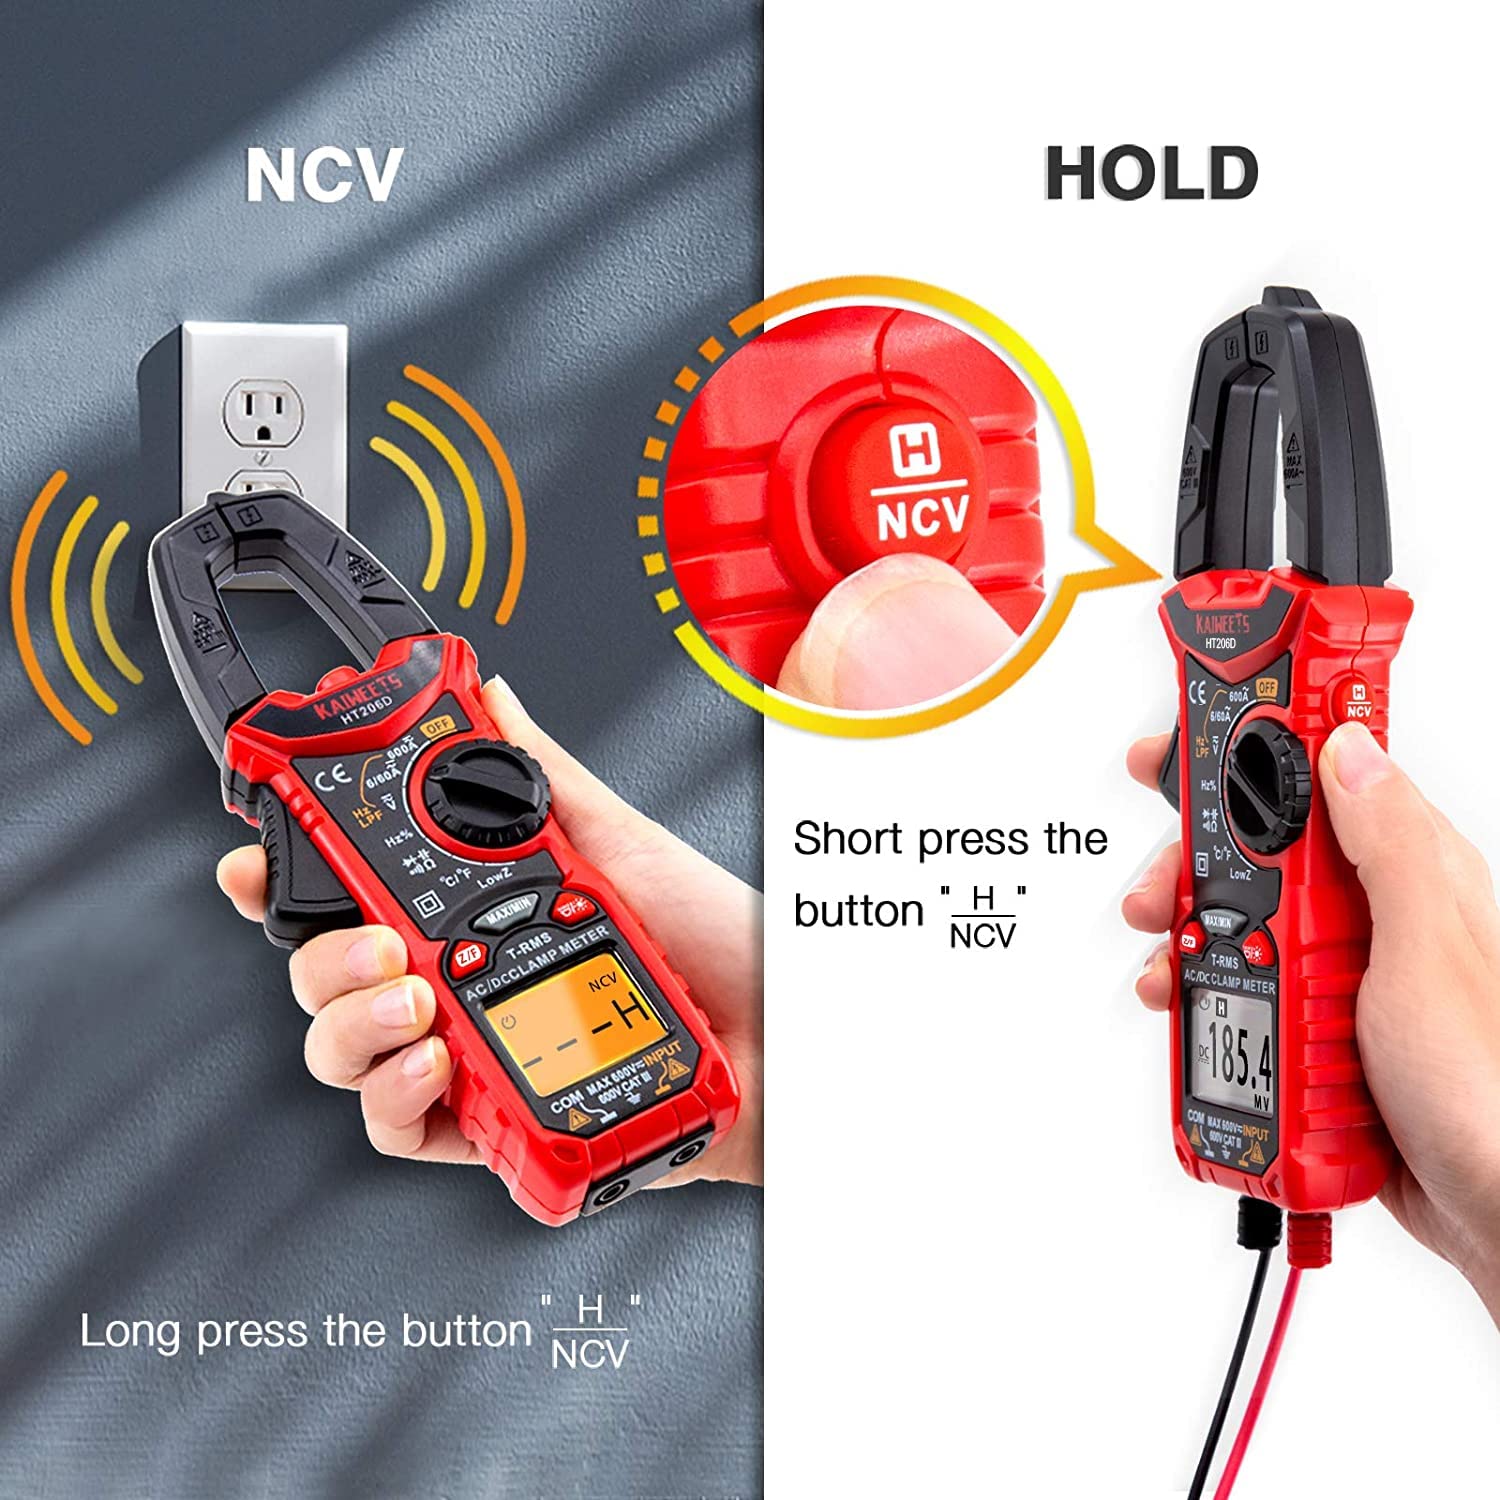
Image 5.3: Illustration of activating the NCV function with a long press and the Data Hold function with a short press of the NCV/HOLD button.
5.7. Low Pass Filter (LPF)
The LPF function is used for accurate voltage measurements on variable frequency drives (VFDs) or other noisy circuits. It filters out high-frequency interference.
- Select the AC voltage function.
- Press the LPF button to activate the Low Pass Filter.
- Proceed with AC voltage measurement as usual.

Image 5.4: Explanation of the Low Pass Filter (LPF) function, illustrating its effect on measurement accuracy for motor drive outputs.
5.8. Inrush Current Measurement
The Inrush function measures the initial surge current when a device is powered on.
- Select the Inrush current function using the rotary dial.
- Open the clamp jaws and enclose one conductor of the device to be tested.
- Power on the device. The meter will capture and display the peak inrush current.

Image 5.5: Inrush Current Test in progress, demonstrating the meter's capability to measure the initial current surge with a range of 5-600A.
5.9. Data Hold (HOLD)
Press the HOLD button (short press the NCV button) to freeze the current reading on the display. Press it again to release the hold function.
5.10. MAX/MIN Measurement
Press the MAX/MIN button to record the maximum and minimum values during a measurement session. Press again to cycle between MAX, MIN, and current readings.
5.11. Flashlight
Press the flashlight button to illuminate the measurement area. Press again to turn it off.
5.12. Auto-Off Function
The meter will automatically power off after approximately 15 minutes of inactivity to conserve battery life. Press any button or rotate the dial to reactivate it.
6. Maintenance
6.1. Cleaning
Wipe the meter's casing with a damp cloth and mild detergent. Do not use abrasives or solvents. Ensure the meter is dry before storage or use.
6.2. Battery Replacement
Replace batteries when the low battery indicator appears on the display. Refer to Section 4.1 for battery installation instructions.
6.3. Storage
If the meter is not used for an extended period, remove the batteries to prevent leakage. Store the meter in a cool, dry place, away from direct sunlight and extreme temperatures.
7. Troubleshooting
| Problem | Possible Cause | Solution |
|---|---|---|
| Meter does not power on. | Dead or incorrectly installed batteries. | Replace batteries, ensuring correct polarity. |
| Inaccurate readings. | Incorrect function selected, damaged test leads, or external interference. | Verify function selection, inspect/replace test leads, move away from strong electromagnetic fields. |
| No continuity beep. | Open circuit or high resistance. | Check the circuit for breaks or high resistance points. |
| NCV not detecting voltage. | No AC voltage present, or sensor not close enough to the conductor. | Ensure AC voltage is present. Move the NCV sensor closer to the live conductor. |
8. Specifications
The KAIWEETS HT206D Smart Digital Clamp Meter offers the following general specifications:

Image 8.1: Key specifications of the KAIWEETS HT206D, including measurement ranges for current, voltage, capacitance, and display count, along with special features.
- Display: 6000 Counts
- AC/DC Current: Up to 600A
- AC/DC Voltage: Up to 600V
- Capacitance: Up to 100mF
- Temperature: Celsius/Fahrenheit
- Measurement Type: True RMS
- Safety Rating: CAT.IV 600V
- Power Source: Battery Powered
- Special Features: Smart Mode, NCV, LPF, LowZ, Inrush Current, Data Hold, MAX/MIN, Flashlight, Auto-Off
9. Warranty and Support
KAIWEETS offers a 3-year after-sales service for the HT206D Smart Digital Clamp Meter, along with lifetime technical assistance.
For any questions, technical support, or warranty claims, please contact KAIWEETS customer service through their official channels or the retailer where the product was purchased.


