
Introduction
This manual provides comprehensive instructions for the safe installation, proper operation, and essential maintenance of the inruwo W10240947 and W10240949 Washer Water Inlet Valve Set. This replacement part is designed for specific Whirlpool, Kenmore, and Maytag washing machine models. Please read these instructions carefully and completely before attempting any installation or repair to ensure safety and correct functionality.
Safety Information
Your safety is paramount. Adhere to the following precautions:
- ALWAYS disconnect power to the washing machine by unplugging it from the electrical outlet before attempting any repairs or maintenance. Failure to do so can result in electric shock.
- ALWAYS turn off the hot and cold water supply valves to the washing machine before beginning work to prevent water damage.
- Wear appropriate personal protective equipment, such as work gloves and eye protection, to prevent injury.
- If you are unsure about any step or uncomfortable performing the repair, consult a qualified appliance technician.
- Ensure all water and electrical connections are secure and leak-free before restoring power and water supply to the appliance.
Compatibility
This water inlet valve set is compatible with a wide range of Whirlpool, Kenmore, and Maytag washing machine models. Please verify your washing machine's model number against the following comprehensive list to ensure proper fit and function:
Compatible Whirlpool Washing Machine Models:
- WTW5500BW0
- WTW5500XL0
- WTW5500XL1
- WTW5500XL2
- WTW5500XW0
- WTW5500XW1
- WTW5500XW2
- WTW5500XW3
- WTW5550XW0
- WTW5550XW1
- WTW5550XW2
- WTW5550XW3
- WTW5600XW0
- WTW5600XW1
- WTW5600XW2
- WTW5600XW3
- WTW5610XW0
- WTW5610XW1
- WTW5610XW2
- WTW5610XW3
- WTW5640XW0
- WTW5640XW1
- WTW5640XW2
- WTW5640XW3
- WTW5700AC0
- WTW5700XL0
- WTW5700XL1
- WTW5700XL2
- WTW5700XL3
- WTW5700XW0
- WTW5700XW1
- WTW5700XW2
- WTW5700XW3
- WTW5800BC0
- WTW5800BW0
- WTW5810BW0
- 2DWTW5500XW0
- 2DWTW5500XW1
- 7MWTW5500XW0
- 7MWTW5500XW1
- 7MWTW5500XW2
- 7MWTW5550YW0
- 7MWTW5550YW1
- WTW5840BC0
- 7MWTW5550YW2
- 7MWTW5560YW0
- 7MWTW5700YW0
- 7MWTW5700YW1
- 7MWTW5700YW2
- WTW5840BW0
Compatible Kenmore Washing Machine Models:
- 11028002010
- 11028002011
- 11028002012
- 11028012010
- 11028012011
- 11028012012
- 11026002010
- 11026002011
- 11026002012
- 11026012010
- 11026012011
- 11026012012
- 11026112310
- 11027102310
Compatible Maytag Washing Machine Models:
- MVWX600BW0
- MVWX500XW0
- MVWX500XW1
- MVWX500XW2
- MVWX550XW0
- MVWX550XW1
- MVWX550XW2
- MVWX5SPAW0
- MVWX600XL1
- MVWX600XW0
- MVWX600XW1
- MVWX600XW2
- MVWX655DW0
- MVWX655DW1
- MVWX700AG0
- MVWX700XL0
- MVWX700XL1
- MVWX700XL2
- MVWX700XW0
- MVWX700XW1
- MVWX700XW2
- MVWX500BW0
- MVWX500XL0
- MVWX500XL1
- MVWX500XL2
- 7MMVWX700XL2
- 7MMVWX500YW0
- 7MMVWX500YW1
- 7MMVWX500YW2
- 7MMVWX510YW0
- 7MMVWX510YW1
- 7MMVWX550YW0
- 7MMVWX655EW0
- 7MMVWX655EW1
- 7MMVWX700XL0
- 7MMVWX700XL1
Package Contents
The package includes the following components:
- 1 x W10240947 Washer Water Inlet Valve (Red)
- 1 x W10240949 Washer Water Inlet Valve (Blue)
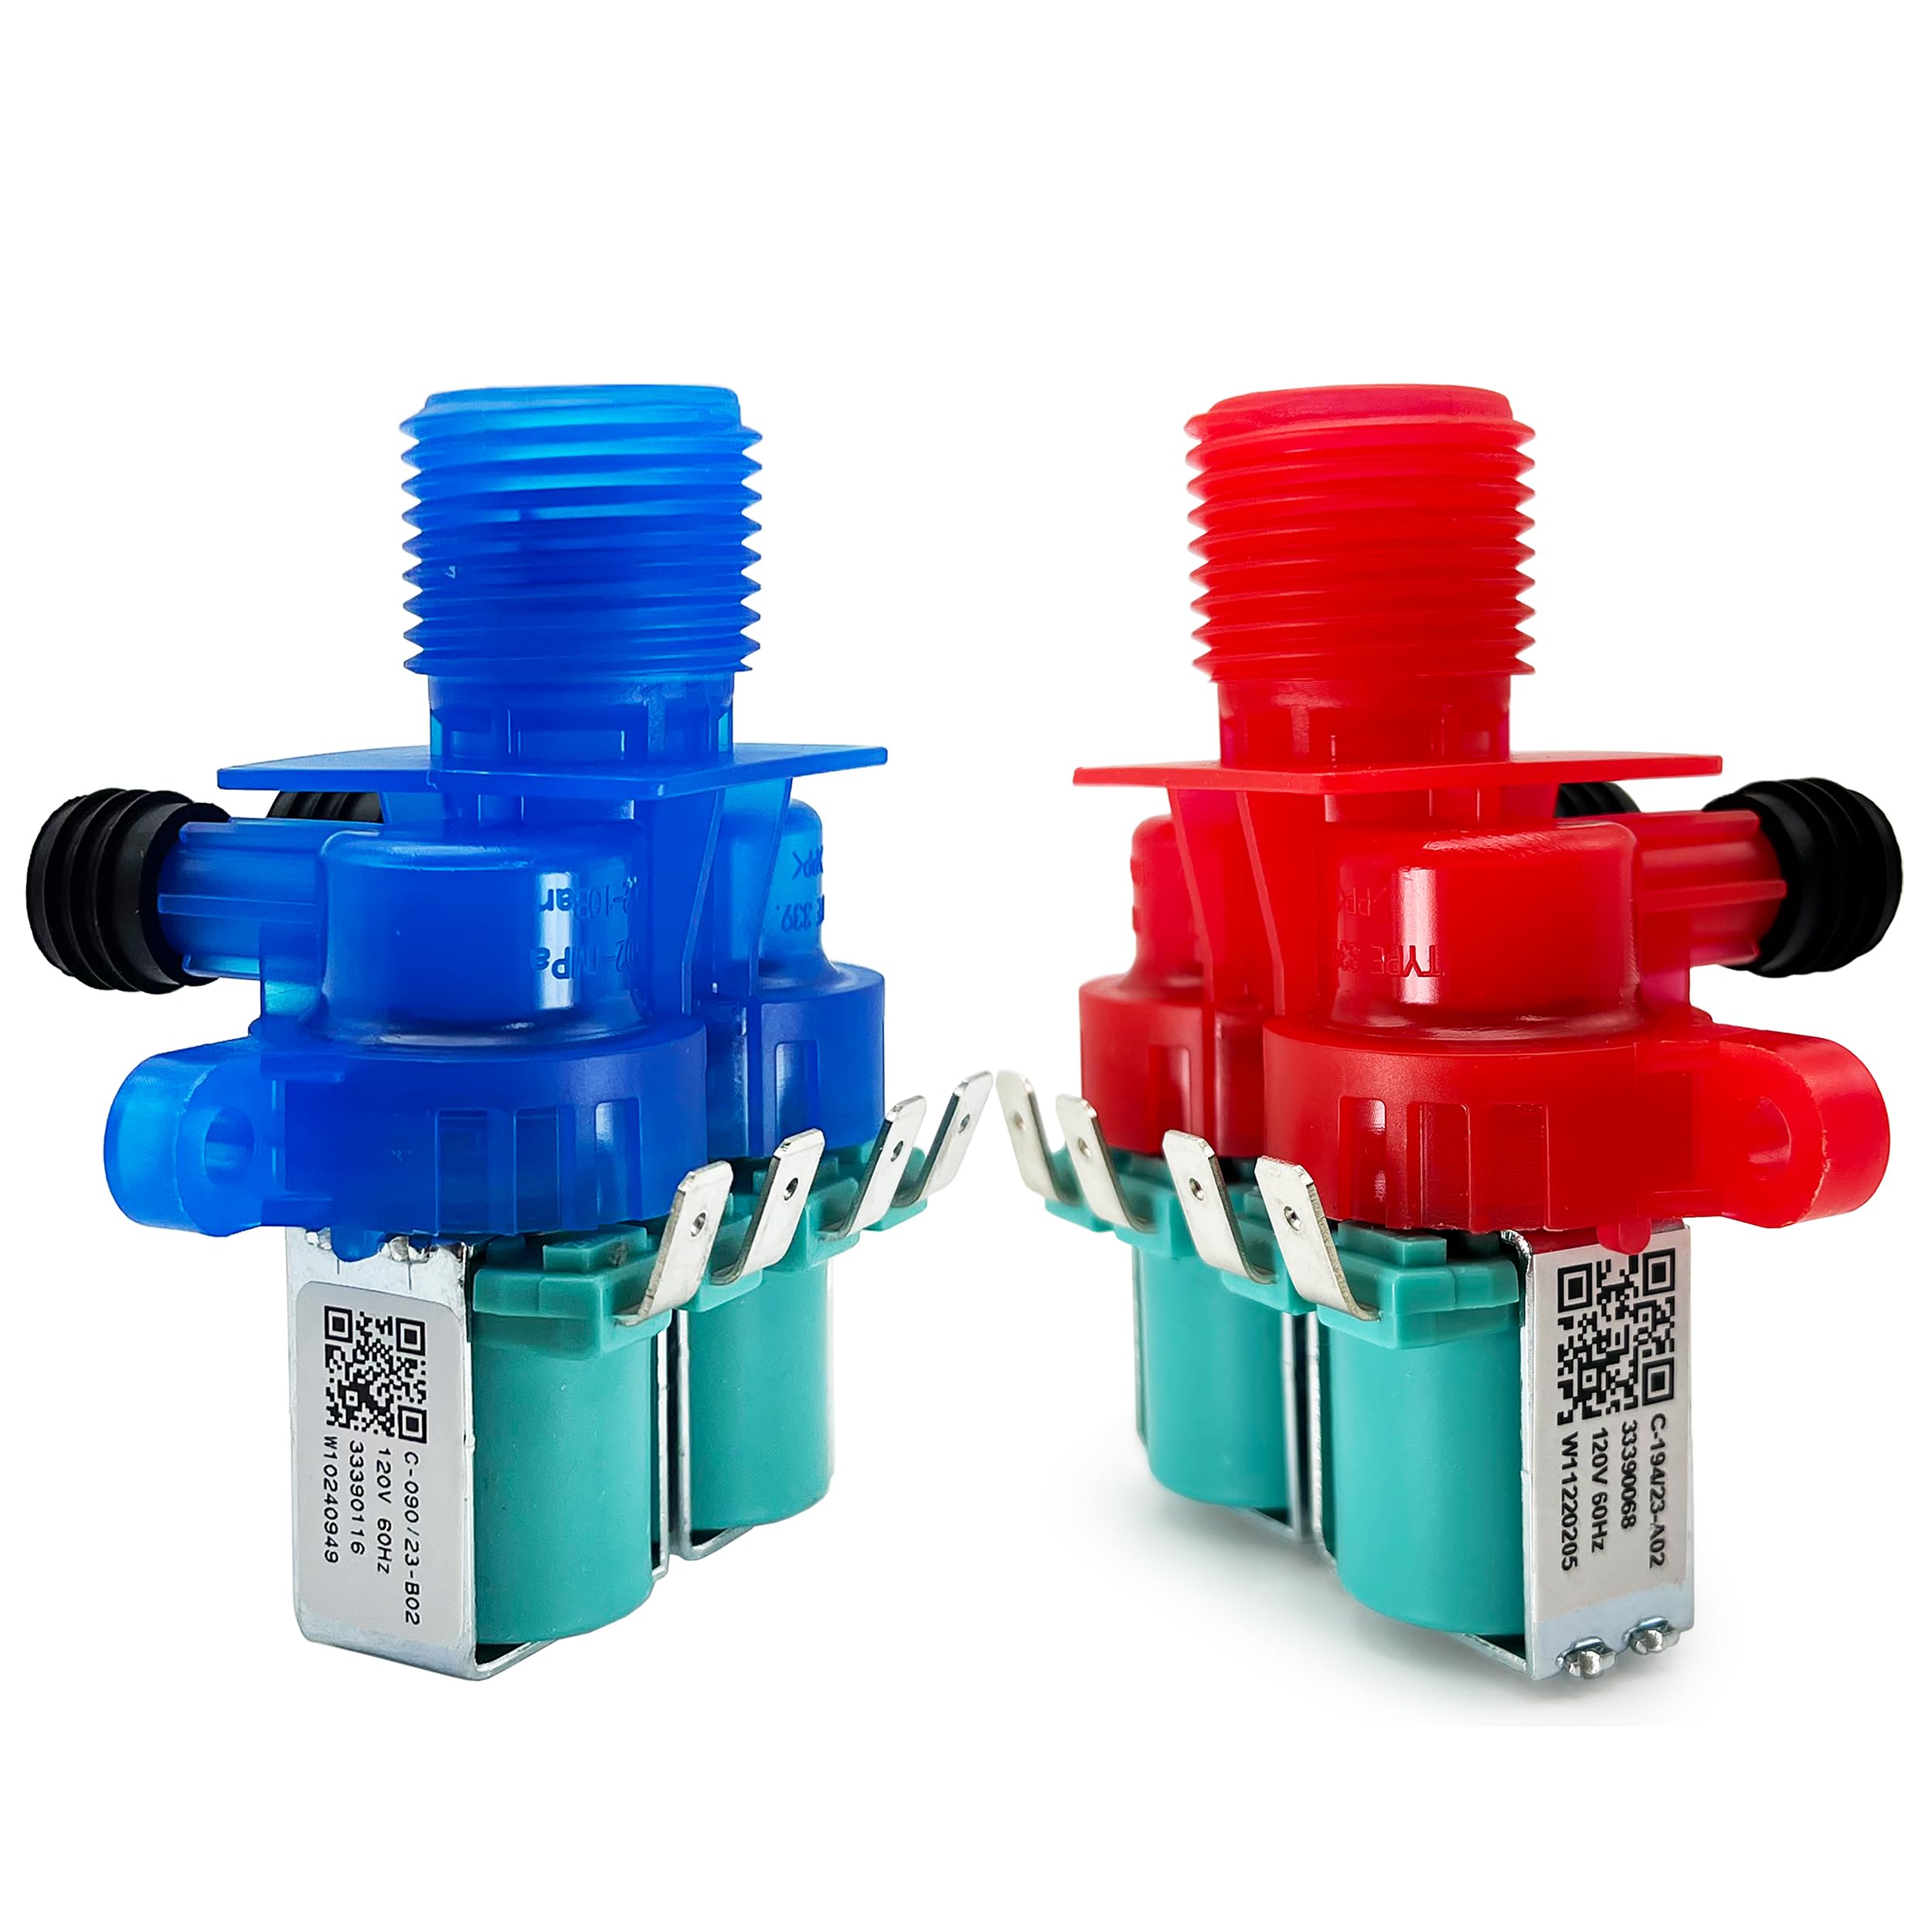
Image: Front view of the inruwo Washer Water Inlet Valve Set, showing both the red (W10240947) and blue (W10240949) valve components with their solenoids.
Specifications
| Feature | Detail |
|---|---|
| Voltage | 120V |
| Frequency | 60Hz |
| Inlets | 1 |
| Outlets | 2 |
| Solenoids | 2 |
| Material | Plastic |
Installation (Setup)
Follow these detailed steps to safely and correctly replace your washing machine's water inlet valve. Always prioritize safety by disconnecting power and water before starting.
- 1. Disconnect Power and Water: Unplug the washing machine from its electrical outlet. Turn off both the hot and cold water supply valves located behind or near the washer.
- 2. Access the Valve: Carefully move the washing machine away from the wall. Depending on your specific washer model, you will need to remove either the back panel or the top panel to gain access to the water inlet valve. Refer to your washing machine's owner's manual or service manual for precise instructions on panel removal.
- 3. Disconnect Hoses: Place a towel or a shallow bucket underneath the water inlet valve to catch any residual water that may drain from the hoses. Disconnect the hot and cold water hoses from the old valve.
- 4. Disconnect Wiring: Gently disconnect the electrical connectors from the solenoids on the old valve. It is advisable to take a photo or make a note of which wire connects to which terminal to ensure correct reinstallation.
- 5. Remove Old Valve: Unscrew or unclip the old water inlet valve from its mounting bracket. Be careful not to damage surrounding components.
- 6. Install New Valve: Position the new inruwo water inlet valve (W10240947 or W10240949) into the mounting bracket and secure it using the original screws or clips. Ensure it is seated firmly.
- 7. Reconnect Wiring: Connect the electrical connectors to the solenoids on the new valve, matching them to their original positions. Ensure they are firmly attached and do not pull off easily.
- 8. Reconnect Hoses: Attach the hot and cold water hoses to the corresponding inlets on the new valve. Hand-tighten the connections, then use a wrench to tighten an additional quarter turn. Do not overtighten, as this can damage the plastic threads or rubber washers.
- 9. Check for Leaks: Slowly turn on the hot and cold water supply valves. Carefully inspect all connections for any signs of leaks. If leaks are present, gently tighten the connections further until they stop.
- 10. Restore Access Panels: Reattach any panels (back or top) that were removed to access the valve.
- 11. Restore Power: Plug the washing machine back into the electrical outlet.
- 12. Test Operation: Run a short wash cycle (e.g., Rinse & Spin) to confirm proper operation of the water fill and to perform a final check for any leaks under operating pressure.

Image: Rear view of the red water inlet valve (W10240947), highlighting the electrical terminals for solenoid connections. Note the orientation for reassembly.

Image: Side view of the blue water inlet valve (W10240949), showing the QR code and label with specifications: C-090/23-B02 120V 60Hz 33390116 W10240949. This label helps confirm the correct part.
Operating
The water inlet valve operates automatically as an integral part of your washing machine's normal cycle. It precisely controls the flow of hot and cold water into the wash tub based on the selected wash settings and water temperature requirements. No direct user operation of the valve is required after successful installation.
Maintenance
To ensure the longevity and optimal performance of your water inlet valve and washing machine, consider the following maintenance tips:
- Inspect Hoses: Periodically (e.g., every 6-12 months) inspect the hot and cold water hoses connected to the valve for any signs of wear, cracks, bulges, or leaks. Replace hoses every 3-5 years or immediately if any damage is observed.
- Clean Inlet Screens: The water inlet ports on the valve contain small screens designed to prevent sediment and debris from entering the valve and the washing machine. If you notice slow filling or reduced water flow, turn off the water supply, disconnect the hoses, and gently clean these screens with a small brush under running water.
- Water Quality: If your household has hard water or water with high mineral content, consider installing a whole-house water filter or a dedicated filter for your washing machine. This can significantly prolong the life of all water-carrying components, including the inlet valve.
Troubleshooting
If you encounter issues after installing the new water inlet valve, refer to the following common problems and their potential solutions:
Problem: Washer Not Filling with Water
- Ensure the hot and cold water supply valves behind the washer are fully open.
- Check that the water hoses are not kinked or bent, restricting water flow.
- Inspect the inlet screens on the water inlet valve for clogs from sediment or debris. Clean if necessary (refer to Maintenance section).
- Verify that the electrical connections to the valve solenoids are secure and properly attached.
- Confirm the washing machine is plugged into a working electrical outlet and has power.
Problem: Washer Filling Slowly
- Check the water pressure at your household faucets to ensure adequate supply.
- Clean the inlet screens on the water inlet valve for any partial blockages.
Problem: Water Leaks from Valve Area
- Ensure all water hose connections to the valve are tight, but not overtightened.
- Check that the rubber washers inside the water hoses are properly seated and are not damaged or missing. Replace if necessary.
- Inspect the valve body itself for any visible cracks or manufacturing defects (unlikely for a new part, but possible).
Problem: Washer Overfilling or Filling Randomly
- This symptom often indicates a faulty solenoid within the water inlet valve that is not closing completely. If this occurs with a newly installed valve, it may be defective.
- Also, check the water level pressure switch and its connecting hose for blockages or damage, as these can also cause overfilling.
- If the issue persists, contact the seller or manufacturer for assistance.
Warranty and Support
For specific warranty information regarding your inruwo Washer Water Inlet Valve Set, please refer to the original seller or the manufacturer directly. It is recommended to retain your purchase receipt as proof of purchase for any potential warranty claims or support inquiries.
If you require further technical assistance or have questions not covered in this manual, please contact the seller or manufacturer's customer support.