
Introduction
Thank you for choosing the LIFUFUTEE JC200 Wireless Switch Pro Controller. This manual provides detailed instructions for setting up, operating, and maintaining your controller to enhance your gaming experience on Nintendo Switch and OLED consoles. Please read this manual thoroughly before use.
Product Features
- Wireless One-Piece Design: Integrated design for comfortable handheld gaming with easy Bluetooth connection.
- Ergonomic Grip: Full-size design with anti-slip pad and safety lock buckle for secure and comfortable long gaming sessions.
- Hall Effect Joysticks: Innovative electromagnetic induction technology ensures no drift and precise control.
- 17 Colorful Lighting Effects: Customizable RGB lighting with various intensities and colors to match your gaming atmosphere.
- Programmable Back Keys: Two programmable keys (ML/MR) on the back, supporting up to 21 key combinations for complex actions.
- Auto Loop Macro Programming: SL/SR keys for auto-looping programmed ML/MR functions, preventing accidental touches and automating repetitive tasks.
- 3 Turbo Speeds & Auto Attack: Adjustable turbo function (5/12/20 presses per second) for A/B/X/Y/L/ZL/R/ZR/ML/MR buttons in both Auto and Manual modes.
- 3 Level Vibration & 6-Axis Gyro Sensor: Dual vibration motors with adjustable intensity (Strong/Medium/Off) and a 6-axis gyro sensor for precise motion detection.
- 1000mAh Battery & One-Key Wake Up: Built-in 1000mAh battery provides over 10 hours of continuous play after a 3-hour charge. One-key wake-up function to quickly reconnect and power on the console.
- Console Protection: Internal anti-slip pad and safety latches protect your console from loosening or scratches.
Setup Instructions
1. Inserting the Nintendo Switch Console
Carefully slide your Nintendo Switch or OLED console into the central slot of the controller. Ensure it is securely seated and the safety lock buckle is engaged to prevent accidental detachment.
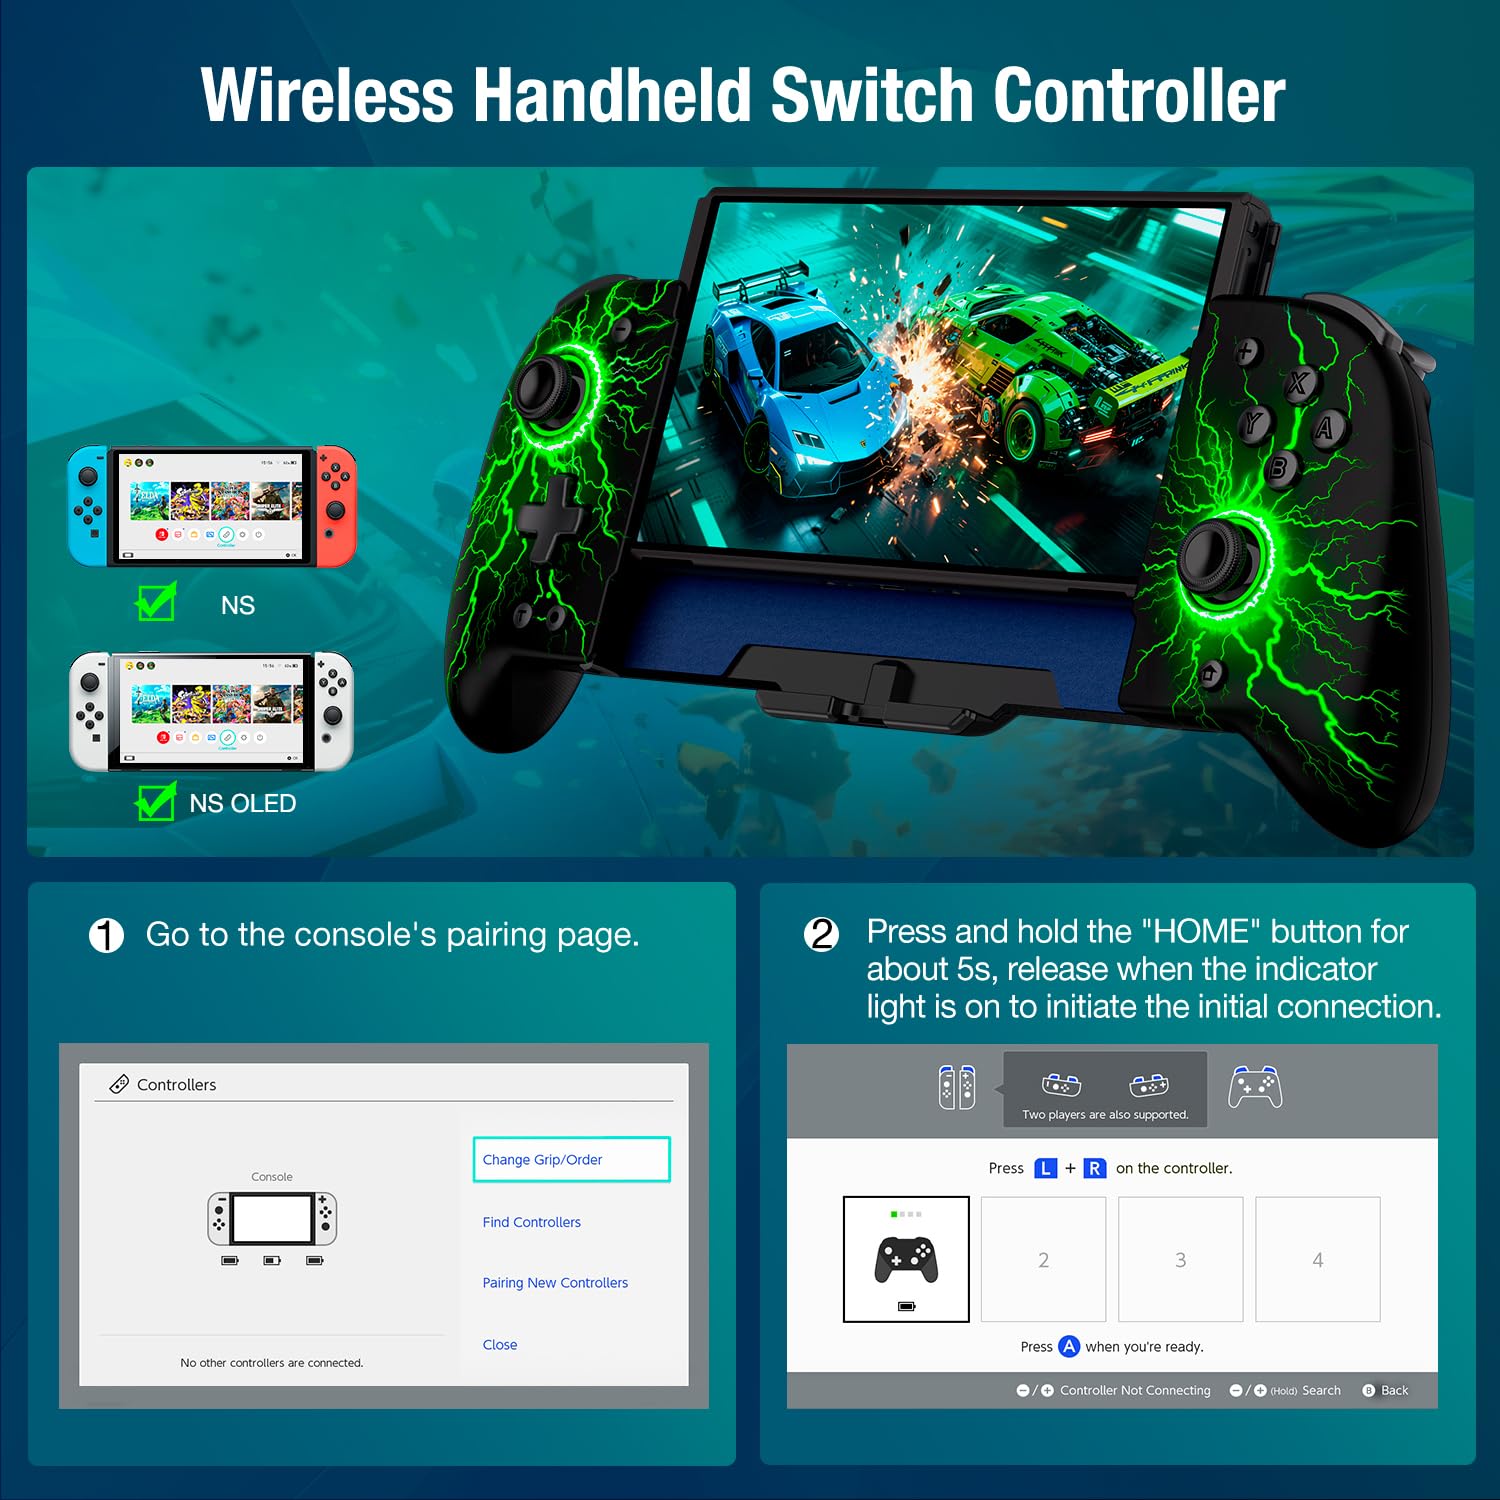
Image: The LIFUFUTEE JC200 controller with a Nintendo Switch console securely inserted, demonstrating the one-piece design.

Image: A diagram highlighting the anti-slip pad, safety locking buckle, and four game card slots on the back of the controller, designed to protect the console.
2. Connecting to the Host (Pairing)
- Turn on your Nintendo Switch console.
- Navigate to the HOME menu and select 'Controllers'.
- Choose 'Change Grip/Order'.
- On the LIFUFUTEE JC200 controller, press and hold the 'HOME' button for approximately 9 seconds until the indicator light flashes rapidly.
- Release the 'HOME' button. The controller will automatically connect to the console.
- Once connected, the indicator light will remain solid.

Image: A visual guide showing the steps to connect the wireless controller to the Nintendo Switch console, including navigating the console's pairing menu and holding the HOME button on the controller.
3. Charging the Controller
The controller has a separate battery and charging port. Use the provided Type-C charging cable to charge the controller. It can be charged simultaneously with the console using the dual Type-C cable.
Video: A user demonstrates the features and setup of the LIFUFUTEE JC200 controller, including how to connect it to the Nintendo Switch and highlighting its ergonomic design and programmable buttons.
Operating Instructions
1. Adjusting Lighting Effects
The controller features 17 different colorful lighting effects. Use the dedicated light control button to cycle through the various effects and intensities. This allows you to customize the visual ambiance during gameplay.

Image: The LIFUFUTEE JC200 controller showcasing its 17 colorful lighting effects, with a diagram indicating how to adjust brightness using the D-pad.
2. Programmable Back Keys (ML/MR)
The back of the controller has two programmable keys, ML and MR. Each key can be set with up to 21 combinations of A/B/X/Y/L/ZL/R/ZR/L3/R3/D-Pad buttons. This allows you to assign complex game actions or combined skills to a single press, reducing button abuse and extending controller lifespan.

Image: A detailed view of the back of the controller, illustrating the ML/MR programmable keys and the SL/SR buttons for auto-cycle macro functions, along with examples of button combinations.
3. Auto Loop Macro Programming (SL/SR)
The SL/SR keys enable Auto-Loop functionality for the ML/MR programmed keys. Double-click SL/SR to toggle the ML/MR function on/off. Press and hold SL/SR for 3 seconds to activate Auto-Loop. This feature is useful for repeating skill combinations in games to acquire rewards without continuous manual input.
4. Adjusting Turbo Speeds
The controller supports both Auto and Manual 'TURBO' modes. You can customize the TURBO function for A/B/X/Y/L/ZL/R/ZR/ML/MR buttons. Adjust the turbo speed to 5, 12, or 20 presses per second to suit different game requirements and reduce finger fatigue.

Image: A visual representation of the Auto & Manual TURBO function, detailing the three adjustable speed levels (5/s, 12/s, 20/s) and their corresponding icons on the controller.
5. Adjusting Vibration Levels
The dual vibration motors offer 3 adjustable levels: Strong, Medium, and Off. This allows you to customize the haptic feedback for a more immersive gaming experience.

Image: A diagram explaining the 3-level vibration feature with intensity indicators (0%, 60%, 100%) and the 6-axis gyro sensor for motion detection, enhancing game immersion.
6. 6-Axis Gyro Sensor
The built-in advanced 6-axis gyro sensor provides precise motion detection, enhancing gaming immersion and allowing for accurate control in games that utilize motion controls.
7. One-Key Wake Up
After the initial connection, simply press the 'HOME' button on the controller to wake up your Nintendo Switch/OLED console and automatically reconnect, even from a distance.
Maintenance
To ensure the longevity and optimal performance of your LIFUFUTEE JC200 controller, follow these maintenance guidelines:
- Cleaning: Use a soft, dry cloth to wipe down the controller regularly. Avoid using harsh chemicals or abrasive materials.
- Storage: Store the controller in a cool, dry place away from direct sunlight and extreme temperatures.
- Battery Care: Avoid fully discharging the battery frequently. Charge the controller when the battery is low to maintain battery health.
- Handling: Handle the controller with care to prevent drops or impacts that could damage internal components or the console when inserted.
Troubleshooting
- Controller Not Connecting: Ensure the console is on and you are in the 'Change Grip/Order' menu. Press and hold the 'HOME' button on the controller for 9 seconds until the indicator flashes rapidly, then release. If issues persist, try restarting both the console and controller.
- Drift Issues: The Hall Effect joysticks are designed to prevent drift. If you experience any unusual joystick behavior, ensure the controller's firmware is up to date (if applicable) or contact customer support.
- Charging Problems: Verify that the Type-C cable is securely connected to both the controller and a power source. Ensure the power source is functioning correctly.
- Buttons Unresponsive: Check for any physical obstructions. If specific buttons are not responding, try resetting the controller by holding the small reset button (if available, refer to quick start guide) or re-pairing it with the console.
Specifications
| Model Number | Lightning Stripe |
| Battery Capacity | 1000mAh |
| Charging Time | Approximately 3 hours |
| Play Time | Over 10 hours (continuous) |
| Connectivity | Bluetooth Wireless |
| Compatibility | Nintendo Switch, Nintendo Switch OLED |
| Item Weight | 14 ounces |
| Package Dimensions | 12.36 x 5 x 2.28 inches |
Warranty and Support
Your LIFUFUTEE JC200 Wireless Switch Pro Controller comes with a user manual and a Type-C quick charging cable. For any assistance with the controller, please contact our professional support team. We aim to respond within 24 hours and provide comprehensive support.
Please refer to the included warranty card for specific warranty terms and conditions.